Garages are often overlooked when it comes to home decor, yet they hold immense potential for organization, efficiency, and style. For homeowners with small garages, making the most of cabinet space is not just practical — it’s essential. Small garages require smart planning to maximize storage, maintain accessibility, and create a visually appealing environment. While many people focus solely on storing tools and outdoor equipment, thoughtful garage cabinet decor can transform the space from chaotic to Pinterest-worthy.
Small space garages present unique challenges. Limited floor area means cabinets must be highly functional, yet aesthetically pleasing. Cluttered surfaces or poorly arranged cabinets can make even a medium-sized garage feel cramped. On the other hand, well-designed cabinets not only provide storage but also elevate the overall visual appeal of the garage. Whether you’re a DIY enthusiast, a parent storing seasonal gear, or a homeowner aiming to create an organized haven, garage cabinets can serve multiple purposes: storage, decor, and accessibility.

Garage cabinet decor goes beyond simply installing shelves. It’s about creating harmony between functionality and visual appeal. Smart design solutions such as labeled bins, modular storage units, pull-out shelves, and vertical organization systems allow you to maximize every inch. Materials, color palettes, and finishing touches also play a role in ensuring your small garage feels organized, spacious, and cohesive. Incorporating pops of color, coordinated containers, and clean lines can instantly make a small garage feel larger and more polished.
Another important aspect of garage cabinet decor is accessibility. Items stored in cabinets should be easy to reach and organized logically. Seasonal items, tools, automotive supplies, and hobby equipment should have designated spots that are labeled and visually neat. Incorporating smart solutions such as sliding doors, magnetic boards, and hanging hooks helps to free up counter space and maintain a clutter-free environment.
Storage solutions are most effective when paired with decor elements. A small garage can be transformed into a functional, stylish space with the addition of wall-mounted storage, cabinet hardware, integrated lighting, and decorative yet functional bins. Even small details like paint color, decorative knobs, or coordinated labels create a visual impact that enhances the overall aesthetic. When done right, your garage cabinets can feel like an extension of your home, blending style and functionality seamlessly.
Maximizing small garage spaces requires creativity. Vertical storage solutions, pegboards, tiered shelving, and stackable bins make use of limited square footage. Clear labeling systems, color coordination, and open shelving create order and efficiency. Lighting, mirrors, and small decorative elements can also make a small space feel larger and more inviting. These design principles transform your garage from a neglected area into a stylish, organized extension of your home.
Throughout this article, you will find 20 smart garage cabinet decor ideas specifically tailored for small spaces. Each idea includes detailed explanations, practical step-by-step instructions, and a list of materials so you can implement them easily. From color-coordinated storage to DIY pull-out shelves and multifunctional cabinets, these tips will inspire you to organize your garage while adding a touch of style and efficiency.
Whether your goal is to declutter, maximize storage, or create a Pinterest-worthy garage aesthetic, these ideas combine practicality and design sensibility. By following these strategies, your garage can become a functional, organized, and visually appealing space that supports your lifestyle and makes everyday tasks easier.
By the end of this guide, small garage owners will have actionable strategies to transform their cabinets into smart, stylish storage solutions. With a combination of creativity, organization, and decor principles, your garage will not only hold your tools and gear efficiently but also become a space you’re proud to showcase.
Idea 1: Color-Coded Storage Cabinets
Introduction
Color-coding your garage cabinets is a simple yet highly effective way to organize a small space. By assigning specific colors to categories of items — tools, cleaning supplies, automotive gear, or seasonal decorations — you instantly create a visually cohesive and accessible system. This method is especially beneficial in small garages, where clutter can accumulate quickly. Color-coded cabinets make it easy to identify where items belong, reducing search time and maintaining order.
This idea works well for homeowners who want both organization and aesthetics. You don’t need expensive labels or complex systems — simply using colored bins, drawers, or paint accents provides a clear structure. It also adds a pop of personality to a space that is usually functional but overlooked.
In addition, color coordination visually expands a small garage. Harmonious tones make cabinets look intentional and reduce visual chaos, creating the illusion of a larger space. This approach allows you to maximize functionality without sacrificing style, making your garage both organized and Pinterest-ready.

Step-by-Step How to Implement
- Assess your garage and categorize items: tools, automotive supplies, cleaning products, seasonal items, etc.
- Choose a color palette that complements your garage’s existing aesthetic.
- Assign a specific color to each category.
- Paint cabinet doors or use colored bins/drawers to represent each category.
- Label each cabinet or bin clearly for quick identification.
- Store items consistently according to the assigned color category.
- Periodically reassess and update categories as needed.
Materials Needed
- Paint or colored cabinet doors
- Colored storage bins or drawers
- Labels or label maker
- Cabinet organizers (optional)
- Cleaning supplies to prep surfaces
Idea 2: Pull-Out Sliding Shelves
Introduction
Pull-out sliding shelves are a space-saving solution perfect for small garage cabinets. Instead of reaching into deep cabinets, sliding shelves allow you to pull the contents forward, providing full visibility and easy access. This is especially helpful in narrow or deep cabinets where items tend to get lost at the back.
This idea combines functionality and style. Sliding shelves make cabinets feel more like a professional workspace while keeping the space organized. They also help reduce clutter by encouraging proper placement of items. In a small garage, every inch counts, and pull-out shelves allow you to use cabinet depth efficiently without wasting space.
Sliding shelves can be customized to fit your cabinet dimensions. They are ideal for storing tools, small containers, or frequently used items. When paired with labeled bins or trays, they make finding and returning items effortless, making your garage more organized and visually pleasing.

Step-by-Step How to Implement
- Measure your cabinet depth and width to determine shelf size.
- Purchase pre-made sliding shelf kits or create DIY pull-out shelves using wood and drawer slides.
- Install drawer slides according to manufacturer instructions.
- Attach the sliding shelf securely to the slides.
- Place bins or organizers on the pull-out shelf.
- Test smooth operation and adjust alignment as needed.
- Label bins for categories: tools, hardware, or automotive supplies.
Materials Needed
- Sliding shelf kit or DIY wood and drawer slides
- Screws and drill
- Storage bins or trays
- Labels for organization
- Measuring tape
Idea 3: Wall-Mounted Cabinet Hooks
Introduction
Wall-mounted hooks inside your garage cabinets provide a clever solution for vertical storage. Hooks allow you to hang tools, cords, small bags, or accessories, freeing up shelf space. In small garages, maximizing vertical space is essential, and hooks can double your storage efficiency without expanding the cabinet footprint.
Hooks also improve accessibility. Hanging frequently used tools inside cabinet doors keeps them within reach, reducing the time spent digging through drawers. Combined with labeled zones, this method keeps small items organized while giving your garage a professional, tidy appearance.

Step-by-Step How to Implement
- Identify the cabinet doors or walls where hooks can be installed.
- Choose appropriate hooks based on the weight of items to hang.
- Drill pilot holes and attach hooks securely.
- Group similar items together for easy access.
- Label the zones or hooks for quick identification.
- Periodically check hook stability and adjust as needed.
Materials Needed
- Wall-mounted hooks or pegboard hooks
- Screws and screwdriver
- Labels or sticky notes
- Drill and measuring tape
Idea 4: Clear Acrylic Storage Bins
Introduction
Clear acrylic storage bins are a simple yet highly effective solution for small garage cabinets. They offer instant visibility, which eliminates the frustration of digging through opaque containers to find what you need. Clear bins also create a uniform, cohesive look inside cabinets, which is particularly beneficial in tight spaces where visual clutter can make a small garage feel even smaller.
Using clear storage bins allows you to categorize items efficiently. Grouping screws, nuts, bolts, and small tools in separate containers keeps your cabinets organized and accessible. When paired with labels, these bins provide a professional and Pinterest-worthy aesthetic. Additionally, acrylic bins are durable and easy to clean, making them perfect for a garage environment that might involve dust, oil, or moisture.
This idea is highly adaptable to various garage layouts. Whether you have a single cabinet or multiple units, clear bins fit neatly on shelves, inside drawers, or even stacked vertically. They’re also versatile enough to hold automotive supplies, gardening tools, or craft materials, making them an all-around solution for small-space organization.

Step-by-Step How to Implement
- Assess the items in your garage cabinets and group them by category.
- Choose clear acrylic bins that fit your cabinet dimensions.
- Place similar items together inside each bin.
- Label each bin with the contents using a label maker or printed stickers.
- Arrange bins on cabinet shelves for easy access.
- Stack bins carefully where vertical space allows, ensuring stability.
- Periodically check bins for wear and reorganize as needed.
Materials Needed
- Clear acrylic storage bins
- Labels or label maker
- Cabinet shelf organizers (optional)
- Cleaning cloth for bins
Idea 5: Magnetic Tool Strips Inside Cabinets
Introduction
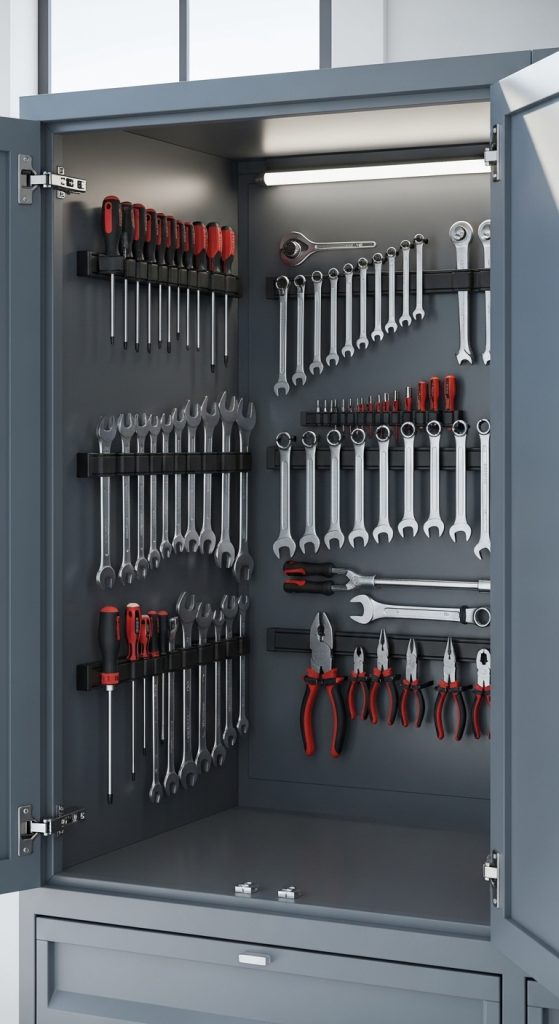
Magnetic strips are an innovative and space-saving solution for small garage cabinets, particularly for tool storage. By mounting a magnetic strip inside a cabinet door or along a wall, you can easily secure metal tools, eliminating cluttered drawers and freeing up shelf space. This method keeps frequently used tools visible and within reach, streamlining workflow and enhancing efficiency.
Magnetic strips are ideal for small garages because they utilize vertical surfaces rather than occupying valuable horizontal cabinet space. This approach also contributes to a professional, organized appearance, giving your garage a polished, Pinterest-worthy look. Additionally, magnetic strips can be combined with labeled zones to categorize tools by type or frequency of use.
Durable and cost-effective, magnetic strips are suitable for a variety of tools — from screwdrivers and wrenches to scissors and pliers. For homeowners who value both functionality and aesthetics, magnetic strips provide a minimalist solution that keeps cabinets neat and visually appealing.
Step-by-Step How to Implement
- Measure the cabinet interior where the magnetic strip will be installed.
- Purchase a magnetic strip of appropriate length and strength.
- Drill pilot holes and attach the magnetic strip securely with screws.
- Place metal tools onto the strip, organizing by type or size.
- Label sections of the strip if desired for easy identification.
- Periodically remove tools to clean the strip and maintain functionality.
Materials Needed
- Magnetic strip (metal-compatible)
- Screws and drill
- Labels (optional)
- Small cleaning cloth
Idea 6: Pull-Out Pegboard Panels
Introduction
Pull-out pegboard panels transform small garage cabinets into highly functional, customizable storage systems. Pegboards allow you to hang tools, accessories, and supplies vertically, making it easier to find and store items efficiently. The pull-out feature maximizes accessibility in small spaces, allowing you to reach items at the back of deep cabinets without removing everything in front.
This idea is perfect for homeowners who want organized and visually appealing cabinets. Pegboards can be configured with hooks, shelves, or bins to suit various items, from gardening tools to craft supplies. The pull-out mechanism ensures that even narrow cabinets become fully functional and easy to navigate, creating a Pinterest-ready solution that balances form and function.
Pull-out pegboards also encourage organization by assigning a specific place for every tool or accessory. By pairing hooks with labeled bins or small containers, you can maintain a clutter-free space that’s easy to maintain over time. For small garages, this approach optimizes vertical and horizontal space simultaneously.

Step-by-Step How to Implement
- Measure your cabinet dimensions to determine pegboard size.
- Purchase a pre-made pegboard or cut one to size.
- Install drawer slides or pull-out tracks inside the cabinet.
- Attach the pegboard to the pull-out frame securely.
- Add hooks, small shelves, or bins to hold tools and accessories.
- Organize items by category and label sections as needed.
- Test smooth operation and adjust alignment if necessary.
Materials Needed
- Pegboard panel
- Drawer slides or pull-out tracks
- Hooks, small shelves, or containers
- Screws and drill
- Labels for organization
Idea 7: LED Cabinet Lighting
Introduction
Adding LED lighting to your garage cabinets not only improves visibility but also elevates the space aesthetically. Proper lighting makes small garages feel brighter, larger, and more functional. It highlights organized shelves, pulls focus to decor elements, and ensures you can easily locate items. LED strips or puck lights are ideal for small spaces because they are energy-efficient, easy to install, and provide ample illumination.
This idea works well with both open and closed cabinets. For glass-front cabinets, LED lighting can create a visually appealing display while showcasing organized tools or decorative storage bins. For enclosed cabinets, motion-sensor LED lights ensure instant visibility without needing additional switches. This combination of utility and visual impact makes your garage cabinets feel professionally styled and Pinterest-ready.
LED lighting also allows homeowners to play with color temperature. Warm white creates a cozy atmosphere, while daylight LEDs maximize visibility and detail. When paired with neat organization systems, LED lights emphasize the functionality and style of every cabinet in a small garage.

Step-by-Step How to Implement
- Measure the cabinet interior to determine LED strip length or puck placement.
- Choose LED lights with adhesive backing or mounting brackets.
- Install the LED lights according to manufacturer instructions.
- Route power cables discreetly for a clean look.
- Test lighting and adjust brightness or placement as needed.
- Combine with organized storage bins or pull-out shelves to highlight items.
Materials Needed
- LED strip lights or puck lights
- Screws or adhesive backing
- Power source and cables
- Cable clips or management accessories
- Optional dimmer switch
Idea 8: Decorative Cabinet Hardware
Introduction
Small garages can benefit from small decorative touches that elevate the overall aesthetic. Swapping out standard cabinet knobs and handles for decorative hardware instantly upgrades your cabinets, giving them a cohesive, Pinterest-worthy look. Decorative hardware can complement existing garage decor or add a pop of style without taking up space.
Choosing hardware in metallic finishes such as brushed nickel, matte black, or gold can add elegance and contrast to neutral cabinets. Colorful knobs or patterned handles also inject personality into the space. For small garages, focusing on details like hardware can make the environment feel carefully curated, improving both visual appeal and usability.
Decorative hardware also improves functionality. Ergonomically designed handles make it easier to access cabinets while maintaining a polished appearance. This is a beginner-friendly and cost-effective way to style garage cabinets while keeping them practical and functional.

Step-by-Step How to Implement
- Remove existing cabinet knobs or handles.
- Select decorative hardware that complements your garage color palette.
- Measure and mark screw positions accurately.
- Install new knobs or handles securely using screws.
- Repeat for all cabinets, ensuring consistent placement.
- Wipe hardware to remove fingerprints and polish for a refined look.
Materials Needed
- Decorative cabinet knobs or handles
- Screws and screwdriver
- Measuring tape
- Pencil for marking
- Cleaning cloth
Idea 9: Tiered Shelf Inserts
Introduction
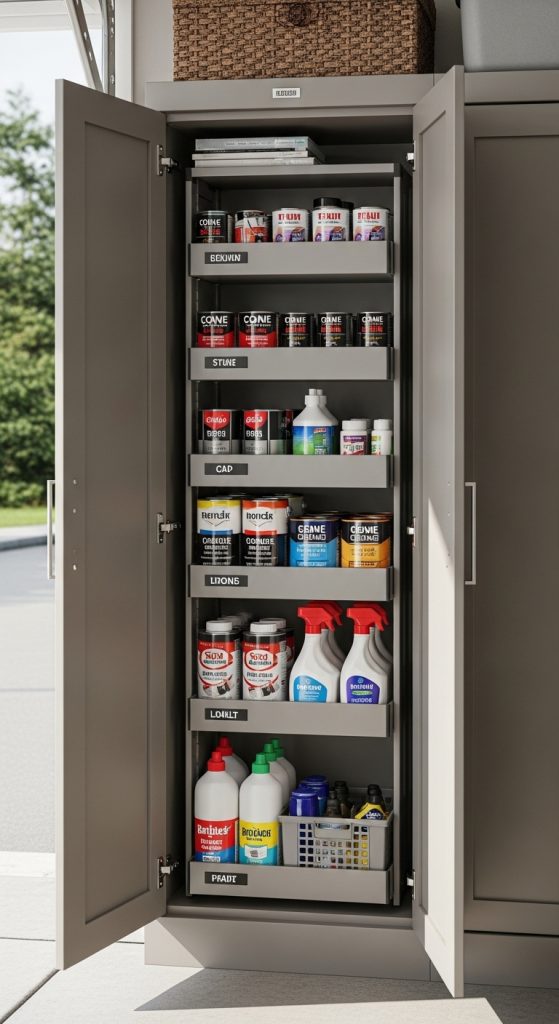
Tiered shelf inserts are perfect for small garages because they maximize vertical space within cabinets. By creating multiple layers, you can store more items while keeping them accessible and organized. Tiered shelving works especially well for smaller items, such as cans of paint, cleaning products, or small automotive supplies.
This system keeps cabinets visually organized and reduces clutter, making it easier to maintain a tidy, Pinterest-ready appearance. It’s particularly useful for homeowners who need to store a variety of items in limited space. Tiered inserts allow you to see everything at a glance, preventing items from being buried behind others and ensuring functional efficiency.
Tiered shelving can be purchased pre-made or built as a DIY solution. Adjustable options are ideal for accommodating items of varying heights, providing flexibility as your storage needs evolve.
Step-by-Step How to Implement
- Measure the cabinet interior to determine tiered shelf dimensions.
- Purchase or construct tiered shelf inserts to fit your space.
- Place items on the tiers according to category or frequency of use.
- Label each tier if necessary for easy identification.
- Adjust height of tiers for tall or short items as needed.
- Periodically reorganize to maintain accessibility and cleanliness.
Materials Needed
- Tiered shelf inserts (metal, wood, or plastic)
- Labels (optional)
- Cleaning cloth
- Measuring tape
Idea 10: Sliding Door Cabinet with Chalkboard Labels
Introduction
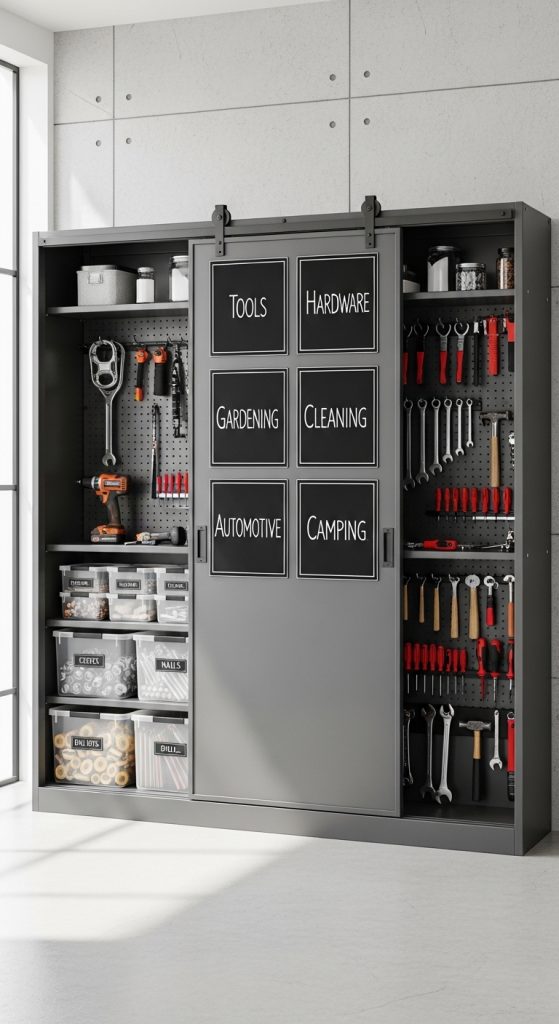
Sliding door cabinets are a space-saving solution that works exceptionally well in small garages. When combined with chalkboard labels, they provide both functional storage and a visually engaging, Pinterest-ready look. Sliding doors eliminate the need for swing clearance, making tight spaces more accessible. Chalkboard labels allow for dynamic organization, giving you the ability to quickly change categories or note the contents.
This approach is ideal for homeowners who enjoy hands-on organization. Chalkboard labels encourage consistency, as items are returned to the correct spot after use. The sliding doors also help maintain a clean exterior, hiding clutter while keeping your garage visually streamlined. By pairing functionality with a stylish surface, you create a practical and visually appealing storage system.
Step-by-Step How to Implement
- Install sliding doors on your cabinet according to manufacturer instructions.
- Clean the surface of the doors for optimal chalkboard adhesion.
- Apply chalkboard paint or attach pre-made chalkboard labels.
- Use chalk or chalk markers to label contents of each cabinet section.
- Organize items inside the cabinet according to categories.
- Update labels as storage needs change.
- Ensure smooth operation of sliding doors without obstruction.
Materials Needed
- Sliding cabinet doors
- Chalkboard paint or chalkboard labels
- Chalk or chalk markers
- Screws and drill
- Cleaning cloth
Idea 11: Adjustable Wire Shelving
Introduction
Adjustable wire shelving is one of the most versatile solutions for small garage cabinets. Unlike fixed shelves, adjustable wire systems allow you to modify shelf height, making it easy to store items of different sizes efficiently. Wire shelving also promotes airflow, which is especially useful for storing cleaning supplies, paints, or items that require ventilation.
In small garages, every inch counts, and adjustable wire shelves make the most of vertical space. They provide a flexible solution that grows with your storage needs, whether you need to store tall containers, short boxes, or a combination of both. Additionally, the open design of wire shelving ensures visibility and accessibility, allowing you to see the contents of each cabinet at a glance.
Wire shelving also adds a modern, industrial touch to your garage. When paired with bins, hooks, and labels, it creates a neat, organized, and visually appealing storage system. This makes it perfect for Pinterest-style organization, combining both aesthetic and practical elements in a small space.

Step-by-Step How to Implement
- Measure your cabinet interior to determine the shelf dimensions and spacing.
- Purchase adjustable wire shelving units compatible with your cabinet dimensions.
- Install the shelving brackets or support rails according to the manufacturer instructions.
- Place wire shelves at desired heights and secure them.
- Organize items on each shelf, grouping by category or frequency of use.
- Add bins or containers for small items to prevent them from slipping through the wire gaps.
- Label each section for easy access and maintenance.
Materials Needed
- Adjustable wire shelving units
- Support brackets or rails
- Screws and drill
- Storage bins for small items
- Labels for organization
Idea 12: Corner Cabinet Lazy Susan
Introduction
Corner cabinets in small garages are notoriously difficult to utilize efficiently. Installing a Lazy Susan, a rotating turntable shelf, is a smart solution that maximizes these awkward spaces. A corner cabinet Lazy Susan provides easy access to items stored deep inside, preventing wasted space and reducing frustration when trying to retrieve frequently used tools or supplies.
This solution is particularly effective in small garages because it allows you to store more items without increasing clutter. The rotating shelves make it simple to reach items in the back, while keeping the cabinet organized and visually appealing. Lazy Susans also help categorize items by type, making small-space storage functional and Pinterest-worthy.
With modern designs available in metal or wood, a Lazy Susan can also add style to your garage cabinets. It combines practicality, accessibility, and aesthetic appeal, making it an essential solution for small-space organization.

Step-by-Step How to Implement
- Measure the corner cabinet dimensions to select the correct Lazy Susan size.
- Purchase a turntable shelf suitable for your cabinet depth.
- Install the Lazy Susan according to manufacturer instructions, ensuring smooth rotation.
- Place items strategically on the rotating shelves, grouping similar items together.
- Adjust placement for balance and accessibility.
- Periodically rotate and reorganize items to maintain efficiency.
Materials Needed
- Corner cabinet Lazy Susan (metal or wood)
- Screws or mounting hardware (included with Lazy Susan)
- Small containers or bins (optional)
- Labels for organization
Idea 13: Hanging Baskets Inside Cabinets
Introduction
Hanging baskets inside garage cabinets are an excellent way to utilize vertical space, especially in small garages. These baskets can hold lightweight items like gloves, rags, small hand tools, or gardening accessories, keeping shelves free for larger items. By suspending storage off the shelf floor, you increase usable space and create a layered storage system that is both practical and visually appealing.
Hanging baskets also improve accessibility. Items stored in baskets are easy to reach without shifting other containers, making your garage more organized and user-friendly. For small spaces, this solution maximizes storage efficiency without cluttering the cabinet interior. Using baskets made from wire, wicker, or fabric adds texture and style to your cabinets, creating a Pinterest-ready look.
This approach is highly flexible. Baskets can be hung at various heights, rotated, or removed easily for cleaning. Combined with labels and organized shelves, hanging baskets make small garage cabinets functional, accessible, and aesthetically pleasing.

Step-by-Step How to Implement
- Measure the cabinet interior to determine basket placement and clearance.
- Select hanging baskets that fit the cabinet dimensions.
- Install hooks or mounting brackets on the cabinet ceiling or underside of shelves.
- Hang baskets securely and ensure they swing freely without obstruction.
- Place lightweight items in the baskets, grouping by type or frequency of use.
- Label baskets if desired for easy identification.
- Periodically remove baskets to clean and reorganize items.
Materials Needed
- Hanging baskets (wire, wicker, or fabric)
- Hooks or mounting brackets
- Screws and drill
- Labels for organization
- Cleaning cloth