St. Patrick’s Day is such a joyful and colorful celebration, especially for kids. From wearing bright green outfits to learning about rainbows, lucky charms, and leprechauns at school, children absolutely love the playful energy of this holiday. One of the most fun ways to make the day feel extra special is by styling their hair in a festive, themed way. St. Patrick’s Day hairstyles for kids are not just cute — they add personality, creativity, and that magical “lucky” touch that completes the whole look.

When it comes to kids’ hairstyles, comfort and practicality matter just as much as appearance. Children are constantly moving — running, playing, dancing, and celebrating — so their hair needs to stay secure throughout the day. That’s why simple braids, ponytails, buns, twists, and half-up styles work beautifully for holiday looks. With just a few green accessories, ribbons, or temporary color accents, you can transform an everyday hairstyle into something festive and memorable without making it complicated or uncomfortable.
Green is, of course, the star color of St. Patrick’s Day, but you don’t have to stop there. You can incorporate gold elastics for a “pot of gold” theme, rainbow ribbons for a magical vibe, or tiny shamrock clips for a subtle yet adorable touch. Temporary hair chalk, clip-in colored strands, glitter spray made for kids, and themed bows are all easy, safe options to elevate simple hairstyles. The best part? Most of these styles can be done in under 15 minutes, making them perfect for busy school mornings.
Another important factor is versatility. Every child has a different hair type — straight, curly, wavy, thick, fine, long, or short. The ideas in this guide can be adjusted to suit various textures and lengths. A braid can become two pigtail braids. A bun can turn into mini buns. A simple ponytail can be upgraded with green elastics or twisted sections. Even toddlers with shorter hair can enjoy festive styles using clips and mini elastics.
Holiday hairstyles are also wonderful for capturing sweet memories. School parties, classroom celebrations, parades, and family photos all become more special when your child’s look reflects the spirit of the day. These small details often make pictures more vibrant and memorable. A rainbow braid or shamrock-inspired style instantly makes the celebration feel complete.
The goal of this article is to provide detailed, easy-to-follow St. Patrick’s Day hairstyle ideas that are both adorable and realistic for parents to recreate at home. Each hairstyle will include clear guidance, helpful tips, and simple materials so you don’t feel overwhelmed. Whether you prefer something subtle and sweet or bold and colorful, you’ll find inspiration that fits your child’s personality and your time schedule.
St. Patrick’s Day only comes once a year, so why not make it extra fun? With a little creativity, a few green accessories, and some simple styling techniques, you can create festive hairstyles that your kids will absolutely love — and maybe even request again next year. 🍀💚
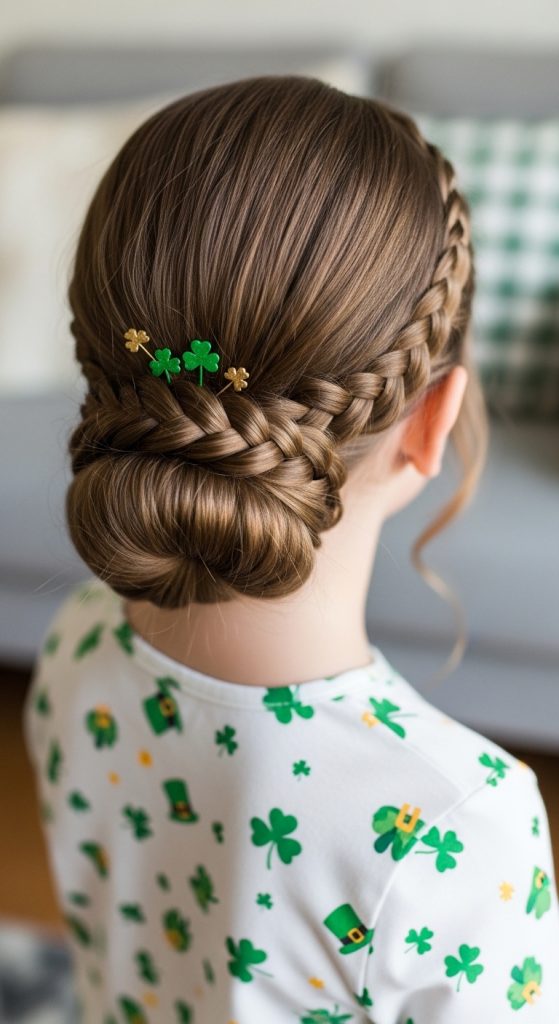
1. Shamrock Braided Ponytail 🍀
Why This Style Works
The Shamrock Braided Ponytail is one of the most festive St. Patrick’s Day hairstyles because it directly reflects the holiday symbol — the lucky clover. It looks intricate, but it’s actually created using small elastic sections and gentle looping techniques rather than advanced braiding skills. That makes it perfect for parents who want something impressive without professional-level difficulty.
This hairstyle is best for medium to long hair and works on straight, wavy, or lightly curly textures. Since the base is a secured ponytail, it holds up well during school, playground time, and parties.

Materials Needed
- Paddle brush
- Fine-tooth comb
- 4–6 small clear elastics
- 1 green ponytail holder
- Sectioning clips
- Optional: shamrock clip or green ribbon
- Light kid-friendly hairspray
Step-by-Step Instructions
Step 1: Prep the Hair
Start with clean, dry, brushed hair. If hair is slippery, lightly mist with water or texturizing spray for grip.
Step 2: Section the Crown
Take a rectangular section from the front hairline to the crown (about 3–4 inches wide). Clip the remaining hair away.
Step 3: Divide into Four Sections
Split this crown section into four equal mini ponytails (two in front, two slightly behind). Secure each with a small elastic.
Step 4: Create the Clover Loops
For each mini ponytail:
- Add another elastic about 1–2 inches down.
- Gently pull the hair between elastics outward to create a rounded “bubble.”
- Slightly pinch and shape the bubble so it forms a leaf-like curve.
Adjust the four bubbles so they form a clover shape.
Step 5: Combine Everything
Gather all remaining hair together with the four sections into one mid-height ponytail. Secure with a green elastic.
Step 6: Finishing Touch
Add a shamrock clip in the center of the clover shape. Lightly spray to hold.
Pro Tips
- Don’t pull bubbles too tight — softness makes the clover shape visible.
- For thin hair, gently tease inside each section before shaping.
- Add green hair chalk to the ponytail ends for extra holiday flair.
Time: 15–20 minutes
Difficulty: Moderate beginner
2. Rainbow Ribbon Braided Pigtails 🌈
Why This Style Works
This is a playful and colorful hairstyle that combines St. Patrick’s Day rainbows with classic pigtail braids. It’s especially great for toddlers and younger children because it keeps hair neatly secured on both sides.
The woven ribbon creates a bright rainbow effect without needing dye or chalk. It’s also soft and comfortable.

Materials Needed
- Brush
- Comb for parting
- 2 green elastics
- Thin rainbow ribbon (2 pieces)
- 2 clear elastics
- Optional gold bow clips
Step-by-Step Instructions
Step 1: Create a Center Part
Use a comb to part the hair evenly down the middle.
Step 2: Secure Pigtails
Tie each side into mid or low pigtails using green elastics.
Step 3: Attach Ribbon
Tie one end of the ribbon at the base of a pigtail (under the elastic).
Step 4: Braid with Ribbon
Divide the pigtail into three sections. Let the ribbon act as one section and braid normally.
Step 5: Secure and Repeat
Tie the end with a clear elastic. Repeat on the other side.
Pro Tips
- Use soft satin ribbon to avoid tangling.
- Choose thin ribbon so braids don’t look bulky.
- Add gold clips at the bottom for a “pot of gold” theme.
Time: 10–15 minutes
Difficulty: Easy
3. Green Bubble Ponytail 💚
Why This Style Works
The Green Bubble Ponytail is trendy, playful, and incredibly easy to recreate. It gives a bold festive look without requiring braiding skills, which makes it perfect for busy school mornings. The “bubble” effect adds volume and dimension, making the hairstyle look much more styled than a regular ponytail.
This works best on medium to long hair. Thicker hair creates fuller bubbles, but even fine hair can achieve this look with gentle teasing. Since the hair is fully secured, it stays neat throughout the day — ideal for active kids.

Materials Needed
- Brush
- Strong ponytail holder (green if possible)
- 6–10 small green or clear elastics
- Comb
- Optional: green hair chalk or glitter gel
- Light hairspray
Step-by-Step Instructions
Step 1: Create a High Ponytail
Brush hair smoothly upward and secure into a high ponytail at the crown.
Step 2: Add Section Elastics
Place another small elastic about 2 inches below the base elastic. Continue adding elastics every 2 inches down the length.
Step 3: Create the Bubbles
Gently tug the hair between each pair of elastics outward to form rounded “bubble” shapes. Pull evenly from both sides to keep it symmetrical.
Step 4: Add Festive Touch
Lightly apply green hair chalk to the bubbles or add glitter gel along the part line for sparkle.
Step 5: Secure and Finish
Lightly spray for hold.
Pro Tips
- For extra volume, lightly tease each section before pulling it outward.
- If hair is layered, keep elastics closer together to prevent pieces from sticking out.
- Add a small shamrock clip at the top for a themed finish.
Time: 8–12 minutes
Difficulty: Very Easy
4. Double Dutch Braids with Gold Accent ✨
Why This Style Works
Double Dutch braids are secure, stylish, and long-lasting. For St. Patrick’s Day, adding a gold ribbon or thread gives a magical “pot of gold at the end of the rainbow” feel. This style works beautifully for school days because it keeps all hair neatly tucked in place.
It’s perfect for medium to long hair and works well on straight, wavy, or curly textures.

Materials Needed
- Brush
- Rat-tail comb
- 2 green elastics
- Thin gold ribbon or metallic thread
- Sectioning clips
- Light hairspray
Step-by-Step Instructions
Step 1: Part the Hair
Create a clean center part from forehead to nape.
Step 2: Begin First Dutch Braid
Take a small section at the front of one side. Divide into three strands.
Braid under instead of over (this makes it Dutch style).
Step 3: Add Hair as You Go
Continue adding small sections of hair into each strand while braiding down toward the nape.
Step 4: Secure
Tie off with a green elastic once you reach the end.
Step 5: Repeat on Other Side
Mirror the same braid on the opposite side.
Step 6: Add Gold Accent
Weave thin gold ribbon through each braid using your fingers or a hairpin, or wrap it lightly around the braid.
Pro Tips
- Keep braid tension firm but not too tight for comfort.
- If new to Dutch braiding, practice once before the event.
- Curl the ends slightly for a softer look.
Time: 15–20 minutes
Difficulty: Moderate
5. Leprechaun Top Knot 🎩
Why This Style Works
The Leprechaun Top Knot is playful, bold, and perfect for kids who love fun themed looks. Inspired by the classic leprechaun hat, this hairstyle creates a high bun styled with green accents and a gold detail to represent a lucky treasure vibe.
It’s quick, secure, and comfortable — making it ideal for school parties, parades, or classroom celebrations. Because the hair is fully tied up, it keeps strands out of the face and stays neat even during active play. This style works best on medium to long hair but can also be done on shorter hair with a smaller bun.

Materials Needed
- Brush
- Strong ponytail holder (green if possible)
- 4–6 bobby pins
- Green ribbon or scrunchie
- Small gold bow or clip
- Optional: green glitter spray
Step-by-Step Instructions
Step 1: Create a High Ponytail
Brush hair upward smoothly and secure it high on the crown. Make sure it feels secure but not too tight.
Step 2: Form the Bun
Twist the ponytail gently and wrap it around the base to form a bun. Secure with bobby pins.
Step 3: Add the “Hat Band”
Wrap a green ribbon or scrunchie around the base of the bun. This mimics the band of a leprechaun hat.
Step 4: Add Gold Accent
Place a small gold bow or clip at the front of the bun to resemble the buckle of a hat.
Step 5: Optional Sparkle
Lightly mist green glitter spray for a festive touch.
Pro Tips
- For fine hair, lightly tease the ponytail before twisting to create a fuller bun.
- If your child has thick hair, divide the ponytail in two, twist both sections, then wrap for better hold.
- Keep bobby pins hidden for a cleaner look.
Time: 8–12 minutes
Difficulty: Easy
6. Half-Up Clover Twist 🍀
Why This Style Works
The Half-Up Clover Twist is perfect for kids who don’t like all their hair pulled back. It keeps the front sections secured while leaving the rest flowing naturally. The clover detail at the back adds a subtle yet festive touch without being overwhelming.
This hairstyle works beautifully on straight, wavy, or curly hair and is ideal for medium-length hair and longer.

Materials Needed
- Brush
- Comb
- 4–5 small clear elastics
- 1 decorative shamrock clip (optional)
- Light hairspray
Step-by-Step Instructions
Step 1: Section the Top
Take two small sections from each side of the head (near the temples).
Step 2: Secure Mini Ponytails
Bring these sections toward the back and secure them with small elastics, creating two mini ponytails.
Step 3: Create Clover Loops
For each mini ponytail:
- Add another elastic about an inch lower.
- Gently pull and shape the section between elastics into a rounded loop.
Position the loops so they resemble clover leaves.
Step 4: Combine
Bring both mini ponytails together and secure into one small half-up ponytail.
Step 5: Add Accessory
Place a shamrock clip in the center to highlight the clover shape.
Pro Tips
- Keep loops soft for a natural clover look.
- If hair is layered, use slightly smaller sections to prevent pieces from sticking out.
- Lightly curl the loose hair ends for a softer finish.
Time: 10–15 minutes
Difficulty: Easy to Moderate
7. Lucky Low Braided Bun 💫
Why This Style Works
The Lucky Low Braided Bun is soft, elegant, and perfect for kids who are wearing a dress or festive outfit for St. Patrick’s Day. It gives a slightly dressy look while still being comfortable and secure enough for school or family events. The braided detail adds texture, and the low placement keeps it gentle on the scalp.
This style works especially well on medium to long hair and looks beautiful on straight, wavy, or lightly curly textures. Because it sits at the nape of the neck, it’s comfortable for sitting in class or riding in the car without pressing awkwardly against the head.
Materials Needed
- Brush
- Comb
- 1 strong elastic (green if possible)
- 3–6 bobby pins
- Small green or gold decorative pins
- Light hairspray
Step-by-Step Instructions
Step 1: Create a Low Ponytail
Brush hair smoothly back and secure it into a low ponytail at the nape of the neck.
Step 2: Braid the Ponytail
Divide the ponytail into three equal sections and create a regular three-strand braid. Secure the end with a small elastic.
Step 3: Form the Bun
Wrap the braid around the base of the ponytail to create a circular bun shape.
Step 4: Secure
Use bobby pins to secure the bun in place. Insert pins underneath so they stay hidden.
Step 5: Add Festive Detail
Add small green pearl pins, shamrock clips, or a tiny gold accessory around the bun.
Pro Tips
- Slightly loosen the braid before wrapping to make the bun look fuller.
- For thin hair, gently tease the ponytail before braiding.
- Leave a few soft strands around the face for a princess-like finish.
Time: 12–15 minutes
Difficulty: Easy
8. Side Swept Rainbow Braid 🌈
Why This Style Works
The Side Swept Rainbow Braid is magical and eye-catching — perfect for kids who love colorful, princess-style hair. This hairstyle combines a soft side braid with subtle rainbow elastics or ribbon woven throughout, creating a “rainbow leading to luck” theme.
It works beautifully for medium to long hair and photographs especially well for school pictures or themed parties.

Materials Needed
- Brush
- Rat-tail comb
- Small colorful elastics (red, orange, yellow, green, blue, purple)
- 1 green elastic
- Optional: light curling iron for ends (parent use only)
- Light hairspray
Step-by-Step Instructions
Step 1: Create a Deep Side Part
Use a comb to create a dramatic side part for volume.
Step 2: Begin the Side Braid
On the heavier side, start a regular three-strand braid near the temple. Braid diagonally toward the opposite shoulder.
Step 3: Add Color as You Go
As you braid, secure small colorful elastics every few inches or weave thin rainbow ribbon into one strand.
Step 4: Finish and Secure
Continue braiding to the end and secure with a green elastic.
Step 5: Loosen for Volume
Gently pull the braid outward (pancake it slightly) for a fuller look.
Pro Tips
- Keep braid slightly loose for a softer, fairytale feel.
- If your child has layers, start the braid slightly further back for better grip.
- Lightly curl the loose end for an extra polished look.
Time: 15–20 minutes
Difficulty: Moderate
9. Mini Shamrock Space Buns 🍀
Why This Style Works
Mini Shamrock Space Buns are playful, trendy, and perfect for kids who love bold, themed looks. The high double buns mimic a fun, “out-of-this-world” style while adding festive shamrock accents at the front or sides. This style works best on medium to long hair and gives a cute, Instagram-worthy look for St. Patrick’s Day celebrations.
The style is also comfortable because the hair is fully secured, and it keeps strands out of the child’s face during school or play. The shamrock loops add the festive touch without needing complicated braiding.

Materials Needed
- Brush
- Rat-tail comb for sectioning
- 2 hair elastics (green or clear)
- 2–4 small elastics for mini loops
- Shamrock hair clips or small bows
- Optional: green glitter spray
- Bobby pins
Step-by-Step Instructions
Step 1: Section the Hair
Divide hair into two equal high ponytails on either side of the head, about 2–3 inches from the crown.
Step 2: Create Mini Loops for Shamrocks
Take small sections at the front/top of each ponytail. Secure with tiny elastics and gently loop the hair through to create small rounded “leaves.” Use 2–3 loops per bun to mimic shamrocks.
Step 3: Form the Buns
Twist each remaining ponytail into a bun and secure with elastics and bobby pins.
Step 4: Add Clips or Accessories
Insert shamrock clips at the front loops or around the buns for extra festivity.
Step 5: Optional Sparkle
Lightly spray green glitter spray over buns for a magical effect.
Pro Tips
- Keep the loops soft and rounded — don’t pull too tightly.
- Mini shamrocks can be small for younger kids with shorter hair.
- Buns should feel secure but not tight for comfort.
Time: 15–20 minutes
Difficulty: Moderate
10. Glittery Lucky Ponytail ✨
Why This Style Works
The Glittery Lucky Ponytail is simple, quick, and still very festive. It’s perfect for busy mornings or last-minute St. Patrick’s Day celebrations. By adding green glitter and a ribbon, a simple ponytail transforms into a holiday-ready look suitable for school, family events, or pictures.
This style works on all hair types and lengths, from short to long hair. It’s comfortable and practical because all the hair is pulled back, and the added sparkle makes it stand out.

Materials Needed
- Brush
- Hair elastic (green preferred)
- Green ribbon or bow
- Kid-safe glitter gel or spray
- Optional shamrock clip
Step-by-Step Instructions
Step 1: Brush and Gather Hair
Brush hair smooth and pull it into a high or mid-height ponytail, depending on preference.
Step 2: Secure the Ponytail
Use a green elastic to hold hair firmly but comfortably.
Step 3: Add Ribbon or Bow
Wrap a green ribbon around the base of the ponytail or tie a festive bow.
Step 4: Apply Glitter
Apply kid-safe glitter gel or spray lightly along the hair length or at the top for a magical shimmer.
Step 5: Optional Shamrock Clip
Place a small shamrock accessory near the base of the ponytail or at the top for added festivity.
Pro Tips
- Keep glitter light for younger kids to avoid irritation.
- Use ribbon or elastic to match the outfit for a coordinated look.
- This style works well for medium-length and long hair; for short hair, add glitter and clips to a half-up section.
Time: 5–10 minutes
Difficulty: Very Easy