Long hair sounds like an advantage—until you’re the one dealing with it every day. It looks beautiful in photos, sure, but in real life it gets heavy, messy, time-consuming, and frustrating fast. Most people with long hair fall into the same trap: they either leave it open all the time and get annoyed when it tangles, or they throw it into the same boring ponytail every single day. Neither option is working as well as you think.
The real problem isn’t your hair length. It’s the lack of practical, repeatable hairstyles that actually suit long hair in daily life. What looks “cute” online often doesn’t survive more than an hour. Styles slip, braids loosen, volume collapses, and suddenly what looked good in the mirror feels like a mess by midday. That’s because most hairstyle ideas are built for appearance, not for durability.
Long hair needs structure. Without it, it drags down your overall look instead of enhancing it. When your hair is too flat, it makes your face look tired. When it’s too bulky, it overwhelms your features. When it’s styled without intention, it just looks like you didn’t try—even if you actually spent time on it.
Another mistake is assuming that “cute” means complicated. It doesn’t. In fact, the more complicated your hairstyle is, the more chances it has to fall apart. Long hair already requires more time to manage, so adding extra steps that don’t hold is just inefficient. What you actually need are hairstyles that balance three things: they look good, they’re quick enough to repeat, and they stay in place without constant fixing.
Hair type plays a bigger role than most people admit. Straight long hair behaves differently from thick wavy hair. Fine hair struggles to hold volume, while heavy hair struggles to hold shape. If you keep copying hairstyles without adjusting them to your texture, you’ll keep getting inconsistent results—and then you’ll assume the style “doesn’t work,” when in reality, you just applied it wrong.
There’s also a comfort factor people ignore. If a hairstyle feels tight, heavy, or unstable, you’ll keep adjusting it all day. That alone ruins the look. A good hairstyle should stay in place without you thinking about it. That’s how you know it’s actually practical, not just visually appealing.
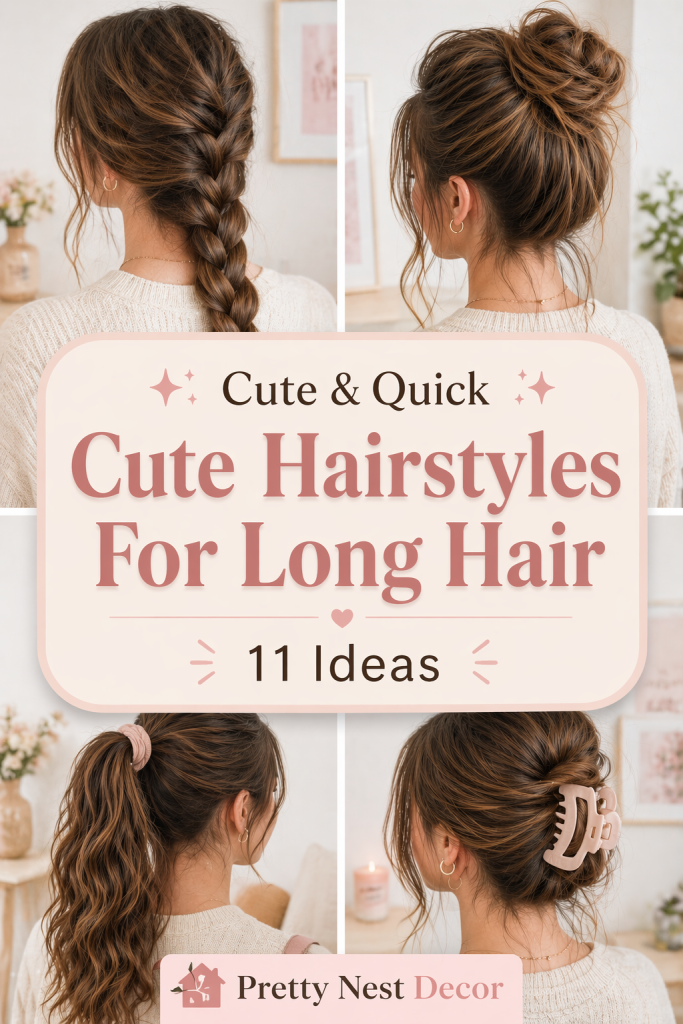
In this guide, you’re not getting random hairstyle ideas thrown together to fill space. You’re getting 11 cute hairstyles for long hair that are designed to actually work in real life. Each one is chosen because it balances style and function. These are hairstyles you can wear to school, casual outings, or even slightly dressed-up situations without needing to redo your hair every few hours.
You’ll also understand how to make each style last longer. Because the difference between a hairstyle that looks good for 10 minutes and one that lasts all day usually comes down to small details—how you section your hair, how tight you secure it, and how you work with your natural texture instead of against it.
If you have a small room and get ready quickly, these styles won’t slow you down. If your hair tends to get frizzy or heavy, you’ll learn how to control it without overloading it with products. If you’re tired of repeating the same two hairstyles every day, this will give you options that actually feel different without being difficult.
By the end of this, you won’t just have more hairstyle ideas—you’ll have better judgment. You’ll know which styles suit your hair type, your routine, and your patience level. And once you understand that, you stop wasting time on styles that look good on someone else but fail on you.
Because long hair can either be your biggest advantage or your biggest daily problem. The difference comes down to how you handle it—and right now, most people are doing it wrong.
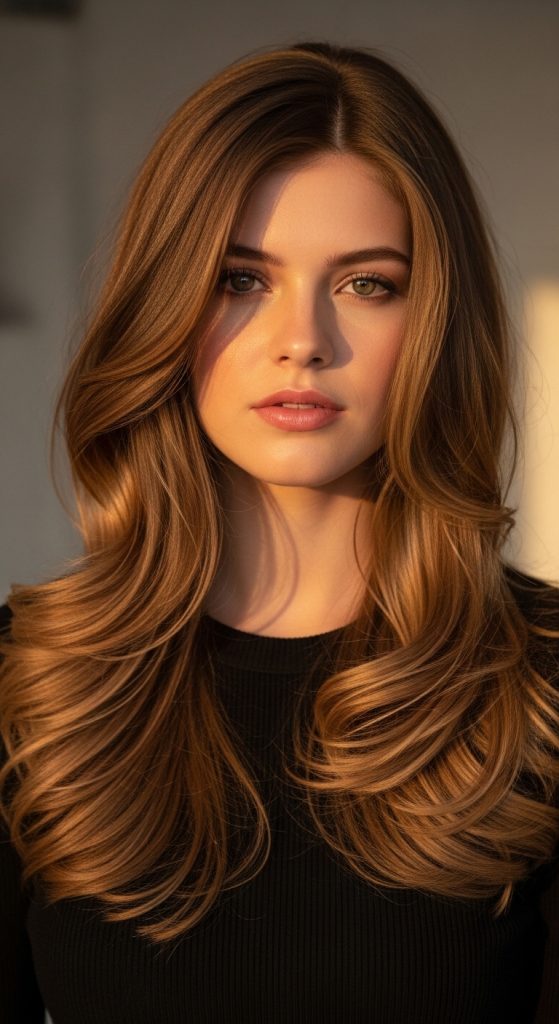
1. Soft Romantic Loose Waves (Everyday “Effortless Cute” Hair)
This is the most misused long-hair style because people assume it’s just “curling your hair and leaving it.” In reality, the difference between messy waves and cute, controlled waves is structure and direction. If done properly, this becomes one of the most reliable go-to styles for long hair in 2026.
What it is
Soft romantic waves are loose, flowing bends in long hair that create volume without looking overly styled. The goal is not tight curls or uniform spirals—it’s natural-looking movement that enhances your hair’s length instead of hiding it.
This style works because it adds dimension to long hair, which otherwise often looks flat when left completely straight.
How to implement it (practical steps)
Start with completely dry hair.
- Apply a light heat protectant
- Divide hair into medium sections (not too small)
- Use a curling wand or straightener to create loose bends
- Alternate directions (some inward, some outward) for natural flow
- Leave the ends slightly straighter for a modern finish
- Gently finger-comb after cooling
If your hair is fine, use smaller sections for better hold. If your hair is thick, larger sections prevent over-styling and keep it soft.
If you don’t want heat, braid your hair slightly damp overnight and loosen in the morning for a heatless version.
Best for
- Long straight or slightly wavy hair
- School, casual outings, or light events
- Oval and soft face shapes
- Anyone who wants “done but not overdone” hair
This works best when you want your hair to look naturally styled without looking like you tried too hard.
Pro tip
Let the waves cool completely before touching them. Most people ruin the style by brushing or separating them too early, which makes them fall flat faster.
Mistake to avoid
Do not make all curls the same direction. That creates a “barrel curl” effect that looks outdated. Also avoid over-spraying—stiff waves lose their softness and stop looking natural.
2. Half-Up Twisted Crown Style (Soft Face-Framing Look)
This hairstyle looks delicate and aesthetic, but the real strength of it is control. It keeps hair away from your face while still allowing length to show, which is exactly why it works so well for long hair in daily routines.
What it is
A half-up hairstyle where small sections from each side are twisted and pinned or tied at the back, forming a soft crown effect. The rest of the hair stays open and flowing.
Unlike tight half-up styles, this version is intentionally soft and slightly loose, which makes it look natural instead of formal.
How to implement it (practical steps)
Start with brushed or lightly waved hair.
- Take a small section from the front of one side
- Twist it loosely toward the back
- Secure it with a pin or small elastic
- Repeat on the other side
- Join both twists at the back and secure together
- Pull slightly at the crown for soft volume
If your hair is slippery, use a bit of texture spray before twisting so it holds better.
If your hair is layered, leave a few short strands out at the front for a softer face frame.
Best for
- Long straight or wavy hair
- School days or casual gatherings
- Heart and oval face shapes
- Anyone who wants a soft feminine look without full tying
This works best when you want a neat front without losing your hair length.
Pro tip
Keep the twists loose, not tight. Tight twisting makes the style look stiff and reduces the “crown” softness that makes it pretty in the first place.
Mistake to avoid
Don’t over-secure with too many pins. Over-pinning flattens the style and removes the natural lift. Also avoid taking too large sections—it should feel light, not heavy at the back.
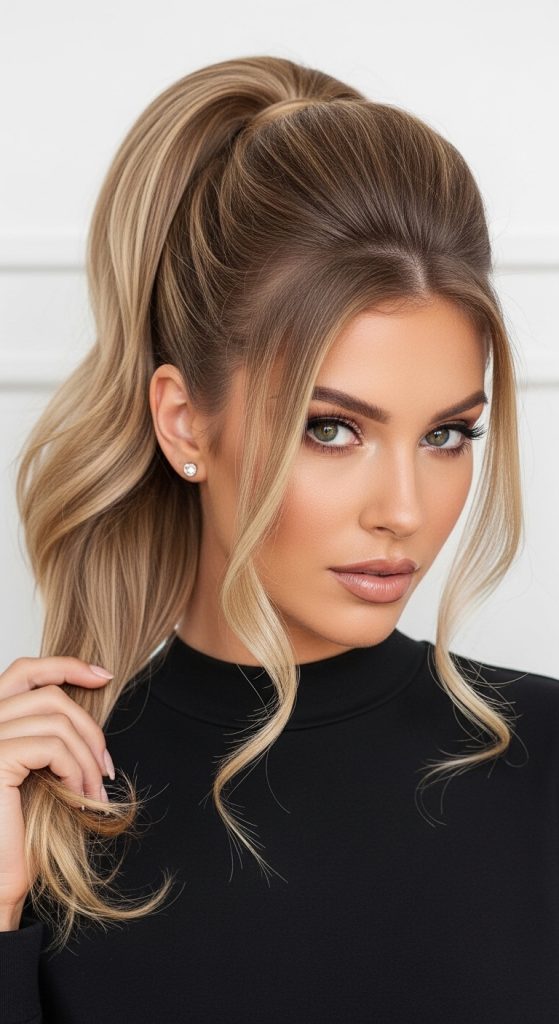
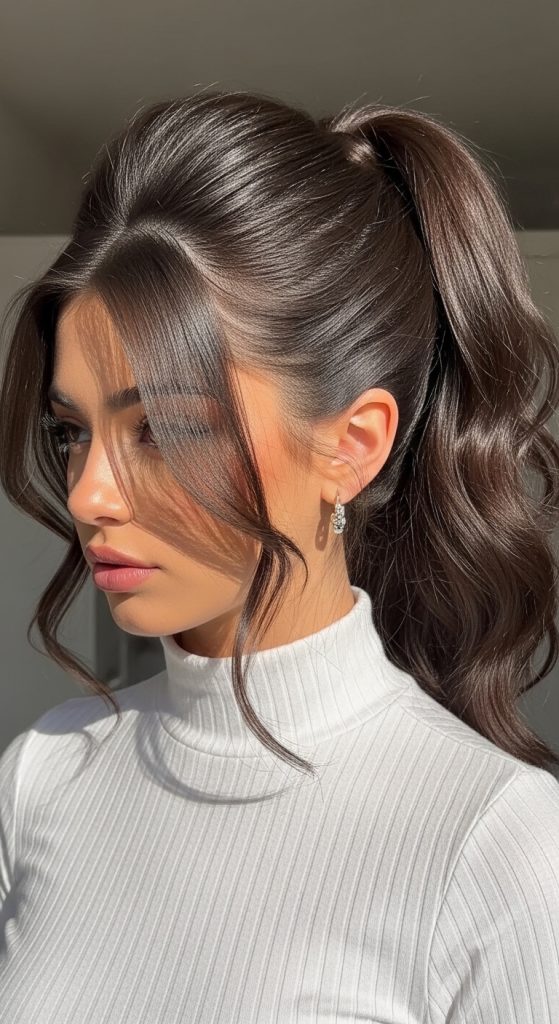
3. High Volume Ponytail with Face-Framing Strands (Lifted Look)
This is not a basic ponytail. The modern version is all about height, controlled volume, and softness around the face. It works because it lifts your features instead of pulling everything flat like a tight ponytail does.
What it is
A high ponytail placed slightly above the crown with volume at the top and soft strands left out at the front. It creates a lifted, youthful appearance while still being practical for long hair.
The key difference between this and a normal ponytail is volume placement. It should never look flat at the top.
How to implement it (practical steps)
Start with slightly textured hair for better grip.
- Flip head slightly forward and gather hair high
- Secure with a strong elastic band
- Gently pull the crown section upward to create volume
- Take small strands from the front and leave them loose
- Wrap a small piece of hair around the elastic for a clean finish
- Lightly adjust height and symmetry
If your hair is fine, tease the crown lightly before tying. If your hair is thick, divide it into two sections before securing for better control.
Best for
- Long straight or thick hair
- Active school or busy days
- Round and oval face shapes
- Anyone who wants a lifted, energetic look
This works best when you want a clean hairstyle that still looks styled and not flat.
Pro tip
The height matters more than anything. If the ponytail is too low, it looks basic. If it’s too high, it can look unstable. The sweet spot is just above the crown.
Mistake to avoid
Do not pull the hair too tightly at the front. That creates a harsh, pulled-back look that feels uncomfortable and looks outdated. Also avoid skipping volume at the crown—it’s what gives the style its shape and personality.
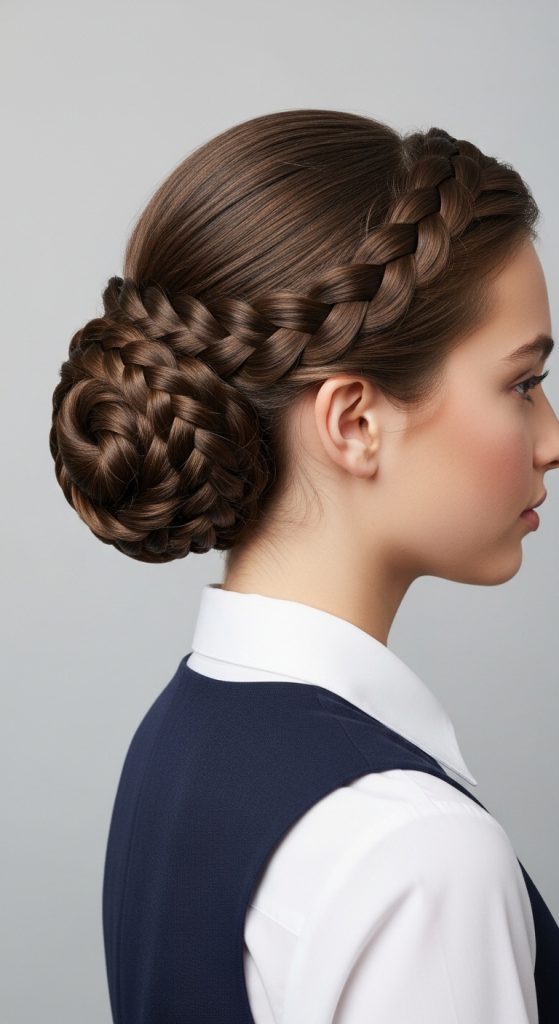
4. Classic Low Braided Bun (Neat, Secure Long-Hair Fix)
This hairstyle is what you use when you want long hair completely controlled without looking boring. Most people either do a messy bun or a simple braid—this combines both in a way that actually holds up through a full day.
What it is
A low bun created from a braid instead of loose twisting. The braid gives structure, which is why this style lasts longer than regular buns. It sits at the nape of the neck and looks clean, balanced, and slightly elegant without requiring effort.
The key idea is simple: braid first, then wrap. That small change is what makes it more secure than typical buns.
How to implement it (practical steps)
Start with detangled hair.
- Tie your hair into a low ponytail
- Braid the ponytail all the way down
- Secure the end with a small elastic
- Wrap the braid around the base to form a bun
- Pin it firmly with bobby pins (cross pattern works best)
- Gently loosen the bun slightly for natural volume
If your hair is thick, keep the braid slightly loose before wrapping. If your hair is fine, braid tighter for better grip.
If layers are falling out, smooth them with a little water or light gel before starting.
Best for
- Long, thick, or layered hair
- School days or long hours outside
- Hot weather or active routines
- Anyone who wants zero hair distraction
This works best when you need your hair to stay exactly where you put it.
Pro tip
The braid is the anchor. If the braid is weak, the bun will fall apart. Make sure tension is even from top to bottom.
Mistake to avoid
Don’t skip the braid and just twist into a bun—it won’t last. Also avoid placing it too low on the neck, or it will feel loose and shift throughout the day.
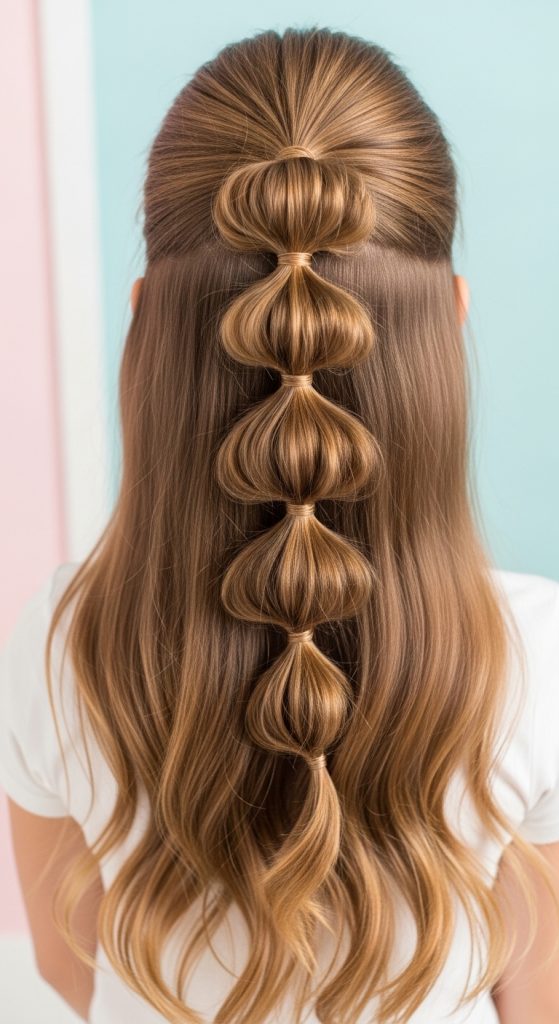
5. Half-Up Bubble Style (Cute Volume Look for Long Hair)
This hairstyle is trending because it solves a common problem: long hair looking flat when left open. It adds structure without requiring full tying or heavy styling.
What it is
A half-up hairstyle where the top section is tied and then divided into “bubble” sections using small elastics. The rest of the hair stays open. It gives volume at the top while keeping length visible.
It’s playful but still controlled, making it perfect for school or casual days.
How to implement it (practical steps)
Start with brushed hair.
- Take the top half of your hair (crown to temples)
- Tie it into a small half ponytail
- Add another elastic 2–3 inches below
- Gently pull the section between elastics to form a bubble
- Repeat once or twice depending on hair length
- Adjust each bubble for even shape
If your hair is fine, keep bubbles small and close. If your hair is thick, space them slightly wider.
If your hair slips easily, use light texture spray before starting.
Best for
- Medium to long hair
- Straight or slightly wavy textures
- School, casual outings, or light events
- Anyone who wants a cute but quick style
This works best when you want open hair but still want it controlled.
Pro tip
Keep tension consistent between elastics. Uneven spacing is what makes this style look messy instead of intentional.
Mistake to avoid
Don’t over-pull the bubbles. If you stretch them too much, they lose shape and turn frizzy. Also avoid using large, bulky elastics—they make the style look heavy and outdated.
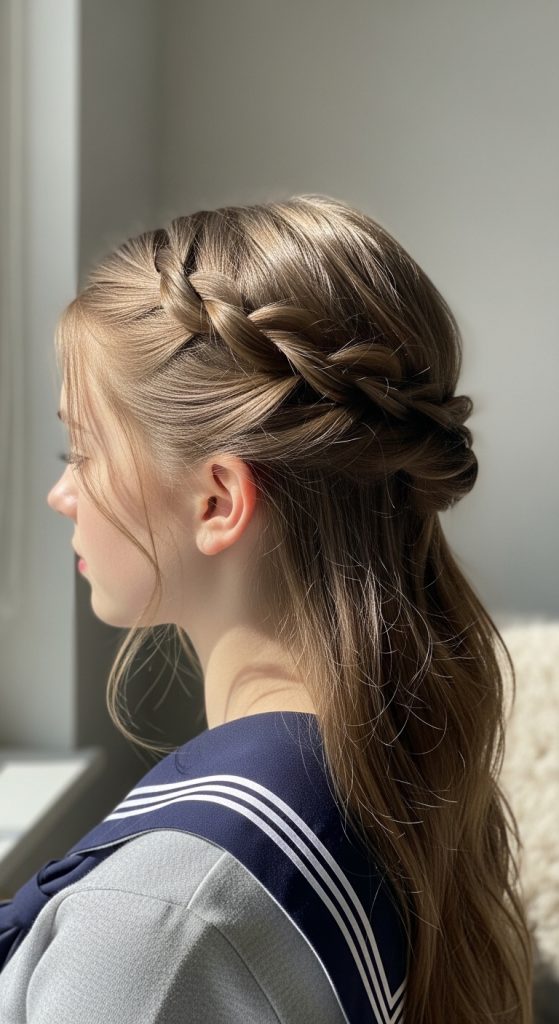
6. Side-Swept Loose Braid (Soft Everyday Control Style)
This is one of the most practical long-hair styles, but people underestimate it because it looks “too simple.” In reality, it’s one of the most reliable ways to keep long hair controlled while still looking soft and feminine.
What it is
A single braid that is swept to one side instead of hanging straight down the back. The braid is slightly loose, creating softness while still keeping hair contained.
It’s a balance between structure and natural flow, which is why it works so well for daily wear.
How to implement it (practical steps)
Start with hair brushed to one side.
- Move all hair over one shoulder
- Divide into three equal sections
- Begin a regular braid from mid-length or slightly higher
- Keep tension medium—not tight, not loose
- Secure the end with an elastic
- Gently pull a few strands from the front for softness
If your hair is layered, smooth it slightly before braiding so shorter strands don’t stick out too much.
If your hair is very straight, a bit of texture spray helps the braid hold better.
Best for
- Long straight or wavy hair
- School or study-heavy days
- Calm, simple routines
- Anyone who wants low-maintenance control
This works best when you want your hair secured but not fully tied up.
Pro tip
Start the braid slightly below ear level for a more natural fall. Starting too high makes it look stiff and overly structured.
Mistake to avoid
Don’t braid too loosely thinking it will look “soft”—it will just fall apart. Also avoid uneven sections, because they make the braid twist incorrectly and look messy instead of intentional.
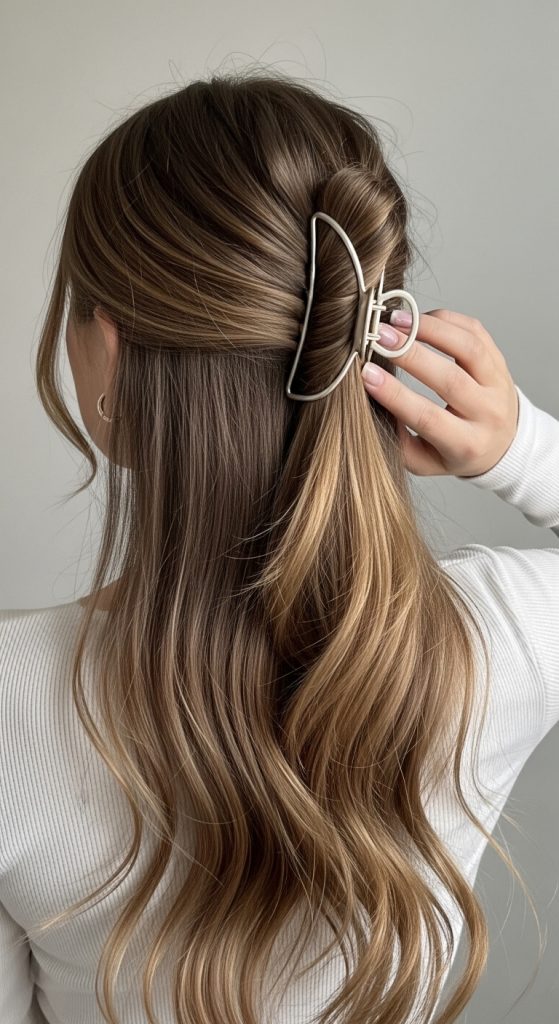
7. Claw Clip Half Twist (Effortless “Put-Together” Look)
This hairstyle looks like you didn’t try, but still somehow looks better than most fully styled hair. That’s exactly why it’s everywhere right now. The problem is, most people use claw clips wrong—too loose, too random, and without structure—so it falls apart fast. The correct version is controlled.
What it is
A half-up twist secured with a claw clip where only the top section is twisted and clipped, leaving the rest of the long hair open. It gives shape at the crown while keeping length visible.
It works because it removes hair from your face without fully tying everything back, which is ideal for long hair that feels heavy during the day.
How to implement it (practical steps)
Start with brushed or lightly textured hair.
- Take the top section of your hair (temples to crown)
- Twist it backward once or twice
- Lift the twist slightly for volume at the top
- Secure it with a medium claw clip
- Let the remaining hair fall naturally
- Adjust front strands for softness
If your hair is silky, add a little dry shampoo before twisting so it grips better. If your hair is thick, twist tighter at the base for stronger hold.
Best for
- Medium to long hair
- Straight or wavy textures
- School days when you want quick styling
- Anyone who dislikes fully tied hair
This works best when you want a relaxed but intentional look.
Pro tip
Choose a claw clip size that matches your hair thickness. Small clips slip, oversized clips look messy.
Mistake to avoid
Don’t twist too loosely. Loose twists collapse within an hour. Also avoid placing the clip too low—it should sit mid-crown, not at the back of the neck.
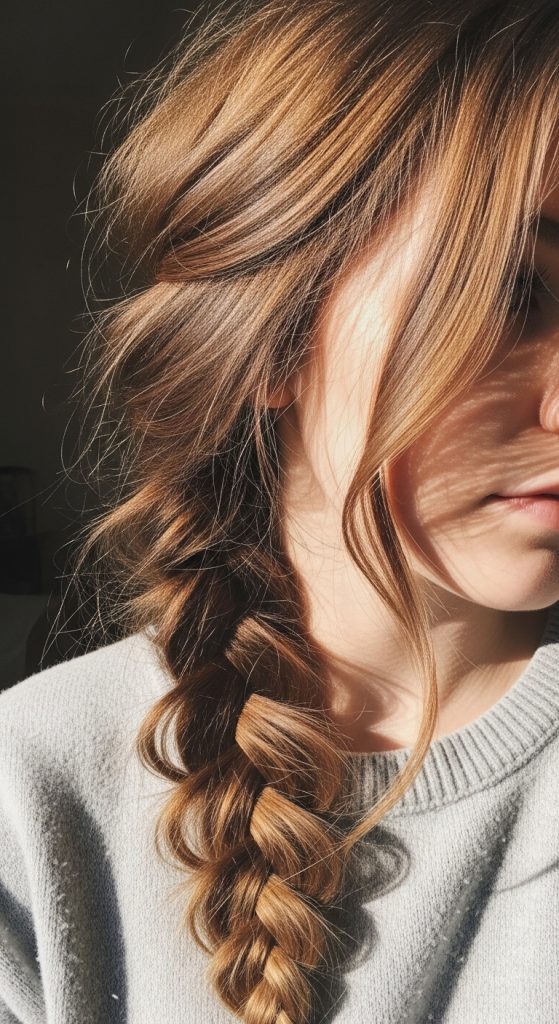
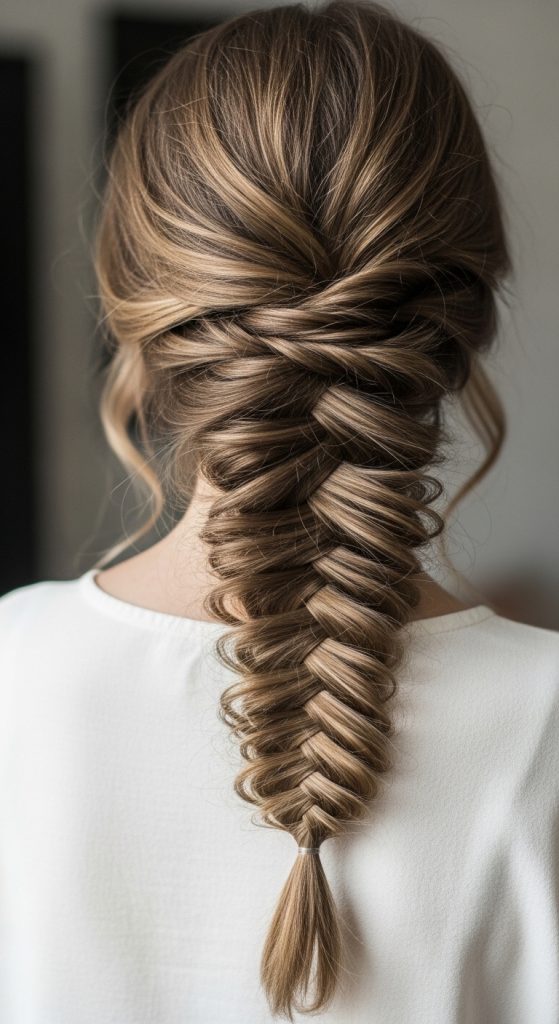
8. Loose Fishtail Braid (Soft Detailed Look)
This hairstyle looks complicated, but once you understand the structure, it becomes one of the most stylish long-hair options for school or casual wear. It gives texture and detail without needing heat tools or heavy products.
What it is
A fishtail braid is created by splitting hair into two sections and crossing small strands from each side. The modern version is intentionally loose, creating a soft, textured finish instead of a tight, rigid braid.
It works especially well for long hair because it shows off length while keeping everything controlled.
How to implement it (practical steps)
Start with detangled hair.
- Divide hair into two equal sections
- Take a small piece from the outside of one section
- Cross it over into the opposite section
- Repeat alternately down the length
- Secure with an elastic at the end
- Gently pull the braid apart for volume
If your hair is very smooth, use texture spray before starting. If it’s layered, keep tension slightly higher at the top so shorter strands stay in place.
Best for
- Long straight or slightly wavy hair
- School days or casual outings
- Medium to thick hair types
- Anyone who wants a detailed but soft style
This works best when you want a braid that looks more advanced than a regular one without extra effort.
Pro tip
Loosen the braid only after finishing it completely. Pulling while braiding can make it uneven.
Mistake to avoid
Don’t make it too tight. A tight fishtail looks stiff and loses its soft aesthetic. Also avoid uneven strand sizes—they ruin the pattern and make it look messy.
9. Low Sleek Bubble Ponytail (Clean Trendy Look)
This is a more polished version of the bubble ponytail and works better for long hair because it controls length while still adding visual interest. It’s structured but not boring.
What it is
A low ponytail divided into bubble sections using elastics, but kept sleek at the top for a clean finish. It blends structure with softness, making it suitable for school or slightly dressier days.
Unlike messy versions, this one focuses on symmetry and smoothness.
How to implement it (practical steps)
Start with smooth, brushed hair.
- Create a low ponytail at the nape
- Secure it tightly with an elastic
- Add another elastic 2–3 inches down
- Pull the section gently to form a bubble
- Repeat down the length of the ponytail
- Smooth the top section for a sleek finish
If your hair is thick, space bubbles slightly wider. If your hair is fine, keep them closer together for better structure.
If flyaways appear, lightly smooth with serum or water.
Best for
- Long straight or wavy hair
- School or structured casual looks
- Medium to thick hair
- Anyone who wants a trendy but controlled style
This works best when you want something different from a basic ponytail but still practical.
Pro tip
Keep the top section sleek before adding bubbles. That contrast is what makes the style look modern instead of messy.
Mistake to avoid
Don’t over-pull the bubbles. Too much pulling breaks symmetry and makes the style look frizzy instead of clean. Also avoid using weak elastics—they ruin the structure quickly.
10. Heatless Overnight Braids (Wake-Up Ready Waves)
This hairstyle is popular for a reason: it removes morning effort completely. But most people do it wrong and end up with uneven waves, frizz, or flat sections. The difference between messy “I slept on my hair” and cute effortless waves is how you prep and braid.
What it is
Two or more loose braids done on slightly damp or dry hair before sleeping, creating soft waves overnight. The goal is controlled texture without heat damage, especially useful for long hair that takes too long to style in the morning.
The 2026 version focuses on soft, natural waves instead of tight crimp-like patterns.

How to implement it (practical steps)
Start with slightly damp or dry hair.
- Lightly brush hair to remove tangles
- Divide hair into 2 sections (or 3 for tighter waves)
- Braid each section loosely from mid-length down
- Secure ends with soft elastics
- Sleep with braids gently placed behind shoulders
- In the morning, open and separate with fingers only
If your hair is fine, use fewer braids for softer waves. If your hair is thick, 3 braids give better definition.
For better hold, apply a tiny bit of leave-in conditioner before braiding—but avoid heavy oils.
Best for
- Long straight or slightly wavy hair
- School mornings with no time for styling
- Heat-free hair routines
- Anyone who wants soft natural waves
This works best when you want to wake up with hair already styled.
Pro tip
Don’t braid tightly. Loose braids = soft waves. Tight braids = crimped, unnatural texture that looks outdated.
Mistake to avoid
Do not brush out waves after opening braids. That turns them frizzy and flat. Always use fingers only to separate.
11. Sleek Half Ponytail with Volume Crown (Lifted Cute Look)
This is one of the most underrated long-hair styles because it fixes a common problem: flat, heavy-looking hair. It lifts the top while still keeping most of the length open, creating a balanced, cute appearance.
What it is
A half-up ponytail placed at the crown with added volume at the top section. The rest of the hair stays down, creating contrast between lifted roots and flowing length.
It works because it gives structure at the top, which instantly makes long hair look more styled and less weighed down.
How to implement it (practical steps)
Start with brushed or lightly styled hair.
- Section the top half of your hair (temples to crown)
- Backcomb lightly at the crown for volume
- Smooth the top layer gently to hide teasing
- Secure the section into a half ponytail
- Tighten slightly, then lift crown again for shape
- Leave front strands out for softness
If your hair is fine, teasing is important for lift. If your hair is thick, focus more on smoothing than volume building.
For better hold, use a strong elastic and avoid overly slippery hair.
Best for
- Long straight or wavy hair
- School or casual outings
- Round or soft face shapes
- Anyone with flat hair who wants instant lift
This works best when you want your hair to look “awake” instead of heavy.
Pro tip
Lift the crown slightly after tying, not before. That gives natural volume without breaking the shape.
Mistake to avoid
Don’t pull the half ponytail too tight. Over-tightening flattens the crown and defeats the purpose. Also avoid skipping volume entirely—it will just look like a small tied section instead of a styled look.