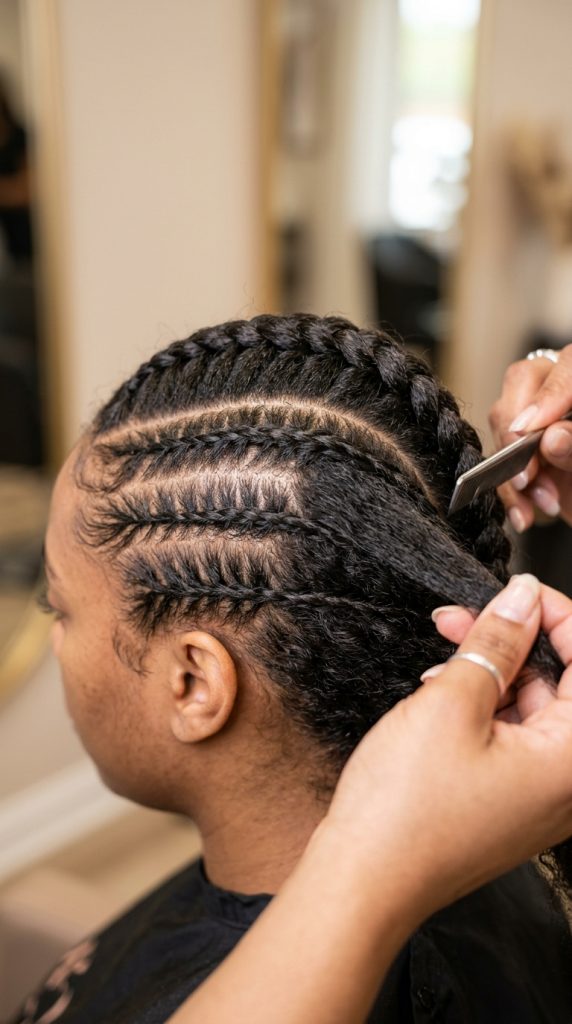
Large knotless braids have become one of the most requested protective hairstyles in recent years, and for good reason. They are stylish, lightweight on the scalp, and far more comfortable than traditional braiding methods that often start with tight knots at the roots. But what truly makes or breaks the final look of knotless braids is not just the braiding technique itself—it is the parting pattern.
If you have ever seen someone with flawless, clean, and perfectly shaped large knotless braids that look symmetrical from every angle, then you have already witnessed the power of a well-designed parting pattern. On the other hand, even the most beautifully installed braids can look uneven, bulky, or unprofessional if the sections are not carefully planned. This is why hairstylists often say that “braiding starts with parting, not braiding.”
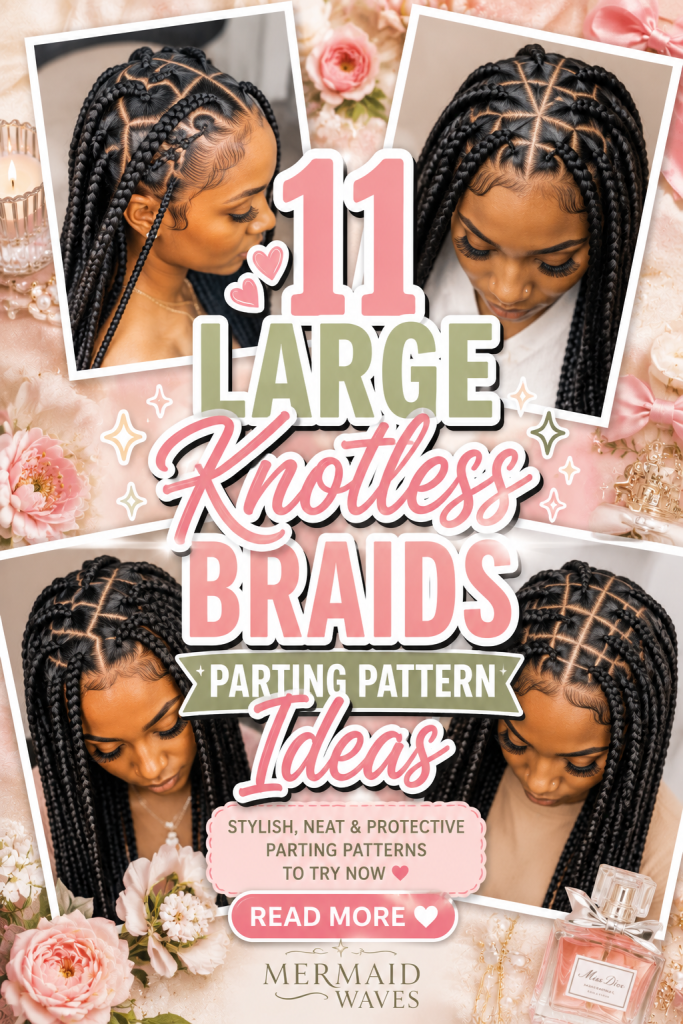
In today’s beauty and protective styling world, people are not just looking for braids that last longer—they want braids that look aesthetic, Instagram-worthy, and tailored to their face shape and lifestyle. Whether you are preparing for a vacation, a special event, a protective style for natural hair growth, or simply want a low-maintenance everyday look, large knotless braids can completely transform your appearance when done with the right parting pattern.
What makes this style even more exciting is its versatility. The same set of knotless braids can look completely different depending on how the scalp is sectioned. Some patterns create a bold and structured appearance, while others give a soft, natural, and effortless flow. Some are perfect for people who want a neat, grid-like finish, while others are designed for those who prefer creative, modern, and slightly edgy looks.
In this guide, you are going to explore 11 detailed large knotless braids parting pattern ideas that are not only visually appealing but also practical for different hair types, lengths, and occasions. Each idea is carefully explained so that you understand not just what the pattern looks like, but also why it works, how it should be installed, and who it is best suited for.
You will also learn how different parting patterns can affect scalp tension, braid longevity, and overall maintenance. For example, if you have a sensitive scalp, certain patterns with larger, more spaced-out sections may feel more comfortable. If you prefer a sleek and polished finish, tighter and more geometric parting designs may be better for you. If you have a small or round face shape, certain directional parting styles can even help frame your face more beautifully.
Another important thing to understand is that knotless braids are already known for being gentler on the scalp compared to traditional box braids. However, the parting pattern still plays a major role in how much tension is distributed across your head. A well-planned pattern ensures that your braids are not only beautiful but also safe for long-term wear, reducing breakage and promoting healthy hair growth underneath.
If you have ever struggled with braids that looked too bulky, uneven, or didn’t last as long as expected, then chances are the issue was not the braiding itself—but the sectioning method used at the beginning. That is exactly why learning different parting patterns is so important. It gives you control over the final outcome of your hairstyle instead of relying only on the braider’s default technique.
In this article, we will also focus on real-life usability. Each pattern idea is designed with everyday women in mind—whether you are a student, a working professional, a busy mom, or someone who simply wants a stylish protective hairstyle without constant upkeep. You will see which patterns are best for quick installation, which ones last longer with minimal frizz, and which ones give the most aesthetic “Pinterest-perfect” finish.
By the end of this guide, you will not only be inspired by different large knotless braid parting styles, but you will also have a clear understanding of how to choose the right one for your own hair goals, face shape, and lifestyle needs. This is not just about hairstyles—it is about making informed beauty choices that enhance both your confidence and hair health.
So, if you are ready to upgrade your braid game and move beyond basic sections, let’s dive into these 11 Large Knotless Braids Parting Pattern Ideas that will completely change the way you think about protective styling.
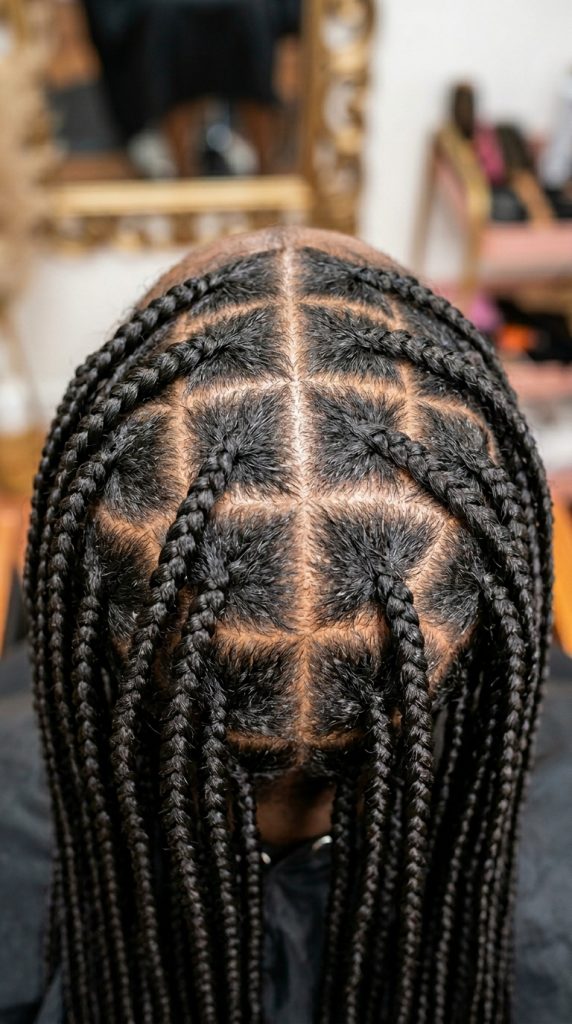
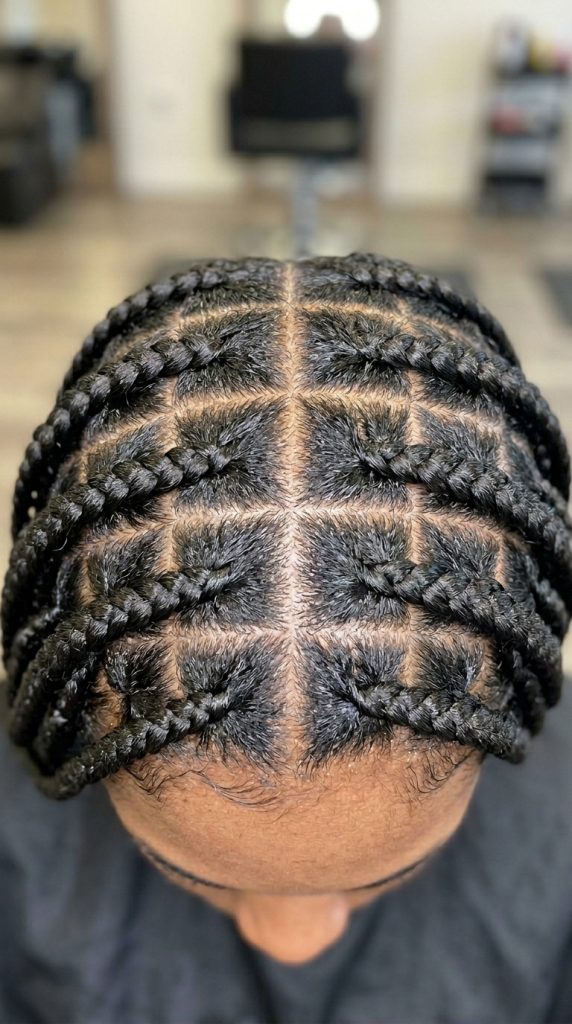
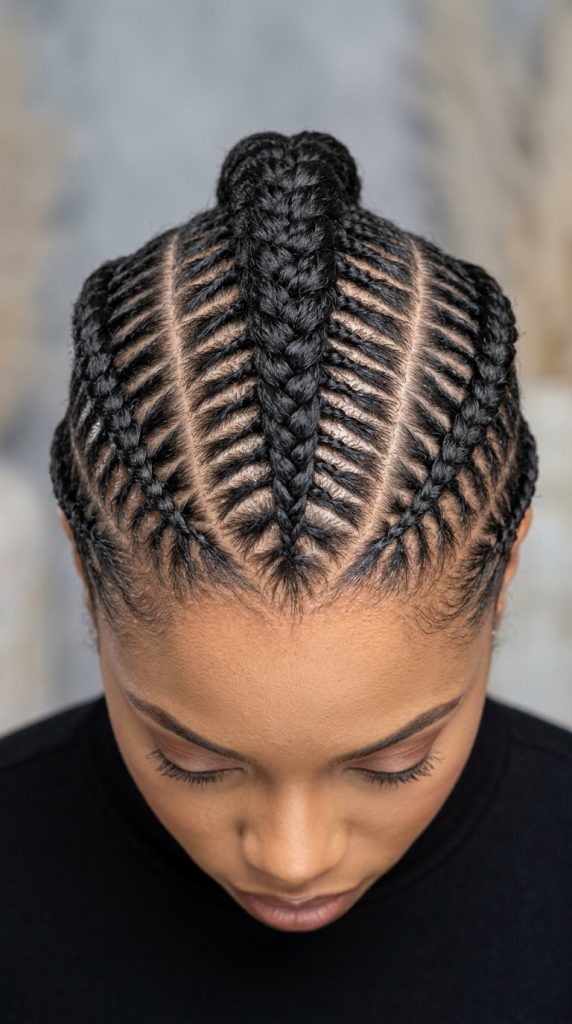
1. Classic Straight-Back Grid Parting (Clean Box Foundation)
What it is (Explanation)
The classic straight-back grid parting is one of the most timeless and widely used foundations for large knotless braids. In this pattern, the hair is divided into clean, straight rows that move from the front hairline straight toward the back of the head. Each section is usually shaped like a rectangle or square, creating a neat “box-like” structure across the scalp.
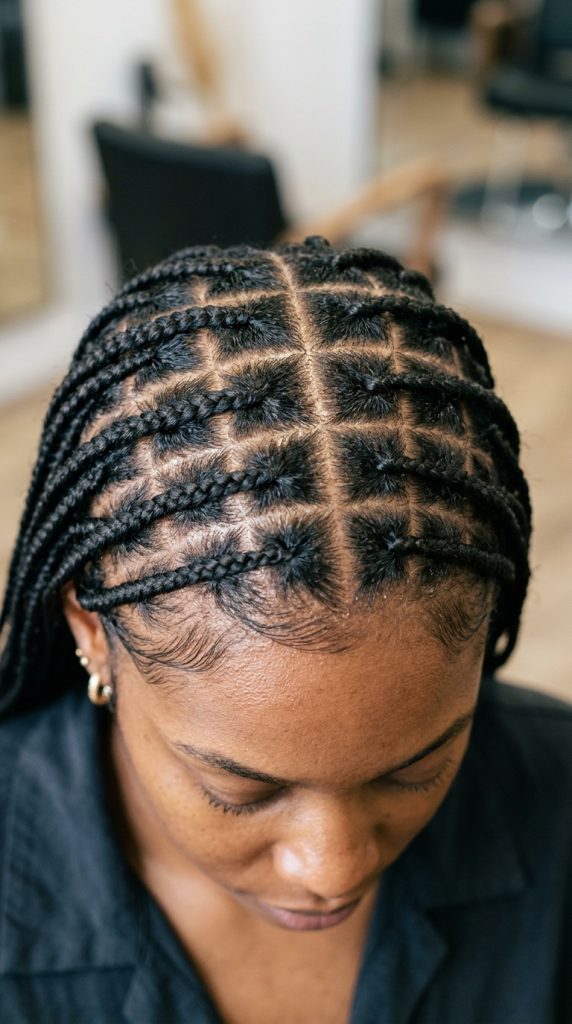
This pattern is popular because it creates a very organized base. When you look at the scalp, everything appears balanced, symmetrical, and evenly distributed. There is no complicated geometry or diagonal movement—just clean, structured lines that give a polished finish once the braids are installed.
If you have ever seen knotless braids that look super sleek and evenly spaced, especially in a classic Instagram or Pinterest hairstyle, there is a high chance they were built on this foundation.
How to implement (Practical steps)
To achieve this pattern correctly, the parting must be precise from the start. You begin by sectioning the hair into a middle line or side part, depending on the desired final look. After that, you create horizontal rows from the forehead to the nape.
Each row should be equal in size if you want uniform large braids. Use a rat-tail comb and make sure every part is clean—no zig-zag or curved lines unless intentionally designed.
A key step is controlling section thickness. For large knotless braids, each grid should be wide enough to support fullness but not so large that the braid becomes heavy or loose at the root. Once the grid is complete, each section is clipped separately to avoid overlapping or mixing.
This pattern works best when done slowly and carefully. Rushing will lead to uneven boxes, which becomes very noticeable once braiding starts.
Best for (Who should use it)
This pattern is perfect for beginners and anyone who wants a clean, professional look without complexity. If you prefer classic styles that are neat, symmetrical, and easy to maintain, this is the best option.
It also works well if you are getting braids for the first time or if you want a protective style for work, school, or everyday wear. If you have a round or oval face shape, this structure also frames the face evenly without adding too much visual distraction.
Pro tip
If you have a small room for error or you are doing braids at home, slightly pre-stretch your parts using a light oil or edge control on the scalp. This helps keep lines sharp and reduces flyaways while sectioning.
Also, always double-check your grid before starting braiding. Once you begin braiding, fixing uneven sections becomes much harder.
Mistake to avoid
The biggest mistake is uneven section sizing. If some boxes are larger than others, the braids will look unbalanced and bulky in certain areas.
Another common mistake is curving the parts unintentionally while trying to go fast. Even a slight curve can change the entire final look of the braid pattern.
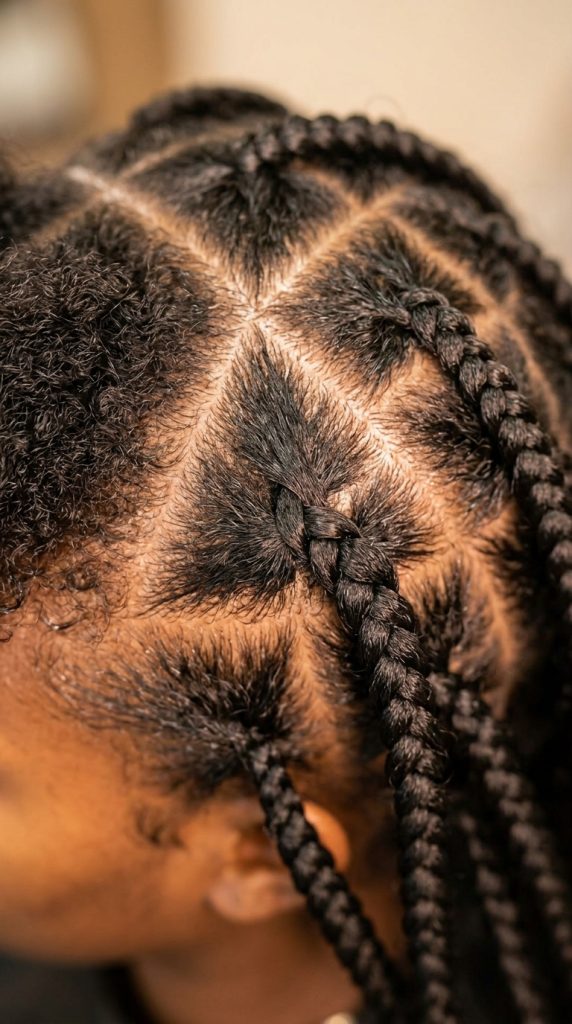
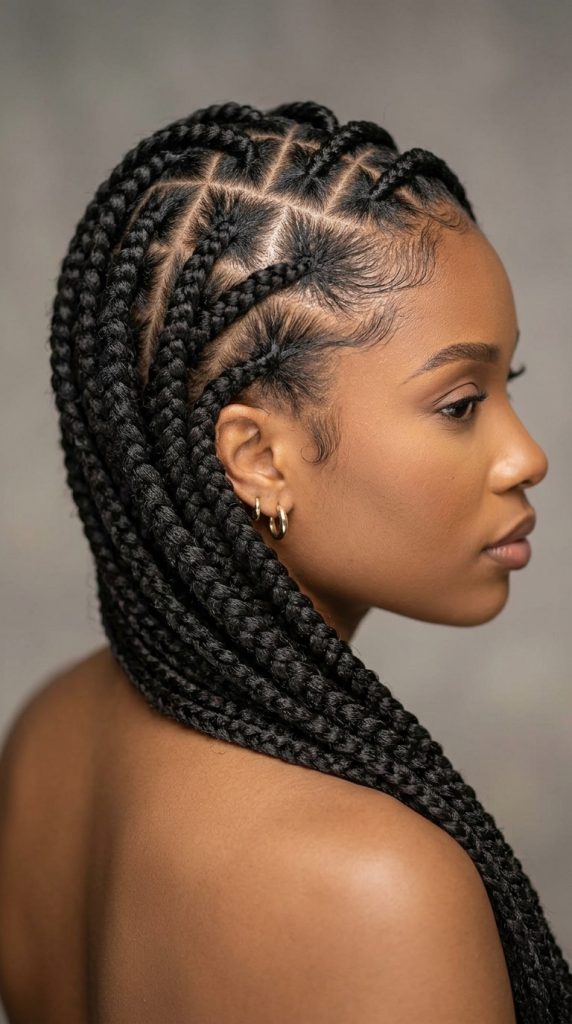
2. Diamond-Shaped Parting Pattern (Modern Geometric Flow)
What it is (Explanation)
The diamond parting pattern is a more modern and visually artistic approach to large knotless braids. Instead of straight boxes, the scalp is divided into diamond-shaped sections that create a flowing, angled structure.
This pattern gives the braids a more dynamic appearance. Instead of looking rigid or boxy, the hair appears to move in soft geometric directions, which adds a stylish and slightly luxury feel to the final look.
It is especially popular in fashion-forward braid designs where people want something more unique than traditional straight-back parts.
How to implement (Practical steps)
To create this pattern, you start by marking a central guide line on the scalp. Instead of making straight horizontal rows, you create diagonal partings that intersect to form diamond shapes.
Each section should meet evenly at points, forming symmetrical “V” or “X” connections. The key here is consistency—once you choose the angle of your diamond shape, every section must follow the same direction.
Use a fine-tooth rat-tail comb for accuracy. It helps to lightly stretch the scalp with your fingers while parting so you can clearly see angles forming.
Once the diamond grid is complete, each section should look like a repeating pattern across the head, almost like a quilt design. This makes the final braids look intentional and highly styled.
Best for (Who should use it)
This pattern is best for people who want a more fashionable, statement hairstyle. If you are someone who enjoys unique beauty looks, photoshoots, or social media content, this pattern will stand out.
It also works beautifully for oval and heart-shaped faces because the angled structure naturally draws attention upward and adds dimension.
If you are attending events, vacations, or want a bold protective style, this is a great choice.
Pro tip
Keep tension extremely even when sectioning diamonds. If one angle is sharper than another, the whole pattern loses its symmetry.
A helpful trick is to lightly sketch the pattern with a tail comb before fully committing to parts.
Mistake to avoid
The most common mistake is making uneven diamond sizes. If some diamonds are large and others are small, the pattern will look chaotic instead of stylish.
Another mistake is over-tight parting at the edges, which can cause unnecessary scalp tension once braiding begins.
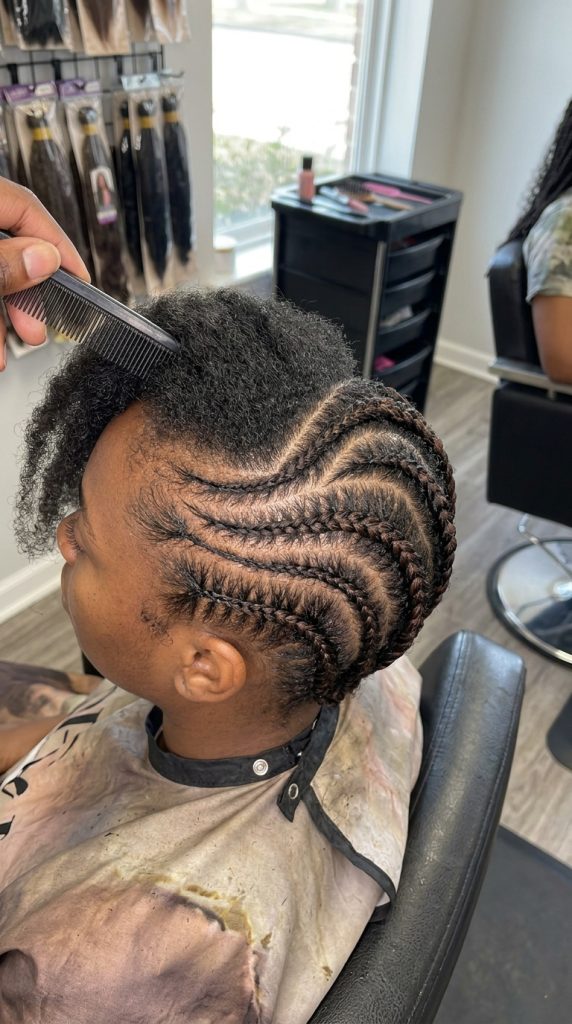
3. Triangle Feed-In Parting Pattern (Soft Natural Flow)
What it is (Explanation)
The triangle parting pattern is one of the most natural-looking foundations for large knotless braids. Instead of structured boxes or geometric shapes, the scalp is divided into triangular sections that often point downward or in alternating directions.
This pattern creates a softer, more organic appearance. The braids flow naturally from the scalp, making the hairstyle look less rigid and more effortless. It is especially loved for knotless braids because it blends seamlessly with the feed-in technique.
The triangle shape also helps distribute hair more evenly, which can reduce bulk at the roots and improve comfort during long wear.
How to implement (Practical steps)
Start by deciding your main part—middle or side. Then, instead of creating straight lines, you begin forming triangular sections by connecting three points: one at the base and two at the top or vice versa depending on direction.
Each triangle should be consistent in size if you want uniform large braids. However, slight variation can be used intentionally for a more natural, freestyle look.
The key is ensuring that each triangle flows into the next without overlapping. Clean separation is important so that braids don’t merge or create uneven tension areas.
This pattern often works best when you visualize the scalp as a series of repeating “arrow-like” shapes pointing in alternating directions.
Best for (Who should use it)
This pattern is ideal for people who want a softer, more natural aesthetic instead of a strict or structured look. If you have thick or dense hair, triangle sections help manage volume more evenly.
It is also great for people who wear braids for long periods because the scalp tension is usually more evenly distributed compared to tight grid systems.
If you prefer boho, free-flowing, or natural beauty styles, this pattern fits perfectly.
Pro tip
When working with triangle parts, always ensure the base of each triangle is clean and not too wide. A balanced base helps the braid sit flatter and prevents puffiness at the roots.
Lightly stretching each section before braiding can also help reduce tension.
Mistake to avoid
Avoid making triangles too irregular or inconsistent in direction. If the pattern loses rhythm, the final braids can look messy instead of intentional.
Another mistake is placing too much hair in one triangle section, which leads to uneven braid thickness.
4. Curved Flow (Crescent) Parting Pattern – Soft Sculpted Look
What it is (Explanation)
The curved flow or crescent parting pattern is a beautifully sculpted approach to large knotless braids where the sections are not straight at all—instead, they follow soft, curved lines across the scalp. These curves often move like gentle waves, wrapping around the head in semi-circular or crescent shapes.
This pattern is designed to create movement even before the braids are installed. While straight-back or grid patterns look structured and geometric, curved parting gives a more organic, “flowing with the head shape” effect. It feels softer, more feminine, and more natural, especially when the braids fall over the shoulders.
The biggest visual advantage is how the curves guide the eye. Instead of stopping abruptly like boxes or diamonds, the sections blend into each other, creating a continuous flow that looks luxurious and intentional.
How to implement (Practical steps)
To create this pattern, you start by mapping the natural curvature of the head. Instead of drawing straight horizontal lines, you gently arc your parting line from one side of the head to the other, almost like drawing a rainbow shape.
Each section should follow the same direction of curvature. If your first row curves upward, every row should mirror that same angle to maintain consistency. Use a rat-tail comb and move slowly—this is a pattern that cannot be rushed.
A helpful technique is to lightly trace the curves first without fully separating the hair. Once all curves are mapped out and visually balanced, then you go back and deepen each parting.
Spacing is very important here. Large knotless braids require enough room in each curved section so the braid does not pull tightly when installed.
Best for (Who should use it)
This pattern is perfect for anyone who wants a soft, elegant, and slightly romantic braid style. If you like hairstyles that feel effortless but still look high-end, this is a strong choice.
It works especially well for people with round or square face shapes because the curved lines help soften facial angles. It is also great for special occasions like vacations, date nights, or events where you want a more styled appearance.
If you prefer Pinterest-inspired, aesthetic hairstyles rather than strict geometric ones, this pattern fits your vibe perfectly.
Pro tip
Always step back and check symmetry from both sides while parting. Curved designs can easily become uneven if one side is more arched than the other.
A small trick is to imagine you are drawing “smiles” across the scalp—this helps maintain consistent curvature.
Mistake to avoid
The most common mistake is making curves too sharp or too random. If the arc changes direction suddenly, the pattern loses its smooth flow and can look messy once braided.
Another mistake is overcrowding sections near the crown, which can create uneven braid tension and reduce comfort over time.
5. Side-Swept Diagonal Parting Pattern – Asymmetrical Drama Look
What it is (Explanation)
The side-swept diagonal parting pattern is a bold and stylish design where all sections are created in a diagonal direction instead of vertical or horizontal alignment. The braids appear to “flow” from one side of the head toward the opposite side, creating an intentional asymmetry.
This pattern is known for its dramatic visual impact. It instantly makes large knotless braids look more fashion-forward and editorial. Instead of a balanced grid, the eye is drawn across the head in a sweeping motion, which adds energy and movement to the hairstyle.
It is especially popular in modern braid styling because it breaks traditional symmetry rules while still maintaining structure and control.
How to implement (Practical steps)
To create this pattern, begin by choosing your dominant direction—usually from one temple toward the opposite nape or crown. This direction will guide the entire structure.
Instead of making straight rows, you will create diagonal lines across the scalp. Each section should angle in the same direction to maintain flow consistency.
Start at the front hairline and part the first section diagonally. Then continue working backward, ensuring each new section mirrors the same slope. Think of it like drawing parallel slanted lines across the head.
For large knotless braids, section size should remain consistent to avoid uneven braid thickness. Use clips to separate each diagonal section clearly so they don’t merge during installation.
Best for (Who should use it)
This pattern is ideal for people who love bold, trendy, and high-fashion hairstyles. If you want your braids to stand out on social media or complement stylish outfits, this is a great option.
It works especially well for oval and longer face shapes because the diagonal flow helps balance facial length. It also suits people who prefer edgy, asymmetrical beauty looks instead of traditional symmetry.
If you often wear side parts or asymmetrical hairstyles, this pattern will feel very natural for you.
Pro tip
Maintain consistent diagonal angles from the very first section. Even a slight change in slope can break the entire flow of the design.
It helps to lightly map all diagonal lines before fully separating the hair so you can visualize the final structure.
Mistake to avoid
The biggest mistake is mixing directions unintentionally. If some sections tilt left while others tilt slightly right, the braid pattern loses its clean aesthetic.
Another mistake is making the front sections too tight or too small, which can cause imbalance when the braids are fully installed and styled.
6. Brick Layer (Offset Grid) Parting Pattern – Volume & Natural Balance
What it is (Explanation)
The brick layer or offset grid pattern is a more advanced and highly effective parting method for large knotless braids. Instead of stacking sections directly on top of each other like a traditional grid, each row is slightly offset—similar to how bricks are laid in a wall.
This creates a staggered pattern where braids do not sit directly in line with the ones above or below them. The result is a more natural distribution of volume and reduced scalp tension in concentrated areas.
Visually, this pattern gives a fuller, more dimensional look because the braids are not aligned in rigid straight columns. Instead, they appear slightly shifted, which adds depth and softness to the overall style.
How to implement (Practical steps)
Start by creating your first horizontal row of sections, just like a standard grid. Each section should be clean and evenly sized.
For the second row, instead of aligning directly under the first row’s parts, shift each section slightly to the left or right—this is what creates the “brick effect.” Continue alternating this offset pattern with every new row.
It is important to maintain consistent spacing between sections so the offset remains controlled rather than random. Use your comb as a measuring guide to keep each shift equal.
For large knotless braids, this pattern helps distribute weight more evenly across the scalp, which is especially useful if you plan to keep the style for several weeks.
Best for (Who should use it)
This pattern is ideal for people who want long-lasting braids with better comfort and reduced scalp strain. If you usually experience tightness or tension with standard grid patterns, this is a better alternative.
It is also great for people with thick or dense hair because it helps avoid stacking too much weight in one straight line.
If you want a natural-looking finish that still feels structured but not too rigid, this pattern is a perfect middle ground.
Pro tip
Keep your offset shifts consistent throughout the entire head. If the stagger becomes irregular, the pattern will lose its brick-like structure and appear uneven.
Also, lightly stretch each section before braiding to ensure smooth installation and reduce root tension.
Mistake to avoid
Avoid accidentally turning the offset into a random pattern. The brick layer only works when the shift is controlled and consistent.
Another mistake is making upper rows too large compared to lower rows, which can cause imbalance in braid weight distribution.
7. Zig-Zag Flow Parting Pattern – Edgy Textured Definition Look
What it is (Explanation)
The zig-zag flow parting pattern is a bold, eye-catching design where the scalp is divided using sharp, angled lines instead of straight or curved sections. These parts move in a back-and-forth “Z” motion, creating a textured visual effect even before the braids are installed.
Unlike clean grid patterns, zig-zag parts are intentionally irregular in direction, but still controlled. The goal is not messiness—it is structured edge. When done properly, this pattern gives large knotless braids a more dynamic, energetic appearance that stands out instantly.
This style is especially popular for people who want something different from the typical neat box braids look. It adds personality to the hairstyle and makes even simple braids look more fashion-forward.
How to implement (Practical steps)
Start by sectioning the hair at the front hairline. Instead of drawing a straight line backward, you begin creating angled parts that shift left and right in a repeating zig-zag motion.
Each section should connect cleanly at sharp angles. Think of it like drawing lightning bolts across the scalp. The key is consistency—every zig and every zag should follow the same rhythm.
Once the first row is completed, continue the pattern backward, making sure each new section mirrors the previous angles. It helps to lightly sketch the entire pattern before fully separating hair so you can maintain structure.
For large knotless braids, make sure each zig-zag section is wide enough to support fullness without creating tension at the roots.
Best for (Who should use it)
This pattern is perfect for people who like bold, trendy, and slightly edgy hairstyles. If you prefer hairstyles that feel modern and Instagram-ready, this is a strong choice.
It also works well for younger clients or anyone who wants a playful twist on traditional braid patterns. If you often wear street-style outfits or experimental fashion looks, zig-zag parts complement that aesthetic very well.
Pro tip
Keep your angles consistent throughout the entire head. Even a slight mismatch in direction can make the pattern look uneven once braids are installed.
Also, lightly define each part with edge control or styling gel to keep the zig-zag structure sharp and visible.
Mistake to avoid
Avoid making zig-zags too tight or too small. This can create unnecessary tension and make braiding difficult.
Another mistake is losing rhythm halfway through—if the pattern changes direction randomly, the final look will lose its intentional design.
8. Mohawk-Inspired Center Parting Pattern – Bold Statement Volume
What it is (Explanation)
The Mohawk-inspired center parting pattern is a dramatic and structured design where the hair is sectioned to emphasize a strong central “ridge” running from the front hairline to the nape. The sides are then parted in a way that directs attention toward the middle section, creating a lifted, mohawk-like visual effect without actually shaving or altering the natural hairline.
This pattern is designed to add height, volume, and focus to the center of the head. Large knotless braids installed with this structure often appear fuller in the middle while still maintaining balance on the sides.
It is a powerful choice for people who want their hairstyle to feel bold, confident, and highly styled.
How to implement (Practical steps)
Begin by creating a precise center section from forehead to nape. This will act as the “main strip” of the mohawk structure.
Next, divide the remaining hair on both sides into angled sections that flow toward the center. Instead of straight rows, these side parts are slightly diagonal, directing visual attention inward.
The center sections are usually slightly larger or more prominent, especially when installing large knotless braids. This enhances the raised effect.
It is important to maintain symmetry on both sides so the mohawk structure remains balanced rather than leaning to one side.
Best for (Who should use it)
This pattern is ideal for people who want a bold, statement-making hairstyle. If you like volume, height, and attention-grabbing looks, this is a perfect choice.
It works especially well for oval and long face shapes because the central volume helps balance facial proportions.
It is also great for events, fashion shoots, or any situation where you want your hairstyle to stand out strongly.
Pro tip
Keep the center section slightly more defined than the sides so the mohawk illusion remains visible even after braiding.
Also, make sure both sides mirror each other perfectly to avoid a lopsided finish.
Mistake to avoid
Avoid making the side sections too large, as this reduces the impact of the center ridge.
Another mistake is uneven center alignment—if the middle shifts even slightly, the entire pattern loses its structured effect.
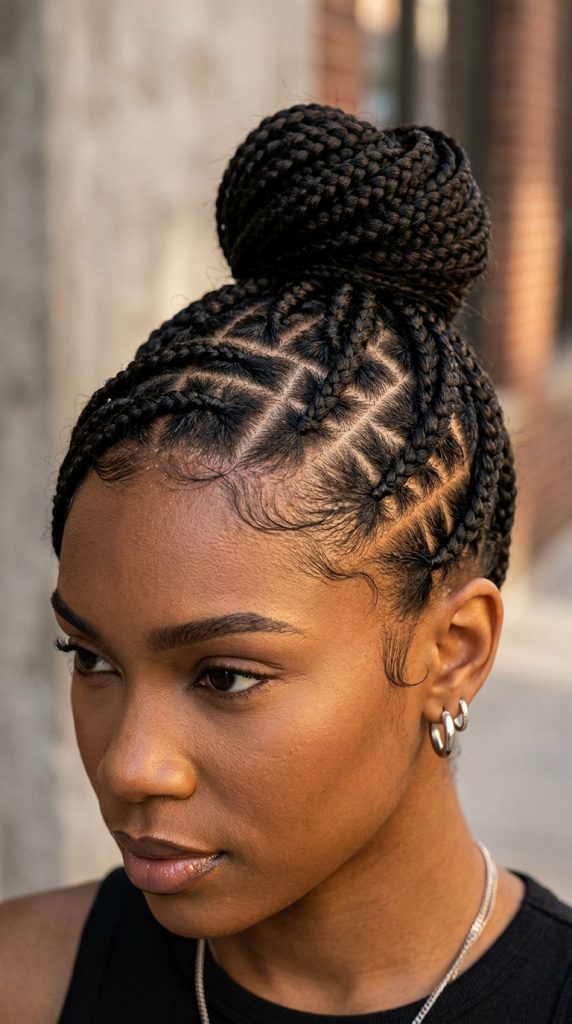
9. Crown Radiating (Sunburst) Parting Pattern – Elegant Star Effect
What it is (Explanation)
The crown radiating or sunburst parting pattern is one of the most visually stunning designs for large knotless braids. In this pattern, all sections originate from a central point near the crown of the head and radiate outward like rays of the sun.
This creates a circular, star-like structure that gives the hairstyle a soft yet regal appearance. Once braids are installed, they appear to flow outward naturally from the center, creating a beautiful sense of symmetry and movement.
It is a favorite among stylists who want to create high-impact, artistic braid designs that feel luxurious and intentional.
How to implement (Practical steps)
Start by identifying the crown point of the head. This will be your central anchor.
From this point, begin parting hair outward in straight or slightly curved lines that extend in all directions—front, sides, and back. Each section should resemble a “ray” coming from the center.
It is important to keep spacing even between each radiating section so the pattern remains balanced. Uneven spacing will disrupt the sunburst effect.
For large knotless braids, ensure each radiating section is wide enough to maintain fullness but not so large that it loses structure.
Best for (Who should use it)
This pattern is perfect for people who want a luxurious, artistic, and highly styled braid look. If you enjoy intricate hairstyles that look custom-made, this is an excellent choice.
It also works well for special occasions like weddings, photoshoots, or vacations where you want a standout hairstyle.
If you have a round or heart-shaped face, this pattern can help elongate and balance facial proportions.
Pro tip
Always start from the exact center point—accuracy here determines the entire symmetry of the pattern.
Lightly map all rays before fully parting to ensure spacing is even all around the crown.
Mistake to avoid
Avoid uneven radiating angles, as this will distort the sunburst effect and make the pattern look lopsided.
Another mistake is overcrowding sections near the crown, which can create tension and reduce the clean visual flow of the style.
10. Feed-In Horizontal Curve Rows – Soft Layered Flow Effect
What it is (Explanation)
The feed-in horizontal curve row pattern is a soft, layered parting technique where sections are created in gentle horizontal lines, but instead of being perfectly straight, each row has a slight curve that follows the natural shape of the head. This creates a flowing, wave-like structure across the scalp that looks smooth and dimensional once large knotless braids are installed.
Unlike rigid grid patterns, this design focuses on movement and softness. The braids appear to “fall” in layers, almost like stacked ribbons, giving the hairstyle a natural, effortless finish. It is especially popular for people who want their braids to look full but not overly structured or heavy.
This pattern is also very forgiving visually. Even if braids are large, the curved layering helps break up bulk and creates a softer silhouette.
How to implement (Practical steps)
Start by dividing the hair into a general horizontal structure, beginning from the front hairline. Instead of drawing straight lines across the head, gently curve each row slightly upward or downward depending on the natural shape of the scalp.
Each new row should mirror the previous curve to maintain consistency. Think of it like stacking soft waves across the head rather than rigid lines.
After mapping the rows, divide each curved band into equal sections for large knotless braids. It is important to keep spacing consistent so the flow of the curves remains visible after installation.
Use clips to separate each section carefully, making sure the curved structure is not disturbed during preparation.
Best for (Who should use it)
This pattern is ideal for people who want a soft, feminine, and natural-looking braid style. If you prefer hairstyles that feel lightweight and flowy instead of sharp or geometric, this is a great option.
It works especially well for people with thick hair because the curved rows help distribute volume evenly across the head.
If you often wear casual, everyday styles but still want something aesthetic and Pinterest-worthy, this pattern fits perfectly.
Pro tip
Keep your curves subtle, not extreme. A gentle arc is enough to create flow without distorting the sectioning structure.
Also, always check symmetry from both sides before starting braiding to ensure balanced layering.
Mistake to avoid
Avoid making curves inconsistent between rows. If one row is curved and the next is almost straight, the final pattern will look uneven.
Another mistake is over-sectioning small areas within curved bands, which can break the smooth layered effect.
11. Free-Form Artistic Parting Pattern – Custom Creative Design Look
What it is (Explanation)
The free-form artistic parting pattern is the most creative and customizable approach to large knotless braids. Instead of following strict geometric rules, this pattern allows the stylist to design unique, flowing, or abstract parting shapes based on creativity, head shape, and desired aesthetic.
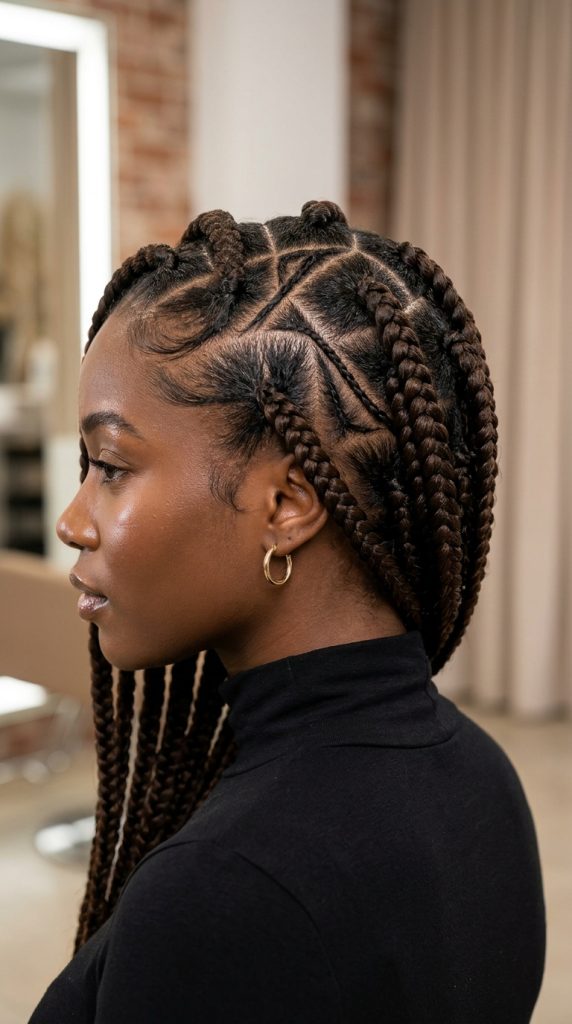
This can include a mix of curves, diagonals, spirals, or asymmetrical sections that are intentionally designed to create a one-of-a-kind look. No two free-form patterns are exactly the same, which makes this style highly personalized.
The goal of this pattern is not uniformity—it is artistic expression. Once braids are installed, the scalp design becomes part of the visual style itself, almost like a hidden artwork beneath the braids.
How to implement (Practical steps)
Begin by analyzing the head shape and deciding on a general flow direction. Instead of planning strict rows, sketch light guiding lines that follow creative movement—this could be swirling patterns, broken diagonals, or mixed curves.
Each section should still be functional for braiding, meaning it must be large enough for knotless braids while maintaining clean separation. Even though the design is artistic, clarity is still important at the scalp level.
Work slowly and build the design step-by-step. Avoid rushing into full sectioning—this pattern requires visualization first. Many stylists lightly map the entire design before fully committing to parts.
The final structure should feel balanced overall, even if it is asymmetrical in detail.
Best for (Who should use it)
This pattern is perfect for people who want a truly unique hairstyle that stands out. If you love creative beauty looks, experimental styles, or content creation for social media, this is an ideal choice.
It is also great for clients who trust their stylist and want a custom design that is not commonly seen.
If you are attending fashion events, shoots, or want a signature hairstyle, this pattern gives maximum individuality.
Pro tip
Always balance creativity with structure. Even the most artistic design needs clean sectioning so braids remain neat and long-lasting.
It helps to take a quick photo of your parting before braiding to check overall balance from a visual perspective.
Mistake to avoid
Avoid overcomplicating the design to the point where sections become unclear. If the pattern is too chaotic, braiding becomes difficult and the final result loses definition.
Another mistake is ignoring scalp tension balance—creative does not mean uncomfortable. Always ensure even weight distribution across the head.