Easter egg decorating has evolved far beyond simple dye kits and stickers. For adults in 2026, it has become a sophisticated form of seasonal artistry, blending creativity, intricate techniques, and trend-forward design aesthetics. From whimsical steampunk motifs to delicate pressed botanical patterns, today’s Easter eggs can transform from ordinary holiday treats into miniature works of art that showcase personal style and meticulous craftsmanship. These projects are perfect for those seeking a relaxing, meditative craft experience, a unique way to celebrate the holiday, or an opportunity to create memorable gifts or table centerpieces that impress family and friends.
Modern adult Easter egg decorating embraces multiple styles. On one end, you have steampunk-inspired eggs adorned with miniature gears, metallic paints, and vintage embellishments that create a mechanical yet artistic charm. On the other, pressed botanical eggs use natural flowers and leaves embedded in transparent or softly colored bases, producing a sophisticated, naturalistic aesthetic. Both approaches highlight attention to detail and demonstrate how egg decorating can bridge art, design, and tradition. These techniques are perfect for craft enthusiasts who want a more advanced, visually striking result compared to conventional Easter egg designs.

The resurgence of DIY adult crafts on platforms like Pinterest, Instagram, and TikTok has fueled the popularity of unique egg designs. Artisans are combining mixed media, hand painting, decoupage, and even resin techniques to create visually captivating eggs that can serve as keepsakes or artistic displays. Whether you’re looking for luxurious metallic finishes, vintage-inspired embellishments, or nature-infused patterns, there’s a method suitable for your skill level. Each style encourages experimentation with color palettes, textures, and materials, allowing crafters to infuse personality into every egg.
In addition to being aesthetically pleasing, adult Easter egg crafting also encourages mindfulness and creativity. The process of carefully layering materials, painting, or arranging miniature components requires patience and focus, providing a relaxing break from the fast-paced demands of modern life. Many enthusiasts find satisfaction in transforming a simple egg into a detailed and intricate design that reflects not only their artistic taste but also seasonal inspiration. Crafting these eggs can be a social activity as well, perfect for workshops, family gatherings, or online community challenges, where crafters share techniques, tips, and completed designs.
Materials for adult egg decorating have also expanded dramatically. You can now experiment with metallic paints, antique embellishments, washi tapes, decoupage papers, dried flowers, resin coatings, miniature gears, and even LED lights. This vast palette allows for creative freedom and endless combinations, turning each egg into a statement piece. The blend of traditional and modern techniques ensures that even classic eggs can be reinvented with a contemporary twist. For instance, a simple boiled egg can become a steampunk owl, featuring tiny gears and metallic accents, or a pressed botanical masterpiece, showcasing delicate flower arrangements in clear varnish.
This article presents 13 Easter egg decorating ideas for adults in 2026, offering innovative approaches that range from vintage-inspired aesthetics to modern, nature-infused designs. Each idea includes step-by-step instructions, material lists, and practical tips for achieving Pinterest-worthy results. The goal is to inspire adults to embrace creativity, elevate holiday décor, and produce eggs that are both visually stunning and meaningful. Whether you are a beginner seeking approachable techniques or an experienced crafter searching for challenging projects, this guide provides ideas for all skill levels.
From creating whimsical steampunk owls to delicately layering pressed botanicals, each idea merges artistry with seasonal charm. The techniques featured are designed to be beginner-friendly while allowing room for personalization and advanced detailing. You’ll discover how to select the right base eggs, prepare surfaces for painting or decoration, apply embellishments carefully, and preserve designs for lasting display. The detailed instructions also emphasize safety, proper handling, and tools management, ensuring that crafting remains enjoyable and stress-free.
Ultimately, adult Easter egg decorating is more than a seasonal activity—it’s a form of creative expression, a way to connect with tradition, and an opportunity to explore art at a miniature scale. By blending contemporary trends with timeless techniques, crafters can produce eggs that stand out on holiday tables, as gifts, or as collectible art pieces. This guide equips you with 13 highly creative, modern, and sophisticated Easter egg ideas, each carefully curated for adult enthusiasts seeking originality, elegance, and fun in 2026.
Idea 1: Steampunk Owl Easter Egg
Introduction
The Steampunk Owl Easter Egg combines the elegance of intricate mechanical design with the whimsical charm of owls. This technique is perfect for adults seeking a sophisticated, eye-catching Easter decoration. The steampunk style emphasizes metallic tones, miniature gears, and vintage accents, giving each egg a unique personality. This design not only challenges creativity but also transforms a simple egg into a display-worthy centerpiece. Using metallic paints, tiny cogs, and layered textures, crafters can achieve a realistic yet fantastical aesthetic that aligns perfectly with Pinterest trends for 2026. The process encourages precision and mindfulness, allowing crafters to slow down and enjoy each step. Perfect for table centerpieces, gifts, or artistic displays, this design blends traditional Easter themes with modern craftsmanship.

Definition / Explanation
A Steampunk Owl Easter Egg features a stylized owl motif enhanced with metallic gears, clock parts, and embossed patterns. It combines steampunk aesthetics (mechanical, industrial, vintage) with seasonal decor, resulting in a miniature sculpture that’s both creative and sophisticated.
Step-by-Step How-To
- Prepare a clean, dry egg (real, blown-out, or wooden).
- Apply a base coat of metallic bronze or copper paint.
- Sketch a simple owl outline lightly with pencil.
- Paint owl details using darker metallic shades and fine brushes.
- Attach miniature gears, watch parts, or metallic stickers with strong craft glue.
- Add shading and highlights to create depth.
- Seal with clear varnish to preserve details.
Materials / Tools Used
- Blown-out or wooden eggs
- Metallic acrylic paints (bronze, copper, silver)
- Fine detail brushes
- Mini gears, watch parts, metallic embellishments
- Craft glue
- Clear varnish
Idea 2: Pressed Botanical Easter Egg
Introduction
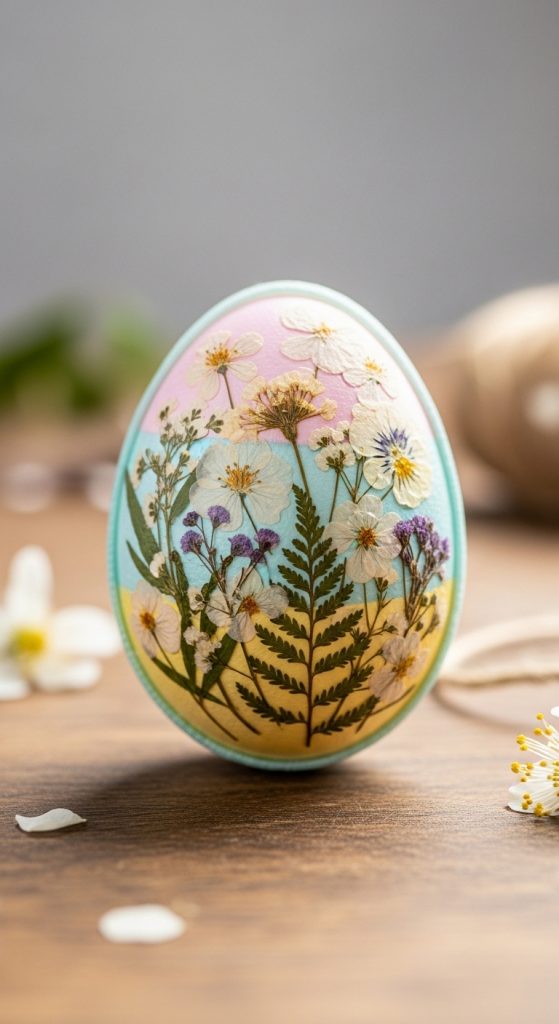
Pressed Botanical Easter Eggs bring nature indoors, offering a delicate, elegant alternative to conventional dyed eggs. This method involves carefully arranging real flowers, leaves, or petals on the egg’s surface, then sealing them with a translucent layer for a soft, sophisticated look. It’s a perfect technique for adults who appreciate minimalism, organic textures, and spring-inspired decor. Pressed botanical eggs are visually calming, Pinterest-worthy, and highly customizable, allowing crafters to use seasonal blooms or personal favorites. They also double as sustainable décor because real plants are biodegradable, making this design eco-friendly. The process encourages patience and attention to detail, resulting in eggs that look professionally crafted and ideal for table centerpieces, gifts, or display arrangements.
Definition / Explanation
A Pressed Botanical Easter Egg showcases natural plant elements arranged artistically and preserved under a protective seal. It highlights organic patterns, vibrant natural colors, and elegant simplicity.
Step-by-Step How-To
- Prepare clean, dry eggs.
- Press flowers or leaves between heavy books for 24–48 hours.
- Apply a thin layer of Mod Podge or clear adhesive to the egg.
- Carefully place pressed botanicals on the egg, adjusting placement.
- Smooth out air bubbles with a soft brush or fingertip.
- Seal with multiple layers of clear varnish for protection.
- Let dry completely between layers.
Materials / Tools Used
- Blown-out or wooden eggs
- Pressed flowers, leaves, petals
- Mod Podge or clear-drying glue
- Fine brushes
- Clear varnish or sealant
Idea 3: Metallic Ombre Easter Egg
Introduction
Metallic Ombre Easter Eggs offer a luxurious twist on classic color fades. This technique combines modern metallic paints with gradient blending, creating a shimmering effect that is visually stunning and highly shareable on Pinterest. Perfect for adults looking for sophisticated, contemporary designs, the metallic ombre effect adds depth, elegance, and vibrancy to holiday décor. The process is versatile, allowing crafters to use gold, silver, rose gold, or iridescent hues depending on their aesthetic preference. This style also encourages experimentation with brush strokes, layering, and blending, making it ideal for those seeking a relaxing, meditative craft experience. The resulting eggs are elegant, minimal, and perfect for centerpieces, gift arrangements, or decorative displays.

Definition / Explanation
Metallic Ombre Easter Eggs feature smooth gradient color transitions with metallic paint, combining reflective shimmer with subtle color blending.
Step-by-Step How-To
- Clean and dry the egg surface.
- Choose two or three complementary metallic shades.
- Apply the darkest shade at one end of the egg.
- Gradually blend in lighter shades toward the other end using a soft brush or sponge.
- Add highlights with fine metallic detail brushes if desired.
- Seal with clear gloss varnish for a polished finish.
Materials / Tools Used
- Blown-out or wooden eggs
- Metallic acrylic paints
- Soft blending brushes or sponges
- Fine detail brushes
- Clear gloss varnish
Idea 4: Geometric Patterned Easter Egg
Introduction
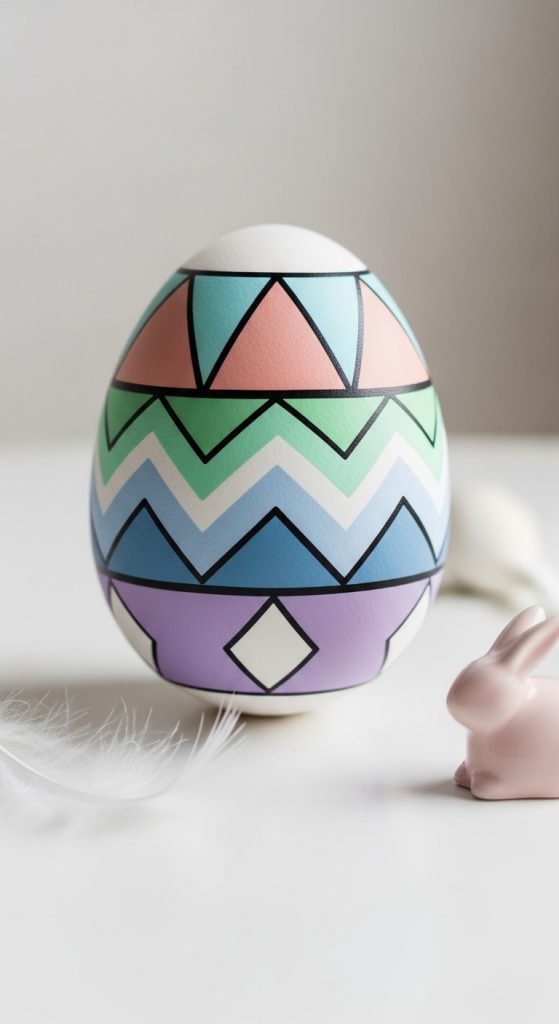
Geometric Patterned Easter Eggs combine symmetry, bold shapes, and precise lines to create a modern, minimalist aesthetic. Perfect for adults seeking sleek, trendy designs, these eggs are both contemporary and visually striking. Using painter’s tape or stencils, you can create triangles, diamonds, chevrons, or other repeating motifs, adding dimension and polish to your Easter décor. This technique encourages precision, planning, and creativity, making it a satisfying project for Pinterest enthusiasts. Geometric eggs work well in sets, with complementary colors and patterns, creating a visually cohesive table display. The design is versatile, allowing for both subtle and bold color combinations, and the eggs can be displayed individually or grouped as a centerpiece.
Definition / Explanation
Geometric Patterned Easter Eggs feature repeated shapes, lines, or abstract designs, combining symmetry and color contrast to achieve a modern, stylish appearance.
Step-by-Step How-To
- Prepare clean, dry eggs.
- Apply a base coat of your chosen color and allow to dry.
- Use painter’s tape or stencils to outline geometric shapes.
- Paint within the outlined shapes using contrasting colors.
- Remove tape carefully after paint dries.
- Touch up edges and apply clear varnish to seal.
Materials / Tools Used
- Blown-out or wooden eggs
- Acrylic paints in multiple colors
- Painter’s tape or stencils
- Fine detail brushes
- Clear varnish
Idea 5: Glitter Glam Easter Egg
Introduction
Glitter Glam Easter Eggs bring sparkle and luxury to seasonal décor, perfect for adults who love eye-catching, Pinterest-worthy designs. Using fine glitter or glitter paint, crafters can transform a simple egg into a dazzling piece of art. This method allows for endless creativity with color combinations, ombre effects, or even layered textures. Glitter eggs are perfect for modern table displays, Easter baskets, or gifting, adding a glamorous, festive touch. The process is straightforward but requires attention to detail to avoid clumping or uneven coverage, making it ideal for a relaxing, rewarding craft session.

Definition / Explanation
Glitter Glam Easter Eggs feature sparkling finishes applied with glitter powder, glue, or paint, creating reflective and luxurious surfaces.
Step-by-Step How-To
- Clean and dry the egg surface.
- Apply a thin layer of glue or clear medium over the egg.
- Sprinkle fine glitter evenly across the surface or roll the egg in a tray of glitter.
- Gently tap off excess glitter.
- Apply additional layers for a richer effect.
- Seal with clear varnish to prevent shedding.
Materials / Tools Used
- Blown-out or wooden eggs
- Fine glitter in desired colors
- Craft glue or Mod Podge
- Small tray or container
- Clear varnish
Idea 6: Marble Effect Easter Egg
Introduction
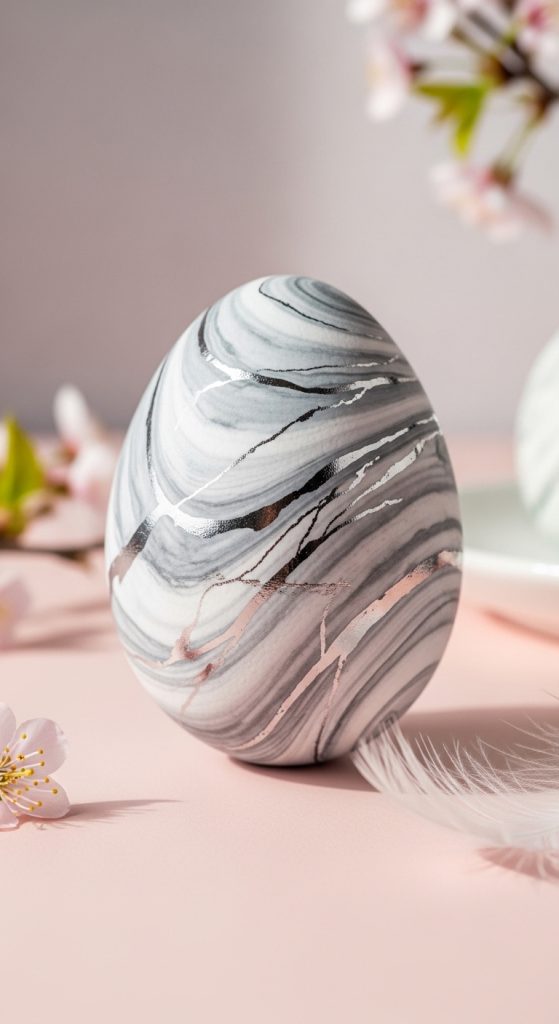
Marble Effect Easter Eggs are a sophisticated way to bring elegance and artistry to seasonal décor. This technique replicates the smooth, veined appearance of natural marble, producing visually stunning eggs that are perfect for adult crafters seeking advanced, Pinterest-worthy designs. The method encourages experimentation with colors, swirls, and layering, allowing each egg to become unique. Using acrylic paints or nail polish in swirling motions, you can achieve intricate marble patterns that are both modern and timeless. Marble Effect Eggs are ideal for minimalist décor, spring tablescapes, and upscale gift presentations. This technique also allows for mixing metallics with natural tones, creating luxurious effects that make the eggs stand out among traditional dyed versions.
Definition / Explanation
Marble Effect Easter Eggs imitate the look of natural marble with swirling, layered paint patterns that create depth, movement, and elegance.
Step-by-Step How-To
- Prepare clean, dry eggs.
- Fill a shallow container with water (room temperature).
- Drop thin layers of acrylic paint or nail polish on the surface.
- Swirl colors gently with a toothpick or skewer.
- Dip the egg slowly into the water to pick up the marbled pattern.
- Remove and let dry completely.
- Seal with clear varnish for a glossy finish.
Materials / Tools Used
- Blown-out or wooden eggs
- Acrylic paints or nail polish in multiple colors
- Shallow container with water
- Toothpick or skewer
- Clear varnish
Idea 7: Metallic Leaf Easter Egg
Introduction x
Metallic Leaf Easter Eggs offer a luxurious, textured design that adds a touch of sophistication to adult Easter décor. Using gold, silver, or copper leaf, crafters can create reflective, intricate patterns that shimmer beautifully in natural light. This technique elevates simple eggs into decorative art pieces suitable for display, gifting, or holiday tables. Applying metallic leaf encourages precision and patience, as the delicate sheets must be carefully handled to achieve a smooth, cohesive surface. This style blends traditional craftsmanship with contemporary elegance, making it a top choice for Pinterest-inspired décor in 2026.

Definition / Explanation
Metallic Leaf Easter Eggs feature thin metal leaf sheets adhered to the egg surface, creating reflective, luxurious patterns that highlight contours and add dimension.
Step-by-Step How-To
- Prepare a clean, dry egg.
- Apply a thin layer of adhesive (leaf glue or Mod Podge).
- Carefully place metal leaf sheets on the sticky surface.
- Smooth gently using a soft brush or fingertip.
- Trim excess edges and add more layers if desired.
- Seal with clear varnish to preserve the metallic sheen.
Materials / Tools Used
- Blown-out or wooden eggs
- Gold, silver, or copper leaf sheets
- Adhesive (Mod Podge or leaf glue)
- Soft brush
- Clear varnish
Idea 8: Watercolor Drip Easter Egg
Introduction
Watercolor Drip Easter Eggs are a creative, painterly approach that transforms eggs into miniature abstract artworks. The flowing, unpredictable drip patterns create a casual yet elegant effect that is perfect for adult decorators seeking a contemporary look. This technique encourages experimentation with colors, transparency, and layering, making each egg a one-of-a-kind piece. Watercolor drip eggs are ideal for pastel spring décor, artistic table centerpieces, or Pinterest-inspired craft projects. The method is forgiving, allowing for both subtle and vibrant outcomes, and emphasizes the beauty of imperfection and organic design.

Definition / Explanation
Watercolor Drip Easter Eggs feature fluid, flowing colors applied in drips or washes, creating soft, blended, artistic effects reminiscent of watercolor paintings.
Step-by-Step How-To
- Prepare clean, dry eggs.
- Thin watercolor paints with water for easy flow.
- Hold the egg upright and apply paint at the top, letting it drip naturally.
- Rotate the egg to create flowing patterns.
- Layer multiple colors for depth.
- Let dry completely.
- Seal with clear varnish for durability.
Materials / Tools Used
- Blown-out or wooden eggs
- Watercolor paints or highly diluted acrylics
- Paintbrushes
- Water container
- Clear varnish
Idea 9: Lace Embellished Easter Egg
Introduction
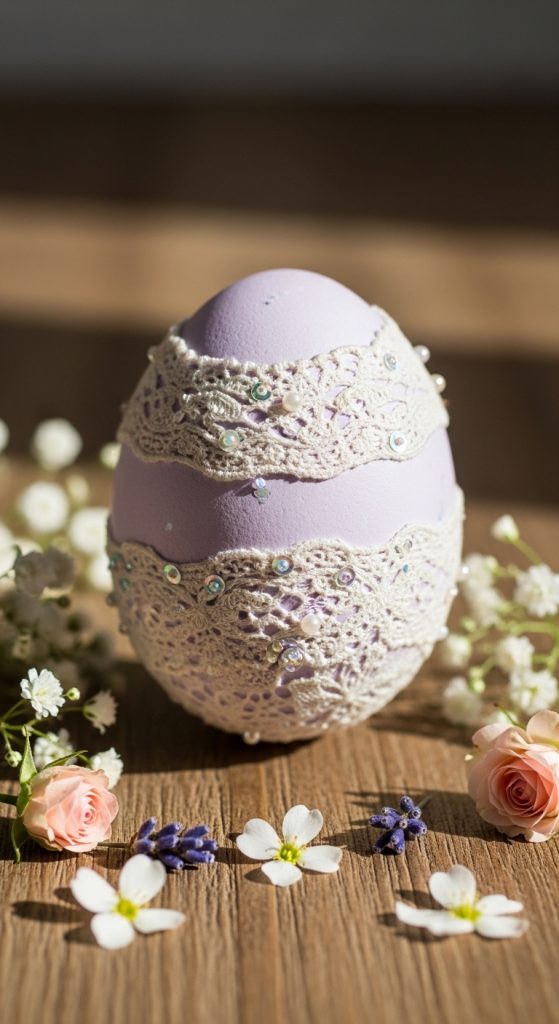
Lace Embellished Easter Eggs create delicate, romantic designs that are perfect for sophisticated décor. Using lace trims or fabric pieces, crafters can wrap eggs to achieve intricate patterns and textures. This method is highly tactile and encourages creativity with layering, glue placement, and complementary paint or dye backgrounds. Lace eggs offer a vintage, feminine aesthetic, ideal for adult Easter décor, Pinterest displays, or gifts that exude elegance. The process is meditative, emphasizing detail and precision, and results in eggs that appear professionally handcrafted.
Definition / Explanation
Lace Embellished Easter Eggs feature decorative lace or fabric applied to the surface, creating intricate, textured patterns and an elegant, vintage-inspired aesthetic.
Step-by-Step How-To
- Prepare clean, dry eggs.
- Cut lace or fabric strips to fit the egg.
- Apply thin layers of glue to the egg surface.
- Carefully wrap or place lace on the egg, smoothing gently.
- Trim excess edges and adjust pattern placement.
- Optionally, add metallic paint highlights or beads.
- Seal with clear varnish to protect the lace.
Materials / Tools Used
- Blown-out or wooden eggs
- Lace or fabric strips
- Craft glue or Mod Podge
- Scissors
- Optional beads or metallic paints
- Clear varnish
Idea 10: Polka Dot Minimalist Easter Egg
Introduction
Polka Dot Minimalist Easter Eggs embrace simplicity, modern design, and playful elegance. This style uses clean, precise dots arranged in patterns over a solid base color, producing a striking, Pinterest-worthy aesthetic. It’s ideal for adults who enjoy modern décor, subtle color contrasts, and creative expression without overwhelming detail. Polka dot eggs can incorporate pastel tones, metallic paints, or even monochrome palettes, making them versatile for various table arrangements or gift sets. The method encourages patience and precision, resulting in clean, repeatable designs that look professional and visually appealing.
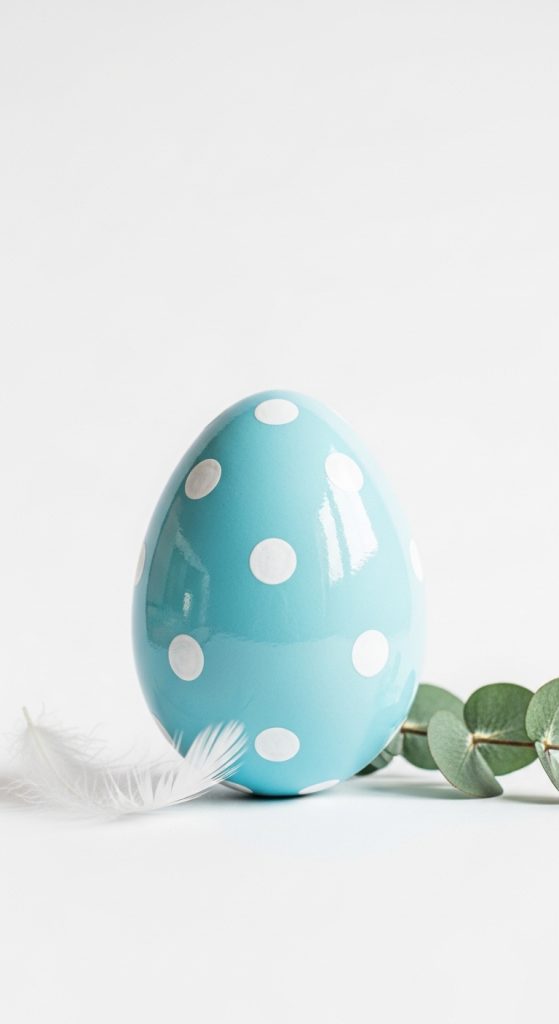
Definition / Explanation
Polka Dot Minimalist Easter Eggs feature small, regularly spaced dots in contrasting colors over a solid base, creating a modern, elegant, and playful appearance.
Step-by-Step How-To
- Prepare clean, dry eggs.
- Paint a base coat in desired color and let dry.
- Use a small brush or dotting tool to create evenly spaced dots in a contrasting color.
- Allow dots to dry fully.
- Touch up any uneven dots with fine brushes.
- Seal with clear varnish for a polished, lasting finish.
Materials / Tools Used
- Blown-out or wooden eggs
- Acrylic paints in base and accent colors
- Dotting tools or fine brushes
- Clear varnish
Idea 11: Steampunk Gear Cluster Easter Egg
Introductionx
The Steampunk Gear Cluster Easter Egg takes the industrial-chic aesthetic of steampunk and turns it into a visually striking miniature masterpiece. Unlike the single-owl motif, this design focuses on clusters of gears, tiny cogs, and metallic embellishments, creating a mechanical, textured surface. This style is perfect for adults who enjoy highly detailed, hands-on crafting and want to experiment with 3D elements on their eggs. The combination of bronze, copper, and silver tones adds depth and sophistication, making these eggs ideal for Pinterest displays, holiday table centerpieces, or gifts for design enthusiasts. Crafting a gear cluster egg encourages patience and precision, providing a satisfying, meditative creative process.
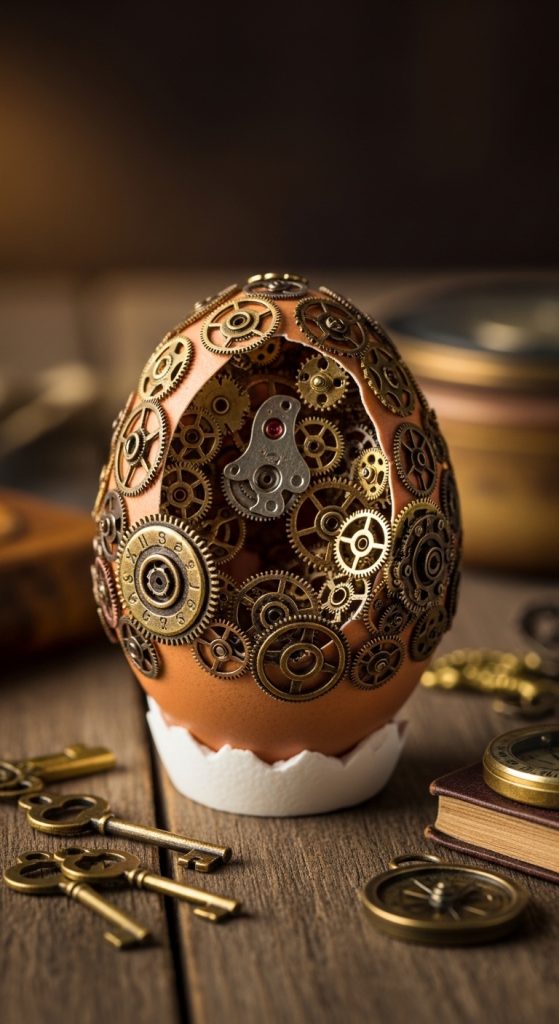
Definition / Explanation
Steampunk Gear Cluster Eggs feature multiple metallic gears, cogs, and embellishments grouped to create depth and dimension, emphasizing the industrial aesthetic of steampunk design.
Step-by-Step How-To
- Prepare a clean, dry blown-out or wooden egg.
- Apply a base coat in bronze or copper metallic paint.
- Arrange miniature gears and cogs in small clusters around the egg.
- Secure each piece with strong craft glue.
- Use darker paint or antique wax to add shading between gears.
- Optional: add tiny watch faces or chains for extra detail.
- Seal with clear varnish to preserve the design.
Materials / Tools Used
- Blown-out or wooden eggs
- Metallic paints (bronze, copper, silver)
- Miniature gears, cogs, small chains
- Craft glue
- Fine brushes for shading
- Clear varnish
Idea 12: Glow-in-the-Dark Easter Egg
Introduction
Glow-in-the-Dark Easter Eggs add a playful, futuristic twist to traditional designs, perfect for adults looking for something unique and fun. Using phosphorescent paint, these eggs can softly glow in the dark, creating a magical effect during evening gatherings or Easter hunts. This technique combines modern craft materials with simple painting skills, making it beginner-friendly yet striking. Glow-in-the-Dark Eggs work well with minimalist designs, geometric patterns, or whimsical motifs, offering endless creative possibilities. They are particularly Pinterest-worthy for their “wow” factor, as the glowing element elevates the egg from ordinary décor to an interactive art piece.
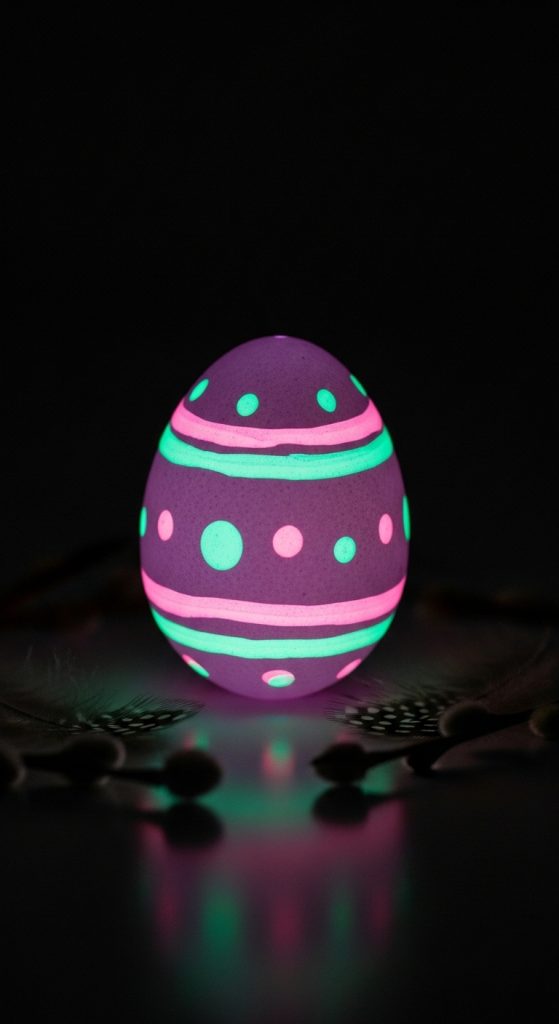
Definition / Explanation
Glow-in-the-Dark Easter Eggs are decorated with phosphorescent or luminescent paints that absorb light and emit a soft glow in darkness, enhancing holiday ambiance.
Step-by-Step How-To
- Prepare clean, dry eggs.
- Apply a base coat of light-colored acrylic paint to enhance glow.
- Using glow-in-the-dark paint, create stripes, dots, or full coverage.
- Layer paint to intensify glowing effect.
- Let dry completely under natural or artificial light.
- Seal with clear varnish to protect the paint.
- Test the glow in a darkened room for best effect.
Materials / Tools Used
- Blown-out or wooden eggs
- Glow-in-the-dark paint
- Base color acrylic paints
- Fine detail brushes
- Clear varnish
Idea 13: Mixed Media Easter Egg (Pressed Botanicals + Metallic Accents)
Introduction
The Mixed Media Easter Egg combines two sophisticated techniques—pressed botanicals and metallic accents—into a single, luxurious design. This approach allows adults to explore texture, color, and layering, creating a visually complex and elegant egg. Using real flowers and leaves alongside gold or silver foil highlights, crafters achieve a harmonious blend of natural and modern aesthetics. This style is ideal for Pinterest displays, high-end Easter décor, or collectible art pieces. The technique emphasizes creativity and careful planning, resulting in a truly unique decorative egg.
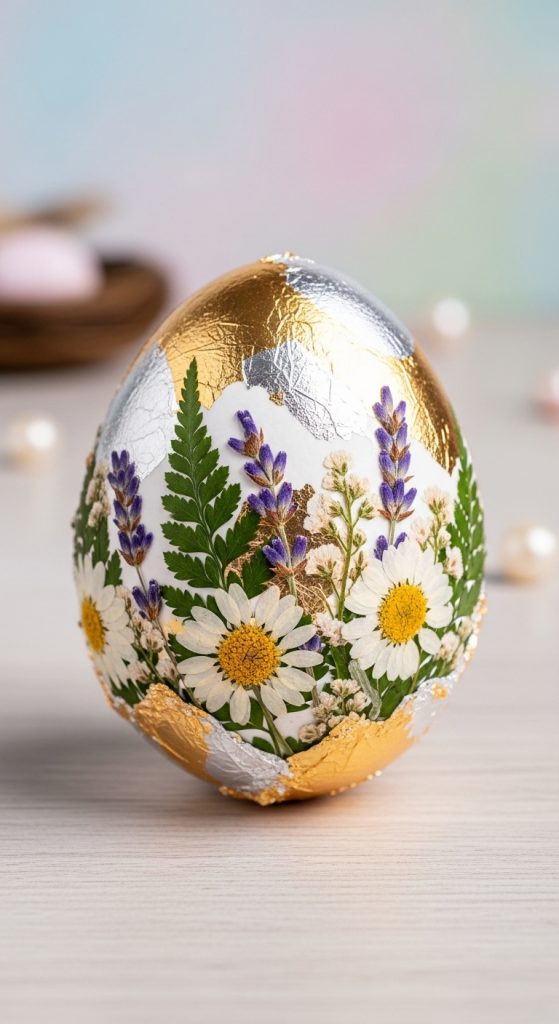
Definition / Explanation
Mixed Media Easter Eggs incorporate multiple decorative techniques, such as natural pressed botanicals combined with metallic paints or foil, producing a layered, sophisticated look.
Step-by-Step How-To
- Prepare a clean, dry egg.
- Apply a base coat of soft pastel acrylic paint.
- Arrange and glue pressed flowers or leaves onto the egg.
- Carefully apply metallic leaf or paint accents around the botanical elements.
- Touch up details with fine brushes for highlights or shadows.
- Seal the entire egg with clear varnish to protect both botanical and metallic elements.
- Let dry completely before display.
Materials / Tools Used
- Blown-out or wooden eggs
- Pressed flowers and leaves
- Pastel acrylic paints
- Metallic leaf or paints (gold, silver, copper)
- Craft glue or Mod Podge
- Fine brushes
- Clear varnish