Evenings are when a patio truly comes alive.
During the day, your patio may function as a simple outdoor extension of your home — a place for morning coffee, quick lunches, or casual seating. But when the sun begins to set, your patio has the potential to transform into something magical. With the right lighting, it can feel like a romantic European courtyard, a cozy boho retreat, a modern outdoor lounge, or a luxurious backyard escape worthy of a Pinterest board.
Lighting is not just about brightness. It is about emotion. It shapes how a space feels. It influences whether guests want to linger, whether conversations flow easily, whether the atmosphere feels intimate or exposed. Harsh overhead floodlights can make a patio feel cold and sterile. But layered, warm lighting can create softness, depth, and visual warmth that instantly elevates the experience.

Aesthetic patio lighting for evenings follows one core principle: layering. Instead of relying on one central light source, beautiful patios combine multiple lighting types at different heights and intensities. Overhead ambient glow, mid-level decorative lighting, and low accent lighting work together to create dimension. This layering prevents harsh shadows while avoiding overexposure.
Another critical element is color temperature. Warm white light (around 2700K–3000K) produces a golden, inviting tone that enhances natural materials like wood, stone, rattan, and greenery. Cool-toned lighting, on the other hand, often feels industrial and uninviting in residential outdoor settings. If your goal is cozy, romantic, or modern-luxury aesthetics, warm light is essential.
Scale and placement also matter. Even small patios can feel grand when lights are positioned intentionally. Overhead string lights create enclosure. Lantern clusters anchor corners. Uplighting adds drama. Candles bring intimacy. Wall sconces add architectural polish. The key is creating focal points instead of evenly flooding the entire space.
You also don’t need a huge budget. Many aesthetic patio lighting setups can be created with affordable outdoor-rated lights, solar fixtures, and battery-operated solutions. What makes them look expensive is thoughtful arrangement, consistency in style, and cohesive color tones.
In this guide, you’ll discover 10 highly detailed aesthetic patio lighting ideas designed specifically for evenings. These ideas are practical, beginner-friendly, and fully adaptable to small patios, balconies, covered decks, pergolas, and open backyard spaces.
Each section will walk you through:
- What the lighting style is
- Why it works aesthetically
- Exactly how to install or style it
- Materials required
- Professional styling tips for a Pinterest-worthy finish
Let’s transform your patio into a glowing sanctuary.
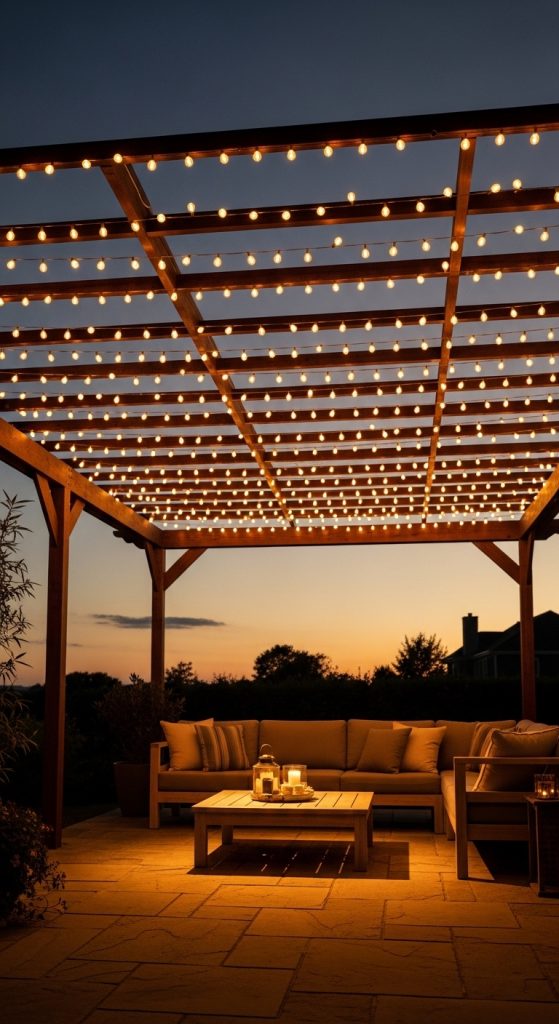
1. Full Overhead String Light Canopy for a Starry Night Effect
Introduction
An overhead string light canopy is one of the most transformative patio lighting designs you can create. It instantly defines the space, visually lowers high ceilings, and makes open patios feel intimate and enclosed. When installed properly, it mimics the feeling of sitting under a sky full of glowing stars.
Unlike randomly draped lights, a structured canopy layout feels intentional and elevated. Even spacing creates a polished, designer-inspired look. The soft overhead glow eliminates harsh shadows while still allowing you to see comfortably. It works beautifully for outdoor dining setups, lounge areas, and even minimalist patios that need warmth.
This lighting style is especially powerful because it frames the entire patio as a dedicated “room.” It visually separates your outdoor seating from the rest of the yard. Whether you have a pergola, wooden beams, or open space with poles, this is one of the most impactful evening upgrades you can install.
What It Is & Why It Works
A structured string light canopy involves suspending multiple parallel strands of warm white outdoor string lights overhead to create even, ambient illumination.
It works because:
- It provides consistent ambient light.
- It softens the entire space.
- It visually encloses open patios.
- It photographs beautifully at night.
Step-by-Step How to Create It
- Measure your patio width and length.
- Choose commercial-grade outdoor string lights with warm bulbs.
- Install anchor points (eye hooks, poles, or pergola beams).
- Start from one side and run strands evenly across.
- Keep equal spacing between rows (12–18 inches apart).
- Slightly tension each strand to prevent sagging.
- Hide cords along beams or corners.
- Connect to a timer for automatic evening activation.
Materials Needed
- Outdoor-rated warm string lights
- Eye hooks or mounting hardware
- Poles (if no structure exists)
- Zip ties or guide wires
- Outdoor extension cord
- Timer switch
Styling Tips
- Avoid mixing bulb styles.
- Keep all bulbs same temperature.
- Add dimmer for extra ambiance.
- Pair with low lanterns for layered effect.
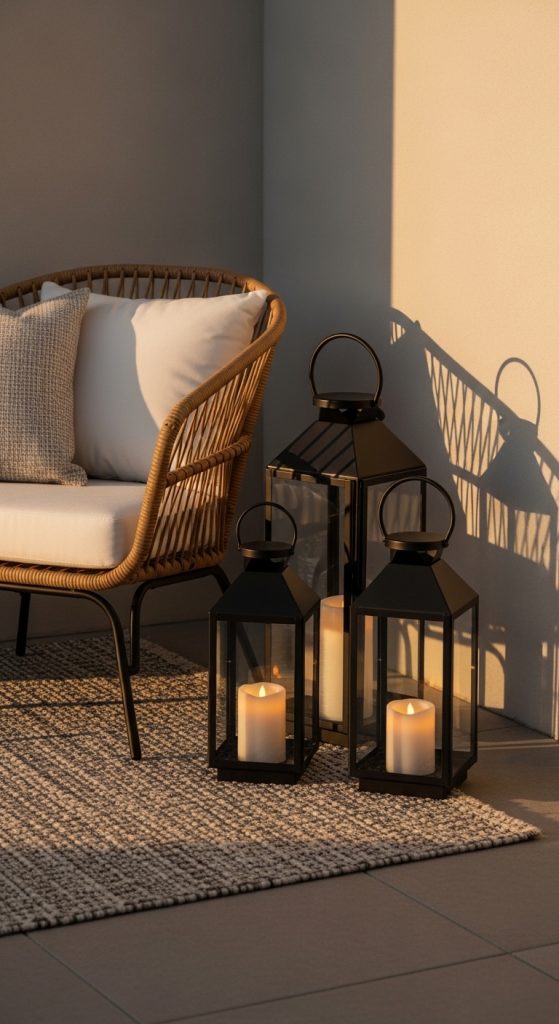
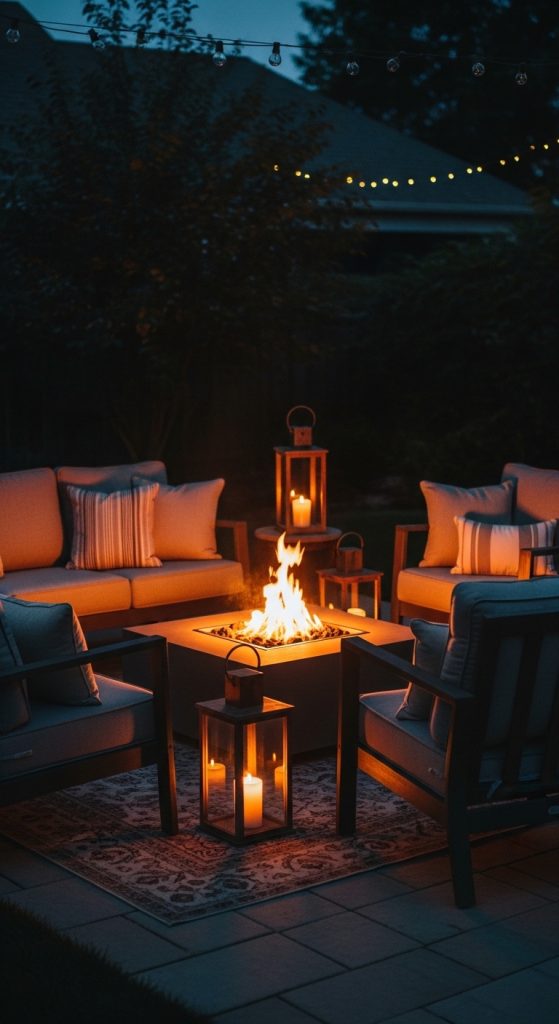
2. Layered Lantern Corners for Depth and Warmth
Introduction
If you want your patio to look curated rather than basic, lantern layering is essential. Corners often feel dark and forgotten at night. By placing lantern clusters strategically, you create soft light pockets that add dimension and luxury.
Lantern lighting feels intimate. Unlike overhead lighting, which spreads light widely, lanterns localize glow. This creates cozy visual zones — perfect for conversation areas or reading corners.
Mixing sizes is the key. One large lantern alone can look empty. But combining three in staggered heights creates intentional styling. The shadows cast through metal or woven patterns also add beautiful texture on surrounding surfaces.
What It Is & Why It Works
Lantern clusters are grouped decorative light fixtures placed at floor level to create layered ambient lighting.
They work because:
- They add height variation.
- They soften dark corners.
- They create visual interest.
- They enhance cozy aesthetics.
Step-by-Step How to Style Lantern Clusters
- Choose 3–5 lanterns in varying sizes.
- Select a cohesive material (black metal, rattan, brass).
- Insert LED flicker candles.
- Place tallest lantern at back.
- Stagger medium and small in front.
- Position near seating or entry point.
- Turn on just after sunset.
Materials Needed
- Decorative outdoor lanterns
- LED candles (warm flicker)
- Batteries or rechargeable units
Styling Tips
- Use odd numbers for visual balance.
- Avoid overcrowding.
- Keep 1–2 feet of breathing space around cluster.
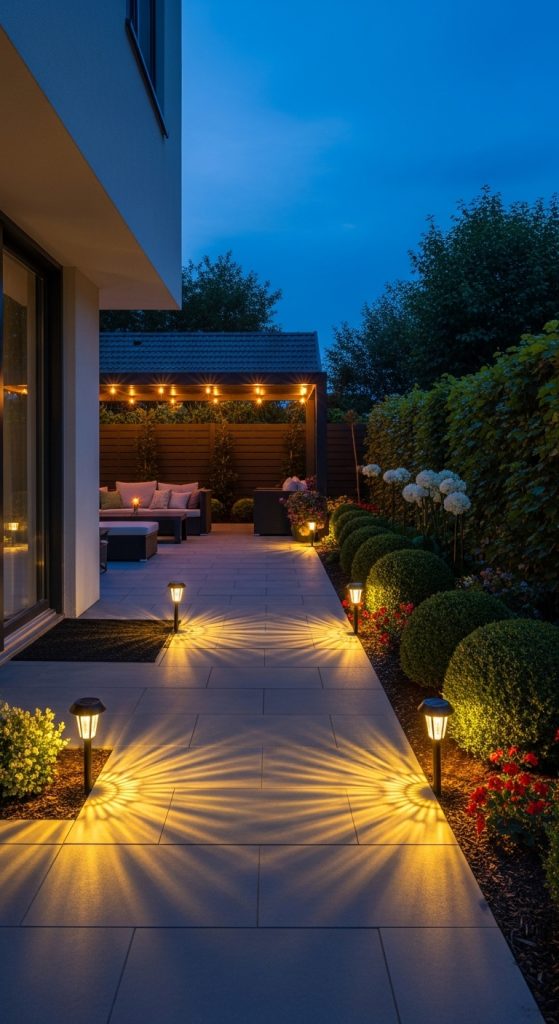
3. Soft Solar Pathway Lighting for a Glowing Garden Transition
Introduction
If your patio connects to a garden, lawn, or walkway, one of the most overlooked yet transformative lighting upgrades is subtle solar pathway lighting. While many people focus only on the seating area, the transition between spaces is what makes a patio feel complete and thoughtfully designed. Soft pathway lighting creates a gentle glow that guides movement while adding a magical, resort-style atmosphere.
Instead of harsh stake lights that overpower the space, aesthetic patio pathway lighting focuses on warm tones and low-profile fixtures. The goal is to illuminate the ground subtly, not spotlight it. When spaced evenly, these lights create rhythm and flow, visually pulling the eye from one area to another.
This lighting style is especially useful for evening gatherings. Guests can move safely without needing bright overhead lights. It also adds depth beyond the patio itself, making your outdoor space feel larger and more layered.
What It Is & Why It Works
Solar pathway lighting consists of sun-powered, low-level light fixtures placed along walkways or garden edges.
It works because:
- It enhances safety without ruining ambiance.
- It adds dimension beyond the patio.
- It creates a luxury landscape effect.
- It requires no wiring or complex installation.
Step-by-Step How to Install It
- Choose warm white solar lights (avoid cool white).
- Measure the length of your walkway.
- Space lights 3–4 feet apart for balance.
- Push stakes firmly into the ground.
- Ensure solar panels receive direct sunlight during the day.
- Turn on at dusk and adjust placement if needed.
Materials Needed
- Warm solar pathway lights
- Measuring tape
- Garden gloves
Styling Tips
- Stick to one finish (matte black or brushed brass).
- Align lights evenly for a clean, polished look.
- Avoid placing them too close together.
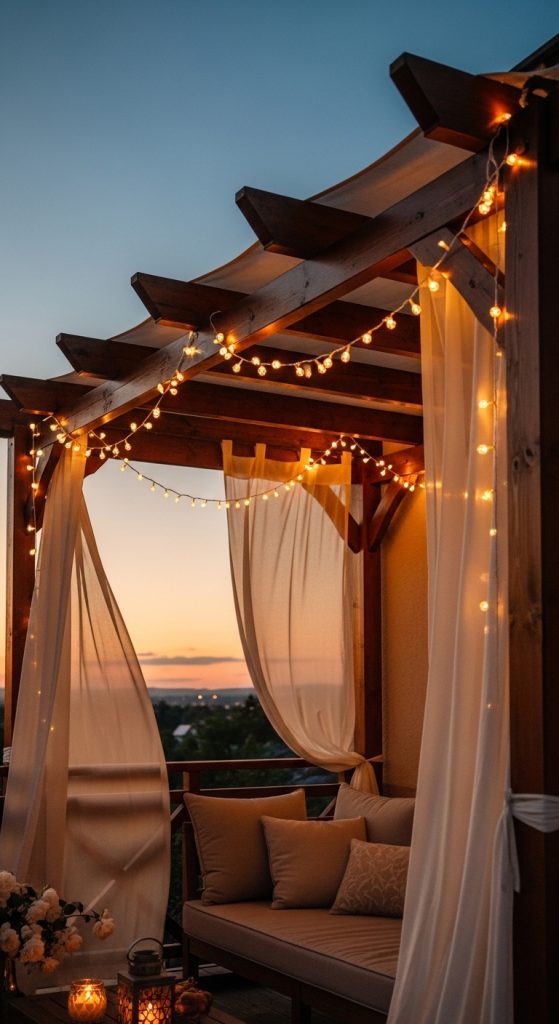
4. Draped Pergola Fairy Lights for a Romantic Glow
Introduction
If your patio includes a pergola or overhead beams, draping fairy lights across the structure creates one of the most romantic evening atmospheres possible. Unlike structured string light canopies, fairy lights offer a delicate, twinkling glow that feels intimate and dreamy.
Fairy lights are smaller and more subtle than standard bulbs. When woven through beams or layered across fabric drapes, they create a soft light curtain effect. The result feels European-inspired, cozy, and incredibly photogenic.
This lighting style works especially well for smaller patios or intimate seating areas. It adds overhead glow without overwhelming the space. The softness of micro lights diffuses beautifully against wood, white beams, or sheer curtains.
What It Is & Why It Works
Fairy lights are thin, flexible light strands with small micro bulbs designed for decorative ambient lighting.
They work because:
- They provide gentle, diffused illumination.
- They add romantic atmosphere.
- They blend seamlessly into structures.
- They are lightweight and flexible.
Step-by-Step Installation
- Select outdoor-rated warm micro fairy lights.
- Begin wrapping from one corner beam.
- Drape loosely across beams in gentle curves.
- Secure with clear outdoor clips.
- Conceal cords along posts.
- Connect to timer for automatic glow.
Materials Needed
- Outdoor fairy lights
- Clear clips
- Extension cord
- Timer
Styling Tips
- Avoid tight wrapping; allow soft draping.
- Pair with sheer curtains for extra diffusion.
- Keep bulb color consistent.
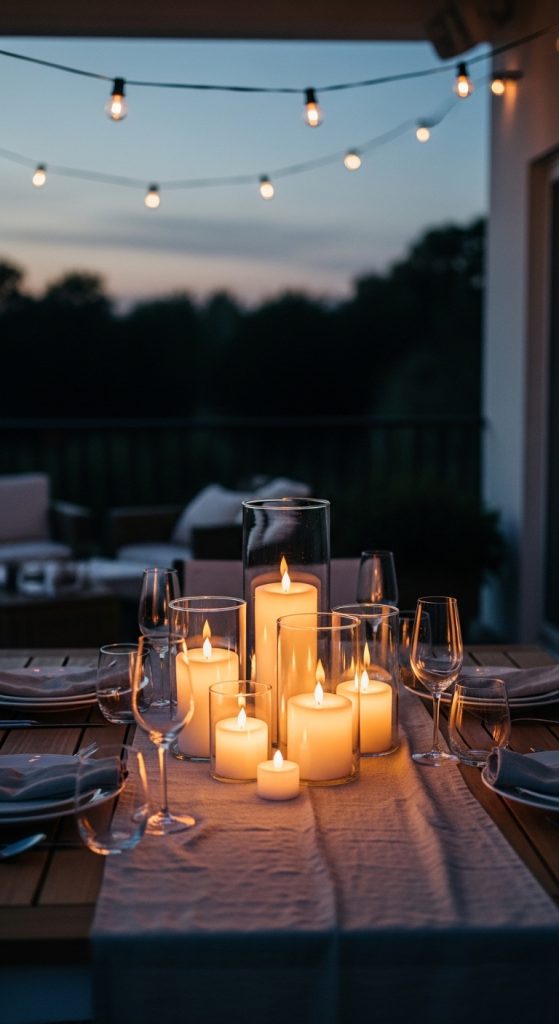
5. Layered LED Candle Tablescapes for Intimate Dining
Introduction
There is no lighting more intimate than candlelight. However, outdoor wind and safety concerns often make real candles impractical. LED candles offer the same warm flicker while being safe and reusable.
When grouped intentionally, LED candles create a luxurious tablescape. Instead of placing one candle in the center, layering multiple heights creates depth. Glass hurricanes amplify the glow and protect against breeze.
This lighting style is perfect for patio dinner parties, date nights, or slow evenings with family. It focuses light directly on the dining table, allowing overhead lighting to remain dim and atmospheric.
What It Is & Why It Works
LED candles mimic real flame flicker while being battery-powered and safe for outdoor use.
They work because:
- They create instant intimacy.
- They are wind-safe.
- They layer beautifully.
- They enhance table decor.
Step-by-Step Setup
- Choose 3–7 LED candles in varying heights.
- Place inside glass hurricane holders.
- Arrange in the center of table.
- Add greenery or stones at base.
- Keep overhead lighting dim.
Materials Needed
- LED candles
- Glass hurricane holders
- Decorative tray or runner
Styling Tips
- Use warm flicker style.
- Avoid mixing white and ivory tones.
- Use odd numbers for balance.
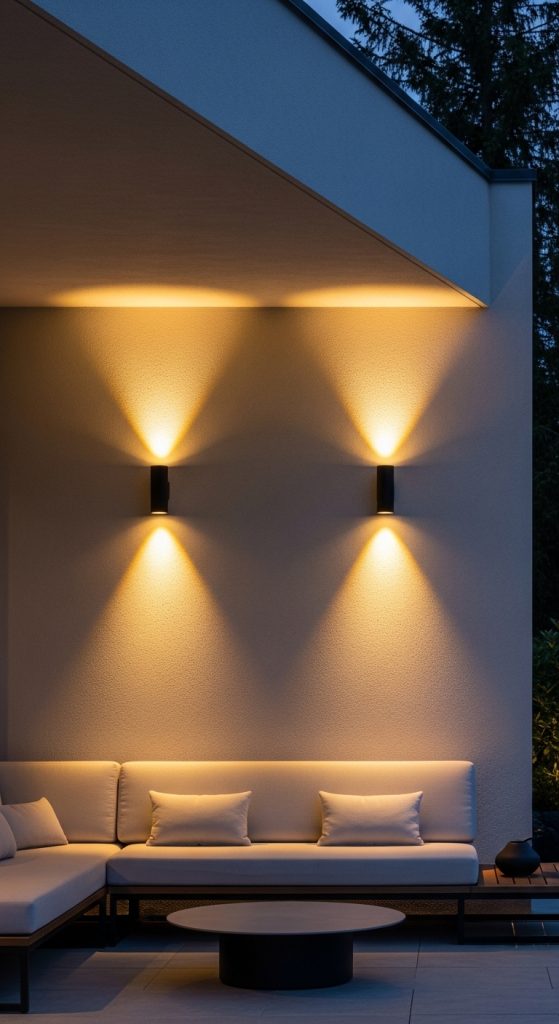
6. Architectural Wall Sconce Lighting for a Modern Finish
Introduction
Wall sconces instantly elevate a patio’s design. They provide structured, architectural lighting that feels intentional and permanent. Unlike temporary decorative lights, sconces create a polished, high-end look.
They are especially effective for covered patios with walls. Up-and-down sconces create beautiful vertical light beams, adding dramatic shadows and depth.
This lighting is ideal for modern or contemporary patio designs but can also suit traditional spaces depending on fixture style.
What It Is & Why It Works
Wall sconces are mounted fixtures that provide vertical accent lighting on exterior walls.
They work because:
- They highlight architecture.
- They provide functional brightness.
- They look permanent and refined.
- They balance decorative lighting.
Step-by-Step Installation
- Choose outdoor-rated sconces.
- Decide placement beside doors or evenly spaced.
- Hire electrician if wiring needed.
- Install warm LED bulbs.
- Test brightness at night.
Materials Needed
- Outdoor wall sconces
- Warm LED bulbs
- Installation hardware
Styling Tips
- Install at eye level.
- Choose matte black for modern look.
- Avoid overly bright bulbs.
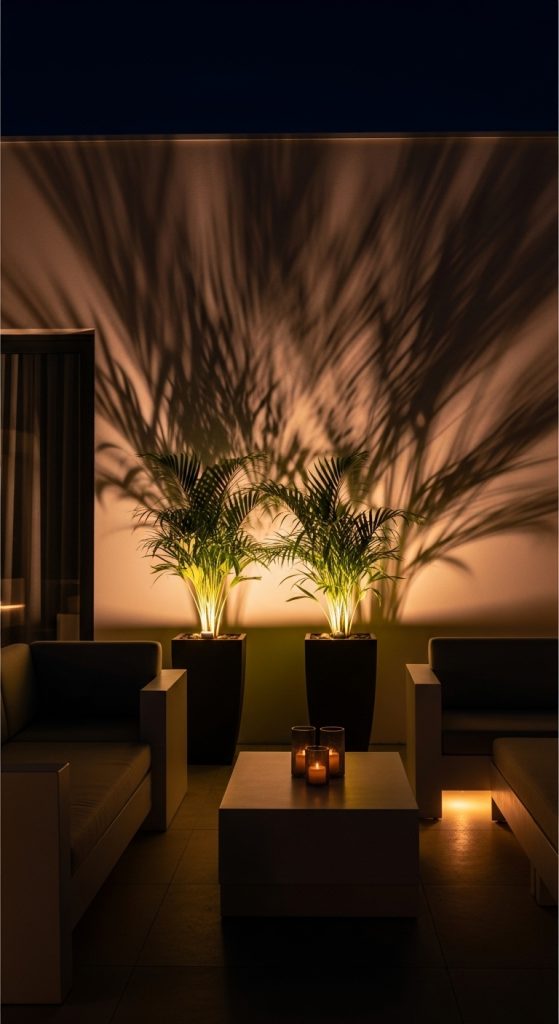
7. Under-Planter Uplighting for Dramatic Shadows
Introduction
Uplighting is one of the most underrated patio lighting techniques. By placing lights at ground level and angling them upward, you create dramatic shadows that add depth and sophistication.
Tall plants and textured walls look especially stunning when illuminated from below. This technique is common in luxury resorts because it creates dimension without overwhelming brightness.
It works beautifully for minimalist patios where subtle drama enhances the overall aesthetic.
What It Is & Why It Works
Uplighting directs light upward to highlight plants and surfaces.
It works because:
- It adds vertical dimension.
- It creates shadow play.
- It enhances greenery.
- It feels high-end.
Step-by-Step Setup
- Choose small outdoor LED spotlights.
- Place behind large planters.
- Angle upward gently.
- Conceal cords.
- Adjust angle at night.
Materials Needed
- Outdoor LED spotlights
- Extension cord
- Cable clips
Styling Tips
- Use warm bulbs.
- Avoid direct glare.
- Highlight only 1–2 key plants.
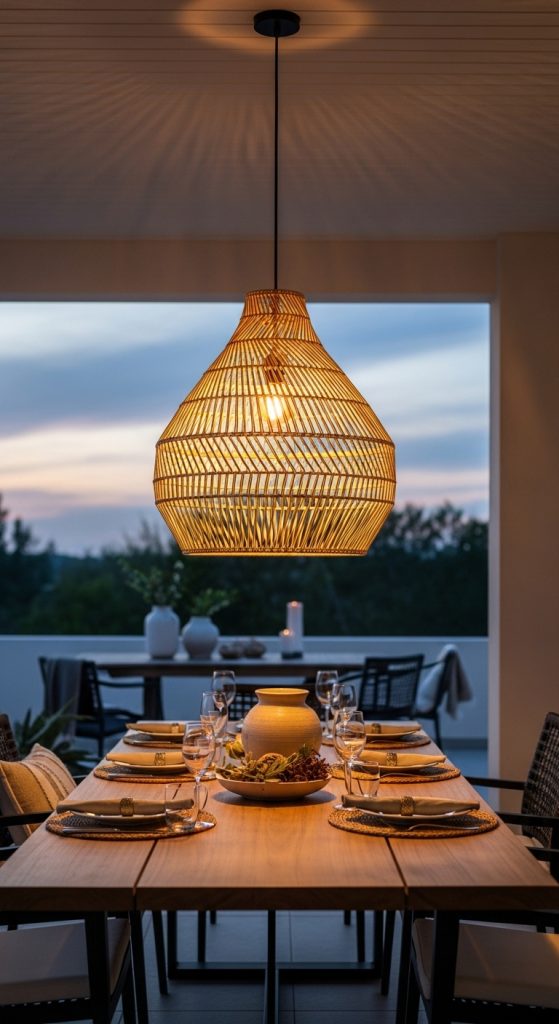
8. Statement Hanging Pendant Over Dining Area
Introduction
A hanging pendant transforms an outdoor dining area into an extension of your interior design. It defines the table visually and provides focused lighting.
Rattan pendants create boho warmth. Black metal creates modern elegance. Clear glass offers classic appeal.
This lighting anchors the space and prevents reliance on scattered decorative lights alone.
What It Is & Why It Works
Outdoor pendant lighting is a suspended fixture providing direct task lighting.
It works because:
- It defines the dining zone.
- It provides focused illumination.
- It enhances design cohesion.
Step-by-Step Installation
- Choose weather-resistant pendant.
- Center above table.
- Install securely.
- Use warm LED bulb.
- Test at night.
Materials Needed
- Outdoor pendant
- Warm LED bulb
- Mounting kit
Styling Tips
- Hang 30–36 inches above table.
- Keep scale proportional.
9. Fire Pit Lighting Layering for Cozy Evenings
Introduction
Fire pits already provide natural glow, but layering subtle lighting around them enhances comfort and visibility.
Instead of overpowering the firelight, add dim lanterns or low string lights to balance surrounding darkness.
This creates a cozy, storytelling atmosphere.
What It Is & Why It Works
Layered fire pit lighting combines flame glow with soft surrounding illumination.
It works because:
- It prevents harsh darkness.
- It maintains warmth.
- It improves visibility.
Step-by-Step Setup
- Arrange seating around fire.
- Add lanterns on outer edges.
- Keep brightness low.
- Turn off overhead lights.
Materials Needed
- Fire pit
- Lanterns
- LED candles
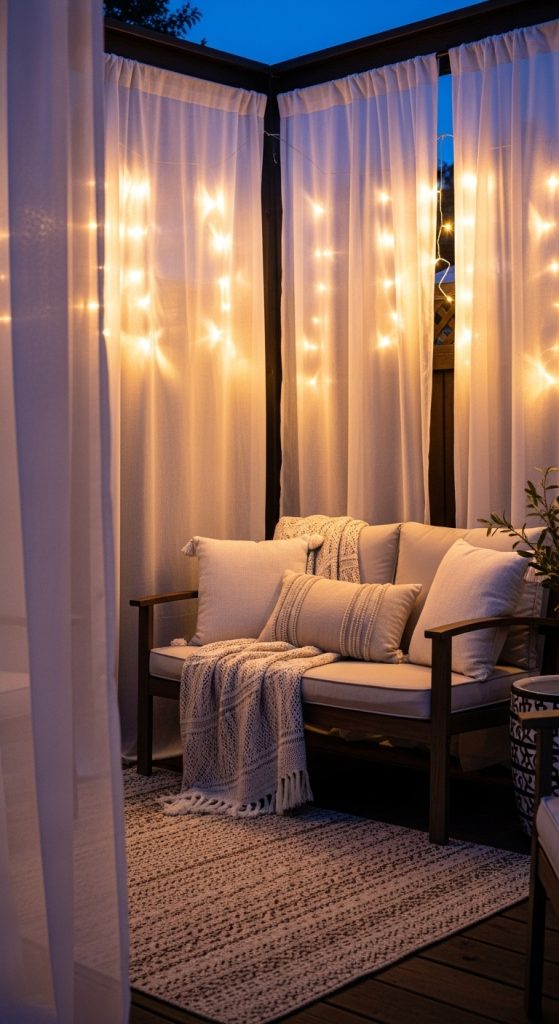
10. Sheer Curtain Backlit Glow for Dreamy Ambiance
Introduction
Combining sheer curtains with hidden fairy lights creates one of the most romantic patio atmospheres possible. The fabric diffuses light, softening its intensity and creating a glowing wall effect.
This works beautifully for pergolas or corner seating areas.
The effect feels luxurious and serene.
What It Is & Why It Works
Backlit curtains combine fabric with concealed lighting for diffused glow.
It works because:
- It softens harsh light.
- It adds movement and texture.
- It creates privacy.
Step-by-Step Setup
- Hang outdoor sheer curtains.
- Attach fairy lights behind fabric.
- Secure wires discreetly.
- Turn on at dusk.
Materials Needed
- Outdoor sheer curtains
- Fairy lights
- Curtain rod
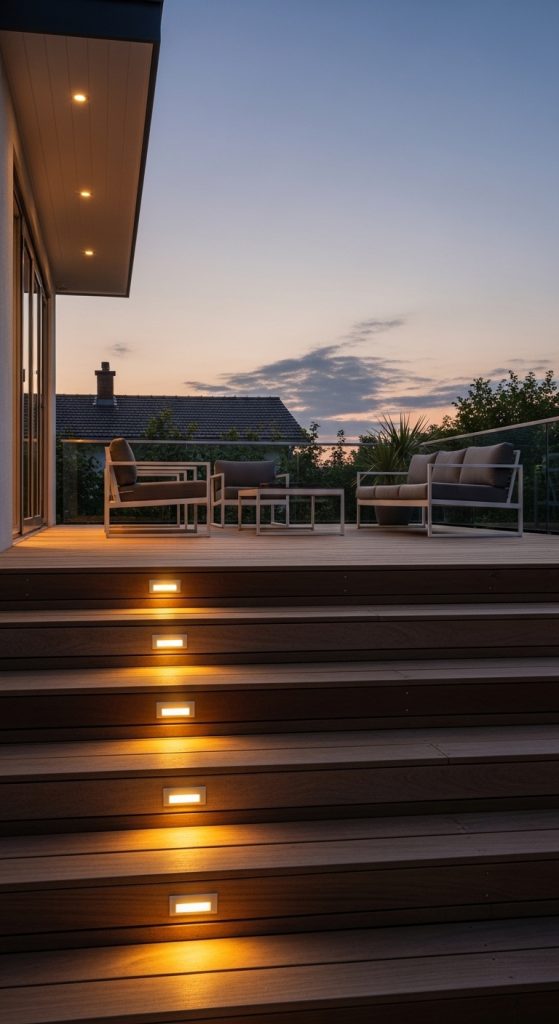
11. Recessed Deck Step Lighting for a Subtle Luxury Glow
Introduction
Recessed step lighting is one of the most refined and luxurious ways to illuminate a patio for evenings. Unlike visible fixtures, recessed lights are built directly into deck steps or stair risers, creating a seamless glow that feels architectural rather than decorative. This type of lighting instantly elevates the overall patio aesthetic and is especially effective for multi-level patios or raised decks.
Instead of harsh overhead brightness, step lighting creates a grounded glow. It highlights transitions between levels while adding dimension and depth. The subtle illumination makes the space feel safe and intentional without overwhelming the ambiance. When installed with warm-toned LEDs, the effect is soft, welcoming, and sophisticated.
This lighting idea is ideal for modern patios, minimalist outdoor spaces, and contemporary backyard designs. It blends into the structure during the day and shines elegantly at night.
What It Is & Why It Works
Recessed step lighting involves embedding small LED fixtures into stair risers or deck edges to provide low-level illumination.
It works because:
- It enhances safety.
- It adds architectural polish.
- It creates subtle ambient glow.
- It eliminates bulky visible fixtures.
Step-by-Step How to Install
- Plan placement along stair risers or deck edges.
- Choose outdoor-rated recessed LED fixtures.
- Mark equal spacing (typically centered per step).
- Cut precise openings (if DIY-capable) or hire professional.
- Connect to low-voltage outdoor wiring.
- Install warm 2700K bulbs.
- Test at night and adjust brightness if dimmable.
Materials Needed
- Recessed LED step lights
- Low-voltage transformer
- Drill and cutting tools
- Outdoor-rated wiring
- Voltage tester
Styling Tips
- Keep spacing symmetrical.
- Use soft warm white only.
- Avoid mixing colors.
- Combine with lantern corners for layered lighting.
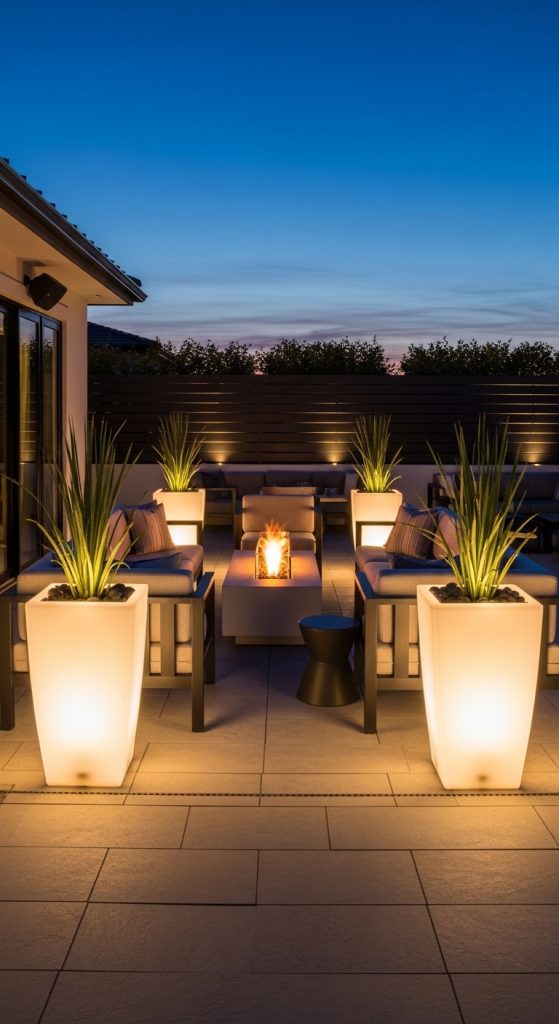
12. Illuminated Planters for a Modern Statement Look
Introduction
Illuminated planters combine greenery and lighting in one elegant design feature. These glowing containers act as both decorative planters and soft light sources, making them perfect for minimalist or modern patios. Instead of placing lights around plants, the light comes from within the planter itself, creating a sculptural glow.
This technique works especially well for evening patios because it adds both height and ambiance. Large illuminated planters placed at entry points or flanking seating areas create visual balance. The soft light highlights plant silhouettes while providing gentle surrounding illumination.
This idea is particularly effective for contemporary outdoor designs, poolside patios, and sleek backyard lounges. It feels high-end but can be achieved with battery-powered or solar options.
What It Is & Why It Works
Illuminated planters are light-up containers that softly glow from within, illuminating both plants and surrounding space.
It works because:
- It combines decor and lighting.
- It creates sculptural interest.
- It eliminates the need for extra fixtures.
- It looks modern and upscale.
Step-by-Step Setup
- Choose outdoor illuminated planters (battery or plug-in).
- Select tall plants with interesting shapes.
- Position at entry points or corners.
- Insert warm light settings.
- Turn on at dusk for soft silhouette effect.
Materials Needed
- Light-up outdoor planters
- Decorative plants
- Power source or batteries
Styling Tips
- Stick to white or soft warm glow.
- Use symmetrical placement for elegance.
- Avoid overly bright settings.
13. Bistro Café String Lights for Intimate Dining Vibes
Introduction
If you want your patio to feel like a charming European café, bistro string lights are the perfect solution. Unlike delicate fairy lights, bistro bulbs are slightly larger and provide a cozy but noticeable glow. When hung lower over a dining area, they create intimacy without feeling overwhelming.
This lighting style works beautifully for smaller patios or dedicated outdoor dining spaces. It defines the table zone and creates a warm, inviting glow that encourages long conversations. When paired with wooden furniture and neutral cushions, the effect feels rustic yet polished.
Bistro lights are especially effective when strung in a slight zigzag pattern overhead rather than tightly parallel. This soft draping adds character and charm.
What It Is & Why It Works
Bistro lights are medium-sized string bulbs designed to create warm ambient lighting for outdoor spaces.
It works because:
- It creates cozy enclosure.
- It feels charming and timeless.
- It enhances dining atmospheres.
- It provides sufficient ambient glow.

Step-by-Step Installation
- Measure dining area width.
- Install hooks or support poles.
- Hang lights in gentle drapes.
- Maintain even tension.
- Connect to timer or dimmer.
Materials Needed
- Outdoor bistro string lights
- Mounting hooks or poles
- Extension cord
- Timer
Styling Tips
- Use warm Edison-style bulbs.
- Hang slightly lower for intimacy.
- Keep consistent spacing.
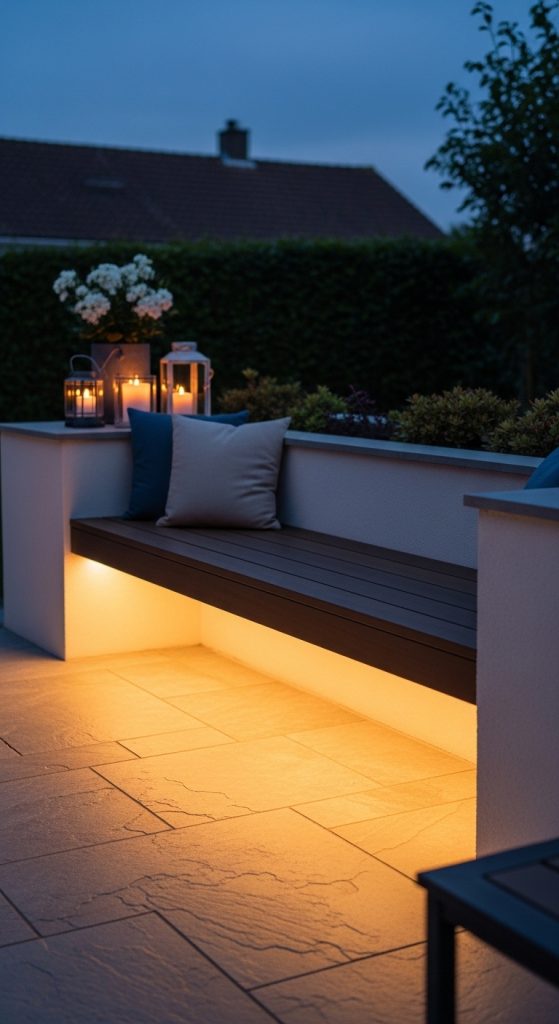
14. Hidden Under-Bench Strip Lighting for a Floating Effect
Introduction
Under-bench strip lighting is a subtle yet striking way to elevate a patio. When LED strips are installed beneath built-in seating, they create a floating illusion. The glow spills softly onto the floor, adding depth and modern sophistication.
This idea is perfect for patios with built-in benches or outdoor sectional seating. Instead of relying on visible fixtures, the light source remains hidden, giving the space a clean and minimal aesthetic.
The floating effect works particularly well with stone or wood surfaces because the texture catches the glow beautifully.
What It Is & Why It Works
Under-bench lighting involves installing concealed LED strips beneath seating edges.
It works because:
- It adds dimension without clutter.
- It highlights patio structure.
- It feels contemporary and upscale.
- It creates soft perimeter glow.
Step-by-Step Setup
- Measure underside of seating.
- Choose outdoor-rated LED strip lights.
- Clean surface before attaching.
- Secure strips with adhesive backing.
- Conceal wires along edges.
- Use dimmer for ambiance control.
Materials Needed
- Outdoor LED strip lights
- Adhesive mounting clips
- Power adapter
- Dimmer switch
Styling Tips
- Choose warm white strips.
- Avoid visible glare.
- Pair with minimal decor.
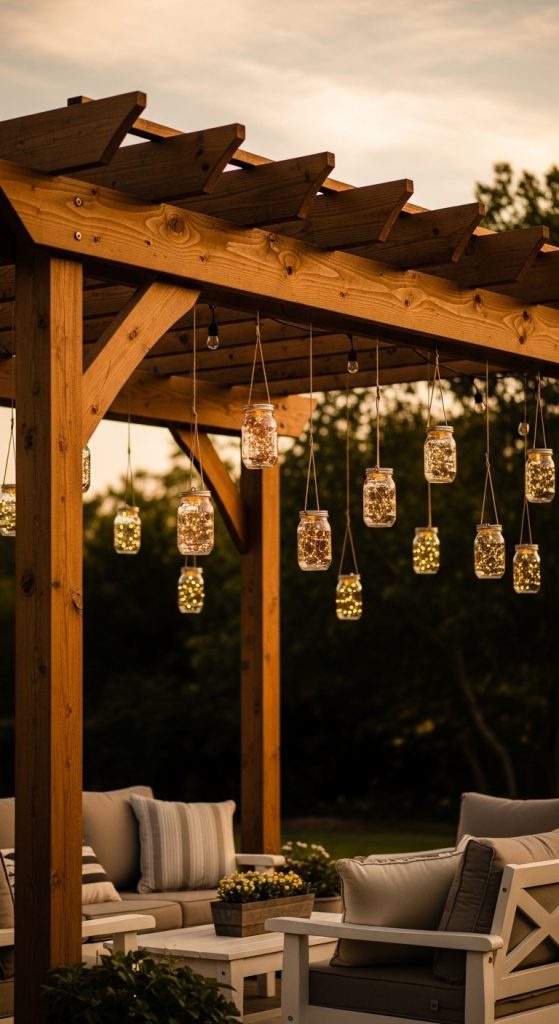
15. Mason Jar Hanging Lights for Rustic Charm
Introduction
For a cozy, farmhouse-inspired patio, mason jar hanging lights create nostalgic charm. Suspended from pergolas, tree branches, or hooks, these glowing jars offer a handcrafted aesthetic that feels warm and welcoming.
Each jar can contain fairy lights or LED candles. The glass amplifies the glow while protecting the light source. When hung at varying heights, the effect feels whimsical and layered.
This lighting style works beautifully for rustic patios, garden-inspired spaces, and casual evening gatherings. It adds personality without requiring complex installation.
What It Is & Why It Works
Mason jar lights are decorative glass jars filled with LED lights and suspended as ambient fixtures.
It works because:
- It creates rustic charm.
- It diffuses light softly.
- It adds vertical interest.
- It feels DIY yet stylish.
Step-by-Step Setup
- Fill mason jars with fairy lights.
- Secure lid tightly.
- Attach strong twine or wire around neck.
- Hang from pergola beams or hooks.
- Space at different heights.
- Turn on at dusk.
Materials Needed
- Mason jars
- Fairy lights or LED candles
- Twine or wire
- Hooks
Styling Tips
- Use warm micro lights.
- Avoid overcrowding.
- Mix heights for depth.