St. Patrick’s Day nail trends have evolved far beyond basic green polish and oversized shamrocks. Today’s Pinterest-inspired manicures blend seasonal charm with modern elegance, allowing you to celebrate March in a way that feels stylish, wearable, and uniquely personal. Whether your aesthetic leans toward soft neutrals and minimal designs or bold, high-impact statement nails, St. Patrick’s Day offers endless creative possibilities.

The beauty of this holiday lies in its color palette. Green is not just one shade — it ranges from airy sage and muted olive to rich emerald and dramatic forest tones. When paired with gold accents, glossy finishes, matte textures, chrome powders, or delicate nail art details, these shades transform into looks that feel elevated rather than costume-like.
Subtle St. Patrick’s Day nails are perfect for professionals, minimalists, or anyone who prefers refined seasonal touches. Think clean green French tips, soft monochrome manicures, delicate clover outlines, or negative space designs. These styles whisper holiday spirit instead of shouting it.
On the other hand, bold St. Patrick’s Day nails are perfect for parties, brunch celebrations, themed events, or content creation. Emerald chrome, glitter gradients, gold foil, and statement accents add drama while still maintaining polished sophistication.
Another major Pinterest trend is versatility. These nail ideas are designed to work on:
• Short natural nails
• Almond shapes
• Coffin nails
• Square tips
• Gel, acrylic, or regular polish
The key to making any St. Patrick’s Day manicure look high-end is precision, balance, and texture layering. Instead of overcrowding designs, focus on intentional accents, clean lines, and complementary finishes.
In this detailed guide, you’ll find five beautifully structured ideas that combine:
• Clear aesthetic vision
• Step-by-step instructions
• Beginner-friendly techniques
• Professional tips
• Required tools and materials
These ideas are designed to be saved, recreated, and adapted to your personal style.
Let’s begin with subtle elegance and build toward bold festive glam.
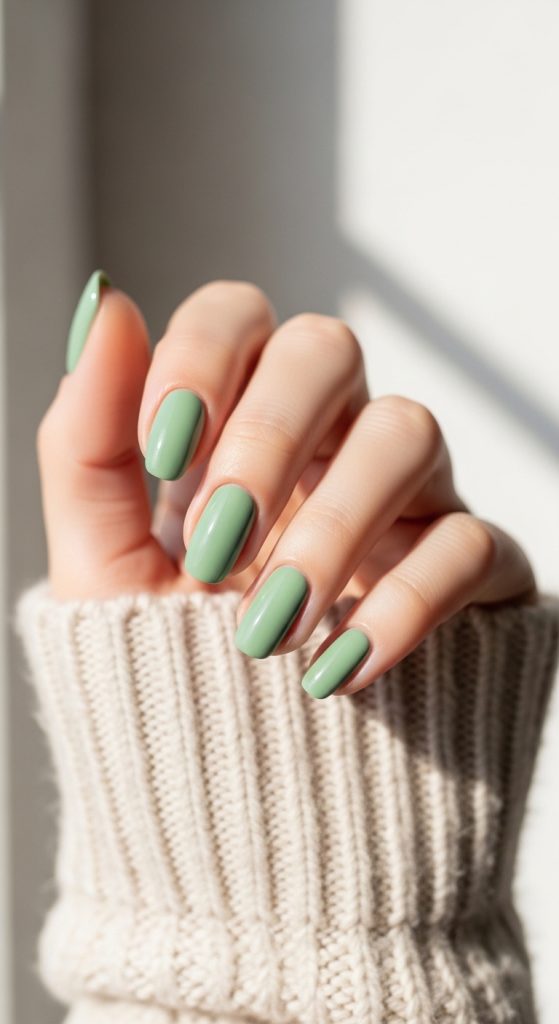
1. Minimal Sage Green Gloss Nails
Introduction
Sage green is the ultimate understated St. Patrick’s Day shade. Unlike neon or bright shamrock green, sage offers a muted, dusty tone that feels calming, refined, and effortlessly chic. It aligns perfectly with minimalist fashion trends and complements neutral spring wardrobes beautifully.
This manicure is ideal for:
• Office environments
• Everyday wear
• Minimalist aesthetics
• Short natural nails
• Gel or regular polish users
Sage green works particularly well in March because it feels transitional — soft enough for winter’s end yet fresh enough for spring beginnings. The glossy finish enhances the color’s depth and keeps the manicure looking healthy and polished.
If you want a subtle nod to St. Patrick’s Day without obvious nail art, this is the perfect choice. It requires no intricate designs but still feels intentional and on-theme.
How To Create This Look
- Remove any old polish and clean nails thoroughly.
- Shape nails into square, oval, or soft almond for a modern finish.
- Lightly buff the nail surface for smooth application.
- Apply cuticle oil, then gently push cuticles back.
- Apply a thin base coat and allow it to dry (or cure if gel).
- Apply the first thin layer of sage green polish.
- Let it dry fully before applying a second thin coat.
- Finish with a high-gloss top coat to seal and protect.
Pro Tip:
Apply thin layers instead of thick coats to prevent streaking and bubbling.
Materials Needed
• Sage green nail polish
• Base coat
• Glossy top coat
• Nail file
• Nail buffer
• Cuticle pusher
• Cotton pads and remover
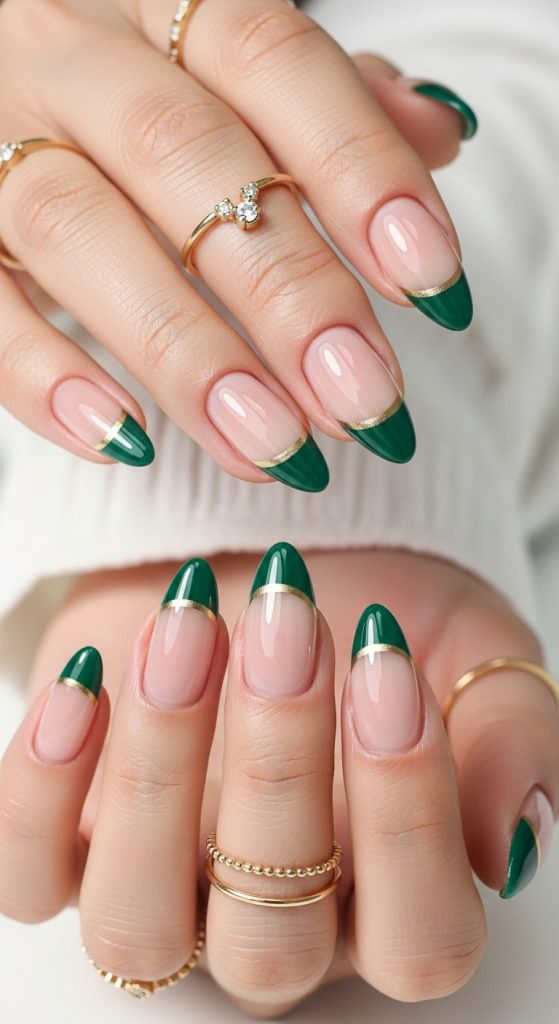
2. Green French Tips with Gold Accent Line
Introduction
If you love timeless nail styles but want a seasonal twist, green French tips with a gold accent line are the perfect balance between subtle and festive. This look replaces classic white tips with emerald, forest, or olive green while adding a thin gold stripe beneath the tip for a refined finish.
The gold detail elevates the manicure, giving it a luxe St. Patrick’s Day feel without being overwhelming. It feels polished, sophisticated, and Instagram-ready.
This design works beautifully for:
• Almond nails
• Coffin nails
• Medium-length square nails
• Professional settings
• Brunch or dinner events
The contrast between nude base, green tips, and gold detailing creates dimension and elegance.
How To Create This Look
- Apply a sheer nude or milky pink base coat.
- Allow it to dry completely.
- Using a thin nail art brush, carefully paint green French tips.
- Once dry, use a striping brush to apply a thin gold line just below the green tip.
- Seal everything with a glossy top coat.
Pro Tip:
Use nail guides or French tip stickers if you struggle with clean lines.
Materials Needed
• Nude base polish
• Emerald or olive green polish
• Gold striping polish or gold foil liner
• Thin nail art brush
• Top coat
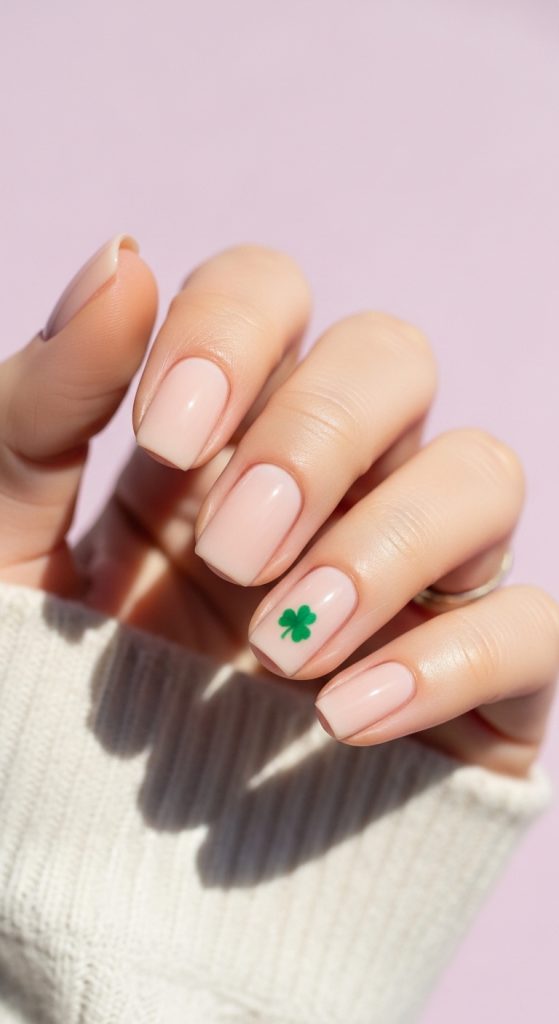
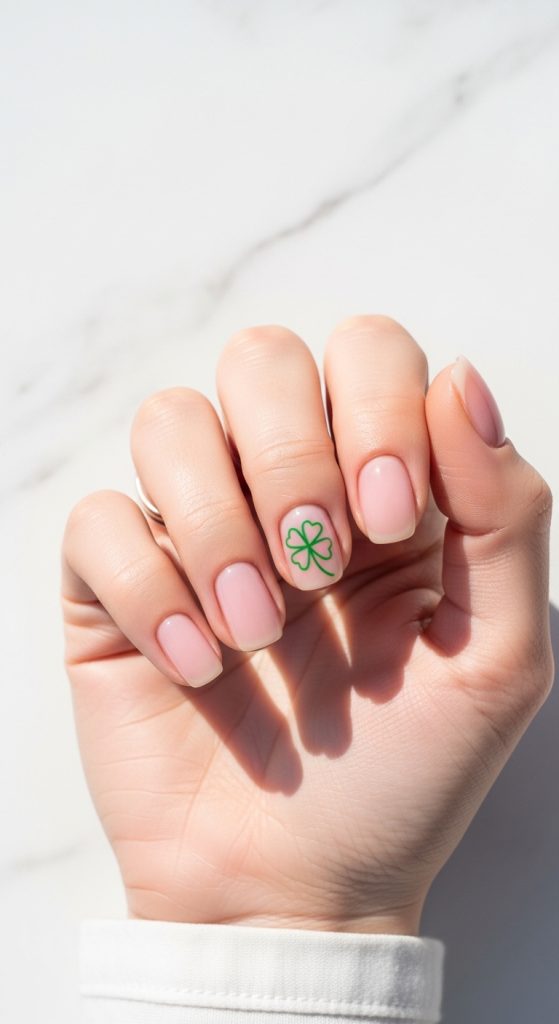
3. Neutral Base with Tiny Shamrock Accent
Introduction
For those who want a hint of playful holiday charm, a tiny shamrock accent nail is the perfect subtle statement. Instead of decorating every nail, you keep the manicure clean and minimal while adding one delicate clover detail.
This design feels modern because the shamrock remains small and refined rather than cartoonish. It works especially well on neutral bases like:
• Milky white
• Beige nude
• Pale sage
• Soft blush
Accent nails allow beginners to experiment with nail art without committing to complex designs on every finger.
How To Create This Look
- Apply two coats of neutral polish on all nails.
- On one chosen nail, use a dotting tool to create four small green dots in a clover shape.
- Add a thin stem using a fine brush.
- Let dry fully.
- Apply glossy top coat.
Pro Tip:
Keep the shamrock small and centered for a chic look.
Materials Needed
• Neutral base polish
• Green polish
• Dotting tool
• Thin detail brush
• Top coat
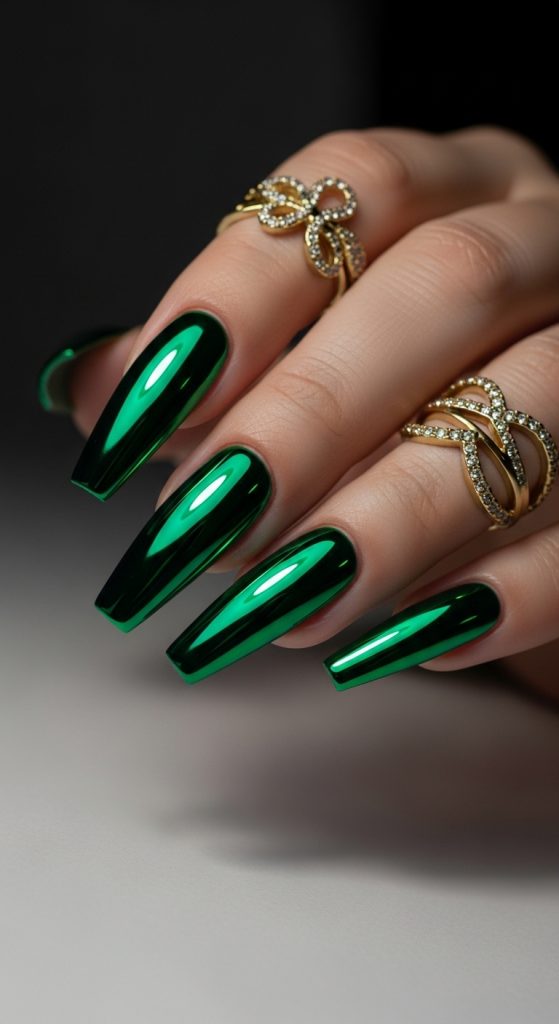
4. Emerald Chrome Glam Nails
Introduction
Emerald chrome nails are bold, dramatic, and perfect for festive celebrations. The metallic mirror effect catches light beautifully, making this design ideal for parties and evening events.
Chrome nails feel high-end and trendy, aligning perfectly with Pinterest’s glam nail aesthetics. The deep emerald tone adds richness while the reflective finish enhances visual impact.
This look is ideal for:
• Medium to long nails
• Coffin or almond shapes
• Gel polish users
• Special events or themed gatherings
How To Create This Look
- Apply a black or dark green gel base.
- Cure under LED/UV lamp.
- Rub emerald chrome powder evenly over the nail.
- Dust off excess powder.
- Seal with no-wipe top coat and cure again.
Pro Tip:
Use a silicone applicator for smooth chrome blending.
Materials Needed
• Dark gel polish
• Emerald chrome powder
• Applicator sponge
• UV/LED lamp
• No-wipe top coat
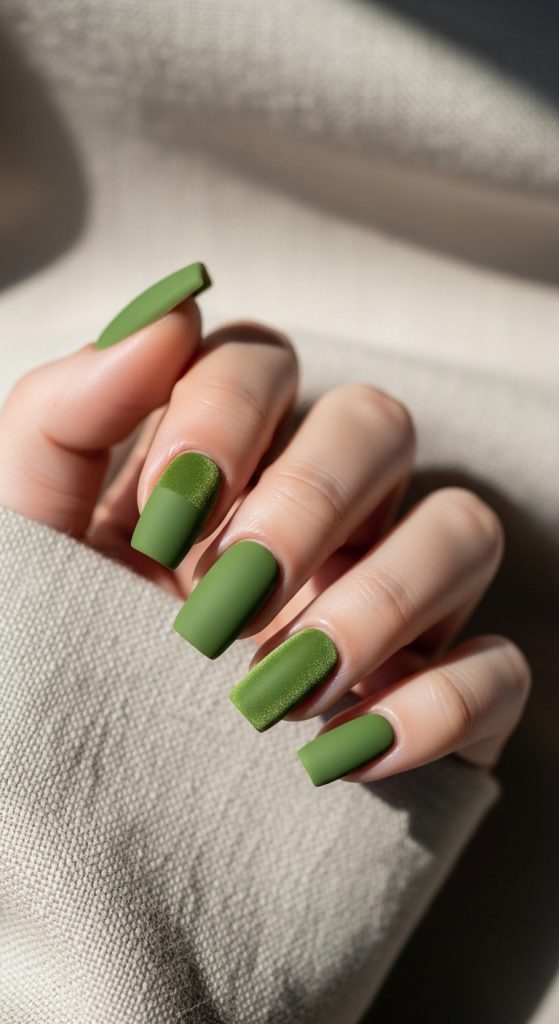
5. Matte Olive Green Modern Nails
Introduction
Matte olive green nails are earthy, trendy, and Pinterest-approved. The velvet matte finish transforms a simple green polish into something soft and fashion-forward.
Olive green feels grounded and natural, making it wearable beyond St. Patrick’s Day. The matte texture gives the manicure a cozy spring aesthetic that pairs beautifully with sweaters and neutral outfits.
This style is perfect for:
• Short square nails
• Minimalist wardrobes
• Casual everyday looks
• Soft seasonal transitions
How To Create This Look
- Apply base coat.
- Paint two thin coats of olive green polish.
- Let polish dry completely.
- Apply matte top coat evenly.
Pro Tip:
Avoid thick matte layers to prevent streaks.
Materials Needed
• Olive green polish
• Base coat
• Matte top coat
• Nail file
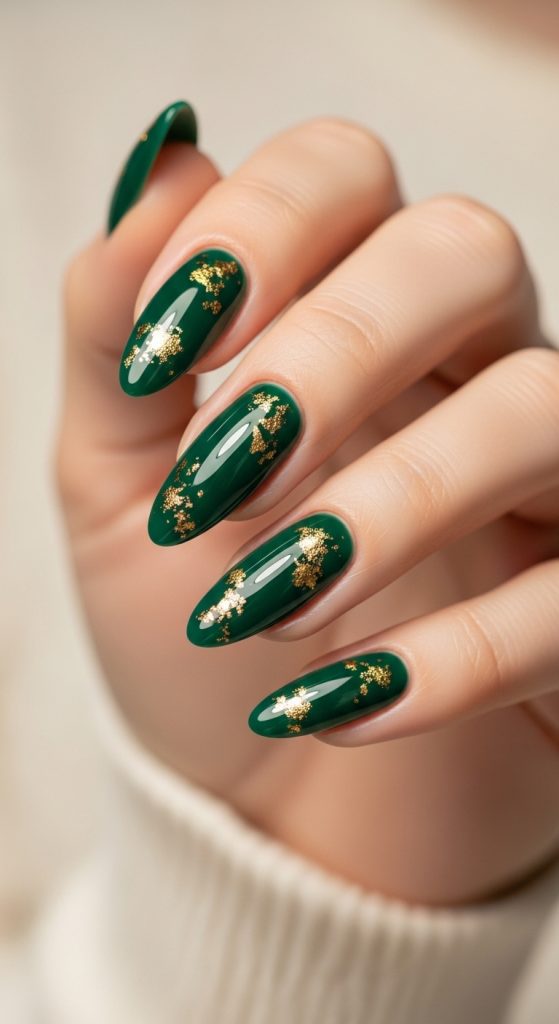
6. Gold Foil Emerald Accent Nails
Introduction
If you want something festive but elevated, gold foil over emerald polish creates the perfect St. Patrick’s Day glam manicure. This look feels luxurious without being overly busy. The deep emerald base represents classic Irish-inspired color tones, while scattered gold foil mimics a “pot of gold” aesthetic in a refined, modern way.
This design is ideal for:
• Party nights
• Dinner dates
• Content photoshoots
• Medium to long nails
• Gel or regular polish
What makes this design Pinterest-worthy is the contrast between rich color and irregular metallic texture. Instead of glitter (which can look chunky), foil adds a soft, flaked shimmer that feels expensive and artistic.
The key is balance — gold should be lightly scattered, not overcrowded.
How To Create This Look
- Shape and prep nails thoroughly.
- Apply base coat and let dry.
- Paint two thin coats of deep emerald polish.
- While the second coat is slightly tacky, gently press small pieces of gold foil onto random areas.
- Use tweezers for placement precision.
- Seal with two layers of glossy top coat to smooth texture.
Pro Tip:
Apply foil mostly toward the cuticle or tip area instead of covering the entire nail. This creates a gradient luxe effect.
Materials Needed
• Emerald green polish
• Base coat
• Gold foil flakes
• Tweezers
• Glossy top coat
• Nail buffer
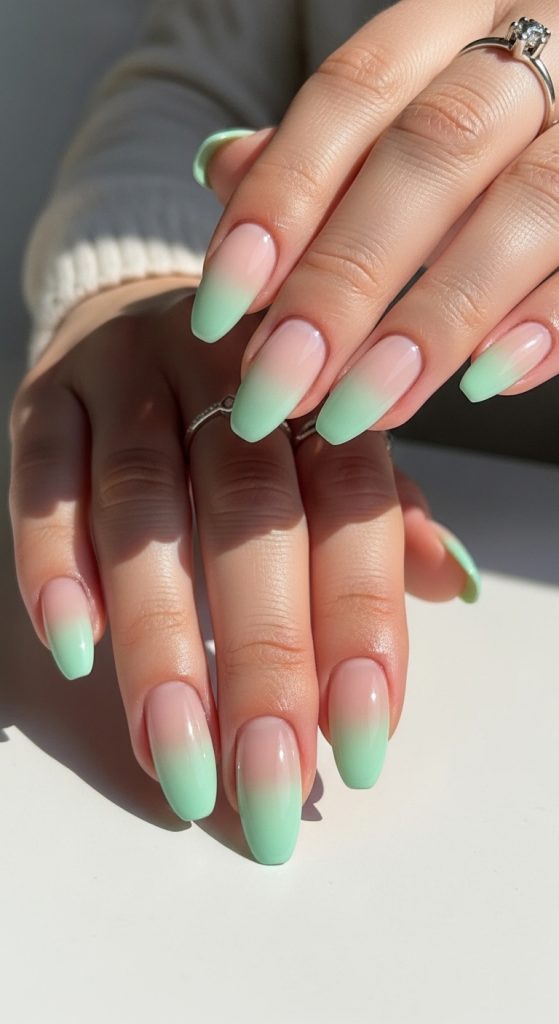
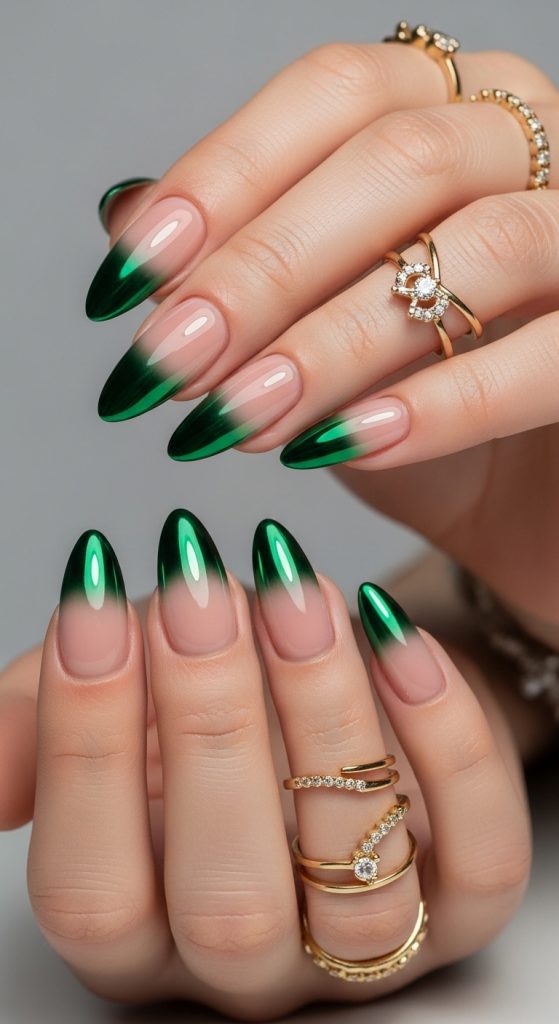
7. Mint Green Ombre Fade
Introduction
For a softer spring-inspired St. Patrick’s Day look, mint green ombre nails offer a subtle and feminine option. Instead of bold green across the entire nail, this design gradually fades from nude or white into mint green at the tip.
Ombre nails are trending heavily on Pinterest because they photograph beautifully and create visual dimension without heavy nail art.
This look works best for:
• Almond nails
• Medium-length nails
• Gel polish users
• Soft spring outfits
Mint green keeps the vibe light and airy, making it perfect for daytime events or casual celebrations.
How To Create This Look
- Apply nude or milky white base coat.
- Let dry completely.
- Use a small sponge to dab mint green polish at the tip.
- Gently blend upward using light tapping motions.
- Repeat until desired gradient is achieved.
- Seal with glossy top coat.
Pro Tip:
Use thin layers and build color gradually for a smoother fade.
Materials Needed
• Nude base polish
• Mint green polish
• Small makeup sponge
• Base coat
• Top coat
8. Shamrock Outline Minimal Design
Introduction
Instead of filling in a clover shape, outline-only shamrocks create a chic minimalist effect. This design uses negative space to keep nails clean and modern while still honoring the holiday theme.
Outline nail art feels sophisticated and editorial rather than playful or cartoon-like. It works beautifully over sheer pink, nude, or soft sage bases.
This style is perfect for:
• Short natural nails
• Office wear
• Minimalist fashion lovers
• Beginners practicing fine-line art
Keeping the clover thin and delicate is key.
How To Create This Look
- Apply two coats of sheer nude polish.
- Allow full drying time.
- Use a fine detail brush to draw four tiny heart-shaped loops forming a clover.
- Add a thin curved stem.
- Seal with top coat.
Pro Tip:
Practice the clover shape on paper first for smoother curves.
Materials Needed
• Sheer nude polish
• Green nail art polish
• Fine detail brush
• Top coat
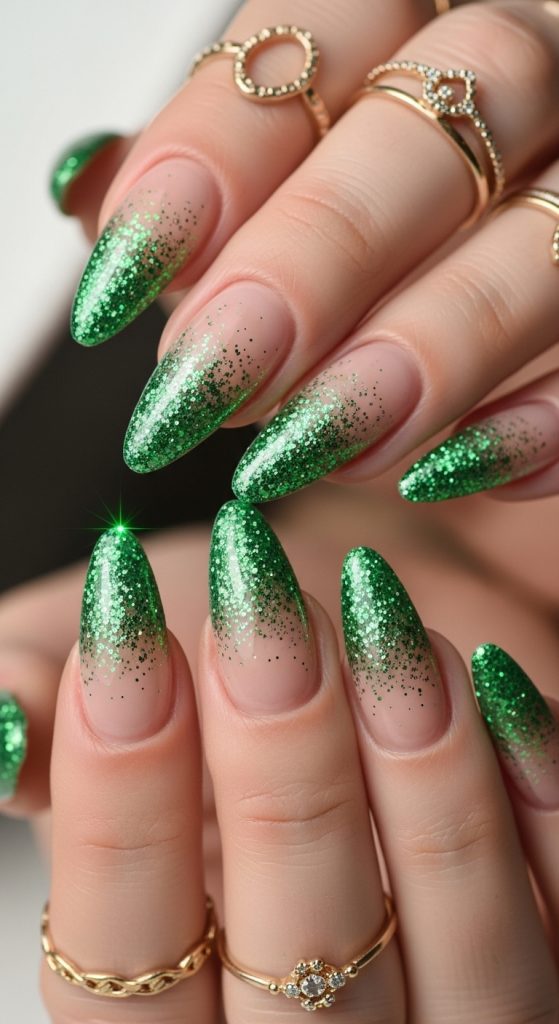
9. Emerald Glitter Gradient Tips
Introduction
If you love sparkle but want a controlled look, glitter gradient tips are perfect. Instead of full glitter coverage, this style concentrates shimmer at the tips and softly fades it downward.
This design combines bold energy with modern restraint. It feels festive without overwhelming the nail.
It works beautifully for:
• Party settings
• Coffin nails
• Almond shapes
• Gel polish manicures
The emerald glitter catches light beautifully, especially in evening settings.
How To Create This Look
- Apply clear or nude base polish.
- Let dry fully.
- Apply emerald glitter polish at the tip.
- Use a sponge or brush to fade glitter downward.
- Add a second thin layer at the tip for depth.
- Seal with glossy top coat.
Pro Tip:
Focus glitter density at the tip and lighten pressure as you blend downward.
Materials Needed
• Nude base polish
• Emerald glitter polish
• Small sponge
• Top coat
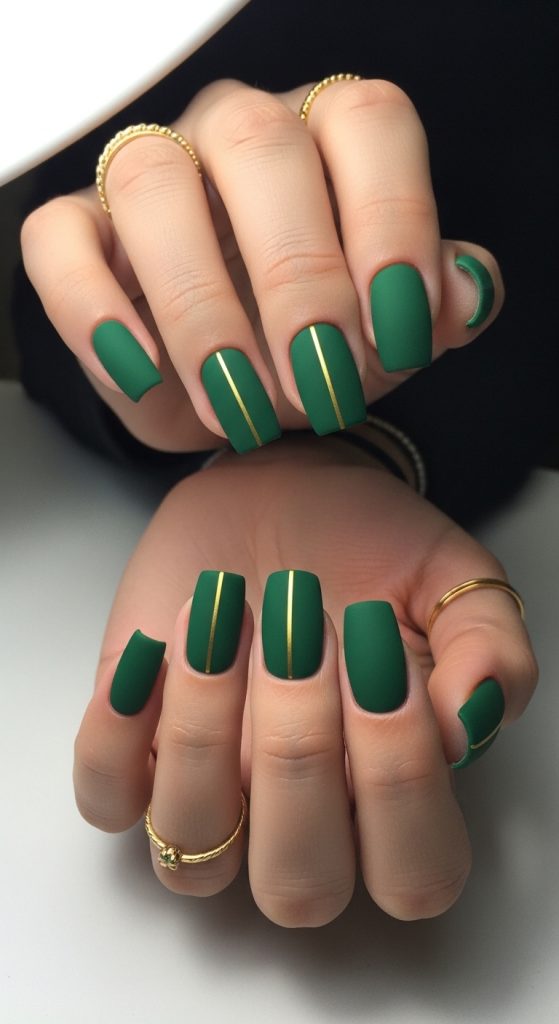
10. Bold Forest Green Matte with Gold Stripe
Introduction
For a powerful yet polished St. Patrick’s Day look, forest green matte nails with a single gold stripe combine bold color with structured elegance.
Forest green is darker and more dramatic than olive or sage. When finished with a matte top coat, it gains a velvety depth. Adding a thin vertical or horizontal gold stripe creates contrast and sophistication.
This design works best for:
• Square nails
• Medium to long length
• Fashion-forward outfits
• Bold personalities
The gold stripe adds architectural interest without cluttering the design.
How To Create This Look
- Apply base coat.
- Paint two thin coats of forest green polish.
- Let fully dry.
- Apply matte top coat.
- Once dry, add a thin gold stripe using striping tape or a fine brush.
- Seal lightly with top coat (if needed for protection).
Pro Tip:
Place the gold stripe slightly off-center for a modern look.
Materials Needed
• Forest green polish
• Matte top coat
• Gold striping tape or gold liner
• Nail file
• Base coat
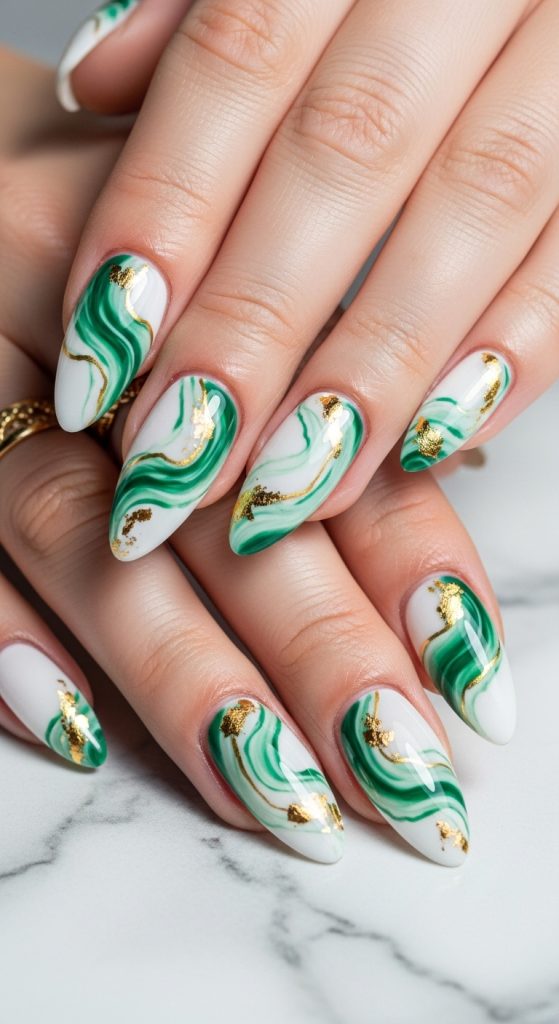
11. Green and Gold Marble Luxe Nails
Introduction
If you want a manicure that feels artistic, expensive, and eye-catching without being overly festive, green and gold marble nails are a stunning choice. Marble designs are trending heavily on Pinterest because they look intricate and high-end, yet they can be recreated with simple techniques.
For St. Patrick’s Day, combining emerald, forest, or olive green with soft white swirls and gold accents creates a luxurious stone-inspired effect. The gold detailing subtly nods to the “pot of gold” theme while keeping the overall look refined and elegant.
This design works beautifully for:
• Almond or coffin nails
• Medium to long length
• Gel polish users
• Special dinners or celebrations
The key to beautiful marble nails is softness — the lines should look blended and natural rather than harsh.
How To Create This Look
- Apply base coat and cure or dry.
- Paint a white or light green base layer.
- While still slightly wet, add small drops of darker green polish.
- Use a thin brush or toothpick to gently swirl colors together.
- Add delicate touches of gold foil or gold liner between swirls.
- Seal with glossy top coat for a stone-like shine.
Pro Tip
Avoid over-swirling. Too much blending can turn the design muddy instead of marbled.
Materials Needed
• White or light green polish
• Dark emerald or forest green polish
• Gold foil or gold liner
• Thin nail art brush or toothpick
• Base coat
• Glossy top coat
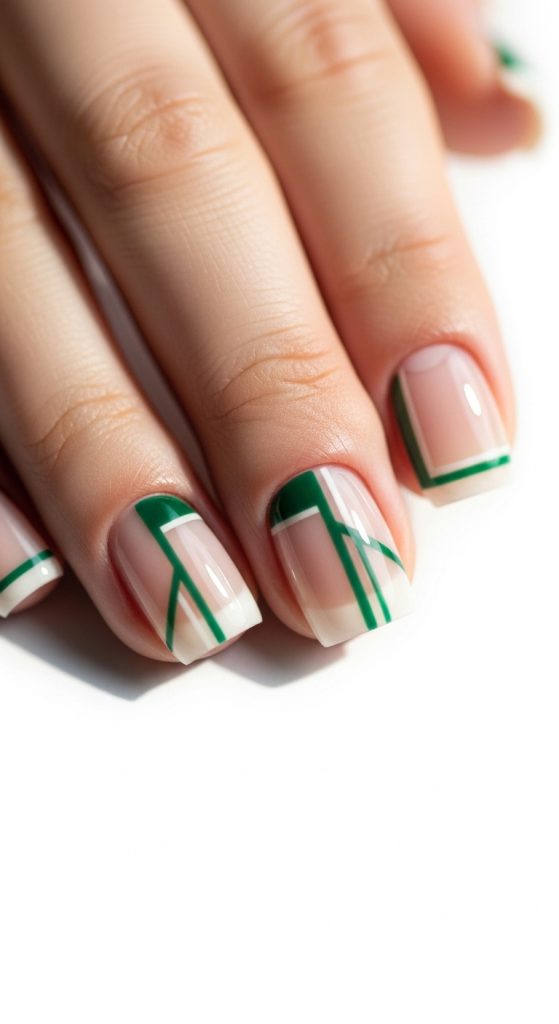
12. Subtle Green Negative Space Design
Introduction
Negative space nails are perfect for modern minimalists who still want to participate in seasonal trends. This design intentionally leaves portions of the natural nail exposed, creating a clean and airy aesthetic.
For St. Patrick’s Day, you can use geometric green shapes, diagonal stripes, or soft curved accents over a clear or sheer pink base. This makes the green feel fresh rather than overpowering.
This style is ideal for:
• Short natural nails
• Office-friendly looks
• Beginners wanting simple nail art
• Clean girl aesthetic lovers
Negative space designs are extremely Pinterest-friendly because they look modern and editorial.
How To Create This Look
- Apply a clear or sheer nude base coat.
- Let dry completely.
- Use striping tape to section off parts of the nail.
- Paint exposed sections with emerald or olive polish.
- Carefully remove tape before polish fully dries.
- Finish with glossy top coat.
Pro Tip
Use thin coats to prevent bleeding under the tape.
Materials Needed
• Clear or sheer nude polish
• Green polish
• Striping tape
• Base coat
• Top coat
13. Emerald Chrome French Fade
Introduction
If you love glam but want something more refined than full chrome nails, try an emerald chrome French fade. This style combines a soft nude base with chrome powder concentrated at the tips, fading slightly downward.
The result is bold yet balanced — dramatic shine at the tip with a natural base that keeps it wearable.
Perfect for:
• Evening events
• Coffin or almond shapes
• Trend-forward nail lovers
• Gel polish users
Chrome fades look extremely striking in photos and under lighting.
How To Create This Look
- Apply nude gel base and cure.
- Lightly apply emerald chrome powder at the tip only.
- Blend slightly downward using a soft applicator.
- Add a second thin layer at the tip for intensity.
- Seal with no-wipe top coat and cure.
Pro Tip
Keep the chrome concentrated at the tip to maintain elegance.
Materials Needed
• Nude gel polish
• Emerald chrome powder
• Applicator sponge
• UV/LED lamp
• Top coat
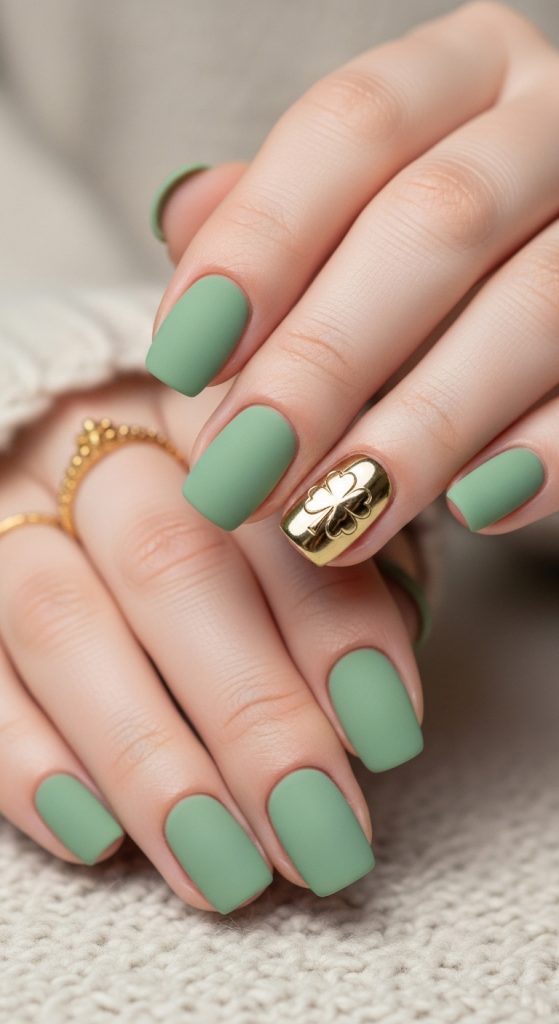
14. Gold Clover Accent Over Matte Green
Introduction
For a balanced mix of subtle and bold, matte green nails with a small gold clover accent offer the perfect contrast. The matte finish softens the green while metallic gold adds a festive highlight.
Instead of painting a green shamrock, switching to gold makes the design feel more elegant and less playful.
Best suited for:
• Short to medium nails
• Square or almond shape
• Modern aesthetic lovers
• Those wanting one standout detail
This design keeps most nails matte and simple, allowing the gold accent to shine.
How To Create This Look
- Apply base coat and two coats of sage or forest green.
- Apply matte top coat and allow to dry.
- On one accent nail, draw a small gold clover using liner polish.
- Seal lightly if needed.
Pro Tip
Keep the clover small and centered for a balanced look.
Materials Needed
• Green polish
• Matte top coat
• Gold liner polish
• Detail brush
• Base coat
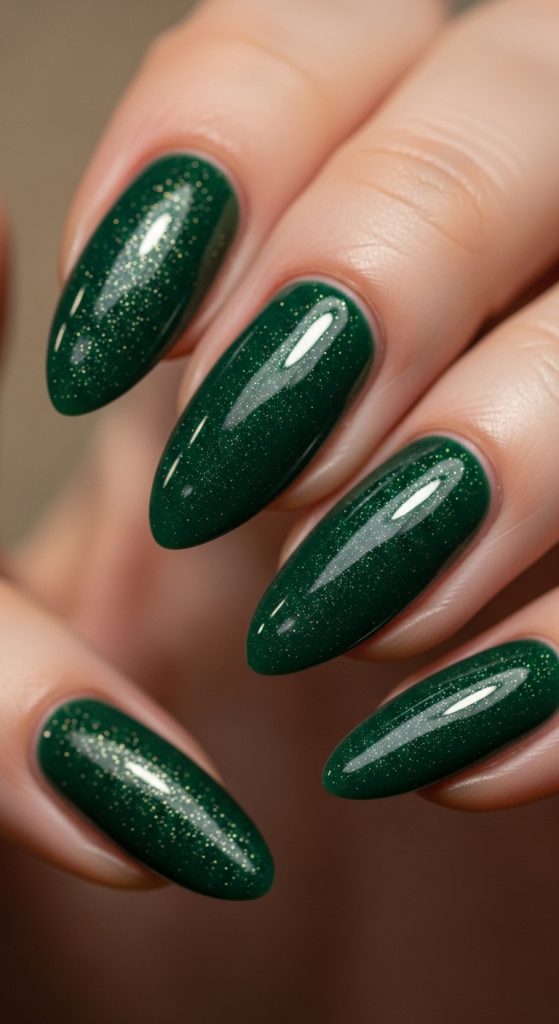
15. Dark Green Gloss with Subtle Glitter Topper
Introduction
If you love depth and dimension, layering a subtle glitter topper over dark green polish creates a magical effect. Instead of chunky glitter, choose a fine shimmer topper that adds sparkle without texture overload.
This design is ideal for:
• Evening events
• Medium nails
• Those who want sparkle but not full glitter
• Beginners looking for easy upgrades
The shimmer catches light beautifully while maintaining sophistication.
How To Create This Look
- Apply base coat.
- Paint two coats of dark forest green polish.
- Let fully dry.
- Apply a thin layer of fine gold or green shimmer topper.
- Seal with glossy top coat.
Pro Tip
Use one thin shimmer coat for subtle elegance — too much can look chunky.
Materials Needed
• Forest green polish
• Fine glitter or shimmer topper
• Base coat
• Glossy top coat