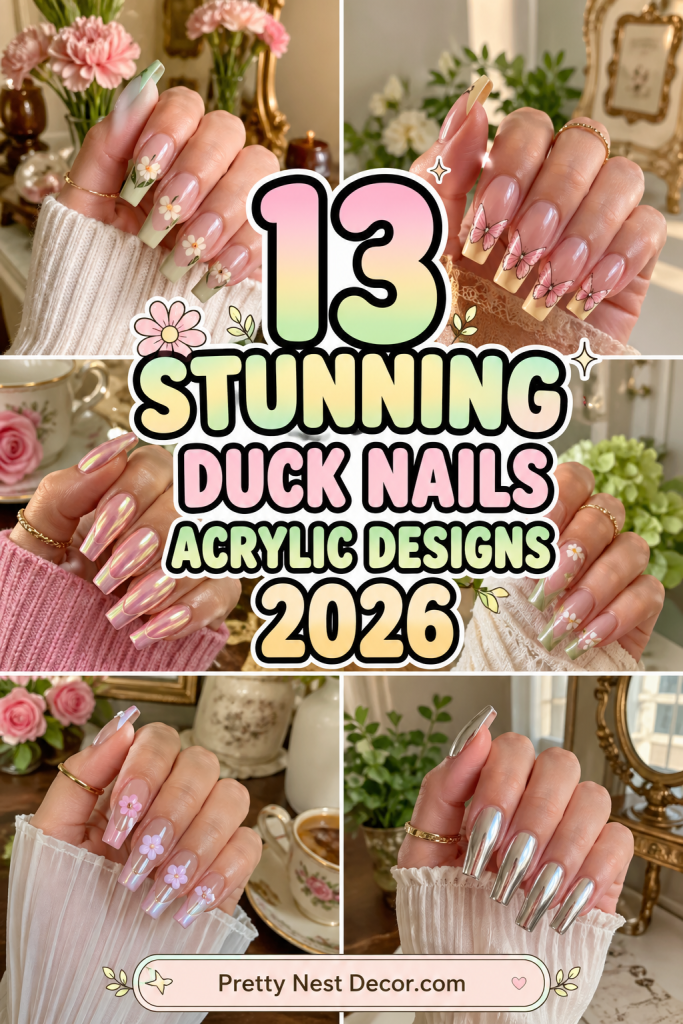
If you think nail trends have already peaked, duck nails are here to prove you wrong. Bold, dramatic, and unapologetically attention-grabbing, duck nails—also known as flare nails—are making a serious comeback in 2026. But this time, they’re not just loud for the sake of being loud. They’ve evolved into something far more refined, creative, and, surprisingly, wearable when done right.
Let’s be clear: duck nails are not for people who want to blend in.
The shape itself is what makes them stand out. Unlike traditional acrylic nails that taper or stay straight, duck nails flare outward at the tip, creating a wide, fan-like effect. For years, this shape was dismissed as outdated or “too much.” And honestly, in the past, it often was—overly chunky, poorly structured, and lacking design direction.
But 2026 has changed that completely.
Today’s duck nails are sharper in execution, smarter in design, and far more intentional. Nail artists are no longer just extending the width—they’re using that extra surface area as a canvas for detailed, high-impact art. Think intricate 3D embellishments, layered textures, chrome finishes, encapsulated designs, and luxury-inspired details that wouldn’t even be possible on standard nail shapes.
Here’s the reality most people don’t understand:
Duck nails are not about the shape alone. They’re about how you use the shape.
If you simply flare the tips and leave them plain, the result looks awkward. That’s where many people go wrong. The width needs purpose. It needs design strategy. When done correctly, duck nails can look editorial, high-fashion, and even elegant—not just bold.
Another reason this trend is gaining traction again is because of social media. Platforms like Pinterest and TikTok are pushing highly visual, statement beauty trends. Subtle nails don’t stop the scroll anymore. People want designs that stand out instantly, and duck nails deliver exactly that.
But before you jump in, understand this:
They require commitment.
Duck nails are not low-maintenance. Their width makes them more noticeable in everyday life—from typing on your phone to doing basic tasks. That doesn’t mean they’re impractical, but it does mean they’re a choice. You’re choosing style over convenience, and if you’re not ready for that, this trend will frustrate you.
At the same time, that’s exactly what makes them powerful.
In a world where most nail designs start to look the same—coffins, almonds, squares—duck nails break the pattern. They give you room to experiment, to personalize, and to create something that actually reflects your style instead of copying what everyone else is doing.
Another shift happening in 2026 is the move toward customization over trends. Instead of blindly following what’s popular, people are adapting styles to fit their personality. Duck nails fit perfectly into this mindset because they’re so versatile in design.
You can go:
- Soft and feminine with pastel tones and subtle gems
- Bold and edgy with chrome, metallics, and sharp accents
- Playful with bright colors, charms, and 3D elements
- Or even luxury-inspired with clean lines, nude bases, and minimal gold detailing
The shape stays the same—but the vibe changes completely depending on how you design it.
And that’s exactly what this guide is going to show you.
You’re not just getting random nail ideas. You’re getting 13 carefully thought-out duck nail acrylic designs for 2026, each broken down in a way that actually helps you understand:
- What makes the design work
- How to recreate it or ask for it at the salon
- Who it suits best
- And the small details that separate a cheap-looking set from a premium one
Because here’s the truth:
Duck nails can either look like a high-fashion statement—or a complete mess. There’s no middle ground.
The difference comes down to design balance, structure, and execution.
So instead of guessing or copying random images, you’re going to understand exactly how to make this trend work in a way that looks intentional, modern, and genuinely stunning—not outdated or overdone.
Let’s get into it.
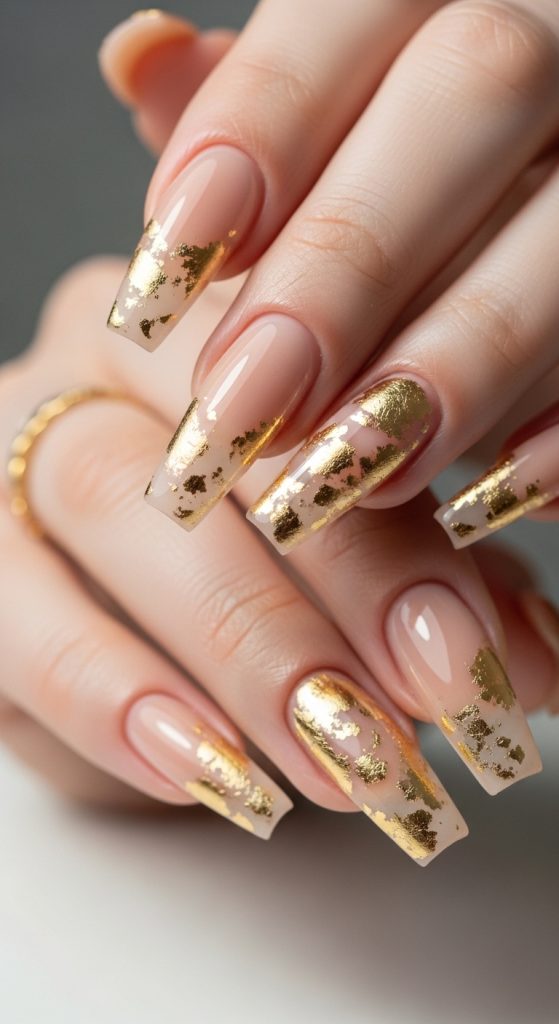
1. Nude Base Duck Nails with Gold Foil Accents (Clean Luxury Statement)
What it is
This design takes the bold duck nail shape and tones it down with a minimal, high-end aesthetic. Instead of loud colors or heavy decoration, it uses a soft nude base paired with delicate gold foil detailing. The contrast between the wide nail shape and the subtle design creates a refined, expensive look.
Most people go wrong with duck nails by trying to fill every inch with design. That turns them into cluttered, overwhelming sets. This idea proves the opposite—when the base is clean, the shape itself becomes the statement.
The gold foil adds just enough texture and shine without overpowering the overall look.
How to implement (practical steps)
Nail structure:
- Medium to long duck nail length (not too extreme for this style)
- Smooth, even flare—not exaggerated or bulky
- Clean apex for proper structure
Base application:
- Apply a sheer nude, milky pink, or soft beige acrylic base
- Keep finish glossy and smooth
Gold detailing:
- Use irregular gold foil pieces, not perfect shapes
- Place foil toward tips or slightly off-center for modern feel
- Seal with clear top coat for smooth finish
Design balance:
- Keep at least 40–50% of the nail empty
- Avoid adding rhinestones or extra elements
Best for
- People trying duck nails for the first time
- Minimal, clean aesthetic lovers
- Events, everyday wear, or soft luxury looks
This works best when you want bold shape without loud design.
Pro tip
Use smaller foil pieces instead of large chunks. Fine detailing looks far more expensive and intentional.
Mistake to avoid
Don’t over-layer gold foil. Too much turns a luxury design into a messy, cheap-looking finish.
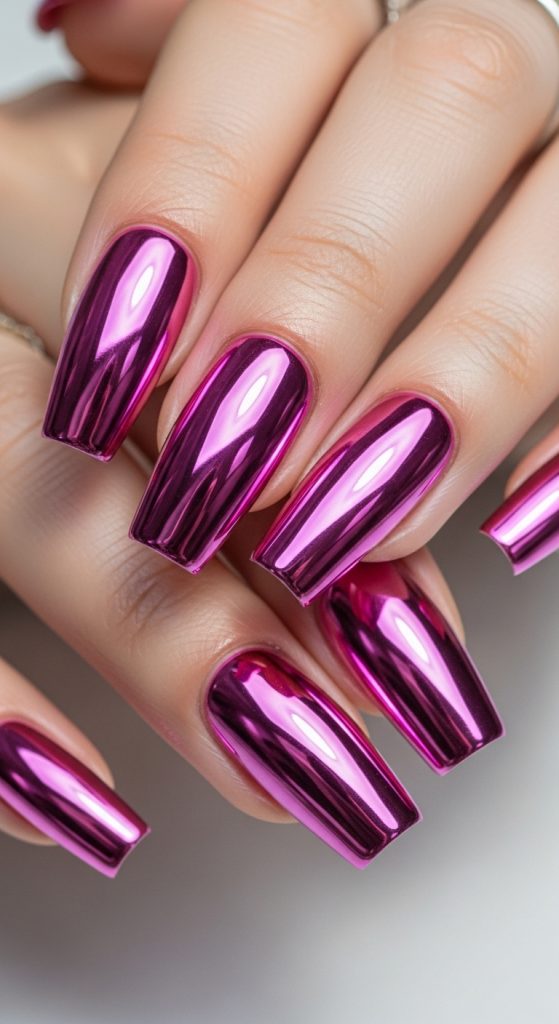
2. Pink Chrome Duck Nails (High-Gloss Trendy Finish)
What it is
This design combines the dramatic duck nail shape with a mirror-like chrome finish, creating a futuristic, ultra-trendy look. Pink chrome specifically adds a feminine touch while still maintaining that bold, reflective effect.
The wide surface of duck nails actually enhances chrome designs because it gives more area for light reflection. When done right, this set looks smooth, glassy, and almost liquid-like.
Most people fail chrome nails by applying uneven powder or using dull base colors. With duck nails, mistakes become even more visible—so precision matters here.
How to implement (practical steps)
Nail structure:
- Medium to long duck shape for full chrome impact
- Smooth surface is critical—no bumps or uneven acrylic
Base color:
- Apply a solid pink base (soft pink or hot pink depending on vibe)
- Cure properly before chrome application
Chrome process:
- Use fine chrome powder and rub evenly across nail
- Ensure full coverage with no patchy areas
- Seal with high-gloss top coat
Optional detailing:
- Add one accent nail with subtle rhinestones or line art
- Keep majority of nails clean to highlight chrome effect
Best for
- Trend-focused looks
- Social media / Pinterest aesthetic
- People who like bold but polished nails
This works best when you want a high-impact, reflective finish.
Pro tip
Always choose a high-quality top coat. Cheap top coats dull the chrome effect and ruin the entire look.
Mistake to avoid
Don’t apply chrome on uneven surfaces. Any flaw in the base will be magnified once the chrome is added.
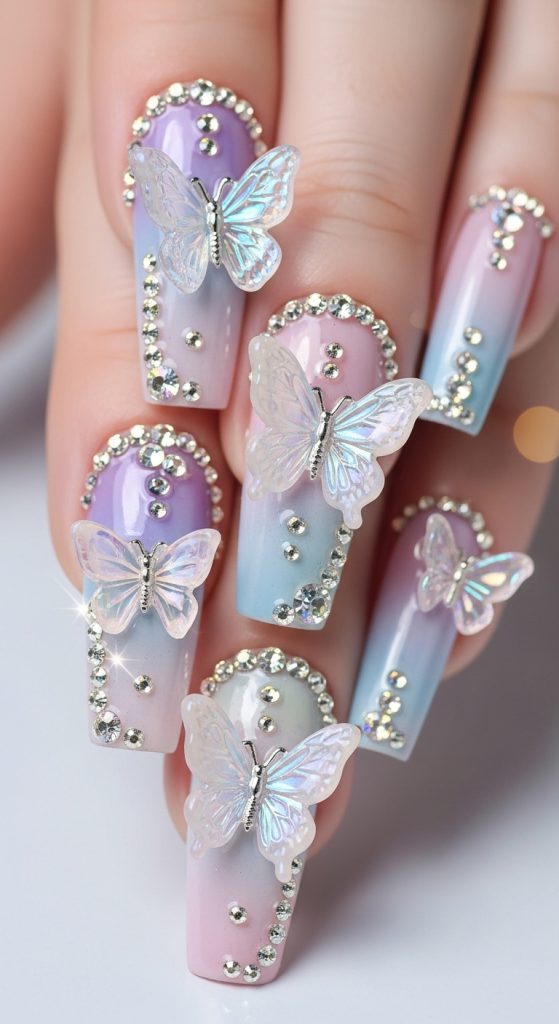
3. 3D Butterfly Duck Nails (Maximalist Artistic Design)
What it is
This is a full statement design that uses the wide duck nail surface for 3D art and layered detailing, centered around butterfly elements. It’s bold, creative, and built for maximum visual impact.
Unlike minimal designs, this one fully embraces the extra space duck nails provide. The butterflies, gems, and textures are not just decoration—they’re part of the structure of the design.
But here’s the truth: this style only works when there is controlled placement. Without structure, it quickly turns chaotic.
How to implement (practical steps)
Nail structure:
- Long duck nails for enough design space
- Strong apex to support added weight
Base layer:
- Use pastel or ombre base (pink, lavender, or nude tones)
- Keep base soft so 3D elements stand out
3D design elements:
- Apply small 3D butterfly charms or sculpted acrylic butterflies
- Add rhinestones, pearls, or crystals around design
- Place larger elements toward center—not edges
Layering technique:
- Start with flat design (glitter, decals)
- Then add raised 3D elements
- Seal properly without flattening the design
Balance strategy:
- Keep 1–2 nails heavily designed
- Leave others slightly simpler for contrast
Best for
- Bold, creative personalities
- Special events, photoshoots, or statement looks
- People who love detailed nail art
This works best when you want attention-grabbing nails.
Pro tip
Stick to one color family (like pink/purple tones). Too many random colors make the design look chaotic.
Mistake to avoid
Don’t overload every nail with heavy 3D elements. Without balance, the design loses its impact and becomes visually messy.
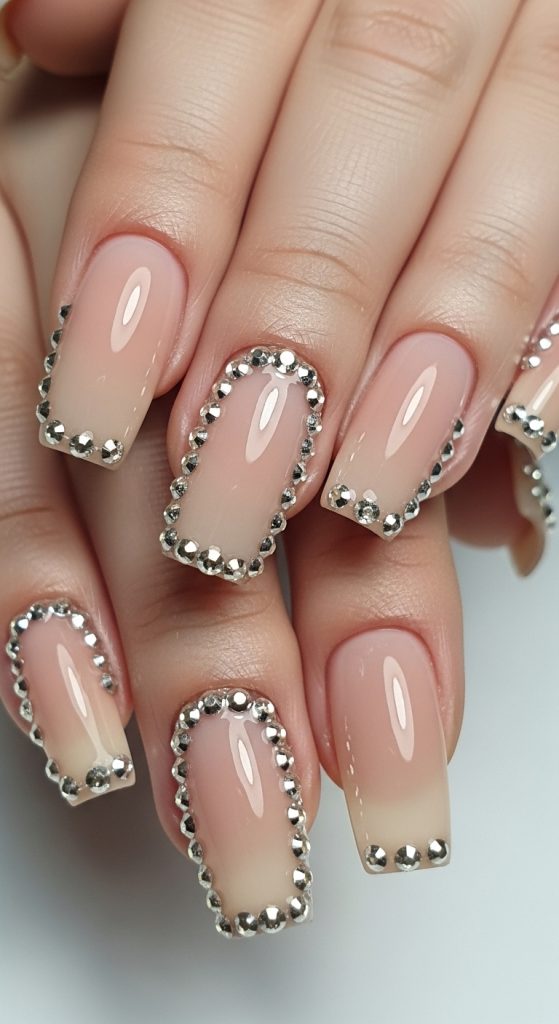
4. Crystal Edge Duck Nails (Luxury Sparkle Frame Design)
What it is
Crystal edge duck nails focus on clean structure with a luxury outline effect. Instead of covering the whole nail with heavy decoration, crystals are placed strategically along the edges or tips, framing the wide duck shape.
This design works because duck nails naturally give you more surface area. If you fill all of it, the design becomes chaotic. If you frame it instead, you get a high-fashion, editorial look that feels expensive and intentional.
It’s basically about restraint—using sparkle as structure, not decoration overload.
How to implement (practical steps)
Nail structure:
- Medium to long duck shape for proper edge visibility
- Smooth acrylic surface (no bumps)
Base layer:
- Nude, soft pink, or sheer milky base
- Keep it glossy and clean
Crystal placement:
- Apply small rhinestones along side edges or tips only
- Follow a curved line to match nail flare shape
- Use different sizes (tiny to medium) for natural flow
Design balance:
- Leave center of nail mostly empty
- Focus sparkle only on borders or outlines
- Use consistent crystal tone (clear or slightly tinted)
Finishing:
- Seal carefully without dulling crystals
- Avoid heavy top coat over stones
Best for
- Luxury-inspired looks
- Weddings, parties, or formal events
- People who like elegant but noticeable nails
This works best when you want “rich-looking” nails without full coverage design.
Pro tip
Follow the natural curve of the duck nail when placing crystals—don’t force straight lines.
Mistake to avoid
Don’t overfill both sides of the nail. Double-heavy edges destroy the clean luxury framing effect.
5. Neon Pop Duck Nails (Bold Color Block Statement)
What it is
Neon pop duck nails are designed for maximum visual impact through bold, solid colors and color blocking. Instead of intricate detailing, the focus is on bright neon shades that instantly stand out.
The wide duck nail shape actually enhances neon designs because it gives more space for color saturation. This makes each nail feel like a mini canvas of bold expression.
This style is not subtle—it’s meant to be seen from a distance.

How to implement (practical steps)
Nail structure:
- Long or medium duck nails for strong visual impact
- Smooth, even surface for clean color application
Color strategy:
- Use 2–3 neon shades maximum (pink, green, orange, yellow)
- Apply solid colors or alternating patterns
- Avoid mixing too many unrelated tones
Design approach:
- Alternate nails with different neon shades
- Or split nails into color blocks (half-and-half designs)
- Keep edges sharp and clean between colors
Finish:
- High-gloss top coat to enhance brightness
- Optional matte top coat for modern twist (but less common)
Best for
- Party looks and festivals
- Bold personality styles
- Summer or vacation aesthetics
This works best when you want attention-grabbing nails with simple execution.
Pro tip
Pair neon shades with one neutral accent nail to prevent visual overload.
Mistake to avoid
Don’t mix neon with too many patterns. The strength of this design is pure color, not complexity.
6. French Tip Duck Nails with Modern Twist (Reinvented Classic)
What it is
This design takes the classic French manicure and upgrades it for duck nails by using wide tips and modern styling variations. Instead of thin, traditional white tips, the flare of duck nails allows for thicker, more creative tip designs.
This is where classic meets modern. The result is familiar but updated—clean enough for everyday wear but still trendy enough for 2026 aesthetics.
The key is not copying old French nails, but reinventing them for the new shape.
How to implement (practical steps)
Nail structure:
- Medium duck nail length for balanced tip space
- Smooth acrylic base with clean edges
Base layer:
- Nude, sheer pink, or milky white base
- Keep tone soft and natural
Tip design options:
- Thick curved white tips following duck flare
- Colored French tips (pastel, neon, or metallic)
- Double French lines for modern effect
Modern upgrades:
- Add thin chrome line above French tip
- Include minimal rhinestones on one accent nail
- Try angled or diagonal French tips for variation
Finishing:
- High-gloss top coat for clean finish
- Keep edges sharp and well-defined
Best for
- People who like elegant but trendy nails
- Office-friendly or everyday wear
- Those transitioning from simple to bold styles
This works best when you want something safe but not boring.
Pro tip
Match tip thickness with nail flare. Wider duck nails need slightly thicker French tips for balance.
Mistake to avoid
Don’t use thin, traditional French lines—they look outdated on duck nail shapes.
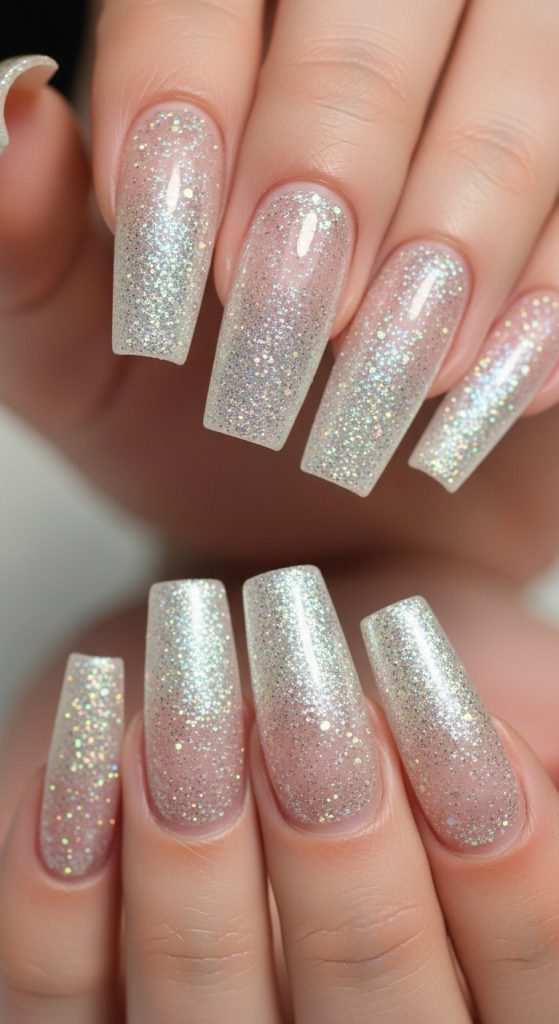
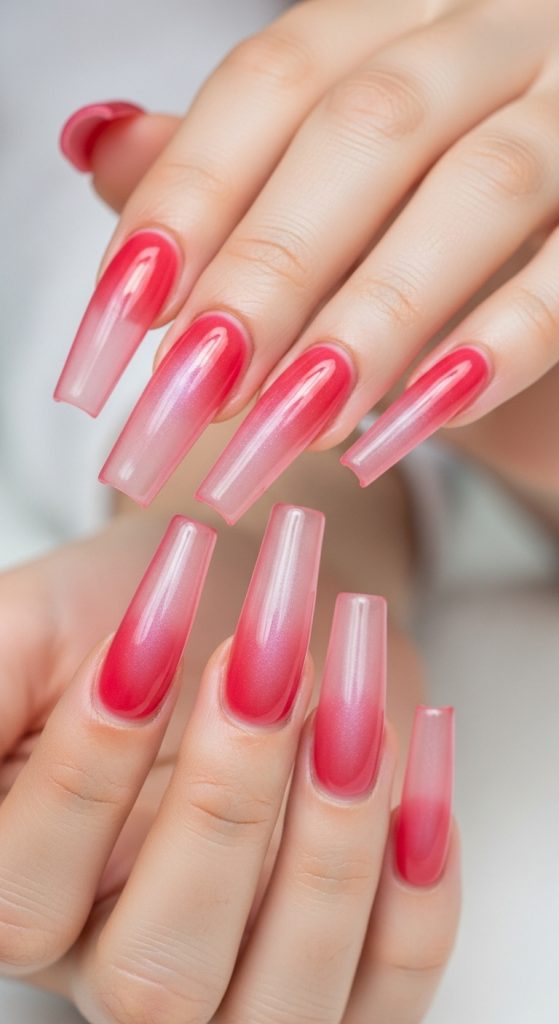
7. Ombre Glitter Duck Nails (Soft Fade Luxury Sparkle)
What it is
Ombre glitter duck nails combine a smooth color fade with controlled sparkle placement, creating a soft but glamorous effect. Instead of full glitter coverage, the shimmer gradually builds from the base or tips, which makes the wide duck shape feel more elegant and less heavy.
The mistake most people make with duck nails is overloading them with texture. This design solves that by using gradation instead of intensity, so the eye moves naturally across the nail instead of getting overwhelmed.
The result is soft luxury with visible shine—not chaotic glitter overload.
How to implement (practical steps)
Nail structure:
- Medium to long duck shape for proper gradient flow
- Smooth acrylic surface is essential
Base design:
- Nude, soft pink, or sheer milky base
- Keep base clean and even
Glitter placement:
- Apply fine glitter starting from tips fading upward
- Or reverse fade starting at cuticle
- Use fine shimmer, not chunky glitter
Blending technique:
- Use sponge or soft brush for smooth gradient
- Ensure no harsh lines between glitter and base
- Build layers gradually instead of one heavy coat
Finishing:
- Seal with glossy top coat for glass effect
- Avoid thick top layers that dull shimmer
Best for
- Elegant party looks
- Soft glam lovers
- People who want sparkle without loud designs
This works best when you want shine that feels expensive, not messy.
Pro tip
Use ultra-fine glitter instead of chunky pieces—fine particles create a smoother luxury fade.
Mistake to avoid
Don’t start glitter too high on the nail. A rushed gradient kills the soft ombre effect.
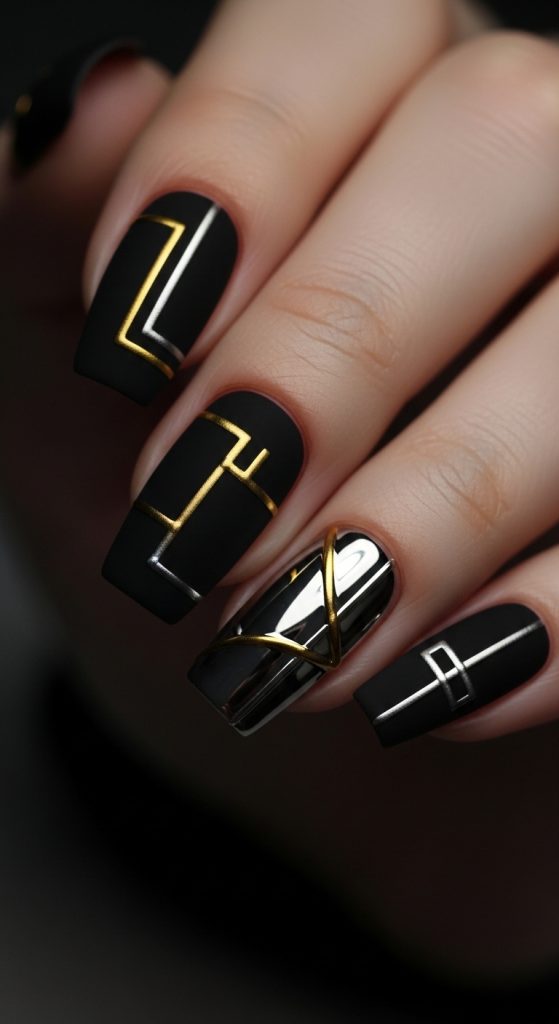
8. Matte Black Duck Nails with Metallic Accents (Edgy Luxury Contrast)
What it is
This design is built on high contrast—deep matte black paired with metallic detailing like gold, silver, or chrome lines. On duck nails, the wide surface makes this contrast even more dramatic and visually powerful.
Matte finishes absorb light, while metallic accents reflect it. That push-and-pull creates a modern, edgy luxury look that feels strong and fashion-forward.
It’s not soft or cute—it’s structured, bold, and intentional.
How to implement (practical steps)
Nail structure:
- Medium or long duck nails for full design impact
- Smooth surface preparation is critical (matte shows flaws easily)
Base layer:
- Apply solid black acrylic or gel base
- Ensure even coverage without streaks
Matte finish:
- Use high-quality matte top coat
- Cure properly for smooth, velvety texture
Metallic accents:
- Add thin gold or silver lines across nail
- Use chrome flakes or foil for controlled shine
- Keep metallic placement minimal and strategic
Design balance:
- Focus accents on 1–2 nails or small sections
- Avoid full metallic coverage
Best for
- Edgy fashion styles
- Night looks, parties, or statement outfits
- People who like bold, structured nails
This works best when you want strong visual contrast.
Pro tip
Gold on matte black looks more luxurious than silver—but silver gives a colder, futuristic vibe.
Mistake to avoid
Don’t overuse metallic details. Too much shine removes the impact of the matte base.
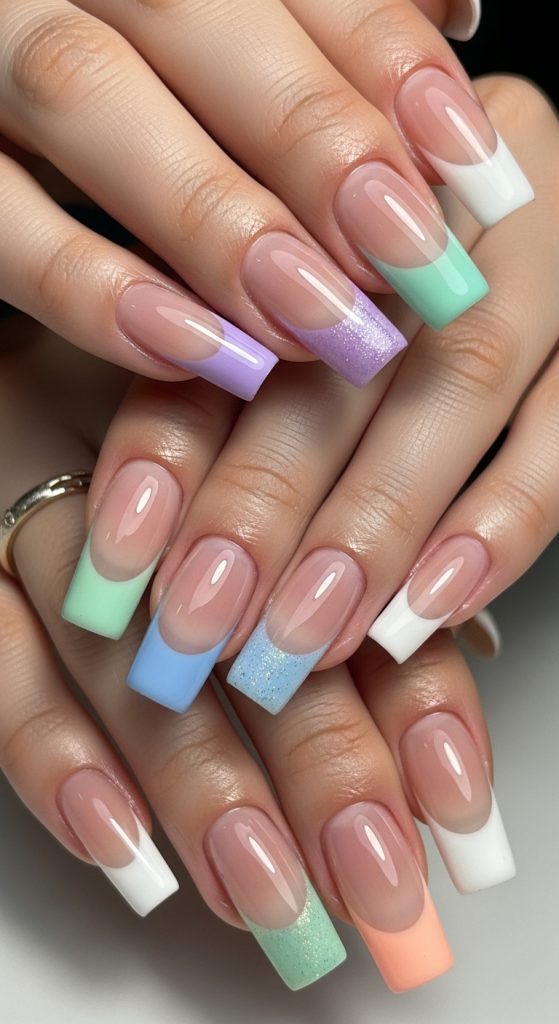
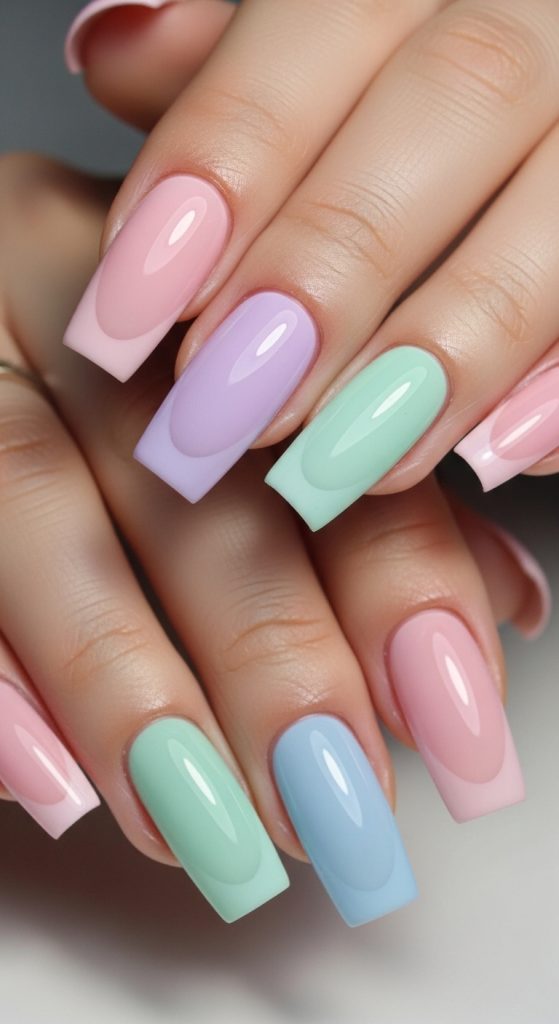
9. Pastel Dream Duck Nails (Soft Aesthetic Multi-Color Set)
What it is
Pastel dream duck nails focus on soft, aesthetic colors combined in a balanced multi-tone design. Instead of one bold statement color, this style uses multiple pastel shades like lavender, baby pink, mint, and soft blue to create a dreamy, cohesive look.
The wide duck nail shape allows each color to stand out individually while still feeling part of a unified set. The key is harmony, not contrast.
This design feels light, feminine, and highly Pinterest-friendly.
How to implement (practical steps)
Nail structure:
- Medium duck nails for balanced color display
- Smooth and evenly shaped acrylic base
Color strategy:
- Use 3–5 pastel shades maximum
- Assign one color per nail or create soft gradients
- Avoid mixing neon or overly dark tones
Design approach:
- Alternate colors across nails for balance
- Or use soft ombre transitions between two pastels
- Keep design simple—focus is color, not detailing
Optional enhancements:
- Add minimal pearl accents on 1–2 nails
- Light shimmer top coat for soft glow effect
- Very subtle line art if needed
Finishing:
- Glossy top coat for fresh aesthetic
- Keep overall look soft and clean
Best for
- Soft aesthetic lovers
- Everyday stylish nails
- Pinterest-inspired beauty looks
This works best when you want cute but coordinated nails.
Pro tip
Stick to pastel tones with similar saturation levels. Mixing strong and weak pastels breaks the harmony.
Mistake to avoid
Don’t add too many patterns or heavy rhinestones. This design relies on simplicity and color balance.
10. 3D Flower Duck Nails (Sculpted Garden Luxury Design)
What it is
This design turns duck nails into a mini 3D floral sculpture, where raised flowers become the main focus instead of flat nail art. Because duck nails offer a wide surface, they are perfect for detailed floral work that needs space and dimension.
Unlike printed floral designs, this version uses acrylic sculpting or gel 3D art, making the flowers physically raised. The result is soft, romantic, and highly artistic—but still bold because of the duck shape.
It’s essentially wearable art, not just nail polish.

How to implement (practical steps)
Nail structure:
- Medium to long duck nails for enough space
- Strong acrylic base to support 3D elements
- Smooth surface before design starts
Base layer:
- Nude, soft pink, or milky white base
- Keep tone neutral so flowers stand out
3D flower creation:
- Use acrylic powder or 3D gel to sculpt petals
- Build flowers layer by layer for depth
- Place flowers near center or one side (not everywhere)
Detailing:
- Add tiny rhinestones or pearl centers
- Use green leaf accents sparingly
- Avoid overcrowding the nail surface
Finishing:
- Seal base carefully while keeping 3D texture intact
- Do not flatten sculpted elements
Best for
- Bridal or event nails
- Soft feminine luxury looks
- People who love artistic nail designs
This works best when you want nails that look handcrafted and detailed.
Pro tip
Limit full 3D flowers to 1–2 nails per hand for balance and elegance.
Mistake to avoid
Don’t place large flowers on every nail. Overuse destroys the luxury feel and makes it look heavy.
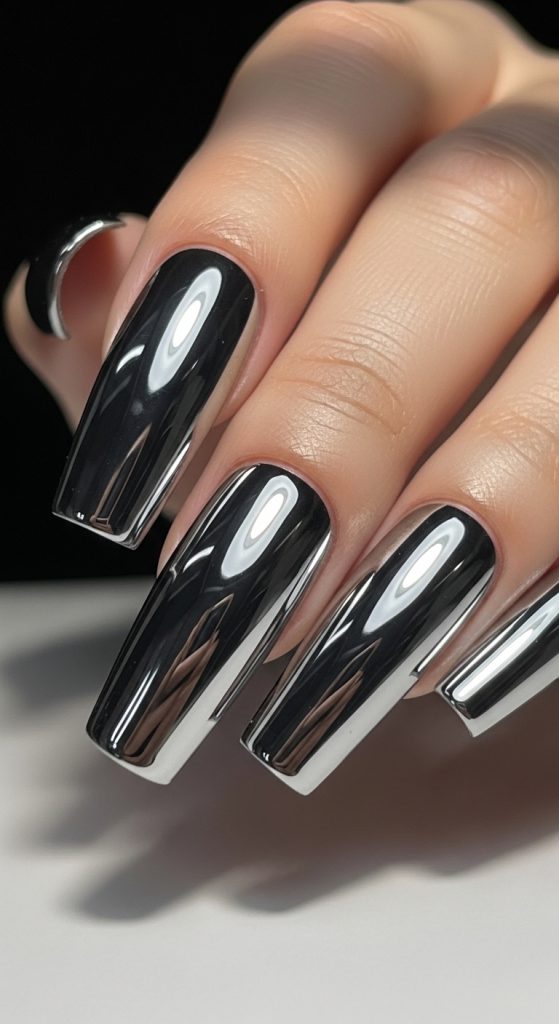
11. Mirror Chrome Duck Nails (Futuristic High-Impact Shine)
What it is
Mirror chrome duck nails are all about maximum reflection and futuristic shine. The wide duck shape enhances the mirror effect, making the nails look like polished metal surfaces.
Unlike soft chrome styles, this one is sharp, bold, and highly reflective. It’s designed to stand out instantly under any light.
This is a statement look—not subtle in any way.
How to implement (practical steps)
Nail structure:
- Long duck nails for full reflective surface
- Perfectly smooth acrylic finish (no imperfections allowed)
Base layer:
- Black or deep gel base for stronger chrome reflection
- Cure evenly for smooth foundation
Chrome application:
- Apply high-quality mirror chrome powder
- Rub evenly until full reflective finish appears
- Ensure no patchy or dull areas
Sealing:
- Use non-dulling no-wipe top coat
- Seal carefully to preserve shine
Optional accents:
- Keep most nails full chrome
- Add one accent nail with minimal rhinestones or line detail
Best for
- Party looks and nightlife
- Fashion-forward personalities
- People who love bold futuristic styles
This works best when you want strong visual impact with minimal design effort.
Pro tip
Black base = deeper mirror effect. Lighter bases = softer chrome glow.
Mistake to avoid
Don’t touch chrome surface before sealing—it ruins the mirror finish permanently.
12. Jelly Transparent Duck Nails (Glass Effect Aesthetic)
What it is
Jelly duck nails use semi-transparent acrylic colors to create a glass-like, see-through effect. Instead of solid opacity, the nails appear soft, glossy, and slightly translucent.
The duck shape makes this effect even more interesting because light passes through the wide surface, creating depth and shine.
This style feels playful, modern, and slightly futuristic at the same time.
How to implement (practical steps)
Nail structure:
- Medium to long duck nails for full transparency effect
- Smooth and even acrylic shaping
Base material:
- Use jelly acrylic or diluted gel polish
- Choose colors like pink, red, purple, or orange jelly tones
Layering technique:
- Apply thin layers to maintain transparency
- Build color gradually, not in thick coats
- Keep consistency even across all nails
Design options:
- Add minimal glitter inside jelly layer
- Include tiny encapsulated charms or flakes
- Keep most nails simple and clear
Finishing:
- High-gloss top coat for glass effect
- Ensure surface is perfectly smooth
Best for
- Trendy aesthetic lovers
- Summer or vacation looks
- People who like playful but modern nails
This works best when you want soft color with unique visual depth.
Pro tip
Less pigment = better jelly effect. Over-saturation kills transparency.
Mistake to avoid
Don’t mix opaque polish with jelly nails—it breaks the glass illusion completely.
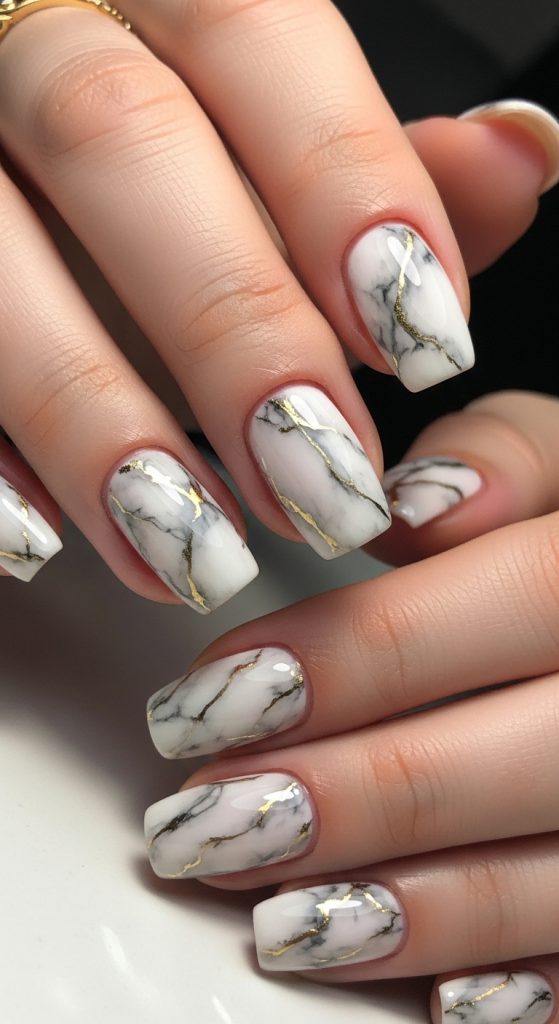
13. Luxury Marble Duck Nails (Elegant Stone-Inspired Design)
What it is
Luxury marble duck nails mimic the natural veining of marble stone, giving a high-end, elegant finish. The wide duck shape allows marble patterns to flow freely without looking cramped.
This design is popular because it looks expensive without needing heavy embellishment. The focus is on natural movement inside the pattern, not decoration.
It’s subtle luxury—clean, structured, and timeless.
How to implement (practical steps)
Nail structure:
- Medium duck nails for balanced marble flow
- Smooth base is essential
Base layer:
- White, nude, or soft beige base
- Keep it clean and even
Marble effect:
- Use thin brush or water-marble technique
- Add soft grey, black, or gold veins
- Blend gently to avoid harsh lines
Detail balance:
- Keep veins random but controlled
- Avoid over-patterning
Optional luxury upgrade:
- Add thin gold foil veins for premium finish
- Use glossy top coat for polished stone look
Best for
- Elegant everyday wear
- Formal events or professional settings
- Minimal luxury lovers
This works best when you want sophisticated nails without loud designs.
Pro tip
Leave negative space in marble design—it makes the pattern look more realistic and expensive.
Mistake to avoid
Don’t over-blend colors. Marble should look natural, not muddy or overmixed.