
Your backyard is more than just a patch of grass or concrete—it’s an extension of your home, a space where you can relax, entertain, and reconnect with nature. A well-designed backyard has the power to transform your lifestyle, offering a retreat for solitude, a vibrant venue for social gatherings, and a canvas to express your creativity. Yet, one common misconception is that creating a stunning backyard requires a massive investment of money. The truth is, with a little imagination, strategic planning, and a focus on budget-friendly solutions, you can achieve a backyard transformation that is both visually appealing and functional, all without breaking the bank.
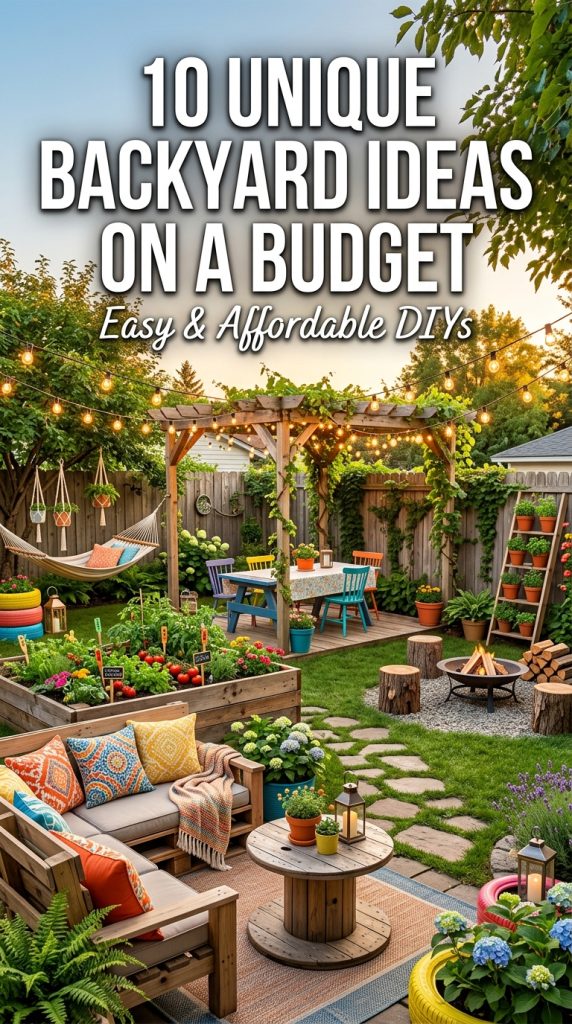
Budget-friendly backyard design is all about maximizing impact while minimizing cost. It’s the art of creatively using materials, repurposing existing items, and choosing high-value focal points that elevate the space without expensive renovations. From DIY projects and affordable decorative elements to clever landscaping tricks, there are countless ways to craft a backyard that feels high-end, Pinterest-worthy, and personal—all on a limited budget. The beauty of designing on a budget is that it encourages resourcefulness and individuality, allowing you to infuse your personality and style into the space rather than following cookie-cutter trends.
One of the keys to a unique, budget-conscious backyard is prioritization. Instead of trying to overhaul every corner of your outdoor area, focus on high-impact changes that provide both aesthetic appeal and functionality. For example, creating a cozy seating area with cushions, a DIY fire pit, and string lights can instantly transform a backyard into a welcoming gathering space. Adding greenery, whether through low-cost potted plants, vertical garden solutions, or repurposed planters, injects life and color while maintaining affordability. Small decorative touches, like handmade lanterns, colorful rugs, or painted fences, can dramatically change the mood of your backyard and make it feel curated and intentional.
DIY projects are the cornerstone of budget-friendly backyard design. Not only do they save money, but they also allow for complete customization. For instance, building furniture from pallets, crafting your own garden planters, or painting old chairs and tables can add charm and originality to your backyard. These projects also provide an opportunity to experiment with styles—boho, rustic, modern, or eclectic—without committing to expensive purchases. Beyond aesthetics, DIY solutions often promote sustainability, as you can repurpose or upcycle materials rather than buying new, costly items.
Another essential aspect of a budget backyard makeover is smart landscaping. You don’t need professional landscapers or expensive turf to achieve a lush and inviting space. Low-maintenance plants, container gardens, and creative use of natural materials like stones, gravel, or reclaimed wood can create a visually interesting and functional backyard environment. By strategically placing plants, creating defined zones, and using layers of texture, you can produce depth and dimension, making the backyard feel much larger and more curated than it actually is. Simple additions like a stepping stone pathway, a DIY trellis, or a vertical herb garden can transform plain areas into focal points without significant expense.
Lighting is another powerful tool in budget backyard design. Affordable string lights, solar-powered lanterns, or DIY candle setups can instantly change the ambiance of your outdoor space. Good lighting not only enhances safety but also creates cozy zones that invite evening gatherings and relaxation. When combined with textiles, rugs, and small decorative elements, lighting adds warmth and intimacy, making your backyard feel like an oasis regardless of size or budget.
Functionality and versatility are also critical considerations for budget-friendly backyard design. Multipurpose furniture, modular seating, and flexible zones can help you get the most out of your space without adding unnecessary expense. A simple bench can double as storage, a low pallet table can serve as a dining or coffee area, and a small corner can be transformed into a play area, dining nook, or meditation space depending on your needs. By thinking creatively about how each element serves multiple purposes, you can maximize utility while keeping costs down.
Finally, the beauty of a budget backyard lies in personalization. Because expensive, pre-designed outdoor furniture or decor isn’t the focus, there’s room to experiment with colors, textures, and creative touches that reflect your personality. Hand-painted garden signs, DIY plant markers, and personalized planters add character and a sense of ownership to the space. A backyard designed on a budget doesn’t mean sacrificing style—it means embracing ingenuity, creativity, and resourcefulness to craft a unique outdoor environment that is both beautiful and practical.
In this guide, we will explore 10 unique backyard ideas on a budget. Each idea has been carefully curated to offer high visual impact, functional value, and easy implementation without requiring a large investment. These ideas range from DIY furniture and budget landscaping solutions to creative seating arrangements, lighting tricks, and decorative touches that make your backyard feel like a high-end retreat. You’ll discover step-by-step instructions, materials lists, and practical tips to achieve each idea with minimal cost, all while creating a Pinterest-worthy backyard that your friends and family will love.
Whether your backyard is small, medium, or expansive, these ideas will inspire you to think outside the box, embrace creativity, and make the most of what you have. From cozy seating corners to vibrant garden zones, from whimsical lighting setups to clever storage hacks, this article will provide actionable guidance to help you transform your outdoor space into a unique and inviting sanctuary—all on a budget. By the end, you’ll have the tools, inspiration, and confidence to design a backyard that is stylish, functional, and personalized, proving that you don’t need to spend a fortune to create a space that feels luxurious, Instagram-worthy, and uniquely yours.
Get ready to explore 10 incredible backyard ideas on a budget that combine creativity, practicality, and charm, turning your outdoor space into a functional and beautiful retreat that looks expensive but costs far less than you imagine. 🌿✨
Idea 1: DIY Pallet Lounge Set
Introduction:
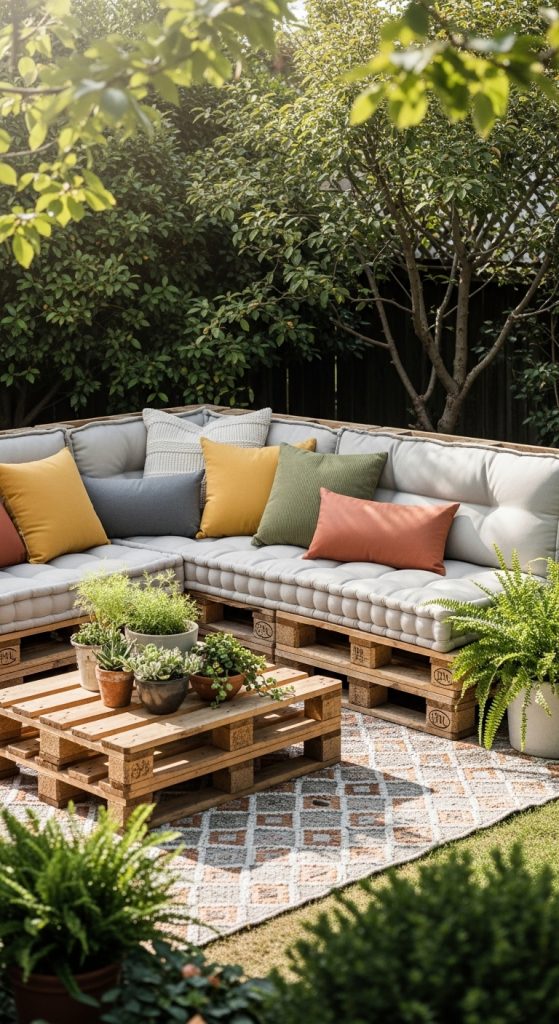
A DIY pallet lounge set is one of the most cost-effective ways to transform your backyard into a comfortable and stylish outdoor living area. Pallets are often free or very inexpensive, and with some sanding, paint, and cushions, you can create a functional seating area that rivals expensive outdoor furniture. This idea is perfect for those on a budget because it utilizes materials that might otherwise go to waste, turning them into a statement piece for your backyard. Adding cushions, throws, and low tables enhances comfort while keeping the eclectic Boho or rustic charm intact. Not only is this solution affordable, but it also allows for customization—size, shape, color, and layout are entirely up to you.
Definition / Explanation:
A pallet lounge set consists of stacked wooden pallets repurposed into seating arrangements. Typically, the pallets serve as the base for sofas, benches, or tables. This approach leverages sustainable, reclaimed materials while offering flexibility in design. Layering with cushions and fabrics transforms the raw wood into a cozy outdoor oasis.
Step-by-Step How-To:
- Source pallets: Collect clean, sturdy pallets (usually free from hardware stores).
- Sand the wood: Remove rough edges and splinters to avoid injuries.
- Paint or stain (optional): Customize with color or seal for weather resistance.
- Stack and secure: Arrange pallets to desired height; secure with screws or brackets.
- Add seating layers: Place outdoor cushions and pillows on top for comfort.
- Include a table: Use a pallet as a low coffee table or add wheels for mobility.
- Accessorize: Add potted plants, lanterns, or rugs to create a cozy atmosphere.
Materials / Tools Used:
- Wooden pallets
- Sandpaper or electric sander
- Screws and brackets
- Paint or wood stain (optional)
- Outdoor cushions and throws
- Potted plants or small decorative items
Pinterest-Optimized Tip: Capture a wide-angle shot showing the full lounge set surrounded by greenery, rugs, and cushions. Close-ups of layered cushions and textures enhance DIY appeal.
Idea 2: String Light Canopy
Introduction:
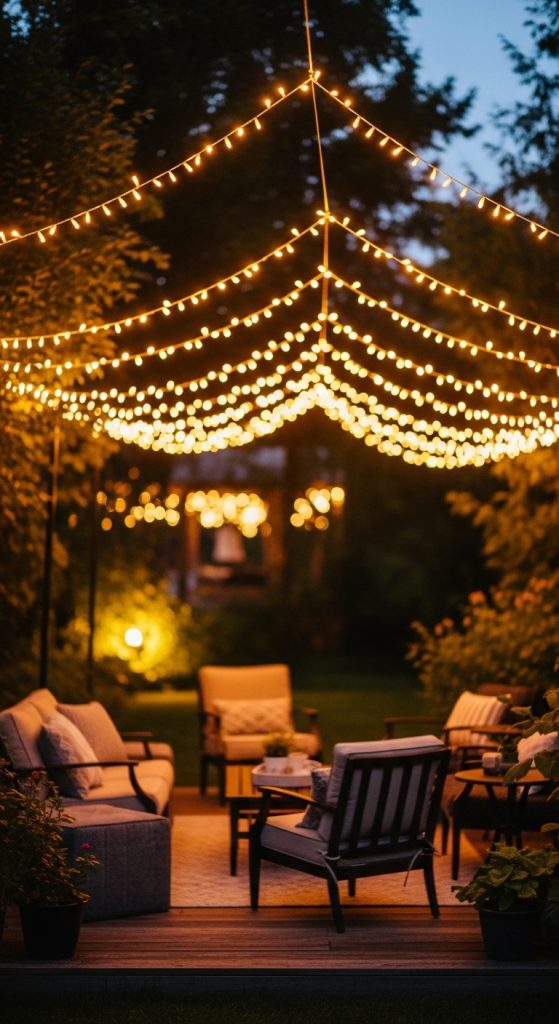
String lights instantly transform any backyard, creating warmth, intimacy, and a magical ambiance without costing a fortune. A DIY string light canopy is ideal for adding personality and charm to your outdoor space. By draping lights above a seating area, pergola, or dining table, you can elevate the atmosphere for evening gatherings or quiet nights alone. This budget-friendly solution is versatile, easy to install, and works in both small and large backyards. The glow from string lights enhances textures, plants, and furniture, making your backyard look far more luxurious than it actually is.
Definition / Explanation:
A string light canopy consists of multiple strands of lights arranged overhead, forming a ceiling effect over a specific zone in the backyard. It highlights focal areas, adds visual interest, and creates a Pinterest-worthy evening ambiance.
Step-by-Step How-To:
- Choose lights: Select outdoor-rated LED or solar string lights.
- Measure space: Determine length, width, and height of the area to cover.
- Install hooks or anchors: Attach to pergolas, fences, or posts securely.
- Drape lights: Hang in zigzag, radial, or crisscross patterns.
- Secure loose ends: Tie or clip to maintain tension.
- Test lighting: Plug in or switch on to adjust spacing and height.
- Optional decoration: Add hanging plants or lanterns to enhance Boho vibes.
Materials / Tools Used:
- Outdoor LED or solar string lights
- Hooks, anchors, or clips
- Ladder or step stool
- Measuring tape
- Optional: hanging planters or lanterns
Pinterest-Optimized Tip: Shoot the canopy at twilight with cozy seating underneath for a dreamy, save-worthy Pinterest scene.
Idea 3: Repurposed Planter Garden
Introduction:
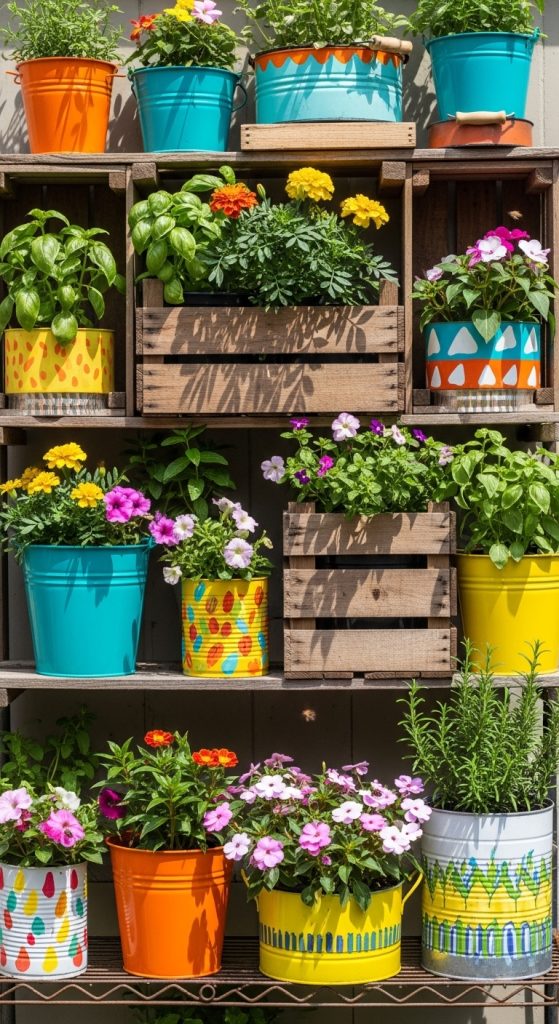
Creating a backyard garden doesn’t have to cost a fortune. Using repurposed containers like old buckets, crates, or jars as planters allows you to cultivate greenery without buying expensive pots. This idea adds charm, personality, and a whimsical touch to your backyard. Mixing colors, sizes, and heights creates visual interest while promoting sustainability by reusing materials. A DIY repurposed planter garden can accommodate flowers, herbs, or small vegetables, making it both decorative and functional. It’s perfect for budget-conscious homeowners who want a lively, lush backyard.
Definition / Explanation:
Repurposed planters involve transforming household items or discarded materials into plant containers. This not only saves money but encourages creativity and eco-friendly practices while enhancing the aesthetic appeal of the backyard.
Step-by-Step How-To:
- Collect containers: Use old buckets, crates, jars, or tins.
- Prepare containers: Drill drainage holes if necessary; clean thoroughly.
- Add soil: Use quality potting soil suitable for selected plants.
- Plant greenery: Choose herbs, flowers, or small vegetables for variety.
- Arrange creatively: Place at different heights using shelves, crates, or stands.
- Optional decor: Paint containers or add decorative labels to personalize.
- Maintain plants: Water regularly and prune to keep plants healthy.
Materials / Tools Used:
- Old containers (buckets, crates, jars, tins)
- Drill (for drainage holes)
- Potting soil
- Plants (flowers, herbs, or veggies)
- Paint or markers for decoration
- Shelves, stands, or crates for elevation
Pinterest-Optimized Tip: Capture a colorful, layered display of repurposed planters with greenery cascading naturally. Include close-ups of painted designs for visual appeal.
Idea 4: DIY Fire Pit with Stones
Introduction:
An outdoor fire pit can be the centerpiece of your backyard without costing a fortune. Using affordable stones, bricks, or pavers, you can build a DIY fire pit that adds warmth, ambiance, and a gathering spot for family and friends. This budget-friendly project enhances both functionality and aesthetics, creating a cozy zone for storytelling, roasting marshmallows, or evening relaxation. A stone fire pit combines rustic charm with practicality, making it a standout feature that elevates your backyard’s overall design.
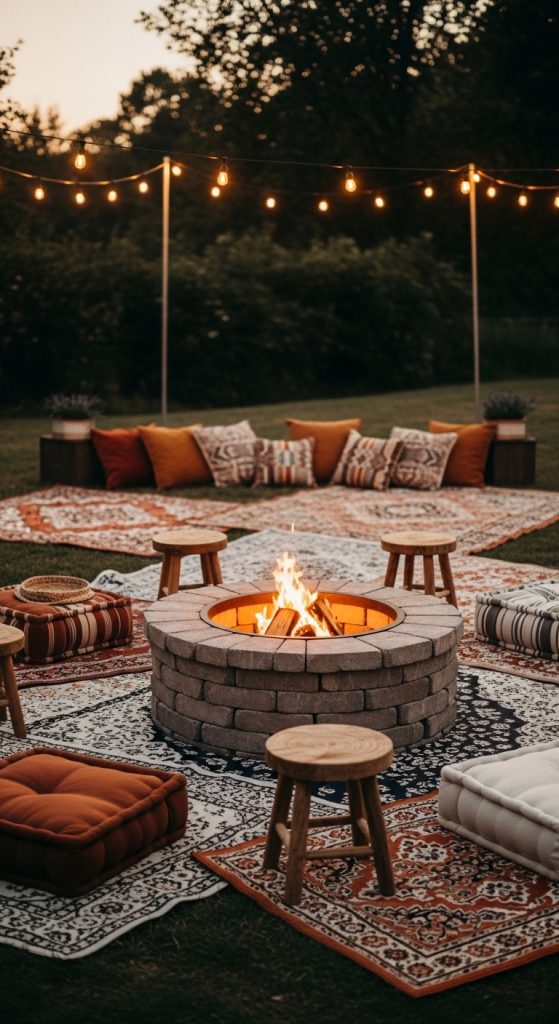
Definition / Explanation:
A stone fire pit is a low-cost, circular or square structure built from stones or bricks, designed to safely contain fire. It provides warmth, seating focus, and visual interest while fitting seamlessly into budget-conscious backyard designs.
Step-by-Step How-To:
- Select location: Choose a flat, non-flammable area away from structures.
- Mark perimeter: Outline the shape and size with chalk or rope.
- Dig shallow pit: About 6–12 inches deep for stability.
- Lay stones or bricks: Arrange in a circle or square; stack securely.
- Level stones: Ensure even height to prevent tipping.
- Fill base: Use gravel or sand for fire safety and stability.
- Test fire: Light a small fire to check airflow and durability.
Materials / Tools Used:
- Stones, bricks, or pavers
- Gravel or sand
- Shovel and leveling tools
- Firewood
- Optional seating: cushions, logs, or low benches
Pinterest-Optimized Tip: Photograph at dusk with a glowing fire, surrounded by cushions and plants to create a warm, inviting, and save-worthy backyard scene.
Idea 5: Painted Fence or Wall Accent
Introduction:
Transforming a plain fence or wall with paint is one of the simplest and most budget-friendly ways to give your backyard a fresh, vibrant look. Adding colors, geometric patterns, or a mural instantly elevates your outdoor space, making it feel more personalized and visually dynamic. This approach works for any size backyard and can complement existing landscaping, furniture, or decorative elements. Beyond aesthetics, a painted wall can serve as a backdrop for seating areas, garden zones, or play spaces, adding depth and character without requiring expensive renovations.
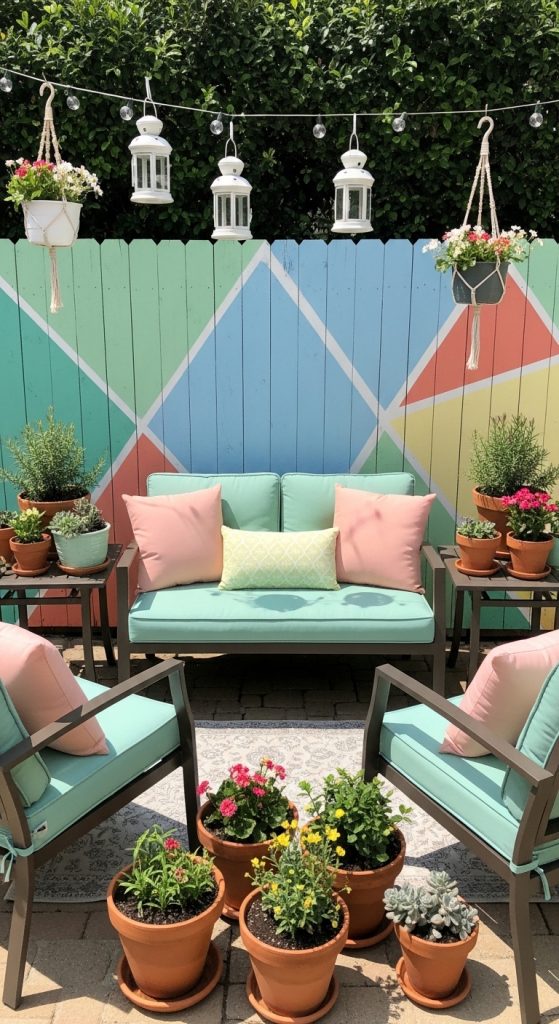
Definition / Explanation:
Painting a fence or wall accent involves applying color, patterns, or artwork to a vertical surface in the backyard. It enhances visual interest, creates focal points, and allows homeowners to express creativity while staying on budget.
Step-by-Step How-To:
- Clean surface: Remove dirt, debris, or peeling paint.
- Apply primer: Ensures paint adheres and lasts longer.
- Choose colors/patterns: Select outdoor-safe paint in vibrant or complementary tones.
- Paint base layer: Cover entire fence or wall evenly.
- Add patterns or designs: Use stencils, tape, or freehand designs for accents.
- Allow to dry: Let paint fully cure before adding decorations.
- Enhance with decor: Hang planters, lights, or artwork for added dimension.
Materials / Tools Used:
- Outdoor paint (acrylic or latex)
- Primer
- Brushes, rollers, or stencils
- Painter’s tape
- Cleaning supplies (soap, water, scrub brush)
- Optional: hanging plants or decorative elements
Pinterest-Optimized Tip: Capture the painted fence with seating, cushions, or garden elements in front. Bright, cheerful colors and patterns make it visually pop and highly save-worthy.
Perfect! Let’s continue with Ideas 6–10 for your article: “10 Unique Backyard Ideas On A Budget”, keeping the same Pinterest-ready, DIY-friendly, detailed format (~500 words each).
Idea 6: Vertical Herb Garden
Introduction:
A vertical herb garden is a smart, budget-friendly way to bring greenery and functionality to your backyard without taking up much floor space. Perfect for small yards or patios, this idea transforms a plain wall, fence, or balcony into a productive and visually appealing feature. Growing herbs vertically not only saves space but also makes fresh ingredients easily accessible for cooking. A DIY vertical herb garden can be customized to fit your style—whether rustic, modern, or Boho—using inexpensive materials like wooden crates, pallets, or hanging planters. This project encourages sustainability, adds texture and layers to your backyard, and creates a natural focal point that draws attention.
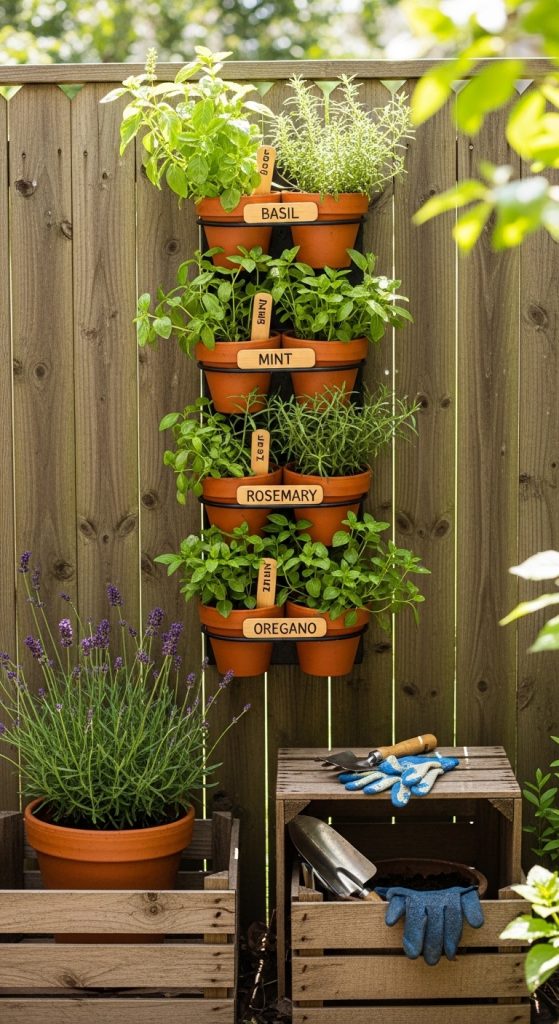
Definition / Explanation:
A vertical herb garden involves growing herbs in stacked or wall-mounted containers, allowing plants to thrive upwards instead of spreading across the ground. It maximizes space, introduces greenery, and offers a practical benefit by providing fresh herbs for culinary use.
Step-by-Step How-To:
- Choose a location: Pick a sunny wall or fence with good drainage.
- Select containers: Use wooden crates, hanging pots, or repurposed items.
- Mount containers: Secure crates or planters to the wall or fence using screws and brackets.
- Add soil and plants: Fill containers with potting soil and plant herbs like basil, mint, rosemary, or thyme.
- Arrange layers: Position taller plants at the top and trailing herbs below for visual interest.
- Water and maintain: Ensure regular watering and prune for growth.
- Optional décor: Paint or decorate containers for a colorful, personal touch.
Materials / Tools Used:
- Wooden crates, pallets, or hanging pots
- Screws, brackets, and drill
- Potting soil
- Herbs (basil, mint, rosemary, thyme, etc.)
- Paint or markers for decoration (optional)
- Watering can
Pinterest-Optimized Tip: Capture a colorful vertical herb wall with cascading greenery, rustic containers, and sunlight filtering through, creating a highly save-worthy and functional backyard focal point.
Idea 7: DIY Outdoor Rug Lounge
Introduction:
Creating a cozy outdoor lounge area doesn’t have to be expensive. Using a DIY or affordable outdoor rug, you can define a seating space, add color, and introduce texture to your backyard. Outdoor rugs make the area feel polished and inviting while protecting surfaces and providing comfort underfoot. Pairing rugs with inexpensive seating options like cushions, poufs, or DIY pallet furniture creates a functional and budget-friendly lounge. This approach encourages creativity—you can mix and match patterns, layer rugs, and experiment with colors to suit your backyard style. The result is a stylish, Pinterest-worthy setup that feels luxurious without the high cost.
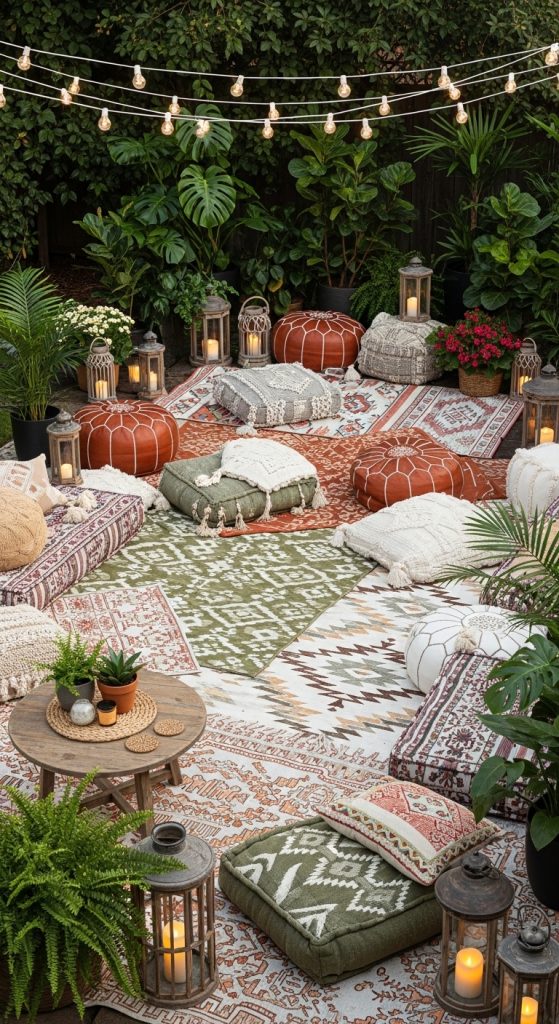
Definition / Explanation:
A DIY outdoor rug lounge is an area defined by a large, inexpensive rug or a layered rug setup, creating a dedicated seating zone in your backyard. Adding cushions, low tables, and decorative elements enhances comfort and visual appeal.
Step-by-Step How-To:
- Select a rug: Choose an outdoor-safe, weather-resistant rug that fits your space.
- Prepare seating: Use floor cushions, poufs, or DIY pallet seating for flexibility.
- Layer rugs (optional): Add smaller rugs on top to create dimension and patterns.
- Add comfort items: Scatter cushions, throws, or blankets for warmth.
- Incorporate décor: Add lanterns, potted plants, or small tables to enhance the vibe.
- Define boundaries: Use planters or stones to mark the lounge area.
- Maintain: Shake or clean rugs periodically to keep them fresh.
Materials / Tools Used:
- Outdoor rug(s)
- Cushions, throws, or poufs
- Small coffee table or trays
- Potted plants and lanterns
- Optional: stones, garden markers
Pinterest-Optimized Tip: Photograph from an overhead angle showing layered rugs, vibrant cushions, and surrounding greenery to emphasize texture, warmth, and style.
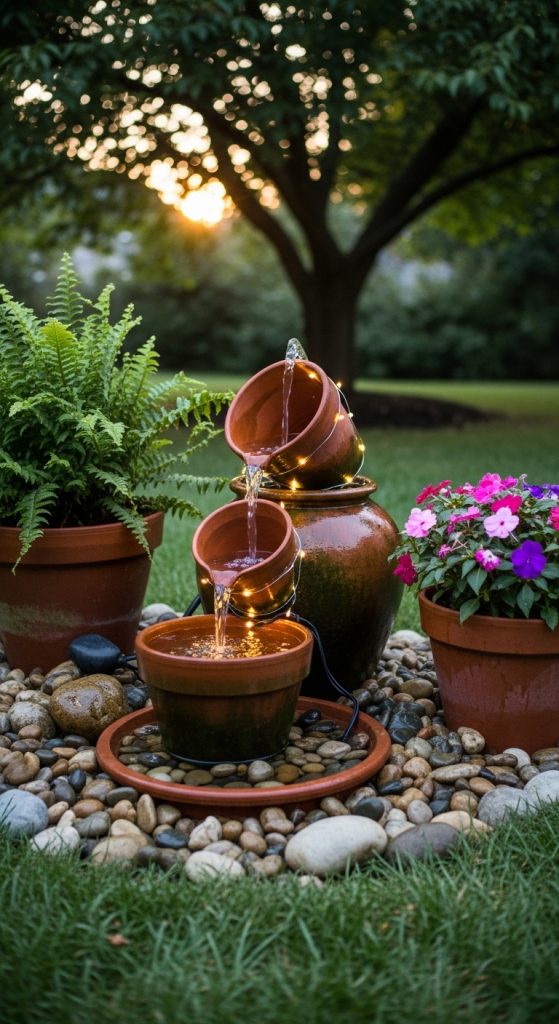
Idea 8: Budget-Friendly Water Fountain
Introduction:
Adding a water feature to your backyard can elevate the space, creating a tranquil and inviting atmosphere. A DIY water fountain can be made inexpensively with materials like clay pots, a small pump, and stones. Beyond its aesthetic appeal, a water fountain adds soothing sounds, promotes relaxation, and can serve as a centerpiece for a seating area. A budget-friendly fountain allows you to enjoy the luxury of a high-end backyard water feature without spending hundreds of dollars. It’s ideal for creating a cozy corner, enhancing meditation spots, or simply adding charm to your garden.
Definition / Explanation:
A budget-friendly water fountain is a small, DIY feature made from affordable materials that circulate water, producing a calming effect. It combines practicality, sustainability, and design, making it a standout yet inexpensive backyard addition.
Step-by-Step How-To:
- Choose a location: Select a level, visible spot near a power source.
- Gather materials: Clay pots, water pump, stones, and sealant.
- Stack pots: Arrange pots with openings aligned to allow water flow.
- Install pump: Position submersible pump in the base pot and connect tubing.
- Add stones: Decorate and stabilize the structure.
- Fill with water: Ensure proper flow and check for leaks.
- Optional décor: Add plants, candles, or lanterns around the fountain.
Materials / Tools Used:
- Clay pots of varying sizes
- Submersible water pump
- Decorative stones
- Sealant (optional)
- Extension cord or nearby power source
- Optional: potted plants, lanterns
Pinterest-Optimized Tip: Capture the fountain with soft evening light, surrounded by greenery, showing the gentle water flow for a serene, save-worthy aesthetic.
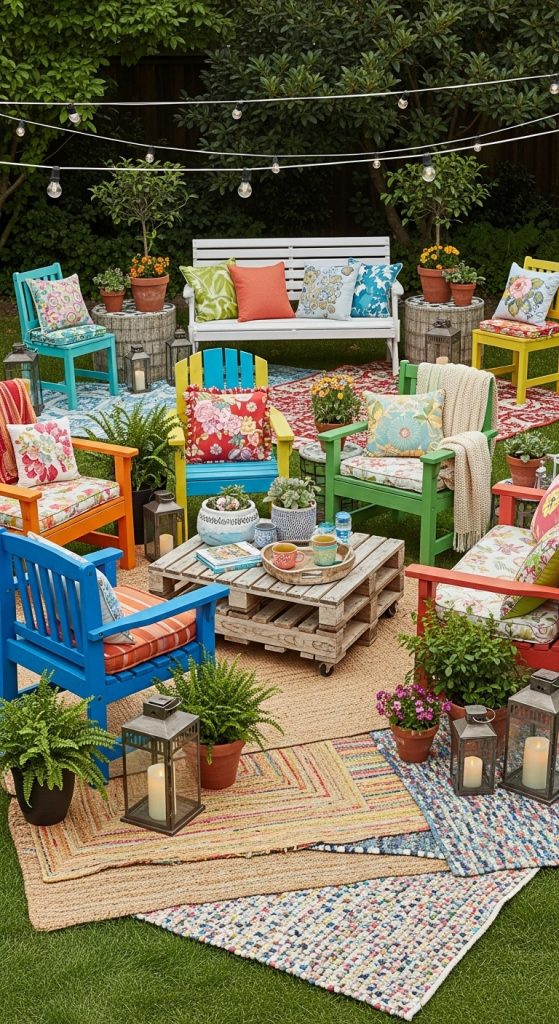
Idea 9: Upcycled Outdoor Seating
Introduction:
Transforming old furniture into outdoor seating is an affordable and creative way to elevate your backyard. Chairs, benches, or even drawers can be repurposed, painted, and cushioned to create functional seating areas. Upcycling adds personality, encourages sustainability, and allows you to design pieces tailored to your space and style. This approach is perfect for homeowners on a budget who want unique furniture that reflects individuality. By layering cushions, throws, and small rugs, you can turn these upcycled items into stylish, cozy backyard seating arrangements that are Pinterest-worthy and functional.
Definition / Explanation:
Upcycled outdoor seating is the process of converting old or discarded furniture into functional backyard seating. By cleaning, repairing, and decorating, you create unique pieces that are both affordable and eco-friendly.
Step-by-Step How-To:
- Collect furniture: Find old chairs, benches, drawers, or wooden crates.
- Clean and repair: Sand, tighten screws, and fix any structural issues.
- Paint or stain: Choose weather-resistant paint for durability and color.
- Add cushions: Use outdoor cushions, pillows, or DIY foam inserts for comfort.
- Decorate: Add throws, rugs, or small side tables to complete the setup.
- Arrange strategically: Place seating in conversation zones or near focal points.
- Maintain: Cover or store during harsh weather to prolong lifespan.
Materials / Tools Used:
- Old furniture (chairs, benches, drawers)
- Sandpaper, brushes, and outdoor paint
- Screws, brackets, and basic tools
- Cushions, throws, and rugs
- Optional: side tables, lanterns, or planters
Pinterest-Optimized Tip: Photograph your upcycled seating in a styled backyard corner with layered textiles and greenery to show creativity and budget-friendly charm.
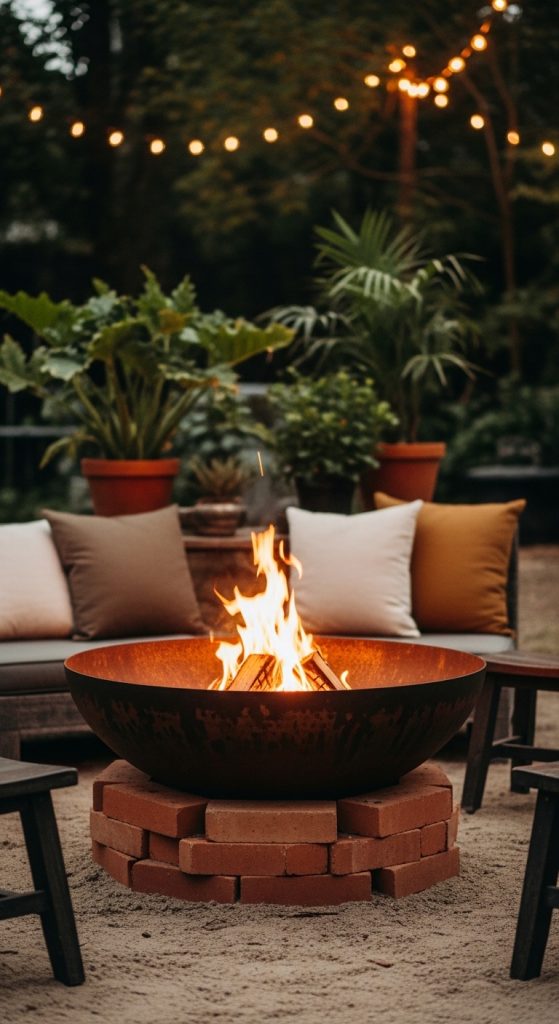
Idea 10: DIY Fire Pit from a Metal Bowl
Introduction:
A DIY fire pit made from a simple metal bowl is a budget-friendly way to add warmth and a gathering spot to your backyard. Unlike traditional stone fire pits, this version is portable, inexpensive, and quick to assemble. Pairing it with inexpensive seating like cushions or stools creates a cozy nook for friends and family. The fire pit not only provides warmth but also adds ambiance, making the backyard inviting for evening relaxation or casual parties. Its simple design allows customization with stones, sand, or paint to match your backyard style.
Definition / Explanation:
A metal bowl fire pit is an easy, affordable solution for creating a backyard focal point. It uses heat-resistant metal, stones, or sand to safely contain fire while serving as a versatile, portable centerpiece.
Step-by-Step How-To:
- Choose a metal bowl: Preferably fire-safe, 18–24 inches in diameter.
- Prepare base: Place bowl on bricks or a fire-resistant surface.
- Add stones or sand: Fill bottom for stability and safety.
- Position seating: Arrange cushions, poufs, or low benches around the pit.
- Add firewood: Use small logs or charcoal for controlled flames.
- Light and enjoy: Ensure safety precautions and monitor fire at all times.
- Optional décor: Surround with lanterns, rugs, or potted plants for charm.
Materials / Tools Used:
- Fire-safe metal bowl
- Bricks or fireproof base
- Sand or small decorative stones
- Firewood or charcoal
- Seating (cushions, poufs, or benches)
- Lanterns or small outdoor décor
Pinterest-Optimized Tip: Capture a cozy evening scene with fire glowing, surrounded by colorful cushions and ambient lighting for a save-worthy budget-friendly backyard vibe.