
A mud room and laundry room combo sounds simple on paper, but in real life it’s one of the most misused spaces in a home. Most people treat it like a leftover corner—somewhere to shove a washing machine, hang a few hooks, maybe add a cabinet if there’s space left. Then they wonder why it always feels cluttered, stressful, and inefficient.
The problem isn’t the size of the room. It’s the layout.
When a mud room and laundry room share the same space, you are combining two completely different functions. One is about transition—coming in from outside, removing shoes, jackets, bags, and dirt. The other is about repetition—washing, drying, folding, and storing clothes. If these two systems are not properly organized, they constantly interfere with each other. Wet clothes end up near shoes, clean laundry gets mixed with outdoor clutter, and the entire space starts to feel chaotic no matter how clean it actually is.

That’s why layout matters more than design.
A well-planned mud room laundry combo is not just about fitting appliances into a room. It’s about creating a workflow. You need a clear entry zone, a cleaning zone, and a storage or folding zone. If even one of these is missing or poorly placed, the whole system breaks down. For example, if your washer is too far from storage, you waste time carrying clothes across the room. If your bench is in the wrong place, people will block access while using it. Small mistakes create daily frustration.
Another issue most people ignore is traffic flow. This space is often near the entrance of the house, which means it gets constant movement. Kids coming in from outside, adults carrying groceries, wet shoes, laundry baskets—it all happens in the same tight area. Without a smart layout, everything collides. The room becomes a bottleneck instead of a helper space.
If you have a small room, this becomes even more critical. You cannot afford wasted corners or random placement. Every inch must have a purpose. Vertical storage becomes important. Hidden storage becomes important. Even door direction can affect how usable the space feels. A poorly planned door swing can block cabinets or restrict movement without you realizing it until later.
Lighting and ventilation also play a role that people often underestimate. Laundry areas deal with moisture, and mud rooms deal with dirt. If airflow is weak, the space can start to feel damp or smell unpleasant over time. That is not a design issue—it’s a layout issue. Placement of machines, cabinets, and even baskets affects how air moves through the room.
The goal of a good mud room laundry combo is simple: make two messy processes feel controlled. Not perfect, not decorative—controlled. You should be able to walk in, drop items where they belong, complete laundry tasks efficiently, and leave without feeling like you just dealt with chaos.
But most layouts fail because they try to copy inspiration without adapting to real use. A beautiful Pinterest setup might look great, but if it doesn’t match your movement pattern, it becomes frustrating in daily life. Real design is not about aesthetics alone—it’s about repetition. If a layout works smoothly every single day, that’s what makes it good.
This guide focuses on practical layout ideas that actually work in real homes, not just staged images. Each idea is built around flow, function, and realistic space usage—so whether your room is large, narrow, or extremely compact, you can still make it efficient instead of overwhelming.
Because in the end, a mud room laundry combo should reduce stress, not create it.
1. Side-by-Side Workflow Layout (Washer–Dryer + Folding Zone)
Explanation (What it is)
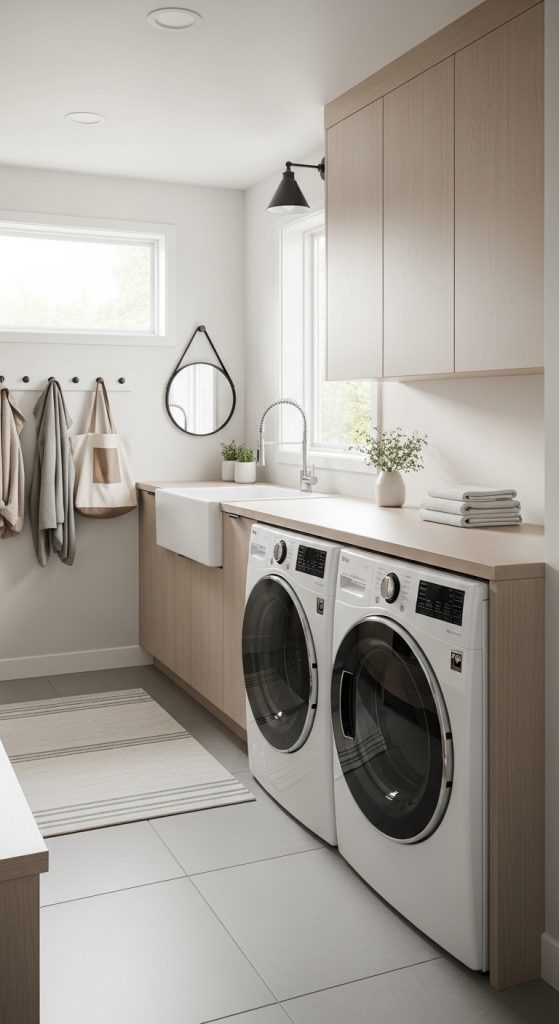
This is the most efficient and commonly used mud room laundry combo layout because it follows a straight workflow system. Everything is arranged in a logical sequence: dirty entry → wash → dry → fold → store. Instead of scattering functions across the room, everything is placed along one wall or in a clean linear setup.
The strength of this layout is simplicity. There are no unnecessary movements, no crossing paths, and no confusion about where things belong. When done correctly, it reduces daily laundry effort significantly because each step flows naturally into the next.
This layout works especially well in narrow or rectangular rooms where space is limited but wall length is available.
How to implement (Practical steps)
Place the washer and dryer side by side on one wall. Ideally, keep them at counter height or slightly elevated if storage allows, so loading and unloading becomes easier.
Directly next to the machines, install a countertop. This becomes your folding zone. The surface should be continuous so clothes can move smoothly from machine to folding without interruption.
Above the countertop, add cabinets or shelves for detergent, baskets, and cleaning supplies. Keep frequently used items at eye level and less-used items higher up.
On the opposite end or nearby section, add hooks or a small bench for mud room use—shoes, jackets, and bags.
If you have a small room, avoid breaking this line into multiple corners. Keeping everything aligned reduces visual clutter and improves efficiency.
Best for
- Narrow or rectangular rooms
- Small to medium homes
- People who want fast, simple laundry workflow
Pro tip
Use a single long countertop instead of separate surfaces. Continuity makes the space feel larger and more organized.
Mistake to avoid
Do not place storage randomly across different walls. It breaks the workflow and forces unnecessary movement during laundry tasks.
2. L-Shaped Corner Combo Layout (Smart Space Utilization)
Explanation (What it is)
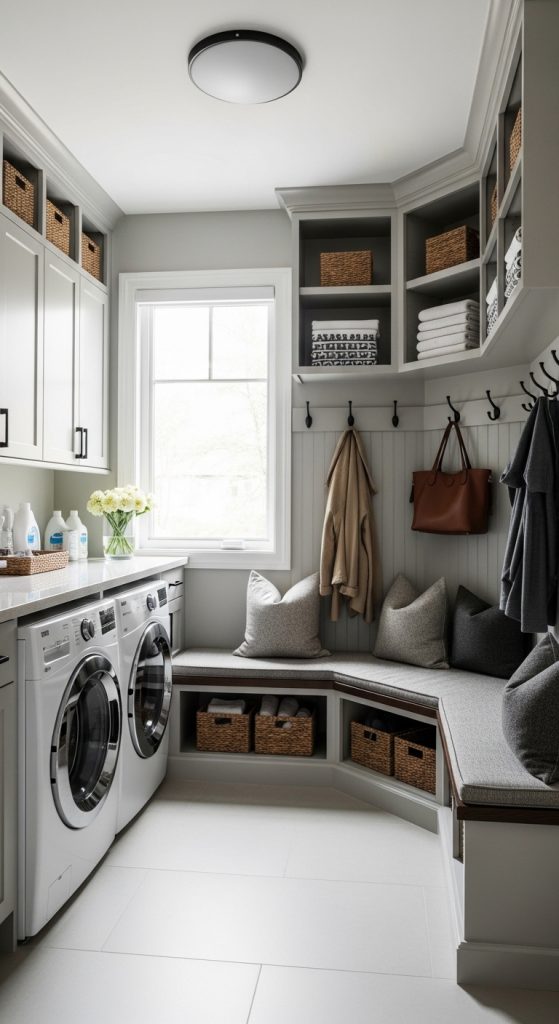
The L-shaped layout uses two adjacent walls to separate functions naturally. One wall is dedicated to laundry tasks, while the other handles mud room storage and entry needs. This creates a natural division without needing physical walls or partitions.
This layout is especially useful when you want to separate “dirty entry” from “clean laundry workflow” while still keeping everything in one connected space.
It also makes better use of corner areas, which are often wasted in poorly planned rooms.
How to implement (Practical steps)
Place washer and dryer along one wall of the L-shape. Keep them close together with a small counter or folding space nearby.
On the second wall, install mud room elements like benches, shoe storage, coat hooks, and baskets. This becomes the transition zone where people enter, remove items, and organize belongings.
Use the corner as a connecting point rather than a blocked space. You can add open shelving or a small cabinet in the corner if needed, but avoid heavy appliances there.
Keep upper storage consistent on both walls to maintain visual balance. Matching cabinets or shelving helps the space feel unified instead of split.
If you have a small room, this layout helps prevent crowding because each wall has a clear purpose.
Best for
- Homes with square or slightly open corner spaces
- Families with frequent entry/exit activity
- People who want separation between laundry and mud functions
Pro tip
Use different flooring zones subtly (like mats or tiles) to define the mud area vs laundry area without adding physical barriers.
Mistake to avoid
Do not overload the corner. Many people try to “use every inch” and end up blocking movement instead of improving function.
3. Stackable Vertical Layout (Compact Space Solution)
Explanation (What it is)
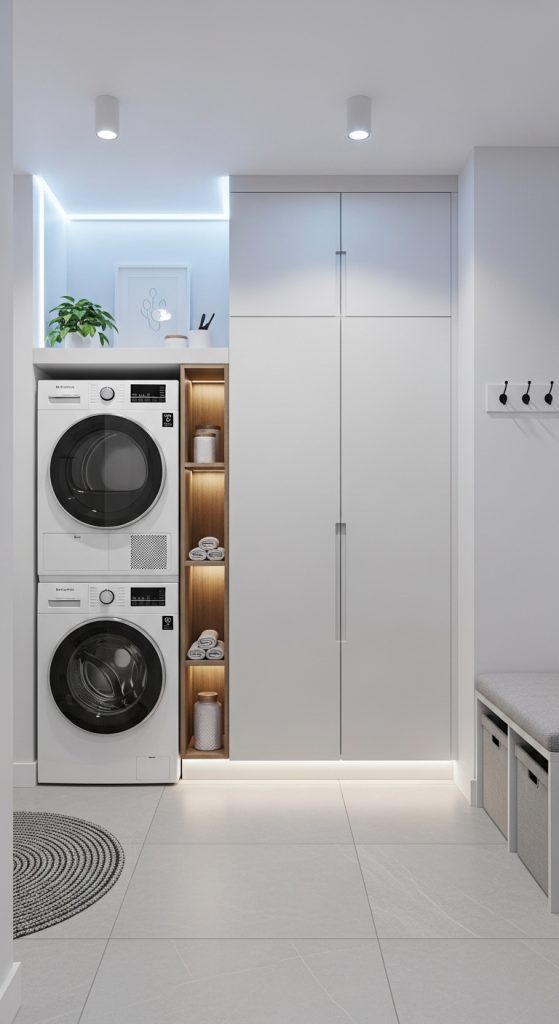
The stackable vertical layout is designed for small or tight spaces where horizontal room is limited. Instead of spreading appliances and storage across walls, everything is built upward. The washer and dryer are stacked vertically, and storage is built above and around them.
This layout focuses on maximizing vertical space instead of floor space, which is critical in compact mud room laundry combos.
It is one of the most efficient layouts for apartments, small homes, or narrow utility rooms.
How to implement (Practical steps)
Start by stacking the washer and dryer using a proper stacking kit to ensure safety and stability.
Next to or above the appliances, install tall vertical cabinets. These should go from near floor level up to ceiling height, using the full wall space efficiently.
Place frequently used items (detergent, baskets, cloth bags) at eye level for easy access. Store less-used items higher up.
At the base level, if space allows, add a small pull-out basket or narrow bench for quick mud room use like shoes or bags.
Keep the layout tight and vertical—avoid spreading items sideways, as that reduces efficiency.
If you have a small room, this layout prevents clutter because everything has a designated vertical zone instead of spreading into walking space.
Best for
- Small rooms or apartments
- Tight utility spaces
- Homes needing maximum floor space efficiency
Pro tip
Use tall, slim cabinets instead of wide ones. Vertical storage keeps the room functional without making it feel crowded.
Mistake to avoid
Do not skip proper stacking support for appliances. Improper stacking can cause vibration issues and long-term damage.
4. Galley-Style Linear Split Layout (Two-Wall Efficiency System)
Explanation (What it is)
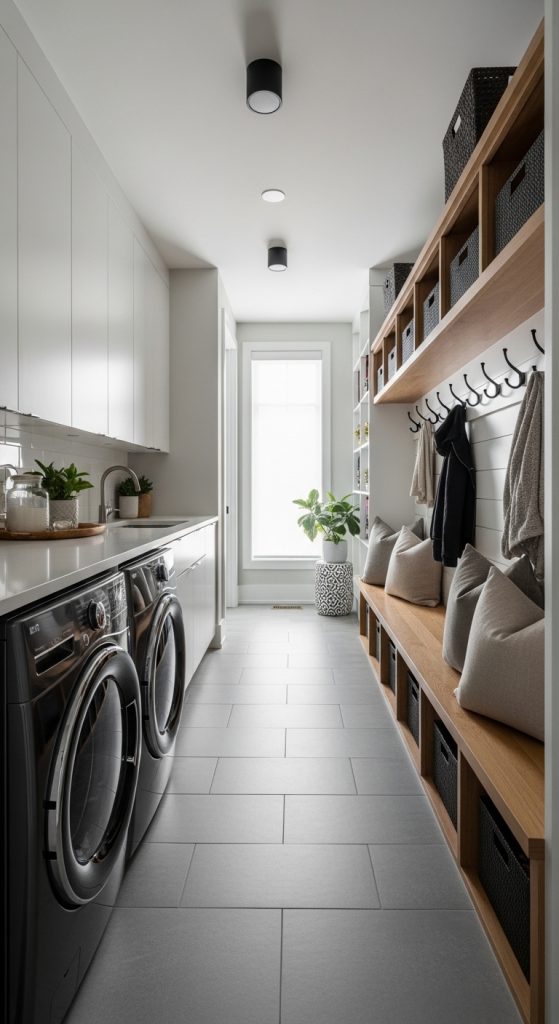
The galley-style layout is built on a simple but powerful idea: divide your mud room laundry combo into two parallel working walls. One wall handles laundry tasks, and the other handles mud room functions like storage, seating, and entry organization.
This layout is often misunderstood as “just placing things on both sides,” but the real strength is in separation of tasks. It prevents overlap between wet laundry work and dirty entry clutter, which is one of the biggest problems in combined spaces.
It works especially well when you have a long, narrow room where both walls can be used without blocking movement in the center walkway.
How to implement (Practical steps)
On the first wall, place your washer and dryer side by side, followed by a continuous countertop for folding clothes. Above this area, install upper cabinets for laundry detergents, baskets, and cleaning supplies.
On the opposite wall, create the mud room zone. Add a built-in bench for seating, shoe storage underneath, and wall hooks above for jackets, bags, and everyday items. Keep this side more “entry-focused” and less appliance-heavy.
Maintain a clear walking path in the middle. This is critical—if the center becomes crowded, the entire layout fails.
If you have a small room, keep both sides shallow. Avoid deep cabinets that reduce walking space.
Best for
- Long, narrow utility rooms
- Busy households with high daily use
- Homes needing clear separation of functions
Pro tip
Keep one side visually lighter (open hooks and shelving) to balance the heavier appliance side and avoid a cramped feeling.
Mistake to avoid
Do not place bulky storage on both walls. Overloading both sides removes the “walk-through” efficiency that makes this layout work.
5. Hidden Laundry Closet + Mud Room Hybrid Layout
Explanation (What it is)
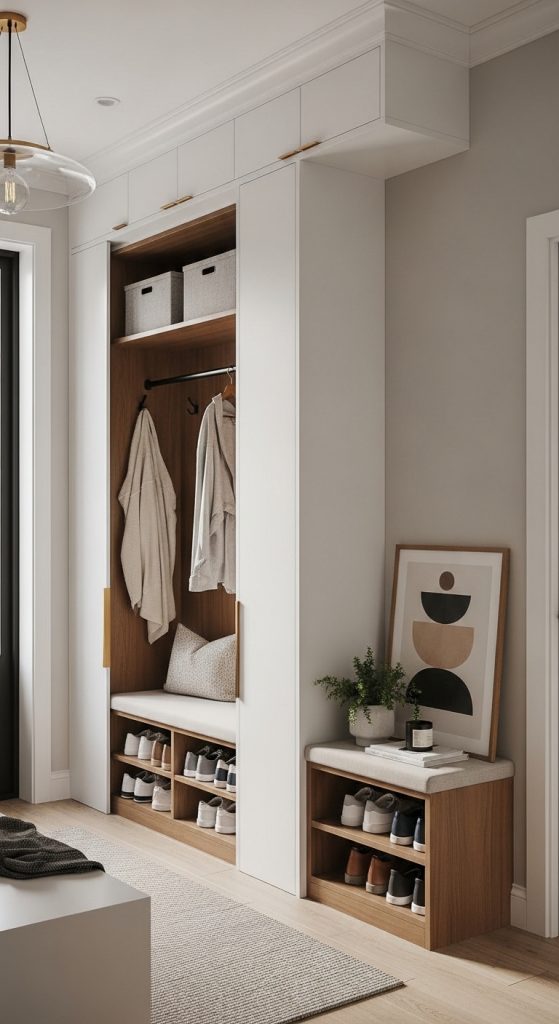
This layout hides the laundry area behind closed cabinetry or sliding doors while keeping the mud room open and functional. The idea is to visually separate “messy work” (laundry) from “daily entry use” (mud room storage).
It is especially useful if your laundry area tends to look cluttered or if you want your space to feel more like a clean hallway or entry zone rather than a utility room.
This design is about visual control. Everything has a place, but not everything is always visible.
How to implement (Practical steps)
Install washer and dryer inside a recessed cabinet or closet-style enclosure. Use sliding or bi-fold doors so the machines can be hidden when not in use.
Inside the closet, add a small overhead shelf for detergent and cleaning supplies. Keep wiring and plumbing neatly concealed to avoid visual clutter.
Outside the closet, dedicate the mud room zone. Add a bench with shoe storage, wall hooks, and small baskets for daily items.
Keep finishes consistent so the hidden laundry area blends into the overall design when closed.
If you have a small room, this layout is very effective because it visually reduces clutter even if the function is the same.
Best for
- Homes that prioritize clean aesthetics
- Open-plan entry areas
- People who dislike visible laundry equipment
Pro tip
Use matching cabinet finishes across the mud room and laundry doors to create a seamless, built-in look.
Mistake to avoid
Do not block ventilation inside the laundry closet. Poor airflow can cause heat and moisture buildup over time.
6. Central Island Workflow Layout (Premium Efficiency Design)
Explanation (What it is)
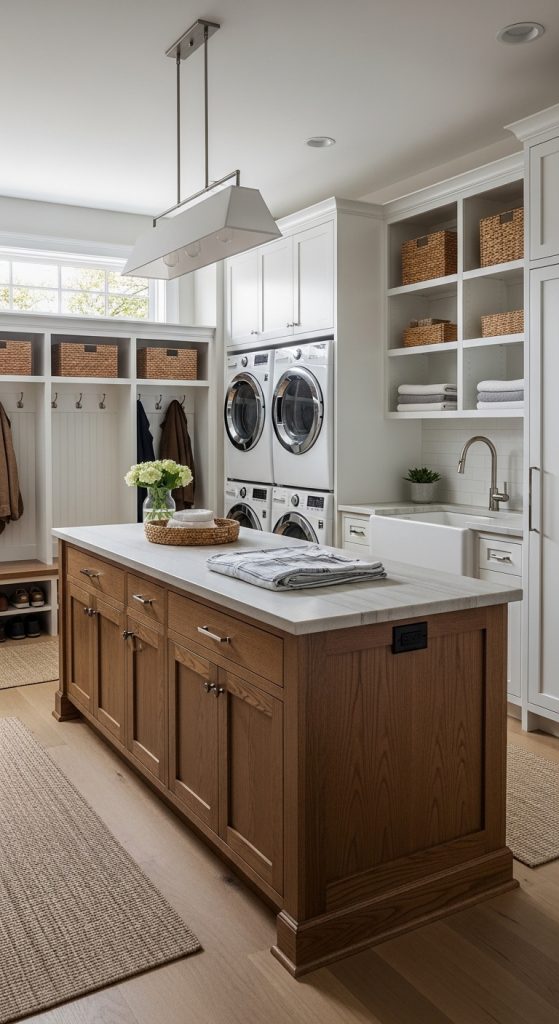
The central island layout introduces a countertop or folding station in the middle of the room, with laundry and mud room functions arranged around it. This creates a circular workflow where you move around a central point instead of working in a straight line.
It feels more premium and organized because it separates tasks into zones while keeping everything within reach. Instead of working against walls, the island becomes the main functional hub.
This layout works best in slightly larger mud room laundry combos where you have enough space to move around comfortably.
How to implement (Practical steps)
Place washer and dryer along one wall as your main washing zone. Opposite or adjacent walls can be used for storage cabinets, mud room hooks, and seating.
In the center, install a sturdy island counter. This is your folding station, sorting area, and temporary storage surface.
Under the island, you can add baskets or open storage for laundry separation (lights, darks, delicates).
Keep at least 3 feet of walking space around the island so movement stays smooth.
If you have a small room, scale down the island into a narrow counter instead of a full block structure.
Best for
- Medium to large utility rooms
- Families with high laundry volume
- Homes wanting a premium, organized feel
Pro tip
Use the island as a multipurpose zone—not just folding, but also sorting and temporary storage during busy laundry days.
Mistake to avoid
Do not make the island too large. Oversized islands reduce movement space and make the room feel cramped instead of functional.
7. Wall-to-Ceiling Built-In Cabinet Layout (Hidden Storage System)
Explanation (What it is)
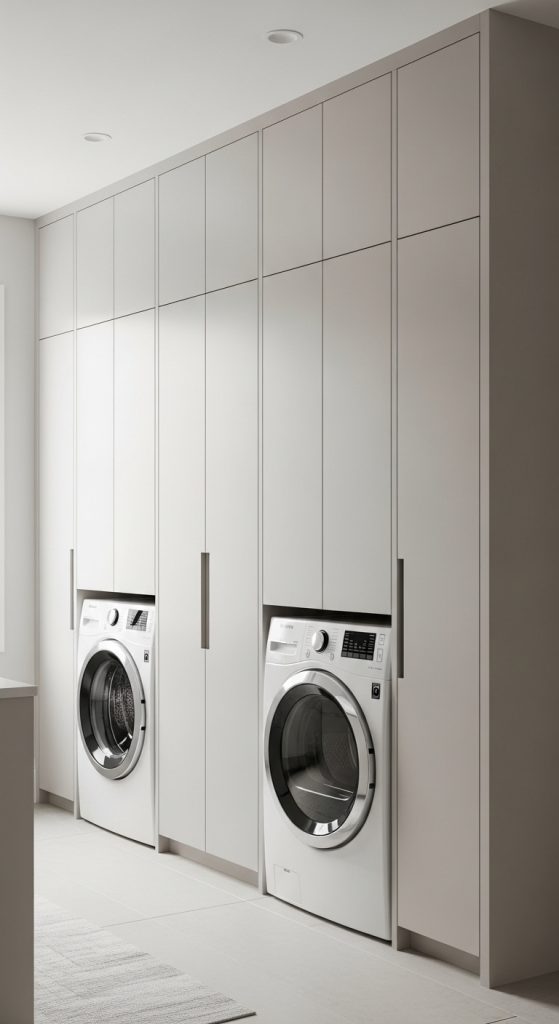
This layout focuses on maximum storage efficiency by turning one full wall into a built-in storage system from floor to ceiling. The washer and dryer are integrated into the lower section, while cabinets extend upward for storage of laundry supplies, seasonal items, cleaning tools, and mud room essentials.
The main idea is control. Instead of having scattered storage units, everything is unified into one clean vertical structure. This reduces visual clutter and makes even a small room feel organized and intentional.
It works especially well when you want a mud room laundry combo that looks “built-in” rather than improvised.
How to implement (Practical steps)
Start by placing washer and dryer side by side in the lower section of the wall. Surround them with base cabinets or a framed enclosure to make them look integrated.
Above the machines, install upper cabinets that go all the way to the ceiling. Use the highest shelves for rarely used items and lower shelves for daily essentials like detergent, fabric softener, and cleaning sprays.
Add a small countertop or folding ledge above or beside the machines for quick sorting.
On the opposite side of the same wall, include mud room elements like hooks, a bench, or cubbies, keeping everything aligned visually.
If you have a small room, stick to light-colored finishes to avoid making the wall feel heavy.
Best for
- Small to medium utility rooms
- Homes needing maximum storage
- People who prefer clean, hidden organization
Pro tip
Use matching cabinet fronts to hide appliances completely for a seamless “wall furniture” effect.
Mistake to avoid
Do not overload upper cabinets with heavy items. Ceiling-height storage should remain light and infrequently used.
8. Split Zone Entry Layout (Clean Separation System)
Explanation (What it is)
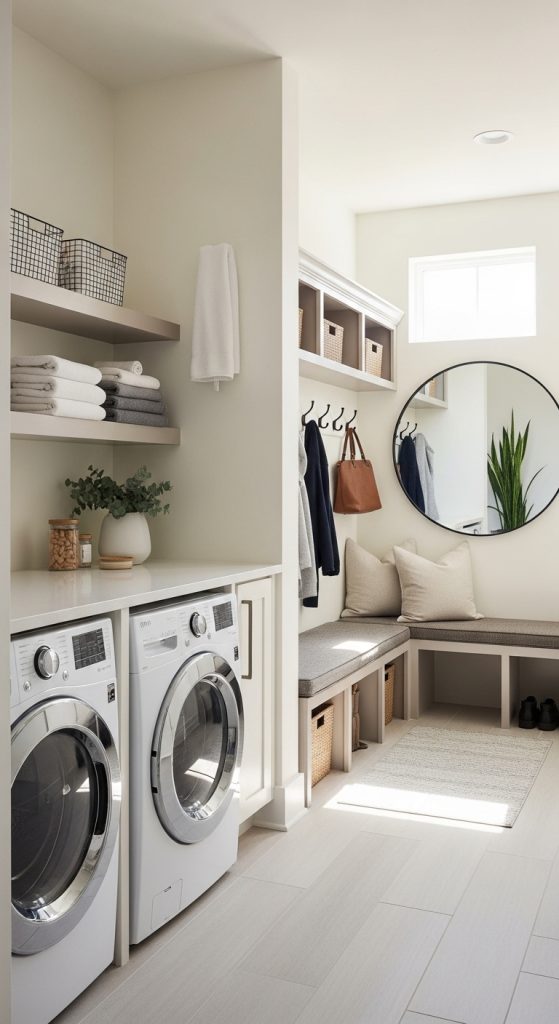
The split zone layout divides the room into two clear functional halves: one side dedicated to mud room entry needs and the other dedicated to laundry work. Unlike linear or galley layouts, this system is more about visual and functional separation rather than workflow direction.
This is ideal when you want to avoid mixing dirty entry clutter with clean laundry tasks. It creates mental clarity in the space—you know exactly where each activity belongs.
It also works well for families where multiple people use the space at the same time.
How to implement (Practical steps)
Choose one side of the room for mud room functions: install a bench, shoe storage, wall hooks, and baskets for daily items like bags and jackets.
On the opposite side, set up the laundry station with washer, dryer, and a folding counter. Keep storage for detergent and cleaning supplies above this area only.
Use a visual divider such as a rug, different flooring texture, or even a narrow cabinet to subtly separate the zones without blocking movement.
If you have a small room, avoid heavy partitions—keep separation visual, not physical.
Best for
- Busy households with multiple users
- Entry-heavy homes
- Medium-sized utility rooms
Pro tip
Use different lighting tones for each zone (slightly warmer in mud area, brighter in laundry area) to reinforce separation.
Mistake to avoid
Do not mix storage between zones. If shoes and laundry supplies overlap, the system breaks down quickly.
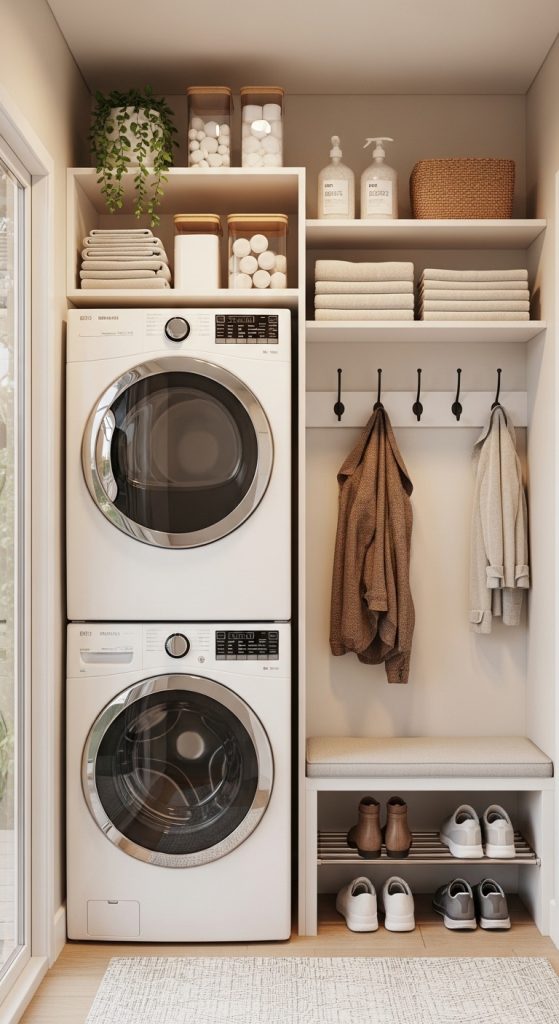
9. Compact Corner Laundry + Vertical Mud Storage Layout
Explanation (What it is)
This layout is designed for very small spaces where every inch matters. The laundry area is pushed into a corner, while the mud room functions are stacked vertically on adjacent walls. Instead of spreading horizontally, everything is compressed and layered.
The strength of this design is efficiency. It turns awkward corners into functional zones and uses vertical space aggressively to compensate for limited floor area.
It is one of the most practical layouts for apartments or narrow utility corners.
How to implement (Practical steps)
Place the washer and dryer in a corner position—either L-shaped or stacked if space is tight.
Above the machines, install vertical shelving that goes upward to maximize storage for detergents and supplies.
On the adjacent wall, install tall hooks, slim cabinets, or pegboards for mud room use like coats, bags, and shoes.
Keep floor space as open as possible. Use wall-mounted storage instead of floor-standing units to prevent overcrowding.
If you have a small room, avoid bulky furniture entirely—focus on slim, vertical solutions.
Best for
- Apartments and small homes
- Tight utility corners
- Minimalist, space-saving designs
Pro tip
Use multi-purpose storage like pegboards so you can reconfigure hooks and shelves as needed.
Mistake to avoid
Do not place too many items at floor level. This layout only works when vertical space is prioritized properly.
10. Bench-Centered Drop Zone Layout (Family-Friendly Flow System)
Explanation (What it is)
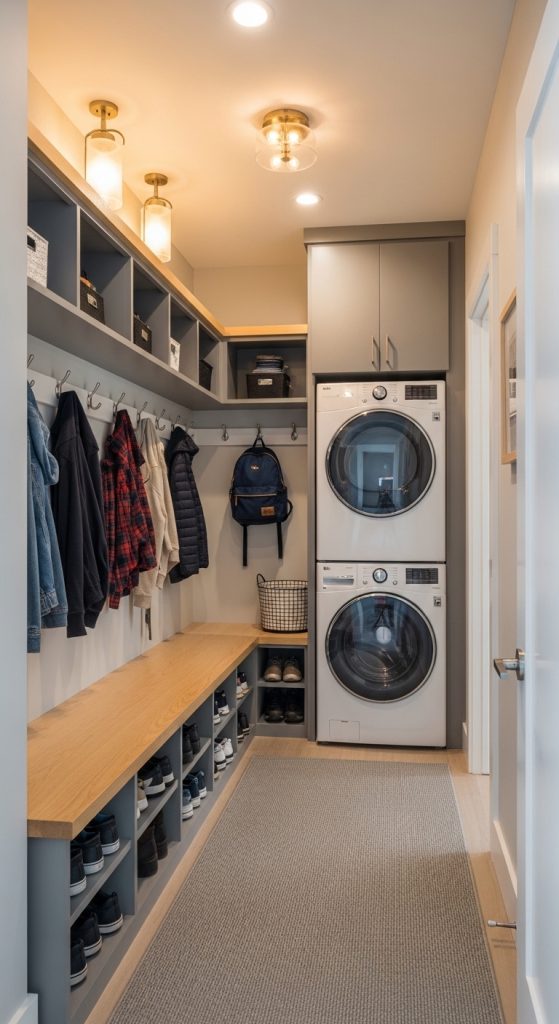
This layout is built around one core idea: the bench is the control point of the entire space. Instead of treating laundry and mud room areas separately, everything revolves around a central “drop zone” where people sit, remove shoes, place bags, and sort items before they move further into the house.
This is especially effective in real family homes where multiple people enter and exit constantly. Without a structured drop zone, items get scattered everywhere—shoes near the door, jackets on chairs, laundry baskets in random corners. The bench solves this by giving every action a defined place.
The laundry zone still exists, but it feels secondary and supports the main entry workflow rather than competing with it.
How to implement (Practical steps)
Place a sturdy built-in or freestanding bench along the main entry wall. Under the bench, add shoe storage drawers or open cubbies for quick access.
Above the bench, install wall hooks or a slim cabinet for jackets, bags, and daily essentials. Keep spacing even so each person has a designated area.
Position the laundry appliances (washer and dryer) on the adjacent wall or slightly further inside the room to keep them separate from the entry traffic flow.
Add a small countertop or folding surface near the machines so laundry work stays efficient but does not interfere with the mud zone.
If you have a small room, keep the bench shallow and avoid bulky seating so movement space is not blocked.
Best for
- Family homes with kids
- High-traffic entry areas
- Medium-sized mud room laundry combos
Pro tip
Assign “personal zones” above the bench (hooks per person). This reduces clutter because everyone knows exactly where their items belong.
Mistake to avoid
Do not place laundry baskets directly in the bench area. It breaks the purpose of the drop zone and creates unnecessary congestion.
11. U-Shaped Wraparound Layout (Maximum Efficiency System)
Explanation (What it is)
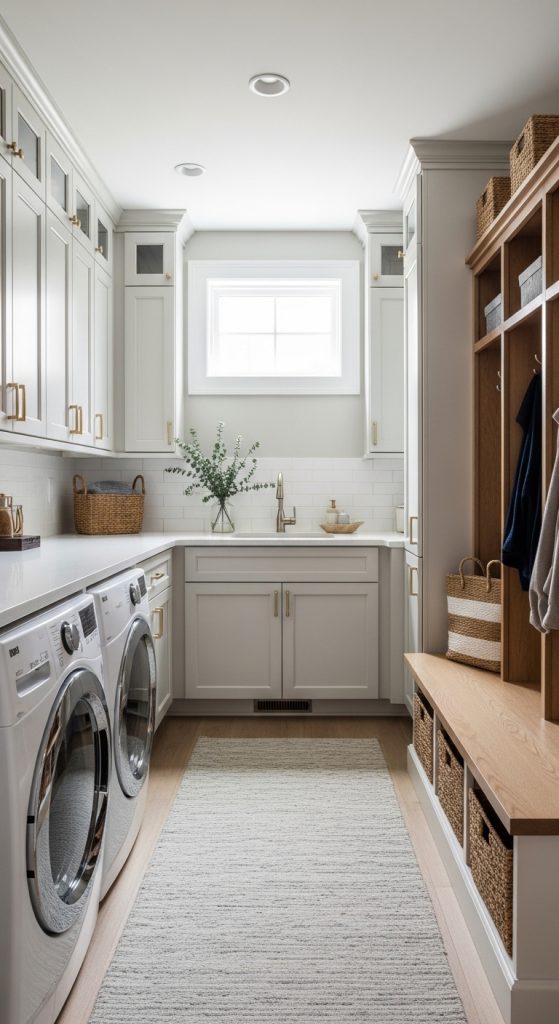
The U-shaped layout is one of the most efficient and structured designs for a mud room laundry combo. It uses three connected walls to form a full working zone where each wall has a specific function: laundry, storage, and entry organization.
This creates a continuous workflow where everything is within arm’s reach. You can wash, move, fold, store, and organize without constantly walking across the room. It feels compact, controlled, and highly functional when planned correctly.
However, this layout only works when space is used carefully. Poor planning can easily make it feel cramped, so balance is critical.
How to implement (Practical steps)
On the first wall, install the laundry system: washer, dryer, and a countertop for folding clothes. Add upper cabinets for detergents and cleaning supplies.
On the second wall, focus on mud room storage: benches, shoe racks, hooks, and cubbies for bags and coats. Keep this side organized for quick entry and exit use.
On the third wall, add additional storage or a slim utility cabinet for overflow items like cleaning tools, baskets, or seasonal storage.
Leave the center area open for movement. This is your working space—if it becomes blocked, the entire layout loses efficiency.
If you have a small room, reduce cabinet depth and keep all elements shallow to avoid crowding.
Best for
- Medium to large utility rooms
- Busy households needing maximum organization
- People who want a complete “all-in-one” system
Pro tip
Use consistent cabinetry across all three walls to create visual unity. Even a complex layout looks clean when materials match.
Mistake to avoid
Do not overfill all three walls equally. One wall should always feel lighter to prevent the space from feeling boxed in.