“Hairstyle art” sounds like something reserved for runways, photoshoots, or professionals—but that assumption is exactly what holds most people back. The truth is, hairstyle art is not about extreme designs or complicated techniques. It’s about intentional styling—turning ordinary hair into something visually interesting, expressive, and slightly elevated beyond basic everyday looks.
Most women fall into one of two patterns: either they stick to the same safe hairstyle every day, or they avoid trying anything creative because they assume it will take too much time or skill. Both approaches lead to the same result—repetition, boredom, and missed potential. The issue isn’t lack of creativity. It’s lack of simple, structured ideas that are actually doable in real life.
Here’s the reality: hairstyle art doesn’t require professional tools, hours of styling, or perfect technique. What it requires is understanding how small changes—like sectioning, placement, texture, or accessories—can transform a basic hairstyle into something that looks intentional and styled. A simple braid, twist, or clip placement can shift your entire look if it’s done with purpose.
Another mistake people make is thinking “art” means complicated. It doesn’t. In fact, the more complicated a hairstyle gets, the less practical it becomes for everyday use. Real hairstyle art is about controlled creativity—designing a look that stands out while still being wearable. If it doesn’t hold, doesn’t feel comfortable, or takes too long, it’s not useful no matter how good it looks in theory.
In 2026, hairstyle trends are moving toward exactly this balance. Clean structure combined with soft, natural texture. Styles that look effortless but still have a unique detail. It’s no longer about perfect curls or heavily sprayed hair—it’s about movement, flow, and subtle design elements that catch attention without overwhelming the look.
Hair texture plays a major role here. Straight hair shows clean lines and patterns more clearly, making it ideal for sleek designs and precise sections. Wavy or curly hair adds natural volume and dimension, which works well for softer, more abstract styles. Instead of forcing your hair into a certain type, the smarter approach is to design around what your hair naturally does.
Face shape and proportions also matter more than people realize. A hairstyle might look impressive, but if it doesn’t balance your features, it won’t feel right. For example, high-volume styles can elongate the face, while side-focused designs soften strong angles. Hairstyle art is not just about the hair—it’s about how it frames the entire look.
Another overlooked factor is placement. Where you position a bun, braid, twist, or accessory completely changes the visual impact. High placement feels bold and noticeable. Mid placement feels balanced and everyday-friendly. Low placement feels soft and elegant. Understanding this alone gives you more control over your final look than most styling techniques.
If you have a small room or limited time to get ready, this becomes even more important. You don’t have the luxury of trial and error. You need styles that are quick to execute but still look creative. That’s where structured hairstyle art comes in—ideas that are simple in steps but strong in visual effect.
Accessories also play a role, but only when used correctly. Adding clips, pins, or decorative elements without a clear purpose creates clutter. Using one or two elements in the right place enhances the design instead of distracting from it. The goal is not decoration—it’s controlled emphasis.
Most importantly, hairstyle art should feel wearable. If you are constantly adjusting it, worrying about it falling apart, or feeling uncomfortable, then it’s not practical. The best styles are the ones you can create, wear confidently, and forget about for the rest of the day.
This guide focuses on hairstyle art ideas that are actually usable—not just creative, but functional. Styles that look different, feel modern, and still fit into real routines. No unnecessary complexity. No unrealistic steps.
Now let’s move into hairstyle ideas that turn simple hair into something visually interesting, without making your routine harder.
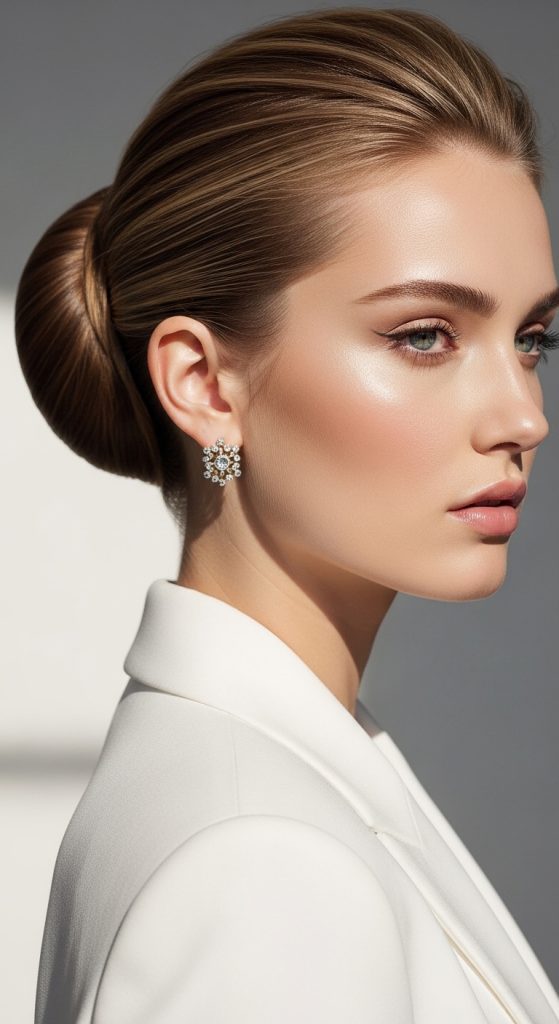
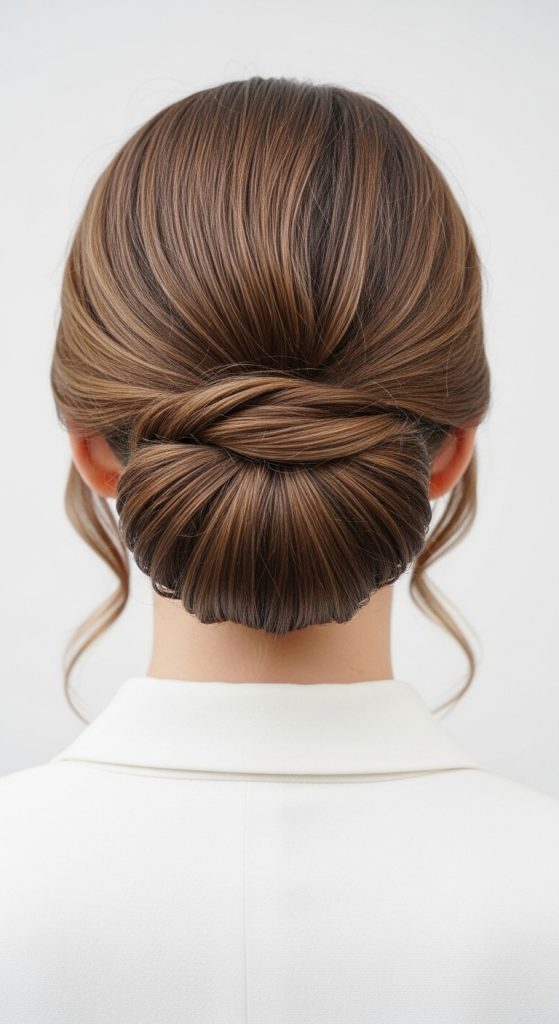
1. Sculpted Low Bun with Defined Parting (Clean Artistic Structure)
What it is
This hairstyle is a refined form of a low bun where the focus is not just the bun itself, but the structure leading into it. The hair is divided with a sharp or defined parting and then shaped into a smooth, sculpted bun at the nape. It looks minimal at first glance, but the controlled lines and symmetry make it feel like intentional hairstyle art.
Unlike messy buns, this is about precision, balance, and visual clarity.
How to implement (practical steps)
Start with slightly smooth, detangled hair. It does not need to be overly flat, but it should be manageable.
Create a clean middle or deep side part depending on your face shape preference.
Brush both sides neatly toward the back, keeping the parting visible and sharp.
Gather all hair at the nape of the neck.
Twist the hair tightly but smoothly into a compact bun shape.
Secure it with pins or a strong elastic, ensuring the bun sits flat and centered.
Apply slight smoothing on the sides so the head shape looks clean and structured.
Optional: use a light serum or water spray to control flyaways for a polished finish.
Best for (who should use it)
This works best for medium to long straight or slightly wavy hair. It is ideal for formal settings, professional environments, or when you want a strong, minimal aesthetic look.
Pro tip
The sharper the parting, the more “artistic” the look becomes. A precise line instantly elevates the entire hairstyle.
Mistake to avoid
Do not make the bun too loose or textured. This style loses its identity if it becomes messy—it relies on structure, not softness.
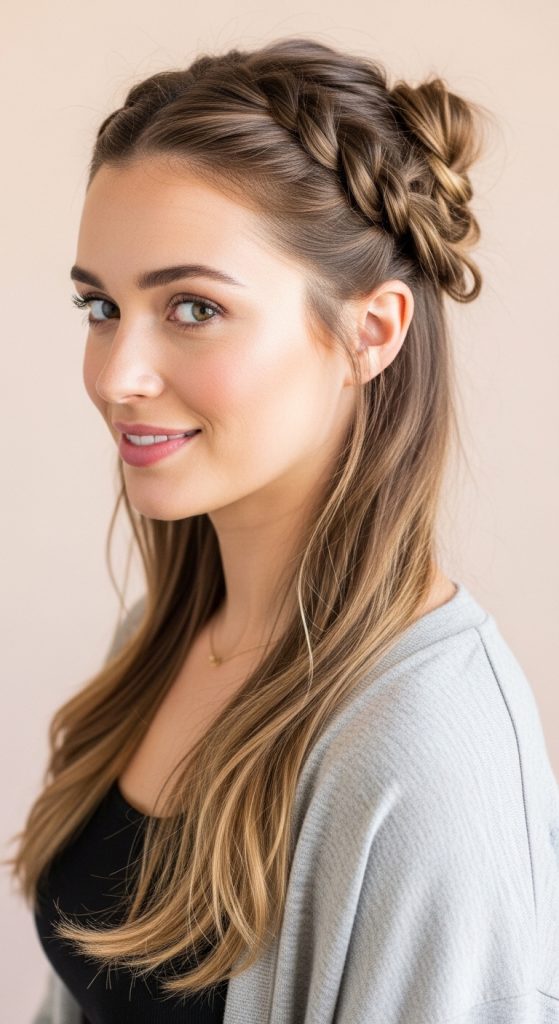
2. Twisted Crown Half-Up Design (Soft Symmetry Art)
What it is
This hairstyle uses two twisted sections from both sides of the head that meet at the back to form a soft crown-like shape. It creates symmetry while still keeping most of the hair loose, making it both decorative and wearable.
It’s a balance between structure and flow, which is what modern hairstyle art focuses on.
How to implement (practical steps)
Part the hair naturally down the middle or slightly off-center.
Take a small section from the front of one side near the temple.
Twist it backward gently toward the back of the head, keeping it loose and soft.
Repeat the same twist on the opposite side.
Bring both twisted sections together at the back of the head.
Secure them with a small clip, pin, or mini elastic.
Adjust the twists so they form a soft curved “crown” shape.
Leave the rest of the hair flowing naturally.
Slightly loosen the twists to add volume and softness.
Best for (who should use it)
This works best for medium to long hair. It is ideal for casual outings, soft feminine looks, or situations where you want a styled but natural appearance.
Pro tip
Loosen the twists slightly after securing them. Soft tension creates a more elegant flow than tight twisting.
Mistake to avoid
Do not make the twists too thick or heavy. Large sections overpower the design and remove the delicate crown effect.
3. Geometric Side Braid Layout (Structured Creative Design)
What it is
The geometric side braid layout is a creative hairstyle where braids are placed in a structured pattern on one side of the head. Instead of a single braid, the hair is sectioned in a controlled way to create visual lines and directional flow.
This style is closer to “hair design” than basic hairstyling because it focuses on pattern and placement.

How to implement (practical steps)
Start by creating a clean side part.
On the heavier side of the part, divide a small section of hair into two or three structured sections.
Create small braids from each section, either parallel or slightly staggered.
Secure each braid individually with small elastics.
Optionally, pin the braids toward the back or let them fall along the side for visible design lines.
Keep the rest of the hair straight or softly textured for contrast.
Gently pull each braid slightly to soften the structure while keeping the pattern visible.
Best for (who should use it)
This works best for medium to long hair and is ideal for creative events, fashion-forward looks, or when you want something more unique than everyday hairstyles.
Pro tip
The “art” comes from spacing. Uneven placement looks accidental, while controlled spacing creates a deliberate design effect.
Mistake to avoid
Do not overcrowd the braids. Too many sections remove clarity and turn the design into visual noise instead of structured art.
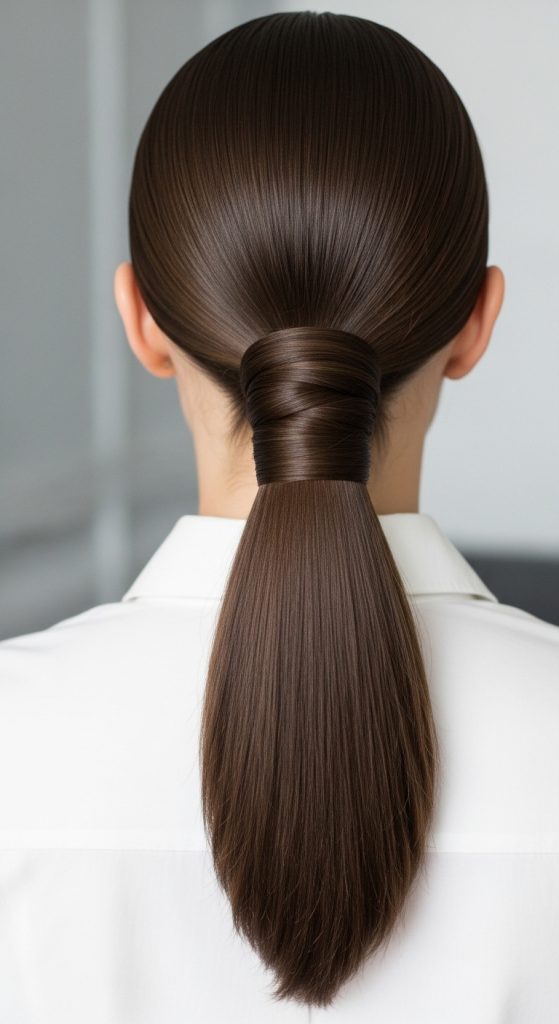
4. Sleek Wrapped Ponytail Illusion (Hidden Elastic Art)
What it is
This hairstyle looks like a simple sleek ponytail at first glance, but the real “art” is in the hidden structure. The hair is tightly smoothed back, then a small section is wrapped around the base to hide the elastic completely. The result is a clean, continuous line that looks expensive, intentional, and professionally styled.
It’s minimal, but visually powerful because there are no visible breaks or accessories.
How to implement (practical steps)
Start with detangled hair and smooth it back using a brush or comb.
Apply slight tension while gathering the hair into a mid or low ponytail position.
Secure it tightly with a thin elastic band.
Take a small strand of hair from the ponytail itself.
Wrap that strand around the elastic base until it fully covers it.
Secure the wrapped strand underneath the ponytail using a pin or tuck it into the elastic.
Smooth the crown area carefully so there are no bumps or uneven sections.
Optional: apply a light serum for extra sleekness and shine.
Best for (who should use it)
This works best for medium to long straight or slightly wavy hair. It is ideal for formal settings, presentations, or days when you want a polished, refined appearance.
Pro tip
The tighter and smoother the base, the more “luxury finish” the style gives. Flyaways break the illusion, so control matters more than volume here.
Mistake to avoid
Do not skip wrapping the elastic. That small detail is what turns a basic ponytail into a styled design.
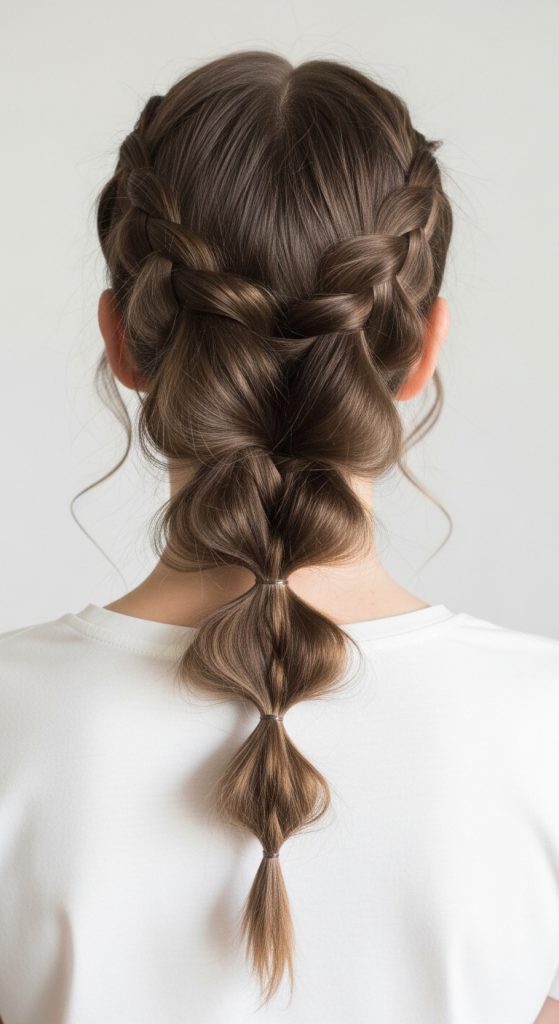
5. Asymmetrical Bubble Braid (Controlled Pattern Design)
What it is
The asymmetrical bubble braid is a creative mix of structure and play. Instead of traditional braiding, the hair is divided into bubble sections using elastics, but placed slightly off-center to create a modern asymmetrical flow. It feels artistic because it breaks balance in a controlled, intentional way.
This style works because it transforms a simple ponytail into a patterned visual element.
How to implement (practical steps)
Gather the hair slightly to one side instead of the center.
Secure it into a low or mid side ponytail.
Add an elastic a few inches down the length of the ponytail.
Gently pull the section between elastics outward to form a rounded “bubble.”
Repeat this process down the length of the hair.
Keep spacing slightly uneven but visually balanced for the asymmetrical effect.
Adjust each bubble so they are soft, not tight.
Leave a few face-framing strands loose for softness.
Best for (who should use it)
This works best for medium to long hair. It is ideal for creative casual looks, fashion-forward styling, or days when you want something playful but still structured.
Pro tip
Slight uneven spacing between bubbles creates a more artistic look than perfect symmetry. Controlled imperfection is the goal.
Mistake to avoid
Do not make the bubbles too tight. Tight sections flatten the design and remove the soft 3D effect that makes this style visually interesting.
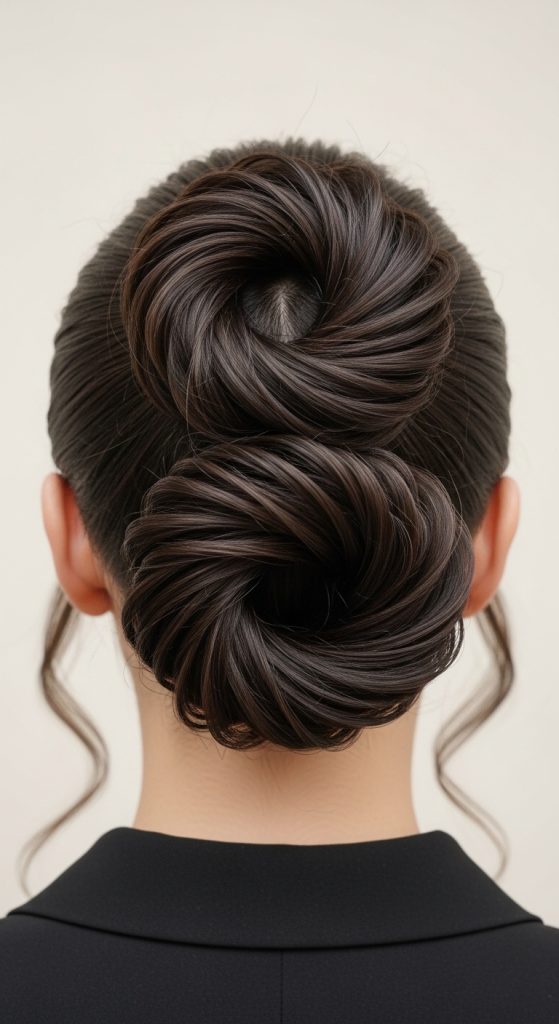
6. Dual Rope Twist Bun Composition (Structured Twin Design)
What it is
This hairstyle uses two rope-style twists that are combined into a single bun shape. Instead of one simple bun, the hair is divided into two twisted sections that are wrapped together, creating a layered, sculpted effect. It looks more complex than it is, which is what makes it feel like hairstyle art.
The twin structure gives depth and visual layering.
How to implement (practical steps)
Divide the hair into two equal sections.
Twist each section tightly in a rope-like motion (twisting two strands around each other).
Once both sides are twisted, bring them together at the nape or mid-back.
Wrap both twists around each other in a circular bun formation.
Secure the bun with pins or a strong elastic.
Adjust the bun by gently pulling small sections to create dimension.
Ensure both twists remain visible in the final shape.
Smooth the outer surface lightly while keeping internal texture.
Best for (who should use it)
This works best for medium to long hair and is ideal for formal creative looks, events, or styled everyday wear when you want something more detailed than a basic bun.
Pro tip
The more defined the rope twists are before combining, the more dimensional and artistic the final bun appears.
Mistake to avoid
Do not merge the twists too tightly into a single flat bun. Losing separation removes the “dual structure” effect that defines this style.
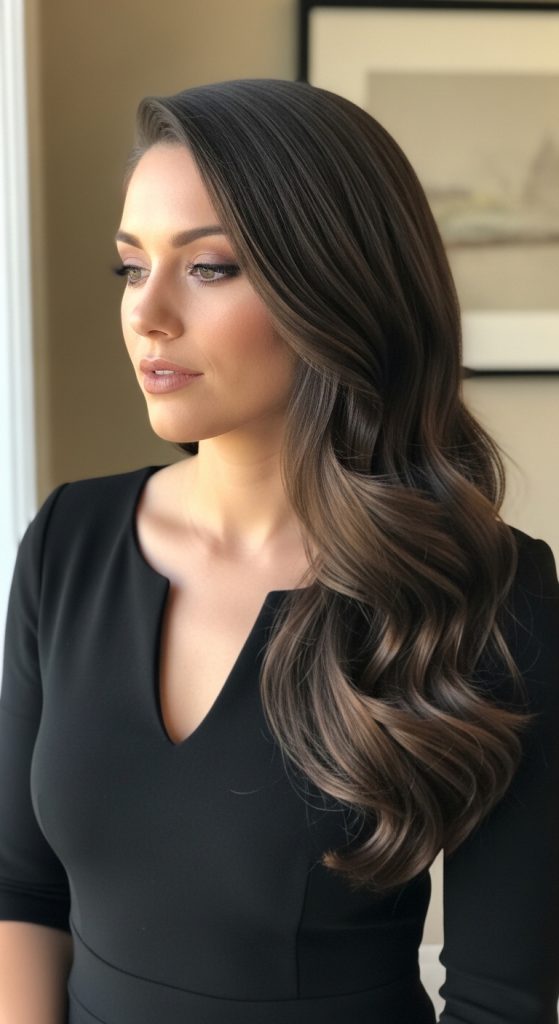
7. Sculpted Wave Side Sweep (Flowing Art Direction Style)
What it is
This hairstyle is about controlled movement rather than tight structure. The hair is shaped into soft waves and then deliberately swept to one side to create a flowing, directional look. It feels like “hair in motion,” but carefully arranged so it stays elegant instead of messy.
The artistic element comes from direction and flow—everything moves in one intentional line.
How to implement (practical steps)
Start with slightly wavy or textured hair. If hair is straight, add soft waves using braiding or heat-free twisting overnight.
Create a side part to define direction.
Gently brush or finger-comb all hair toward one side of the face.
Apply light tension at the crown so the top stays smooth but not flat.
Secure the heavier side slightly at the back using hidden pins if needed.
Allow the lengths to fall naturally over one shoulder.
Adjust waves so they flow in the same direction for a uniform look.
Pull a few soft strands near the face to maintain softness.
Best for (who should use it)
This works best for medium to long hair and is ideal for events, casual elegance, or fashion-forward looks where softness and movement are key.
Pro tip
The more consistent the wave direction, the more “editorial” and artistic the final result looks.
Mistake to avoid
Do not over-brush the waves. Breaking texture removes the flow, which is the core design element of this style.
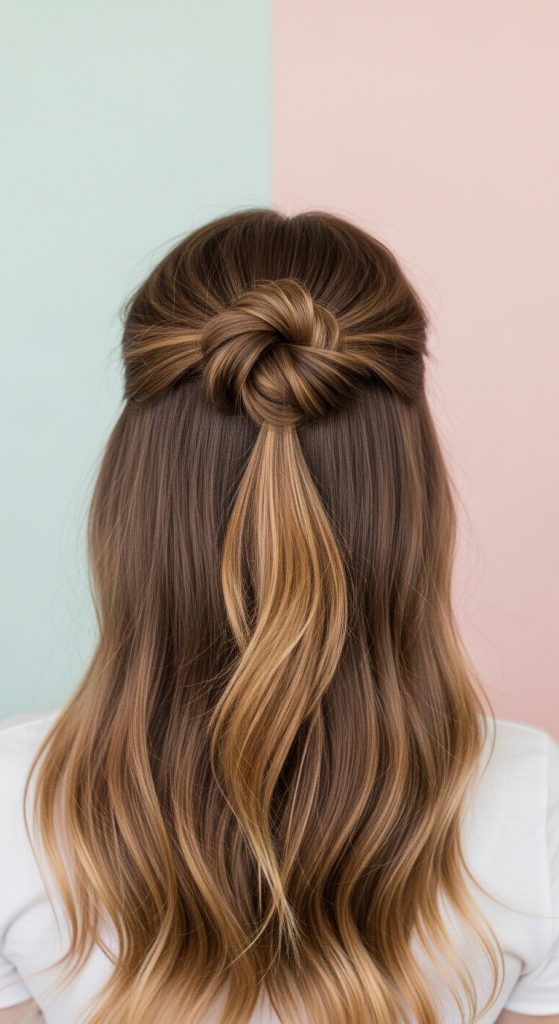
8. Crown Knot Accent Design (Minimal Center Focus Art)
What it is
This hairstyle places a small knot or twist right at the crown area while leaving the rest of the hair loose. It creates a central focal point, almost like a “design anchor,” which draws attention to the top section of the head.
It’s minimal, but visually strategic—one small detail changes the entire look.
How to implement (practical steps)
Take a small section of hair from the top center of the head.
Divide it into two strands and twist them together lightly.
Wrap the twisted section into a small knot at the crown.
Secure it with a pin or small elastic underneath.
Let the rest of the hair fall naturally down the back.
Adjust the knot so it sits slightly raised, not flat against the head.
Gently loosen surrounding hair to balance the focus point.
Optional: add soft waves to the remaining hair for contrast.
Best for (who should use it)
This works best for medium to long hair and is ideal for minimalist styling, soft aesthetic looks, or subtle creative detailing.
Pro tip
The smaller and more precise the knot, the more refined and artistic the final look appears.
Mistake to avoid
Do not make the knot too large. Oversized knots shift focus away from elegance and make the style look bulky.
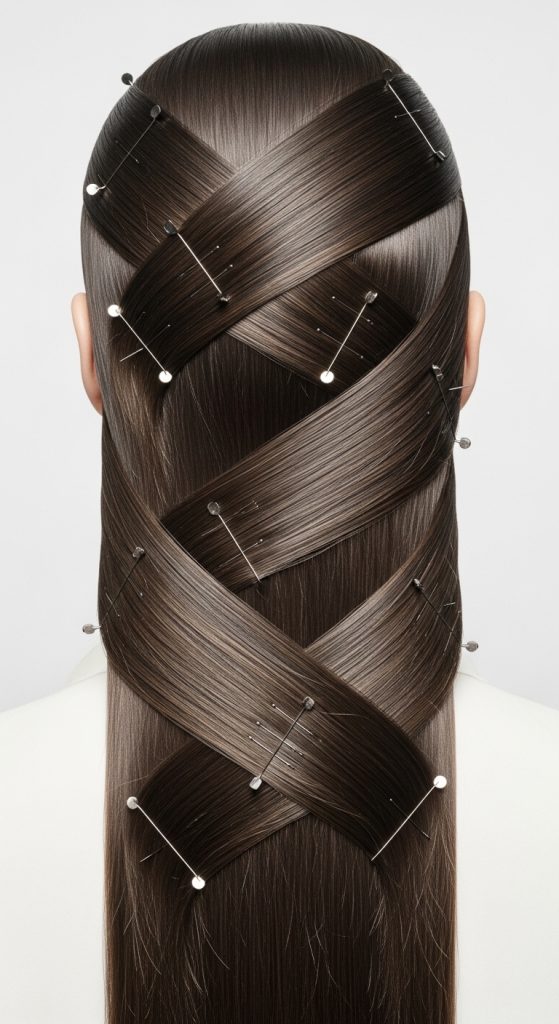
9. Layered Pin-Line Design (Hidden Structural Art)
What it is
This hairstyle uses strategically placed pins or small sections of hair to create visible “lines” or structure across the head. Instead of hiding all structure, this style intentionally exposes it as part of the design.
It feels modern and slightly architectural, as if the hair itself has a blueprint.
How to implement (practical steps)
Start with smooth or lightly textured hair.
Create a side or center part depending on preference.
Take small sections of hair from one side and pin them in parallel lines toward the back.
Repeat on the opposite side if symmetry is desired.
Keep spacing between pins or sections consistent for a structured look.
Allow the remaining hair to stay loose and natural.
Slightly adjust pinned sections so they lie flat but remain visible.
Ensure the pattern looks intentional, not random.
Best for (who should use it)
This works best for medium to long hair and is ideal for creative styling, photoshoots, events, or when you want a structured artistic look.
Pro tip
Even spacing is what makes this style look “designed.” Uneven placement breaks the visual rhythm.
Mistake to avoid
Do not overcrowd the pins. Too many sections destroy clarity and turn the design into visual clutter instead of structured art.
10. Sculpted Low Knot with Face Frame Geometry (Refined Minimal Art)
What it is
This hairstyle is a controlled low knot designed with intentional face-framing strands. It’s not a messy bun and not a tight formal bun—it sits in between. The “art” comes from contrast: a clean, structured knot at the back paired with soft, deliberately placed front strands that shape the face.
It works like architecture—structured base, soft edges.
How to implement (practical steps)
Start with smooth, detangled hair. Keep it manageable but not overly stiff.
Create a clean middle or soft side part depending on face shape.
Leave two defined front sections out on each side before gathering the rest.
Bring the remaining hair to the nape of the neck.
Twist it into a compact knot, keeping the shape controlled but not overly tight.
Secure with pins or a small elastic underneath.
Now refine the front: lightly curl or bend the face-framing strands inward.
Adjust symmetry so both sides feel balanced but not identical.
Keep the bun smooth while allowing slight softness at the edges.
Best for (who should use it)
This works best for medium to long hair. It is ideal for formal events, clean aesthetic looks, or situations where you want polished simplicity with a modern edge.
Pro tip
The face-frame is the “art layer.” Slight asymmetry in the front strands often looks more natural and editorial than perfect matching.
Mistake to avoid
Do not over-tighten the knot. A rigid base removes the softness that makes this style look modern instead of old-fashioned.
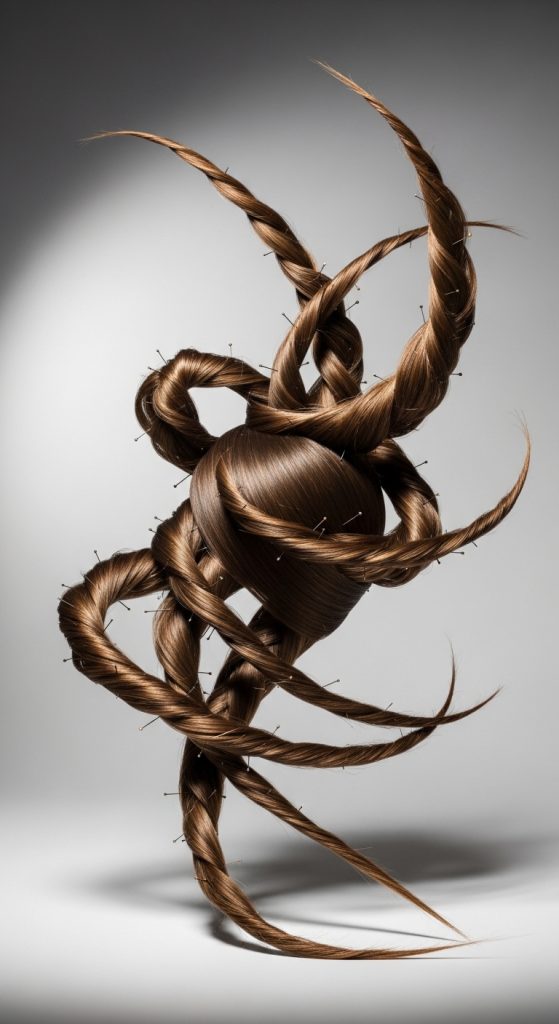
11. Abstract Twisted Hair Sculpture (Creative Editorial Style)
What it is
This is a high-creativity hairstyle where sections of hair are twisted, pinned, and shaped into an abstract form rather than a traditional bun or braid. It looks like a structured hair sculpture—irregular, directional, and intentionally artistic.
This style is less about function and more about visual impact, often inspired by runway or editorial hair design.
How to implement (practical steps)
Start with clean, dry hair with light texture for grip.
Divide the hair into 2–4 uneven sections (not perfectly equal).
Twist each section in different directions—some upward, some sideways.
Pin each twist individually at different points on the back of the head.
Do not aim for symmetry; instead, focus on balance of shapes.
Allow some ends to remain loose or slightly curved outward.
Layer the twists so they overlap slightly, creating depth.
Step back and adjust until the structure looks intentional, not random.
Lightly secure everything so it holds without flattening the shape.
Best for (who should use it)
This works best for medium to long hair and is ideal for fashion events, photoshoots, creative styling practice, or content creation where visual impact matters more than everyday practicality.
Pro tip
Negative space is part of the design. Leaving gaps between twists actually makes the hairstyle look more artistic and intentional.
Mistake to avoid
Do not try to make it neat or identical. The moment you force symmetry, the “sculpture” effect disappears and it becomes a basic updo.