Mornings with kids are rarely calm. You already know this. Between getting them dressed, packing lunches, finding missing socks, and managing your own schedule, hairstyling often becomes the last priority—and usually the first thing to get rushed or skipped.
But here’s the truth: ignoring hairstyles completely is a mistake.
A child’s hairstyle is not just about looks. It affects confidence, comfort, hygiene, and even how organized their entire day feels. When hair is messy, tangled, or constantly falling into their face, it becomes a distraction. They fidget more. They feel uncomfortable. And over time, it subtly affects how they present themselves.
At the same time, you don’t have the luxury to spend 30–40 minutes doing complicated braids every morning. That’s unrealistic. Most Pinterest content fails here—it looks beautiful but completely ignores real-life constraints.
That’s exactly why this guide exists.
In 2026, the focus is shifting toward smart, efficient, and low-maintenance hairstyles that still look polished and stylish. Parents are no longer chasing perfection—they want hairstyles that:
- Take 5–10 minutes max
- Stay intact through school, اللعب, and activities
- Work for different hair types (straight, curly, thick, fine)
- Require minimal tools and products
- Look good enough for photos, school, and outings
And most importantly—kids should actually enjoy wearing them.
Because if the hairstyle is uncomfortable, too tight, or painful to remove, it doesn’t matter how good it looks. The child will resist it the next day, and now you’ve created a daily struggle instead of a routine.
The Real Problem Most Parents Ignore
Most people approach kids’ hairstyles the wrong way. They focus on copying styles instead of understanding what actually works.
Here’s what usually goes wrong:
- Hairstyles are too complicated for daily use
- They don’t match the child’s hair texture or length
- They look good in photos but fall apart within hours
- They require tools or skills that aren’t practical
- They prioritize style over comfort and durability
This leads to frustration—for both you and the child.
So instead of trying random ideas every morning, you need a system. A set of go-to hairstyles that are:
- Reliable
- Easy to repeat
- Adaptable for school, events, or casual days
That’s what separates someone who struggles daily from someone who handles mornings smoothly.
What’s Different About Hairstyles in 2026
Trends have changed—and if you’re still following outdated styles, you’re making your life harder.
In 2026, kids’ hairstyles are focused on:
- Soft, natural looks instead of overly tight styles
- Protective styling to reduce hair damage
- Quick variations of basic styles (ponytails, braids, buns)
- Accessories doing the work (clips, bands, scrunchies)
- Styles that can transition from school → play → outing
There’s also a stronger emphasis on hair health. Tight styles, excessive pulling, and daily heat styling are being avoided more than ever—especially for young children.
If you have a small window in the morning, this shift actually works in your favor. Simpler styles are now considered better—not lazy.
What You’ll Learn in This Article
This is not another shallow list of “cute hairstyles.”
You’re going to learn 10 practical, real-life hairstyles that you can actually use—not just admire.
For each one, you’ll understand:
- What the hairstyle is and why it works
- Exactly how to do it step-by-step
- When to use it (school, events, busy mornings, etc.)
- Who it works best for (hair type, length, age)
- A pro tip that makes it easier or better
- A mistake that ruins the entire look
By the end, you won’t be guessing anymore. You’ll have a ready-to-use system for daily styling.
Who This Guide Is For
This guide is especially useful if:
- You struggle with time in the morning
- Your child hates sitting still for long hairstyles
- You don’t have advanced braiding skills
- You want styles that actually last all day
- You’re tired of Pinterest ideas that look good but don’t work
If you have a small room, limited tools, or minimal experience—this still works. That’s the point.
The Mindset Shift You Need
Stop trying to impress. Start trying to simplify.
The best hairstyle is not the most creative one—it’s the one that:
- Takes the least effort
- Causes zero stress
- Keeps your child comfortable
- Still looks clean and put-together
Once you accept this, everything becomes easier.
Because the goal isn’t to create a perfect hairstyle every day.
The goal is to create a repeatable routine that works without thinking.
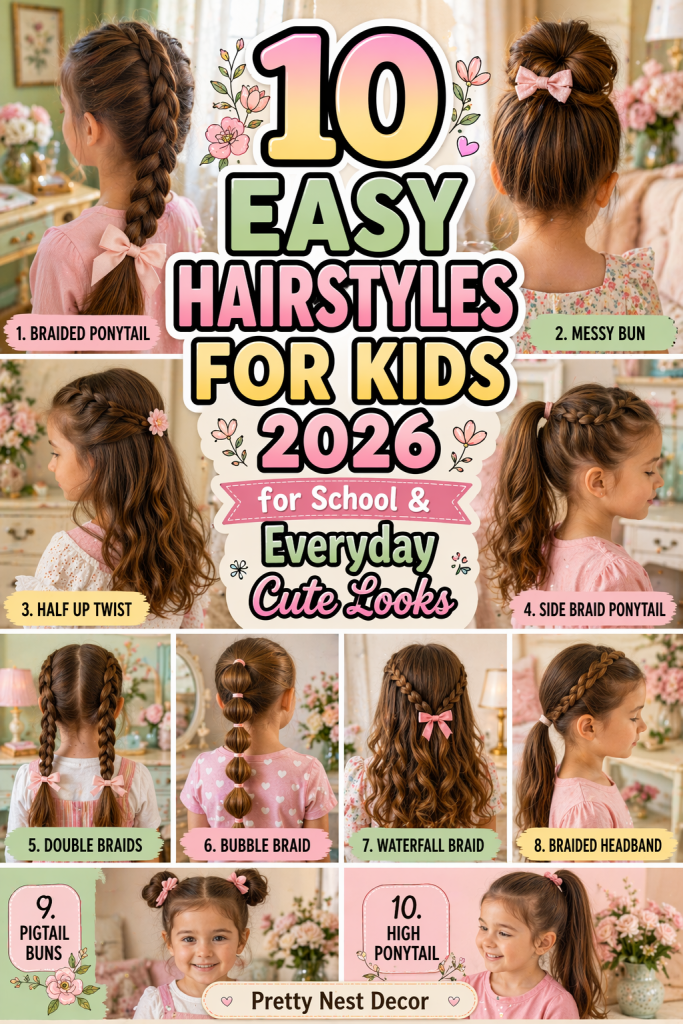
1. Classic Low Ponytail
Explanation (What it is)
The low ponytail is the most basic hairstyle—and that’s exactly why most people ruin it. They treat it like a last-minute fix instead of a polished style. In 2026, the low ponytail has evolved into a clean, intentional look that appears neat, soft, and slightly styled rather than rushed.
Instead of pulling hair back randomly, this version focuses on smooth sections, controlled volume, and subtle finishing details. It works for school, casual outings, and even small events when done properly.

How to Implement (Step-by-step)
Start with slightly damp or brushed hair. If the hair is very dry or frizzy, lightly mist it with water or apply a small amount of leave-in conditioner.
- Create a clean center or side part—don’t skip this. It instantly makes the style look intentional.
- Use a brush to gather hair at the nape of the neck. Keep tension gentle—too tight will cause discomfort.
- Secure with a soft elastic band. Avoid thin, harsh bands that pull hair.
- Take a small section of hair from the ponytail and wrap it around the elastic. Pin it underneath.
- Gently pull a few front strands loose for a softer look.
If you have a small room or limited time, skip the wrapping step—but don’t skip brushing. That’s what separates messy from clean.
Best For
- Straight to slightly wavy hair
- Medium to long hair
- School mornings or quick outings
This works best when you need something fast but still want your child to look put-together.
Pro Tip
Add a fabric scrunchie or soft ribbon instead of a basic elastic. It instantly upgrades the look without extra effort.
Mistake to Avoid
Pulling the ponytail too tight. This causes scalp tension, headaches, and can damage hair over time. Comfort matters more than perfection.
2. Double Braided Pigtails (Structured and Long-Lasting)
Explanation (What it is)
This is not the childish version of pigtails you’re imagining. In 2026, double braided pigtails are used as a protective, long-lasting hairstyle that keeps hair secure all day.
Instead of loose, uneven braids, the focus is on clean parting and balanced structure, making it both practical and visually neat.
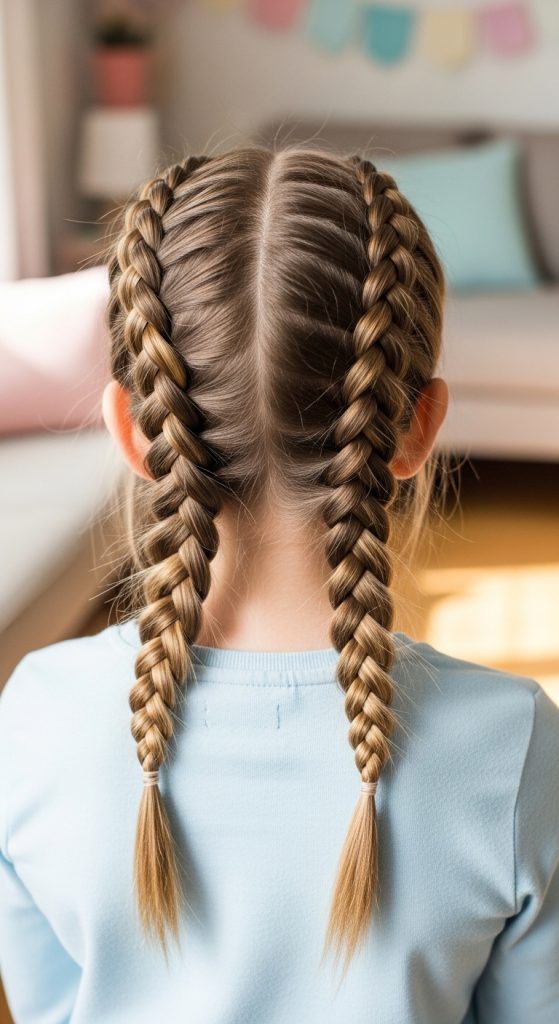
How to Implement
- Divide the hair into two equal sections using a center part. Take your time here—uneven parts ruin the look.
- Clip one side to keep it out of the way.
- Start braiding from just below the ear or higher depending on preference.
- Keep the braid firm but not tight—consistent tension is key.
- Secure with soft elastics at the ends.
- Repeat on the other side, ensuring both braids are similar in size and length.
If your child has layers, apply a bit of water or styling cream to keep small hairs in place.
Best For
- Thick or long hair
- Active kids (school, اللعب, sports)
- Days when you don’t want to redo hair
This works best when durability matters more than styling variety.
Pro Tip
Slightly loosen the braid after tying it by gently pulling the sides. This gives a fuller, more modern look instead of a tight, outdated style.
Mistake to Avoid
Braiding uneven sections. If one side is thicker, the entire hairstyle looks unbalanced and sloppy.
3. Half-Up Twisted Crown
Explanation (What it is)
This style sits between fully open hair and fully tied hair. It keeps hair away from the face while still allowing movement and softness.
The twisted crown adds a simple decorative element without needing braiding skills. It looks more complex than it actually is—which is exactly what you want.

How to Implement
- Take small sections from both sides of the head near the temples.
- Twist each section backward (not downward).
- Bring both twists to the back of the head.
- Secure them together using a small elastic or clip.
- Leave the rest of the hair open.
If the hair is slippery, use a small clip first, then add an elastic for extra hold.
Best For
- Medium-length hair
- Slightly wavy or straight hair
- Casual days, school, or small gatherings
This works best when you want something feminine but quick.
Pro Tip
Add a small decorative clip where the twists meet. It hides imperfections and elevates the style instantly.
Mistake to Avoid
Twisting too loosely. Loose twists fall apart quickly and lose shape within hours.
4. Messy Top Bun (Controlled, Not Lazy)
Explanation (What it is)
Most people misunderstand the messy bun. They think messy means careless. It doesn’t. A proper messy bun is controlled imperfection—it looks relaxed but stays secure.
For kids, this is one of the fastest styles, but only if done correctly.
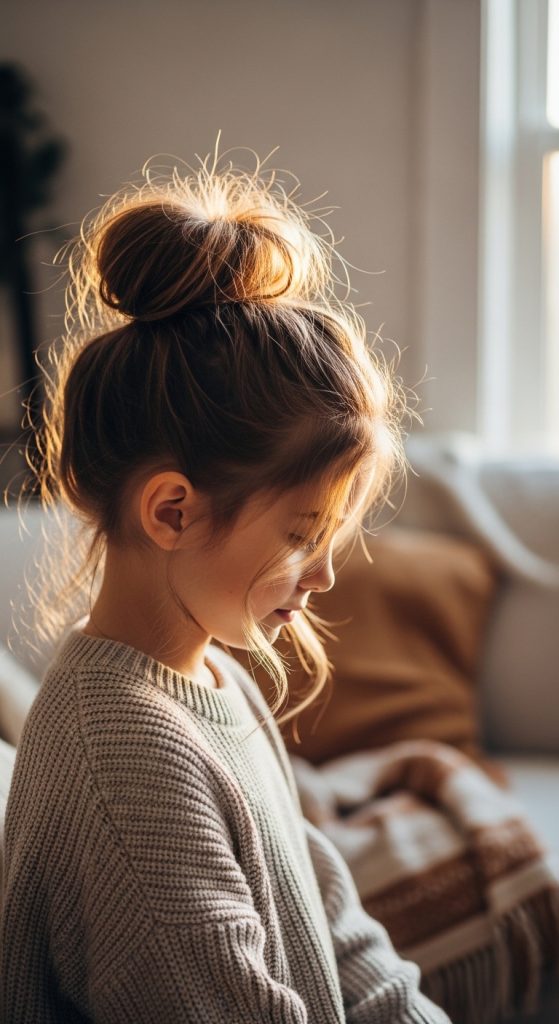
How to Implement
- Gather hair into a high ponytail at the crown.
- Twist the ponytail loosely.
- Wrap it around the base to form a bun.
- Secure with a soft elastic or a few pins.
- Gently pull out small strands to create softness.
If you have a small room and no styling tools, this is your go-to.
Best For
- Medium to long hair
- Busy mornings
- Warm weather
This works best when speed is the priority.
Pro Tip
Use a textured scrunchie instead of pins. It holds the bun in place and adds volume without effort.
Mistake to Avoid
Making the bun too loose. It will collapse within an hour, especially if the child is active.
5. Bubble Ponytail (Modern and Fun)
Explanation (What it is)
The bubble ponytail is one of the biggest hairstyle trends for kids in 2026. It transforms a simple ponytail into something visually interesting using multiple elastics.
It looks creative but requires almost no skill—which is why it’s so effective.
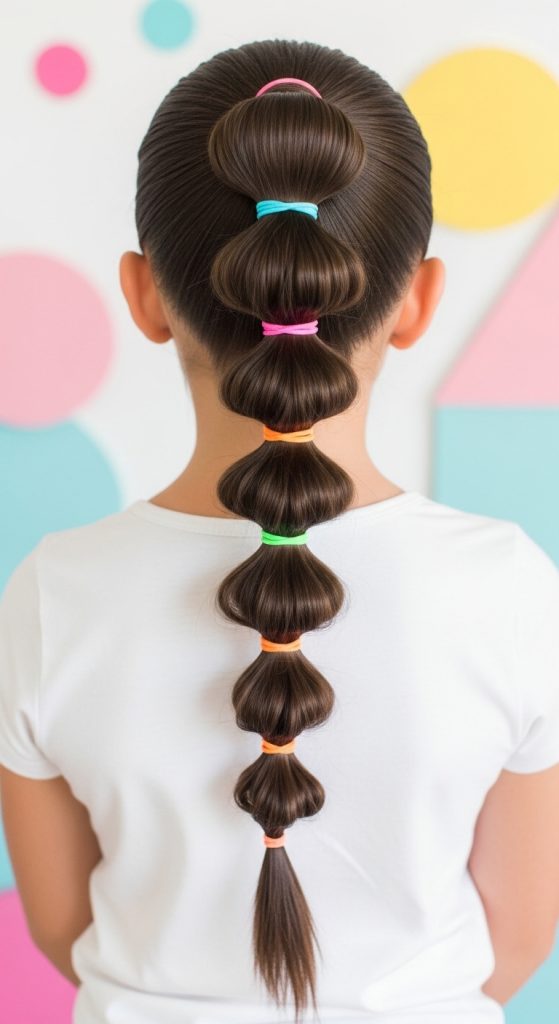
How to Implement
- Start with a regular high or mid ponytail.
- Add another elastic 2–3 inches below the first.
- Gently pull the hair between the elastics to create a “bubble” effect.
- Repeat this down the length of the ponytail.
You can adjust the size of bubbles depending on hair length.
Best For
- Long hair
- Kids who like fun styles
- School days or casual outings
This works best when you want something different without extra time.
Pro Tip
Use colorful elastics for each section. It adds personality and makes the hairstyle stand out.
Mistake to Avoid
Spacing elastics unevenly. This makes the bubbles look awkward and unbalanced.
6. Side Braid (Soft, Practical, and Actually Wearable All Day)
Explanation (What it is)
The side braid looks simple—but done right, it’s one of the most balanced hairstyles for kids. It keeps hair controlled, prevents tangling, and still looks soft and natural instead of overly strict.
Most people either braid it too tight (making it uncomfortable) or too loose (making it fall apart). The 2026 version focuses on controlled looseness—a braid that holds shape but still has movement.
This is the kind of hairstyle that quietly works all day without needing fixing every hour.
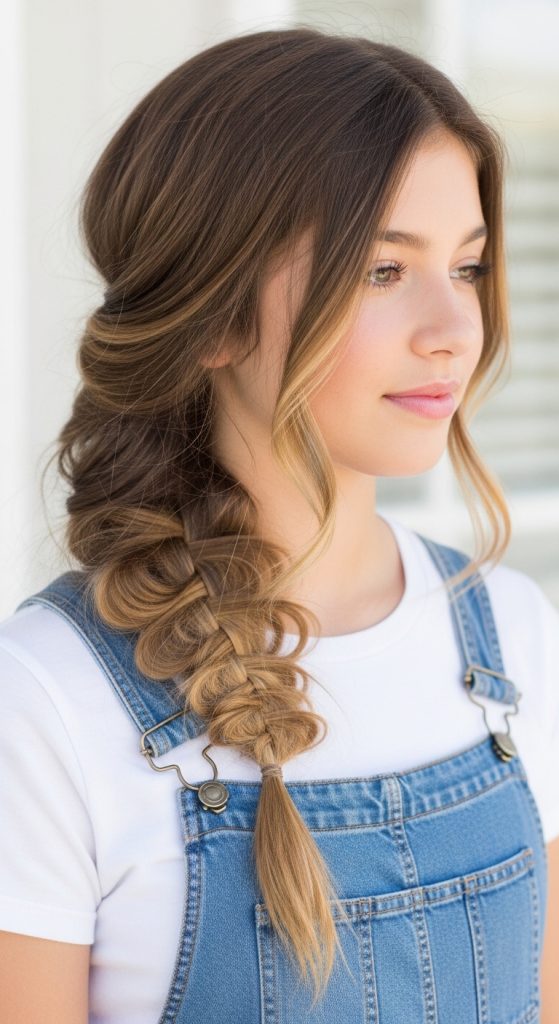
How to Implement (Step-by-step)
- Start by brushing all the hair to one side—left or right, depending on comfort.
- Create a slight side part. Don’t skip this—it gives direction and shape.
- Gather the hair just below the ear on that side.
- Divide into three equal sections.
- Begin a standard braid, keeping the tension consistent—not tight, not loose.
- Continue braiding until the ends and secure with a soft elastic.
- Gently pull the sides of the braid (this is called “pancaking”) to add volume and softness.
If the hair is silky and slips easily, lightly dampen it before braiding. This works best when the hair has slight grip.
Best For
- Medium to long hair
- Straight or slightly wavy textures
- School days where hair needs to stay in place
This works best when you want a style that lasts without constant fixing.
Pro Tip
Leave a few thin strands near the front loose. It frames the face and makes the style look intentional instead of basic.
Mistake to Avoid
Pulling all the hair too far forward before braiding. This creates tension at the scalp and makes the style uncomfortable after a few hours.
7. Double Mini Buns (Trendy but Needs Control)
Explanation (What it is)
Double mini buns—also called space buns—are popular for a reason: they’re fun, modern, and visually interesting. But most people do them wrong. They either look uneven, messy in a bad way, or fall apart quickly.
In 2026, the focus is on symmetry and structure, not randomness. When done correctly, this hairstyle is both playful and stable.
How to Implement (Step-by-step)
- Divide the hair into two equal sections using a clean center part.
- Secure each section into a high ponytail on each side of the head. Placement matters—keep them even.
- Take one ponytail, twist it, and wrap it around its base to form a bun.
- Secure with an elastic or pins.
- Repeat on the other side, matching size and height as closely as possible.
- Adjust both buns slightly so they sit evenly on the head.
If you have a small room and limited mirror angles, use the ears as a guide—both buns should align roughly with them.
Best For
- Medium-length hair
- Kids who like playful, trendy styles
- Weekends, outings, or casual school days
This works best when you want something different from basic ponytails or braids.
Pro Tip
Use textured scrunchies or small claw clips for each bun. They help hold shape and make the style look fuller without extra effort.
Mistake to Avoid
Making one bun bigger or higher than the other. Even a small imbalance makes the whole hairstyle look careless instead of stylish.
8. Sleek High Ponytail (Clean, Sharp, and Reliable)
Explanation (What it is)
This is where most parents get lazy—and it shows. A high ponytail is not just “tie it up and go.” When done right, it becomes one of the cleanest, most polished hairstyles a child can wear.
In 2026, the sleek high ponytail is all about smoothness, alignment, and hold. No bumps, no uneven sections, no loose mess at the crown. It gives a sharp, confident look while still being practical for long school hours.
It’s especially useful on days when you need something that won’t fall apart, no matter how active the child is.
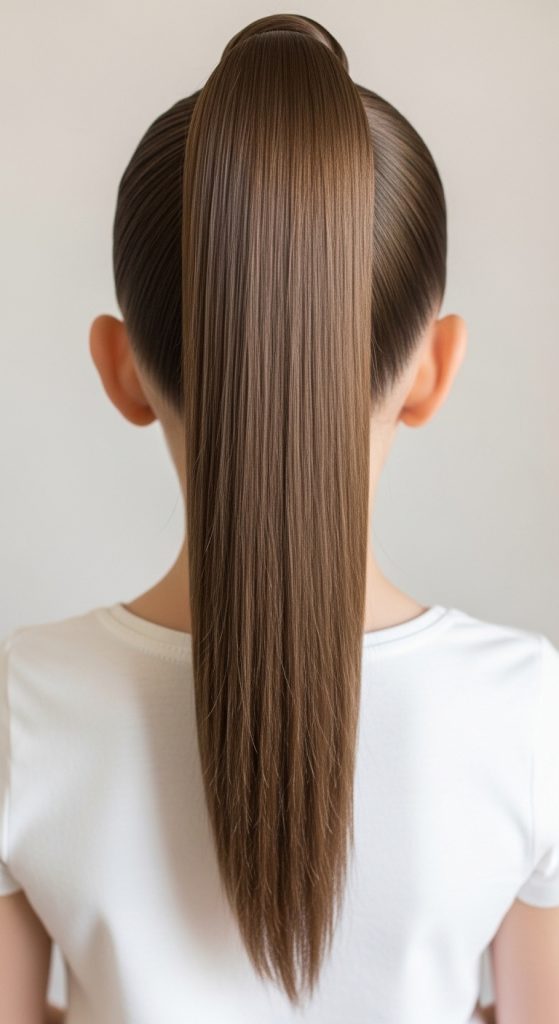
How to Implement (Step-by-step)
- Start with fully brushed hair—no shortcuts here. Knots will ruin the finish.
- Slightly dampen the hair or apply a small amount of leave-in conditioner to control frizz.
- Use a comb (not just a brush) to gather hair toward the crown of the head.
- Keep the head straight while tying—this helps avoid uneven tension.
- Secure tightly with a strong but soft elastic.
- Take a small section of hair from the ponytail and wrap it around the band to hide it. Pin underneath.
- Smooth down any flyaways using your hands or a soft brush.
If you have a small room or limited time, focus only on steps 1–4. But understand—skipping detail is why most ponytails look average.
Best For
- Medium to long hair
- Straight or slightly wavy textures
- School, sports, or long days outside
This works best when durability and neatness are the priority.
Pro Tip
Flip the head slightly forward while gathering the ponytail. This helps eliminate bumps and gives a tighter, cleaner finish.
Mistake to Avoid
Over-tightening to the point of discomfort. A sleek ponytail should feel secure—not painful. If the child complains, you’ve already done it wrong.
9. Simple Hair Clips Style (Low Effort, High Impact)
Explanation (What it is)
This is the most underestimated hairstyle—and that’s exactly why it works so well. Instead of forcing complex styles, this method uses strategic placement of clips to control and decorate the hair.
In 2026, accessories are doing half the work. The focus is on clean sections + aesthetic clips, not complicated techniques.
If you think this is “too basic,” you’re missing the point. Done correctly, it can look more modern than braids that take three times longer.
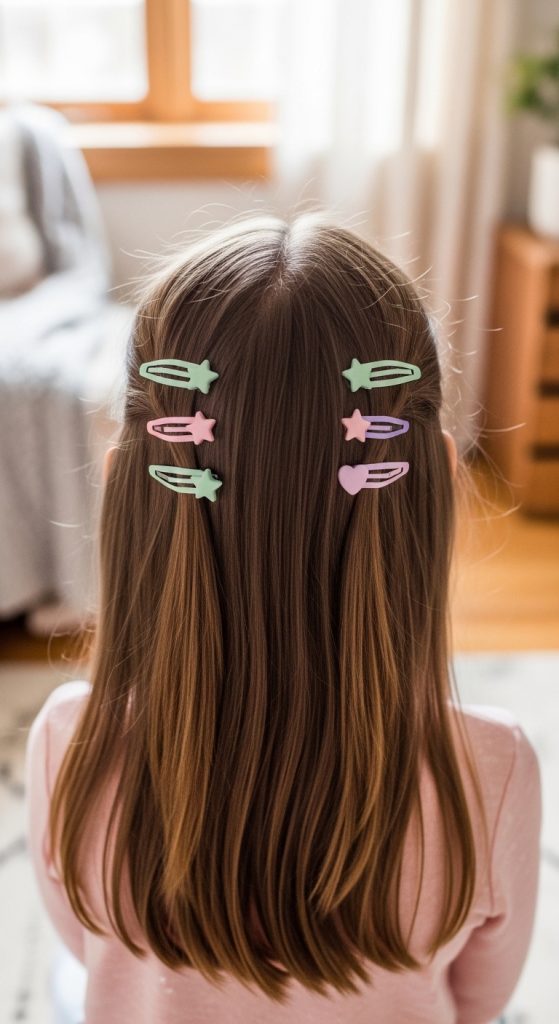
How to Implement (Step-by-step)
- Start with brushed, detangled hair.
- Create a center or side part depending on preference.
- Take small front sections from both sides.
- Twist or simply pull them back slightly.
- Secure each side with a clip (snap clips, mini claws, or decorative pins).
- Leave the rest of the hair open.
You can also stack multiple clips on one side for a more styled look.
If you have a small room or zero time, this is your safest option.
Best For
- Short to medium hair
- Fine or straight hair
- Quick school mornings or last-minute styling
This works best when you need something done in under 2–3 minutes.
Pro Tip
Use matching or coordinated clips instead of random ones. This small detail instantly upgrades the entire look.
Mistake to Avoid
Using too many clips without structure. Random placement makes the style look messy instead of styled. Keep it intentional.
10. Low Braided Bun (Clean, Secure, and Long-Lasting)
Explanation (What it is)
This is where simple meets smart. The low braided bun combines two basic techniques—braiding and bun styling—to create a hairstyle that is neat, durable, and far more structured than a regular bun.
Most parents rely on messy buns because they’re quick—but they fall apart. On the other hand, tight buns can be uncomfortable. This style solves both problems. The braid adds grip and control, while the low placement keeps it comfortable for long wear.
In 2026, this is one of the most practical “polished” styles for kids. It works for school, events, and even long days out without needing constant fixing.

How to Implement (Step-by-step)
- Start with brushed, detangled hair. If the hair is very smooth, lightly dampen it to improve grip.
- Gather all the hair into a low ponytail at the nape of the neck. Keep it centered and balanced.
- Secure the ponytail with a soft elastic.
- Divide the ponytail into three sections and create a standard braid.
- Tie the end of the braid with another elastic.
- Take the braid and wrap it around the base of the ponytail to form a bun.
- Secure the bun using pins or an additional elastic.
- Adjust slightly to make the bun look even and stable.
If you have a small room or limited time, don’t overthink the shape—focus on securing it properly. A stable bun matters more than a perfect one.
Best For
- Medium to long hair
- Thick or slightly textured hair
- School days, formal events, or long outings
This works best when you need a hairstyle that stays intact for hours without maintenance.
Pro Tip
Before wrapping the braid, gently loosen it (just slightly). This adds volume and makes the bun look fuller instead of thin and tight.
Mistake to Avoid
Skipping the braid and trying to wrap loose hair directly. That defeats the purpose—the bun will loosen quickly and lose shape.