
Gothic romance and relaxed bohemian design create a stunning interior aesthetic. When October arrives, ordinary seasonal decorationsHalloween Decor often feel cheap and uninspired. In contrast, adults crave sophisticated textures, moody palettes, and handmade artistry. This hybrid decor style blends dark drama with organic, cozy materials.

Consequently, your living spaces transform into chic, enchanted autumn sanctuaries. You can easily bypass garish plastic skeletons and neon orange trinkets. Instead, focus on rich velvets, tarnished metals, and dried botanicals. These curated elements evoke mysterious vintage romance without feeling cluttered. Even beginners can craft these elevated, museum-worthy decor pieces effortlessly.
Why Gothic-Boho Fusion Dominates Autumn Trends
Social platforms like Pinterest celebrate the union of darkness and warmth. The bohemian aesthetic introduces earthy terracotta, dried florals, and woven textiles. Meanwhile, traditional gothic design contributes deep charcoals, brass, and macabre silhouettes. When combined, they balance each other out with effortless grace.
Therefore, your Halloween decor looks intentional, editorial, and deeply cozy. You achieve an atmospheric home ambiance that transitions through Thanksgiving. Furthermore, crafting your own decor gives you complete creative control. You curate pieces that align perfectly with your permanent interior style.
The Power of Sustainable, Upcycled Holiday Crafting
Fast-fashion home decor creates immense seasonal waste every single year. Fortunately, gothic-boho DIY projects rely heavily on upcycled household items. You can easily repurpose old glass bottles, thrifted frames, and scrap fabrics. In addition, foraged natural elements like fallen branches cost nothing at all.
Consequently, you save significant money while crafting luxurious seasonal centerpieces. Upcycling also imbues every single decor piece with genuine vintage character. Your living room feels uniquely collected rather than mass-produced in factories. Thus, sustainability meets high-end moody aesthetics in the best way.
Transforming Atmosphere with Thoughtful Ambient Lighting
Lighting serves as the single most critical element in moody styling. Harsh overhead lights instantly destroy the intimate, mystical gothic aesthetic. Instead, you should rely entirely on low, flickering warm light sources. Taper candles, fairy wire, and tinted glass create captivating room shadows.
Moreover, textured elements like macrame cast intricate, dramatic silhouettes on walls. This warm glow makes rich black and burgundy fabrics feel inviting. Your guests will immediately feel relaxed and mesmerized by the atmosphere. Thoughtful illumination turns any simple DIY into a showstopping visual focal point.
Essential Materials for Sophisticated Dark Boho Crafts
Building a dedicated crafting stash makes holiday decorating smooth and enjoyable. First, gather a variety of matte black and antique gold spray paints. Also, collect natural jute cord, black cotton macrame rope, and lace.
Additionally, dried florals like pampas grass and eucalyptus add essential texture. Keep hot glue, floral wire, and wire cutters within easy reach. These versatile supplies form the foundation for almost every gothic-boho project. With these basic materials ready, transforming your space becomes remarkably fast.
Seamlessly Blending Seasonal Accents with Everyday Decor
You do not need to pack away your daily furniture for Halloween. Instead, tuck moody handmade accents organically among your existing shelf displays. For instance, place a dried floral skull alongside your houseplant collection.
Similarly, drape black velvet runners across your daily dining table setup. This subtle integration ensures your home looks chic rather than chaotic. The spooky elements feel like natural extensions of your personal taste. Now, let us dive into eleven breathtaking DIY decor projects for adults.
1. Matte Black Pampas Grass Skull Centerpiece

Earthy Bohemian Florals Meet Regal Macabre Structure
Dried pampas grass brings instant softness and organic bohemian texture indoors. However, pairing fluffy beige plumes with a matte black skull adds drama. This centerpiece commands attention on any dining table, mantle, or entryway console.
Furthermore, the stark contrast between soft botanicals and hard bone captivates guests. It feels sophisticated, modern, and completely elevated above standard holiday crafts. You avoid bright colors entirely, sticking to a refined neutral gothic palette. The finished display looks like a luxury boutique floral arrangement.
How to Build the Pampas Skull Centerpiece Step-by-Step
First, spray a hollow plastic or resin skull with matte black paint. Apply two even coats, allowing each layer to dry completely first. Next, use a craft knife to cut a circular opening on top.
Then, place a block of dry floral foam securely inside the cavity. Insert three large beige pampas grass stems into the center foam. Afterward, surround the pampas with dried black eucalyptus and bunny tails. Blend the floral edges outward to create a dramatic, cascading floral crown. Finally, position the finished skull centerpiece atop a dark wooden tray.
Required Materials for Pampas Skull
- Realistic plastic or resin craft skull
- Matte black multi-surface spray paint
- Dry floral foam block for arrangement
- Dried natural pampas grass and bunny tails
- Preserved black eucalyptus stems and floral wire
- Serrated craft knife or heavy-duty shears
2. Draped Black Velvet Cheesecloth Ghost Canopy
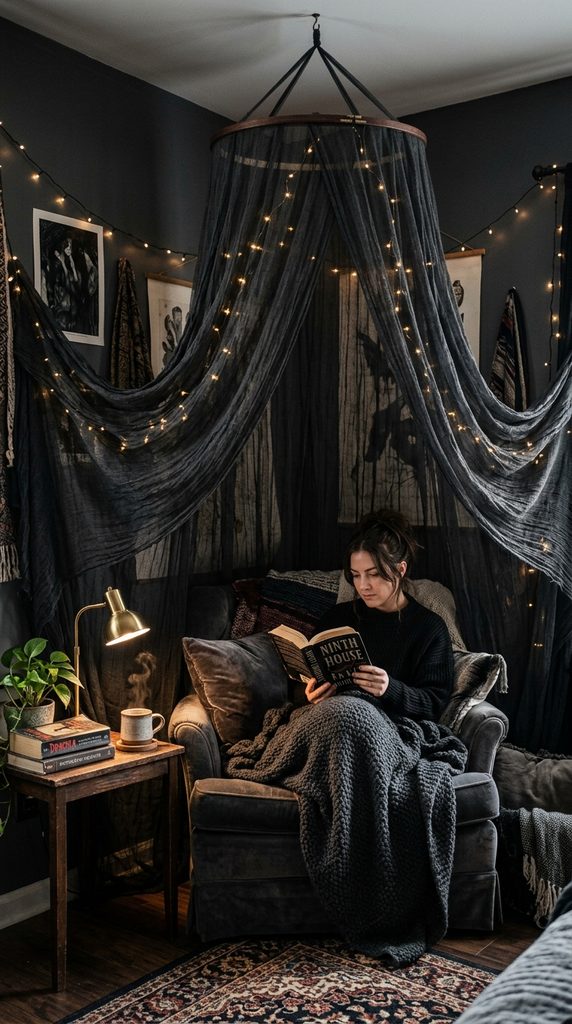
Flowing Ethereal Textiles for a Moody Bedroom Sanctuary
Traditional white sheet ghosts often look juvenile and cartoonish in homes. In contrast, layered black cheesecloth creates an ethereal, spectral canopy. It drapes delicately over reading nooks, headboards, or cozy living room corners.
Moreover, the sheer, distressed fabric catches low candlelight with haunting beauty. It adds rich textural depth without overwhelming your existing home furniture. This project brings romantic, phantom-like gothic elegance to any ceiling space. It transforms an ordinary room into a moody bohemian retreat in minutes.
How to Craft the Spectral Canopy Step-by-Step
Start by cutting three large panels of open-weave unbleached cheesecloth. Next, submerge the fabric panels in black fabric dye within a bucket. Let the fabric soak thoroughly until it achieves a deep charcoal hue.
Then, rinse the dyed cloth in cold water and hang to dry. Once dry, use your fingers to gently tear and fray lower edges. Attach a lightweight wooden embroidery hoop securely to the ceiling using hooks. Afterward, drape the black cheesecloth panels symmetrically over the suspended hoop. Finally, weave warm battery-operated micro fairy lights through the fabric layers.
Required Materials for Spectral Canopy
- Unbleached open-weave cotton cheesecloth
- Deep black liquid or powder fabric dye
- Large wooden embroidery hoop (12 to 14 inches)
- Warm white micro LED battery fairy lights
- Ceiling screw hooks and clear monofilament line
- Fabric scissors for intentional edge fraying
3. Tarnished Brass and Pressed Botanical Frames
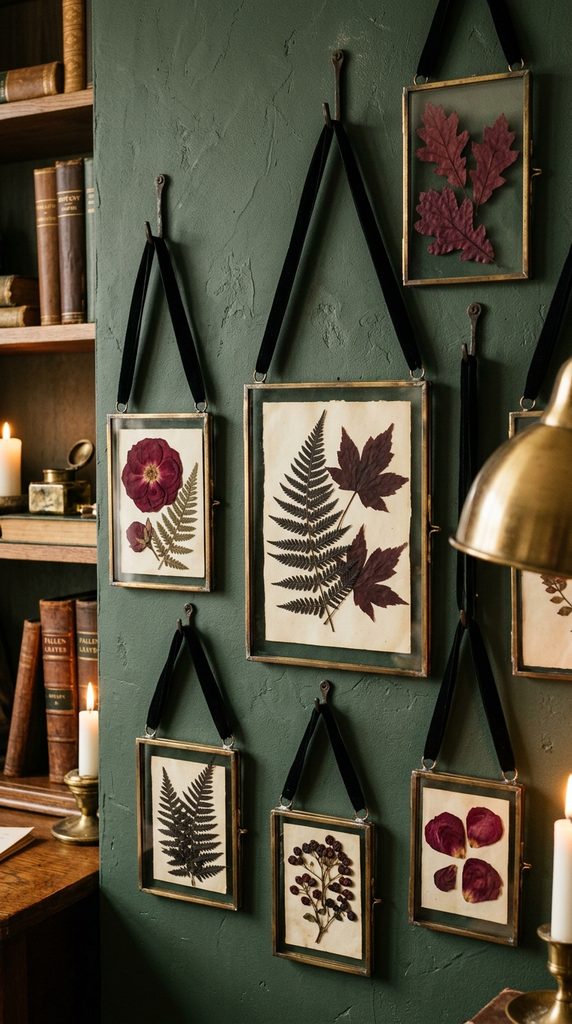
Victorian Herbarium Elegance with Dark Autumn Foliage
Pressed botanical frames offer a timeless, antique scientific study aesthetic. By using deep burgundy leaves and dark ferns, you evoke gothic nature. The clean glass panels float delicate specimens against your wall backdrop.
Additionally, aged brass frames add warm metallic highlights to dim corners. This DIY allows you to display nature’s fleeting beauty with refined maturity. It works beautifully grouped together as a dramatic seasonal gallery wall. Best of all, these framed botanicals stay pristine for years of display.
How to Press and Frame Gothic Botanicals Step-by-Step
Begin by foraging dark autumn foliage, black ferns, and deep red roses. Next, place the delicate botanical cuttings flat between heavy parchment paper sheets. Press the paper stack beneath heavy books for roughly seven days.
Once completely dry and flat, open your double-glass brass hanging frame. Then, use tweezers to position the pressed leaves on the glass. Add a tiny dab of clear craft glue behind the main stem. Carefully close the top glass panel to seal the botanical inside. Finally, suspend the frames on walls using textured black velvet ribbon.
Required Materials for Botanical Frames
- Double-glass hanging frames with antique brass finishes
- Pressed dark ferns, dried deep red roses, and leaves
- Heavy books and parchment paper for pressing
- Clear-drying liquid craft adhesive
- Fine precision craft tweezers
- Thin black velvet hanging ribbon

4. Macrame Bat and Crescent Moon Wall Hanging
Intricate Bohemian Fiber Art with a Nocturnal Twist
Macrame wall hangings are classic staples of modern bohemian interior styling. However, incorporating black cord and crescent shapes introduces a spooky dimension. This handmade fiber art piece brings tactile warmth to bare walls.
Furthermore, the delicate fringe softens the sharp angles of surrounding furniture. It delivers an artistic, handmade touch that looks professionally crafted by artisans. The piece subtly honors nocturnal creatures without screaming generic Halloween novelty. It remains a chic, understated statement piece throughout the entire autumn season.
How to Knot the Macrame Moon Hanging Step-by-Step
First, secure a metal crescent moon craft hoop to your workspace. Next, cut twelve lengths of black four-millimeter braided cotton rope. Fold each rope length in half and attach using Lark’s Head knots.
Then, knot a series of alternating square knots beneath the hoop base. Gradually taper the knots inward to form a sharp, distinct V-shape. Afterward, attach two small laser-cut wooden bat charms using black string. Leave the remaining lower cotton ropes hanging long and loose below. Finally, brush through the bottom rope ends using a fine comb for fringe.
Required Materials for Macrame Moon
- Metal crescent moon craft dreamcatcher hoop
- 4mm black braided natural cotton macrame cord
- Laser-cut thin wooden bat or moth silhouettes
- Black acrylic craft paint and small paintbrush
- Fine-tooth pet slicker brush or comb for fringe
- Sharp fabric scissors and measuring tape
5. Antiqued Terracotta Potion and Apothecary Jars

Earthy Boho Pottery Upcycled into Mysterious Vessels
Standard plastic Halloween potion bottles often look tacky on display shelves. Instead, transform thrifted glass jars into rustic, matte terracotta vessels. This textured faux-pottery finish brings warm bohemian earthiness to your space.
Moreover, hand-painted gothic apothecary labels give each bottle rich historical character. They look like authentic, ancient herbal containers recovered from a mystical workshop. You can style them in clusters on bookshelves, mantles, or coffee tables. This quick craft turns discarded household recycling into stunning home decor.
How to Create Textured Terracotta Jars Step-by-Step
Start by collecting assorted empty glass jars, wine bottles, and corked vials. Clean the glass thoroughly and remove all original adhesive paper labels. Next, mix matte acrylic paint with equal parts baking soda in cups.
This paint mixture creates a thick, chalky faux-ceramic plaster texture. Then, brush the textured paint evenly across the glass jar surfaces. Allow the first coat to dry fully before adding a second layer. Afterward, attach printable vintage apothecary labels using matte decoupage glue. Finally, seal the jars with raw wooden cork stoppers on top.
Required Materials for Terracotta Jars
- Assorted empty glass bottles and jars with corks
- Baking soda for creating chalky textural paint
- Matte acrylic paint in terracotta, charcoal, and ochre
- Printable vintage gothic apothecary label designs
- Matte finish decoupage glue (Mod Podge)
- Flat synthetic crafting paintbrushes
6. Dried Floral Bleeding Black Pillar Candles
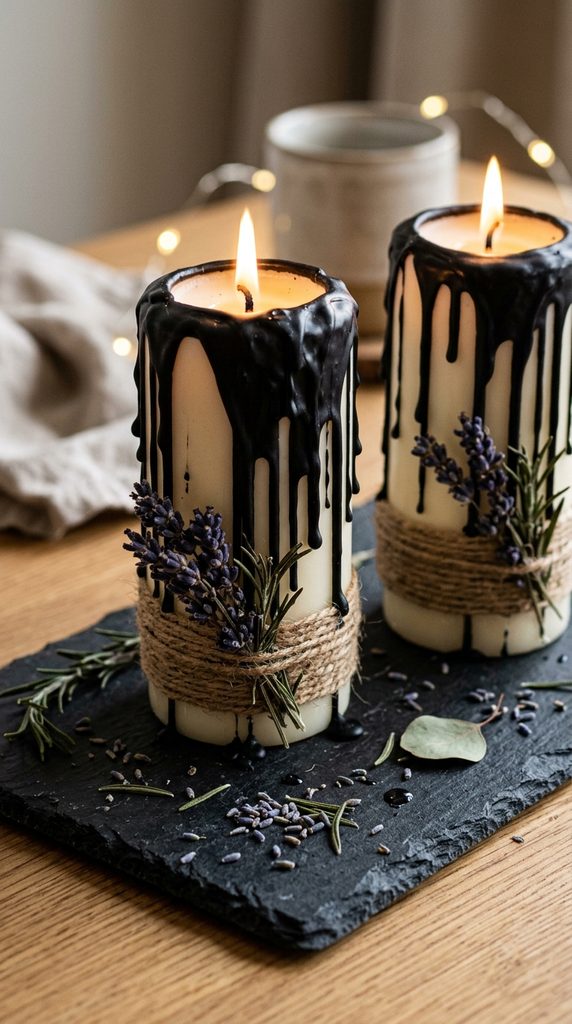
Romantic Wax Drippings Over Autumn Herb Bundles
Pillar candles are indispensable for creating an intimate, moody interior atmosphere. By layering dark, contrasting wax drips, you introduce vintage gothic melodrama. Wrapping the candle base with dried botanical sprigs adds essential boho charm.
Consequently, this easy DIY elevates plain, inexpensive wax pillars into art. When lit, the flickering flame illuminates the rich cascading wax layers. It feels luxurious, ritualistic, and beautifully nostalgic on any autumn evening. It serves as an effortless centerpiece for your dining room table.
How to Drip and Embellish Pillar Candles Step-by-Step
Begin by arranging three white or cream unscented pillar candles together. Next, light a separate taper candle made of pure black wax. Hold the burning black candle tilted directly over the white pillars.
Allow the hot black wax to drip generously down the candle sides. Create varied drip lengths along the perimeter for an organic look. Then, wrap a strand of natural jute twine around the lower base. Tuck small sprigs of dried lavender and rosemary beneath the twine. Finally, place the finished pillars securely onto a flat slate stone tray.
Required Materials for Bleeding Candles
- Thick unscented white or ivory wax pillar candles
- Solid black wax taper candle for dripping
- Natural dried lavender, rosemary, and wheat sprigs
- Thin brown jute twine or raw leather cord
- Natural rough-edge black slate coaster or tray
- Long craft lighter or matchsticks
7. Moody Celestial Boho Pumpkin Display

Ditching Traditional Carving for Gilded Constellation Art
Traditional jack-o’-lanterns rot quickly and often disrupt sophisticated home decor. In contrast, celestial painted pumpkins last throughout the entire holiday season. Painting real or faux pumpkins charcoal black creates an intense, dramatic canvas.
Furthermore, hand-painted metallic gold constellations bring whimsical celestial magic to shelves. The shimmering gold stars catch ambient room lighting with delicate grace. This project requires no messy pumpkin gutting or complex carving tools. It represents modern, mess-free holiday crafting at its absolute finest.
How to Paint Celestial Pumpkins Step-by-Step
First, wipe smooth craft pumpkins clean with a dry microfiber cloth. Next, apply two coats of ultra-matte charcoal or obsidian chalk paint. Ensure the pumpkin surface is fully opaque and dried completely throughout.
Then, use a fine-tip metallic gold paint pen to sketch constellations. Draw delicate star clusters, moons, and subtle geometric celestial connecting lines. Afterward, add tiny white paint dots to simulate distant starry galaxies. Wrap a strip of raw-edge black chiffon ribbon around the stem. Finally, cluster different pumpkin sizes together across your fireplace hearth.
Required Materials for Celestial Pumpkins
- Faux foam craft pumpkins or real smooth heirloom gourds
- Ultra-matte charcoal gray or black chalk paint
- Fine-tip oil-based metallic gold and silver paint pens
- Opaque white acrylic paint pen for micro-dots
- Frayed raw-edge black chiffon or silk ribbon
- Flat foam sponge paintbrushes
8. Gothic Arch Wooden Wall Sconces
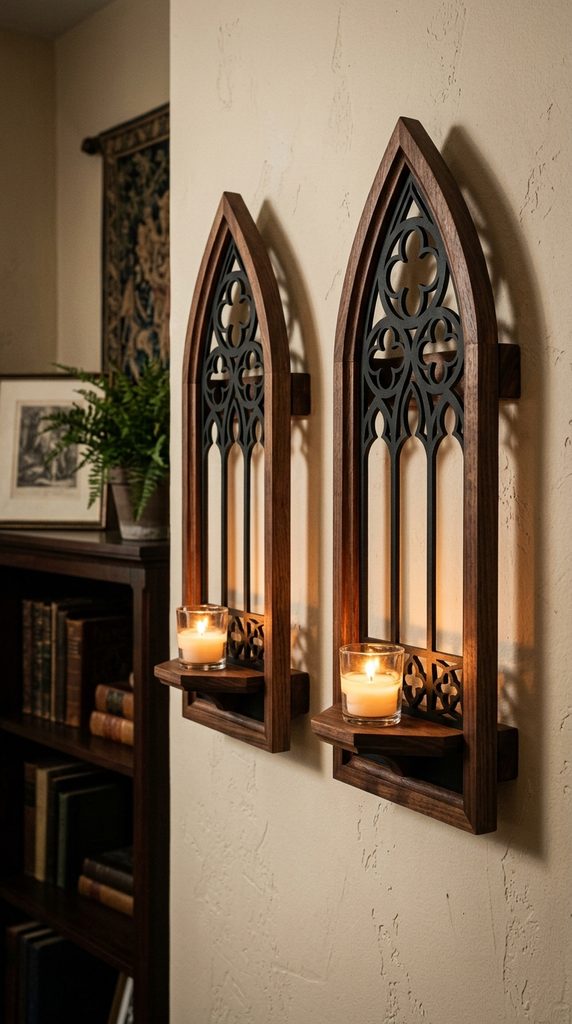
Architectural Church Windows Framing Flickering Ambient Glow
Gothic cathedral architecture features dramatic pointed arches and intricate wooden tracery. Recreating these miniature window arches adds historic majesty to plain walls. Backing the arches with natural wood tones retains essential bohemian warmth.
Moreover, adding a small floating shelf allows you to support candles safely. These sconces draw the eye upward, making living room ceilings feel taller. They cast gorgeous, flickering cathedral-like shadows across your walls all evening. This woodworking craft delivers tremendous high-end visual impact on modest budgets.
How to Build Gothic Arch Sconces Step-by-Step
Start by cutting a pointed cathedral arch silhouette from lightweight plywood. Next, sand all outer rough edges smooth using medium-grit sandpaper. Stain the wood backing with an antique walnut or ebony stain.
Then, attach a miniature wooden rectangular shelf ledge near the base. Use wood glue and small brad nails to secure the shelf firmly. Afterward, paint a laser-cut gothic tracery overlay in matte black. Glue the black tracery frame directly over the stained wood arch. Finally, mount the sconce on walls and set a flameless candle on top.
Required Materials for Arch Sconces
- Lightweight birch plywood boards or pre-cut wood arches
- Laser-cut wooden gothic window tracery overlays
- Dark walnut penetrating wood stain and rags
- Matte black acrylic craft paint
- Wood glue, small finishing nails, and hammer
- Battery-operated flickering LED glass votive candles
9. Foraged Witch’s Broom with Crystal Accents

Rustic Folk Art Crafted from Fallen Autumn Branches
Besoms, or traditional witches’ brooms, carry deep seasonal folklore and history. Crafting your own decorative broom using foraged twigs feels earthy and grounding. The natural textures of bare birch branches bring woodland magic indoors.
Additionally, binding the handle with raw crystals infuses healing bohemian energy. It leans into rustic natural spirituality rather than tacky commercial witch tropes. You can lean your bespoke broom against entry doorways or fireplaces. It serves as a striking, conversation-starting sculptural art piece all autumn.
How to Assemble a Boho Besom Step-by-Step
Begin by foraging a sturdy, curved tree branch for your handle. Next, gather a thick bundle of thin, flexible dried birch twigs. Align the twigs around the base end of your main branch.
Then, wrap heavy brown jute cord tightly around the twig bundle. Tie multiple secure knots to lock the broom bristles firmly into place. Afterward, wrap copper craft wire around the upper wooden handle. Secure a raw clear quartz or black tourmaline crystal under the wire. Finally, tuck sprigs of dried eucalyptus into the cord bindings for fragrance.
Required Materials for Boho Besom
- Sturdy foraged tree branch (roughly three feet long)
- Large bundle of flexible thin birch or heather twigs
- Heavy natural jute twine or black waxed cord
- Raw pointed quartz crystal or black obsidian stone
- Flexible raw copper crafting wire
- Dried eucalyptus and cinnamon sticks for scent
10. Distressed Antique Velvet Skull Garland

Luxurious Tactile Bunting for Mantles and Staircases
Paper and plastic seasonal banners often feel flimsy and distinctly temporary. However, a handmade crushed-velvet skull garland offers permanent, heirloom-level luxury. The plush velvet fabric catches ambient light, displaying rich, multidimensional color tones.
Furthermore, alternating muted jewel tones with charcoal creates striking bohemian harmony. This garland drapes gracefully across fireplace mantles, mirrors, or open shelving. It adds cozy tactile softness while maintaining an alluring, mysterious gothic aesthetic. You will look forward to pulling this bespoke banner out every autumn.
How to Sew a Velvet Skull Garland Step-by-Step
Start by tracing a simple skull silhouette onto cardstock for templates. Next, pin the template over pieces of rich crushed velvet fabric. Cut out matching front and back skull shapes using sharp fabric shears.
Then, sew the fabric edges together, leaving a small opening below. Lightly stuff each skull with polyester fiberfill for subtle plush dimension. Hand-stitch the opening closed using matching thread and a needle. Afterward, space the finished velvet skulls evenly along thick black rope. Finally, tie wooden beads and dark tassels between each velvet skull.
Required Materials for Velvet Garland
- Crushed velvet fabric remnants in black, plum, and emerald
- Polyester fiberfill stuffing for soft dimension
- Hand-sewing needles and heavy-duty thread
- Thick black twisted cotton rope or velvet ribbon
- Unfinished natural round wooden craft beads
- Black and burgundy silk embroidery floss for tassels
11. Cloche Terrarium with Bone and Botanical Curiosities

Victorian Curiosity Cabinet Wonders Under Flawless Glass
Glass cloches instantly elevate any small decorative item into precious art. Creating a miniature curiosity terrarium brings moody natural history to tabletops. By combining ethically sourced bones with dried moss, you evoke woodland wonder.
Moreover, the transparent glass dome reflects cozy room lighting with pristine clarity. It feels intellectual, artistic, and deeply rooted in historical curiosity cabinets. This compact display fits effortlessly onto small desks, bedside tables, or bookshelves. It provides an intriguing, gothic-boho accent that requires zero maintenance.
How to Style a Curiosity Cloche Step-by-Step
First, clean a glass display cloche and wooden base thoroughly. Next, apply a layer of hot glue across the wooden base plate. Press preserved dark green sheet moss firmly over the glued surface.
Then, arrange a piece of twisted natural driftwood into the moss. Position a replica animal skull or bone specimen against the wood. Afterward, hot-glue miniature dried mushrooms and black florals around bones. Place a tiny battery-operated warm micro fairy light string inside. Finally, lower the glass cloche dome over the completed curio arrangement.
Required Materials for Curiosity Cloche
- Glass display cloche dome with wooden base
- Preserved dark forest green sheet moss and lichen
- Small resin replica animal skull or bone specimens
- Miniature dried craft mushrooms and dark botanicals
- Small piece of natural twisted branch or driftwood
- Hot glue gun and all-temperature glue sticks