A small garage can quickly become a chaotic space where tools, gear, and household items compete for every inch of room. Many homeowners struggle with clutter, inefficient layouts, and lack of storage options that fit compact garages, making it difficult to find tools when needed or to even walk around safely. However, with the right planning, small garage storage solutions can transform this overlooked space into a highly organized, functional, and visually appealing area. The key is to maximize vertical space, use multifunctional storage systems, and carefully categorize tools and gear so that everything has a designated place. Small garages don’t need to feel cramped or cluttered; with strategic storage ideas, they can become highly efficient workshops, hobby spaces, or storage hubs.

One of the biggest challenges in small garages is the sheer variety of items that need storage. Tools like hammers, drills, saws, and wrenches, sports equipment, gardening tools, and seasonal gear can quickly overwhelm a space if left unorganized. Without proper storage, items are often scattered across the floor or piled on shelves haphazardly, creating frustration and safety hazards. By incorporating small-space storage solutions, you not only gain functionality but also peace of mind. Properly organized garages allow you to quickly locate tools, protect valuable equipment from damage, and even create space for projects or vehicles.
DIY and small-scale storage solutions offer flexibility and cost-effectiveness. Rather than investing in oversized cabinets that dominate a small garage, consider wall-mounted pegboards, overhead racks, stackable bins, and modular shelving. These solutions make use of otherwise wasted space, such as the vertical walls and ceiling, and keep frequently used items easily accessible. Additionally, labeling systems and color-coded bins further enhance efficiency, ensuring that every tool and piece of gear has its home. Pinterest-inspired small garage storage ideas often feature clever hacks like magnetic strips for screwdrivers, hanging baskets for lightweight items, and foldable workbenches that save floor space.
Maximizing floor space is another critical aspect of small garage organization. Rolling tool carts, slim cabinets, and compact storage towers allow you to move tools as needed without creating permanent obstructions. Multi-functional furniture, such as workbenches with built-in drawers or wall-mounted foldable tables, enables a garage to function both as a storage space and a practical work area. Even small garages can accommodate bicycles, ladders, or outdoor gear when vertical and wall-mounted storage is thoughtfully implemented.
An organized garage also enhances safety. Loose tools and clutter on the floor can cause trips, falls, or damage to expensive equipment. By utilizing small garage storage solutions that emphasize organization, visibility, and accessibility, you create a safer environment for family members, pets, and yourself. Items that are clearly stored and labeled are easier to track, reducing the chance of lost or misplaced tools.
This article provides detailed small garage storage ideas for tools and gear, specifically tailored for compact garages. Each idea includes a clear explanation, step-by-step instructions, a materials/tools list, and tips for maximizing efficiency in tight spaces. From wall-mounted pegboards and magnetic tool strips to overhead racks and custom shelving solutions, these concepts combine practicality with visual appeal, making your garage Pinterest-worthy and highly functional. Whether your goal is to declutter, create a mini workshop, or simply make better use of limited space, these storage solutions will inspire you to rethink your garage layout.
By implementing these ideas, even the smallest garage can become an organized, efficient, and enjoyable space. You’ll learn how to prioritize essential tools, categorize gear, and optimize every inch of available space while keeping the area visually tidy. Each solution is practical, cost-effective, and beginner-friendly, ensuring that anyone can transform their garage with minimal effort. By the end of this guide, your small garage will no longer feel cramped or overwhelming—it will become a streamlined, functional storage haven for all your tools and gear, ready for any project or hobby.
Let’s dive into the first 10 small garage storage solutions designed to maximize space, enhance organization, and make every tool and piece of gear easy to find and access.
Idea 1: Wall-Mounted Pegboard Organizer
Introduction
A wall-mounted pegboard is one of the most versatile and space-saving storage solutions for a small garage. Pegboards allow you to utilize vertical wall space, keeping tools organized and within easy reach. This solution is perfect for compact garages because it clears countertops and workbenches while creating a visually appealing, Pinterest-worthy display of your tools. By arranging tools like hammers, screwdrivers, pliers, and wrenches on hooks, you can categorize them by type or frequency of use. The customizable layout ensures that each item has a designated spot, reducing clutter and time spent searching for the right tool. Pegboards also allow for future expansion—additional hooks, shelves, or bins can be added as your tool collection grows.
This system is beginner-friendly and cost-effective, providing an instant upgrade to any small garage. In addition to hanging tools, you can store lightweight gear such as tape, gloves, or small power tools. Labeling hooks or areas further enhances functionality and ensures the garage stays organized over time. A pegboard not only maximizes space but also encourages an efficient workflow, making every project smoother and faster.

Materials Needed:
- Wall-mounted pegboard panel
- Pegboard hooks and shelves
- Screws and wall anchors
- Measuring tape and drill
- Optional small storage bins
Step-by-Step How-To:
- Measure the wall space and cut the pegboard to fit if necessary.
- Use a drill and wall anchors to securely mount the pegboard.
- Attach hooks and shelves, arranging them based on your tools’ sizes and frequency of use.
- Hang each tool on a designated hook, grouping by type for easy access.
- Optionally, place small bins on pegboard shelves for tiny items like screws, nuts, or bolts.
Idea 2: Magnetic Tool Strip
Introduction
A magnetic tool strip is a sleek, modern solution for storing metal tools in a small garage. Perfect for compact spaces, this system uses strong magnets to hold hammers, wrenches, screwdrivers, and pliers directly on the wall. Magnetic strips save counter and shelf space, providing a clutter-free and visually organized garage. They also allow for quick access—tools are instantly visible and easy to grab. This approach is especially helpful for DIY enthusiasts or hobbyists who need frequently used tools readily available without rummaging through drawers.
Magnetic strips are beginner-friendly and can be installed in minutes. They are compatible with metal hand tools, making them versatile for different workshop setups. In addition, these strips can be used in combination with pegboards or wall-mounted shelves to maximize storage efficiency. By using a magnetic strip, you create a streamlined, Pinterest-worthy display that not only saves space but also elevates the overall look of your small garage.

Materials Needed:
- Strong magnetic tool strip(s)
- Screws and wall anchors
- Drill or screwdriver
- Measuring tape
- Optional labels for each tool
Step-by-Step How-To:
- Measure and mark the wall where the magnetic strip will be installed.
- Drill holes and insert wall anchors if needed.
- Secure the magnetic strip to the wall using screws.
- Attach metal tools directly to the strip, arranging by size or type.
- Optionally, add labels above or below each tool for quick identification.
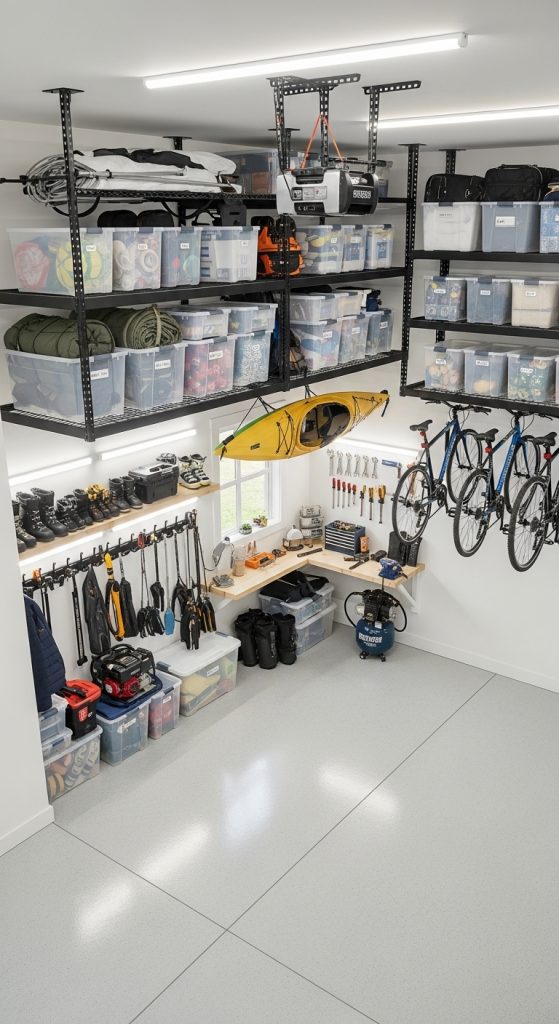
Idea 3: Overhead Garage Storage Racks
Introduction
Overhead garage storage racks are ideal for maximizing space in small garages. By utilizing the ceiling, these racks free up floor area for vehicles, workspaces, or larger equipment. They are perfect for storing bulky items such as seasonal gear, camping supplies, or rarely used tools. Overhead racks allow you to keep items out of sight but still accessible, reducing clutter and enhancing safety by preventing floor obstruction. This solution is particularly Pinterest-worthy because it transforms a previously wasted space into a functional storage area.
These racks are durable, adjustable, and beginner-friendly for homeowners willing to follow step-by-step instructions. By storing items overhead, you reduce visual clutter and create a more open, organized feel in a small garage. The system works best when combined with labeled bins or containers to keep similar items together, ensuring quick retrieval whenever needed.
Materials Needed:
- Overhead garage storage rack kit
- Screws, bolts, and anchors
- Ladder for installation
- Storage bins or containers
- Drill and wrench
Step-by-Step How-To:
- Locate ceiling joists using a stud finder to ensure secure installation.
- Assemble the overhead rack according to the manufacturer’s instructions.
- Use screws and anchors to mount the rack securely to the ceiling joists.
- Place storage bins or containers on the rack, categorizing items by type.
- Label bins for easy access and safety.
Idea 4: Rolling Tool Cart
Introduction
A rolling tool cart is a compact, mobile solution for small garages. It provides easy access to frequently used tools without taking up permanent floor space. Rolling carts are ideal for small garages because they can be moved close to the workspace during projects and rolled away for storage afterward. Many carts feature multiple drawers, shelves, and compartments, allowing you to store hand tools, power tools, screws, and accessories efficiently. This solution ensures a clutter-free workspace while maintaining mobility, which is essential for small-space organization.
Rolling carts are beginner-friendly, affordable, and adaptable for various garage setups. They can be paired with pegboards, magnetic strips, or wall shelves for a complete small-space storage system. By labeling drawers and organizing items by type, your garage becomes highly functional and visually pleasing, creating a Pinterest-worthy, organized atmosphere.

Materials Needed:
- Rolling tool cart with drawers
- Labels or drawer organizers
- Small storage bins for screws, nuts, and bolts
- Optional pegboard attachment on the cart sides
Step-by-Step How-To:
- Assemble the rolling cart according to manufacturer instructions.
- Categorize tools and items by type and assign each drawer or shelf.
- Place small bins inside drawers for tiny items.
- Roll the cart to your workspace as needed, then return it to a corner or against a wall.
- Label drawers to maintain organization.
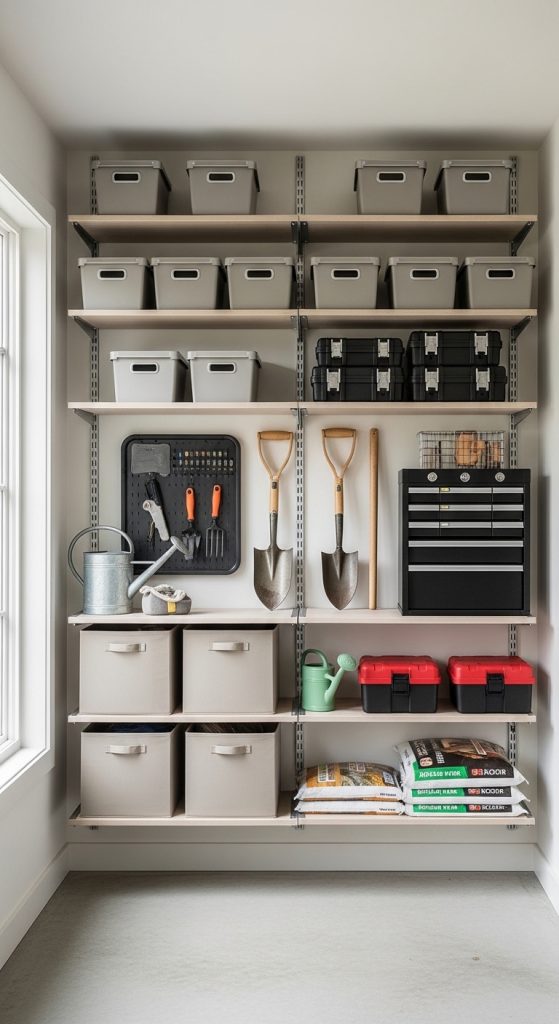
Idea 5: Wall-Mounted Shelving Units
Introduction
Wall-mounted shelving units are a classic small-space solution that keeps your garage organized without taking up floor space. These shelves can store toolboxes, power tools, paint cans, or outdoor gear, freeing up floor area for projects or vehicles. By utilizing vertical space, you maximize storage potential and keep items easily accessible. This solution is beginner-friendly and highly adaptable: adjustable shelves allow you to change spacing as your tool collection grows. The visual appeal of neatly arranged bins and labeled shelves also makes the garage Pinterest-worthy, combining functionality with style.
Shelving units can be paired with storage bins, baskets, or hooks to further categorize and protect items. With a clearly defined system, you reduce the time spent searching for tools while maintaining a clean, organized garage environment.
Materials Needed:
- Wall-mounted shelving units or adjustable brackets and boards
- Screws, wall anchors, and drill
- Storage bins or baskets
- Labels for bins
- Level and measuring tape
Step-by-Step How-To:
- Measure wall space and determine shelf placement.
- Use a level to mark bracket positions and secure with screws and anchors.
- Install shelves onto brackets and check for stability.
- Place storage bins or baskets on shelves and categorize items.
- Label bins for easy identification and maintenance.
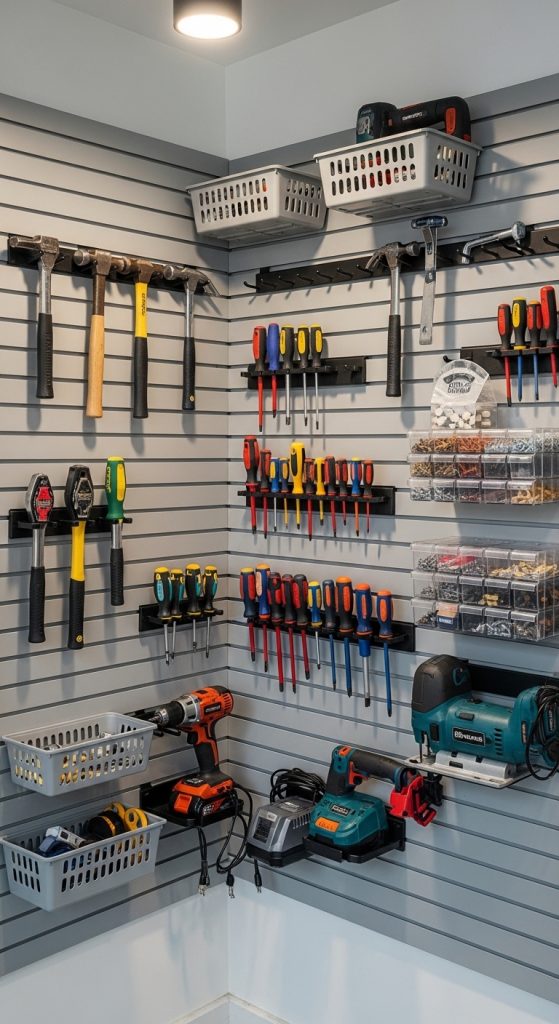
Idea 6: Slatwall Storage System
Introduction x
A slatwall storage system is a professional-grade garage organization solution that’s perfect for small spaces. Slatwalls use horizontal panels with slots, allowing you to hang hooks, baskets, shelves, and specialized holders for tools and gear. This system maximizes wall space, keeping the floor clear while making tools highly accessible. The flexibility of slatwalls allows you to rearrange hooks and accessories as your storage needs change, which is ideal for homeowners who acquire new tools or gear over time.
Slatwall panels create a clean, Pinterest-worthy visual appeal because every tool can have a dedicated space, making the garage look neat and organized. This system is beginner-friendly with basic installation skills and offers the advantage of customizable configurations for hand tools, power tools, sporting equipment, and even outdoor gear. By combining slatwalls with labeled bins and baskets, you create a visually appealing, efficient garage storage system that works in compact spaces.
Materials Needed:
- Slatwall panels
- Mounting screws and wall anchors
- Hooks, baskets, and tool holders compatible with slatwall
- Drill and measuring tape
- Optional labels for bins and hooks
Step-by-Step How-To:
- Measure wall space and plan slatwall placement.
- Drill holes and attach slatwall panels securely to the wall using screws and anchors.
- Arrange hooks, baskets, and tool holders based on your tool types and sizes.
- Hang hand tools, power tools, or gear on designated hooks and shelves.
- Label hooks or bins for easy organization and retrieval.
Idea 7: Over-the-Door Storage Racks
Introduction x
Over-the-door storage racks are an ingenious solution for small garages that often have limited wall and floor space. These racks utilize the back of garage doors to store tools, gardening supplies, sports equipment, or cleaning gear. By lifting items off the floor, over-the-door racks create more room for vehicles, workbenches, and safe walking space. This small-space hack is especially effective in compact garages where every inch counts.
These racks are beginner-friendly, often requiring minimal installation, and can be customized to hold lightweight items like brooms, extension cords, or small hand tools. They are also highly Pinterest-worthy, offering a clean and organized look while making previously wasted space functional. Combining over-the-door racks with bins or hooks enhances organization further, keeping your garage clutter-free and visually appealing.

Materials Needed:
- Over-the-door storage rack or hooks
- Screws and wall anchors (if needed)
- Storage bins or baskets
- Measuring tape and level
Step-by-Step How-To:
- Hang the rack over the garage door or mount according to instructions.
- Arrange bins, baskets, or hooks on the rack.
- Place tools, cleaning supplies, or lightweight equipment in the bins or on hooks.
- Adjust placement for balance and accessibility.
- Ensure door can open and close freely without obstruction.
Idea 8: Stackable Clear Storage Bins
Introduction
Stackable clear storage bins are an essential small-space storage solution for compact garages. These bins allow you to store tools, hardware, seasonal gear, or outdoor equipment while keeping items visible and accessible. Clear bins make it easy to identify contents without opening each container, saving time and reducing frustration. The stackable design ensures vertical space is maximized, ideal for garages with limited floor area.
This beginner-friendly solution is cost-effective and highly adaptable. Bins can be grouped by type, labeled for quick identification, and placed on shelves, under benches, or in corners. By keeping items organized in clear bins, your garage maintains a clean, Pinterest-worthy look while preventing clutter. This method also protects items from dust, moisture, and damage, making it practical and visually appealing.

Materials Needed:
- Clear stackable storage bins with lids
- Labels or marker pens
- Shelving unit or floor space for stacking
- Optional dividers for small items
Step-by-Step How-To:
- Categorize items by type or use (hand tools, power tools, seasonal gear).
- Place items in clear bins, using dividers for smaller pieces.
- Stack bins vertically to save floor space.
- Label each bin clearly for quick identification.
- Arrange bins in an accessible area on shelves or against a wall.
Idea 9: Foldable Wall-Mounted Workbench
Introduction
A foldable wall-mounted workbench is perfect for small garages where floor space is at a premium. This space-saving solution provides a sturdy surface for projects and tool use but folds away when not in use, freeing up valuable room. Compact, DIY-friendly, and functional, foldable workbenches are ideal for homeowners who need both a workspace and open floor space for storage or vehicles.
This solution combines practicality with Pinterest-worthy aesthetics. You can customize the height, surface material, and storage options such as small shelves or pegboard backings. Pairing a foldable workbench with wall-mounted storage creates a highly organized, small-space garage that’s both functional and visually appealing.

Materials Needed:
- Foldable wall-mounted workbench kit or DIY materials
- Screws, brackets, and anchors
- Drill and level
- Optional pegboard back panel and hooks for tool storage
Step-by-Step How-To:
- Choose a wall with sufficient clearance and stud support.
- Install foldable brackets securely using screws and anchors.
- Attach the workbench surface to the brackets and ensure it folds smoothly.
- Optionally, add a pegboard panel above the bench for additional tool storage.
- Fold the bench down when not in use to maximize floor space.
Idea 10: Bicycle and Ladder Wall Hooks
Introduction
Bicycles, ladders, and long-handled tools often dominate floor space in small garages, causing clutter and limiting movement. Wall hooks offer a practical solution by lifting these items vertically, freeing floor space while keeping them accessible. This solution is Pinterest-worthy because it creates a clean, organized look and efficiently utilizes vertical storage. Wall hooks can accommodate various items, from bicycles and ladders to rakes, shovels, and even extension cords.
Installing hooks is beginner-friendly and highly flexible. You can group similar items together, maximize wall height, and combine with other storage solutions like shelves or pegboards for a complete small-space garage organization system. By securing heavy items to the wall, you improve safety, reduce clutter, and maintain a functional workspace.

Materials Needed:
- Heavy-duty wall hooks or J-hooks
- Screws and wall anchors
- Drill and stud finder
- Optional protective padding or hooks for delicate items
Step-by-Step How-To:
- Use a stud finder to locate wall studs for secure hook installation.
- Mark the placement of hooks based on item size and shape.
- Drill holes and attach hooks with screws, ensuring stability.
- Hang bicycles, ladders, or tools securely on the hooks.
- Adjust spacing or add more hooks to optimize vertical storage and accessibility.
Idea 11: Sliding Storage Bins Under Workbench
Introduction
Small garages often struggle with utilizing every inch of space effectively, especially under workbenches. Sliding storage bins under a workbench offer a practical and beginner-friendly solution that keeps tools, hardware, and gear neatly tucked away while remaining easily accessible. This setup works exceptionally well in compact garages where floor space is limited, because the bins slide out like drawers, allowing you to quickly grab what you need without digging through cluttered shelves. Sliding bins can hold hand tools, power tool accessories, screws, nails, or even small gardening supplies, ensuring everything has a dedicated place.
This solution is both practical and visually appealing, making your garage Pinterest-worthy. The bins can be labeled and color-coded for easy identification, reducing time spent searching for specific tools. By using the space under a workbench, you free up other areas for larger equipment or project space. This DIY-friendly system is highly customizable: you can add as many bins as needed, adjust the height to fit different sizes, and even combine with wall-mounted storage solutions for maximum efficiency. Sliding storage bins create a clean, organized, and functional garage setup, ideal for anyone looking to maximize a small space.

Materials Needed:
- Plastic or wooden sliding storage bins/drawers
- Workbench with open space underneath
- Drawer rails or pre-made sliding mechanisms (optional)
- Labels or marker pens
- Measuring tape
Step-by-Step How-To:
- Measure the available space under your workbench to determine the size and number of bins.
- Select sliding bins that fit the dimensions; add drawer rails if needed for smooth movement.
- Place the bins under the workbench, ensuring they slide in and out freely.
- Organize tools, hardware, and gear in individual bins by category.
- Label each bin clearly to make identification and access quick and easy.
- Maintain order by returning items to their designated bins after use.