Most people treat fencing as an afterthought—and that’s exactly why their outdoor space never feels complete. They spend time and money on paint, furniture, plants, and lighting, but when it comes to the fence, they either rush the decision or go for the cheapest option without thinking long-term. The result is predictable: a boundary that does its job physically, but completely fails visually.
If you’re working with a limited budget, the pressure is even higher. You want something affordable, but you also don’t want your space to look cheap or unfinished. That’s where most people get stuck. They assume style requires a high budget, so they either delay the project or settle for basic, outdated fencing that adds no real value.

That assumption is wrong.
The real issue is not budget—it’s lack of planning. A low-budget fence can look clean, modern, and intentional if you make the right design decisions. At the same time, an expensive fence can look poorly executed if the proportions, spacing, or materials are wrong. Cost does not guarantee results—strategy does.
This is where metal fencing becomes one of the smartest choices, especially when money is tight.
Metal is often misunderstood. Many people associate it with cold, industrial designs or think it automatically looks harsh and uninviting. Others assume it’s expensive or complicated to install. In reality, metal is one of the most flexible materials you can use. It can be minimal or decorative, bold or subtle, modern or even warm when paired correctly with other elements like wood, plants, or lighting.
More importantly, metal performs well over time. Unlike wood, it doesn’t rot. Unlike cheap plastic or low-quality materials, it doesn’t degrade quickly under sun exposure. When properly coated or treated, it resists rust and requires far less maintenance. That matters more than most people realize. A fence is not something you want to repair every few months. If your goal is to save money, durability has to be part of the decision—not just the upfront price.
Another problem people run into is scale. A fence that looks good in a large space can completely overwhelm a small yard. Thick panels, heavy designs, or overly tall structures can make your outdoor area feel closed in and smaller than it actually is. On the other hand, a fence that is too open might not provide enough privacy or security.
Metal solves this balance better than most materials. Because it can be designed with slim lines and controlled spacing, it allows you to create boundaries without making the space feel blocked. If you have a small room outdoors—like a compact yard, patio, or side area—this becomes critical. The wrong fence will make it feel cramped. The right one will define the area while still keeping it visually open.
There is also a practical side that most people ignore: installation and adaptability. Budget projects rarely happen all at once. You might build your fence in phases, upgrading sections over time. Metal fencing allows for that flexibility. You can start with a basic structure and enhance it later with paint, panels, or decorative elements without having to rebuild everything from scratch.
But here’s where most mistakes happen.
People either overcomplicate the design or oversimplify it in the wrong way. They add too many elements—mixing styles, patterns, and finishes—until the fence looks cluttered. Or they go too basic, choosing something so plain that it looks temporary or unfinished. The goal is not complexity. The goal is clarity. A strong fence design should feel intentional, even if it is simple.
This guide is built with that principle in mind.
You’re not getting generic fence ideas that only work in staged photos. You’re getting practical, budget-friendly metal fence designs that actually work in real spaces. Each idea focuses on smart use of materials, realistic installation, and long-term value. You’ll learn how to use metal in a way that enhances your space instead of making it feel cold or cheap.
You’ll also understand what to avoid—because most costly mistakes don’t come from what people do, but from what they don’t think about. Poor spacing, wrong proportions, ignoring maintenance, or choosing the wrong finish can turn even a good idea into a bad result.
At the end of the day, a fence is not just a boundary. It’s a visual frame for everything inside it. It affects how your space feels, how it functions, and how it is perceived from the outside.
If you approach it casually, it will always look like an afterthought. But if you approach it with a clear plan—even on a tight budget—you can create something that looks intentional, durable, and far more expensive than it actually is.
That’s the difference you’re aiming for.
1. Horizontal Metal Slat Fence (Minimal Modern Look)
Explanation (What it is)
This is one of the smartest budget metal fence designs when done correctly. Instead of traditional vertical bars, the fence uses horizontal metal slats spaced evenly across a frame. The look is clean, modern, and structured without feeling heavy or closed off.
What makes this design powerful is control. You decide the spacing between slats, which directly affects privacy, airflow, and visual openness. Tight spacing creates more privacy, while wider gaps keep the space airy. Most people either go too tight (making it feel boxed in) or too open (losing function). The balance is what makes it work.
This style also visually widens your space. Horizontal lines trick the eye into seeing a broader area, which is useful if you have a small yard or narrow outdoor section.

How to implement (Practical steps)
Start with a simple metal frame—steel or iron works best for durability. Instead of buying expensive pre-made panels, you can reduce cost by using standard metal strips or flat bars and welding or bolting them yourself or through a local fabricator.
Keep the slats consistent in thickness and spacing. A common mistake is uneven gaps, which instantly makes the fence look cheap. Measure once, mark everything, and stick to it.
For budget control:
- Use fewer, slightly thicker slats instead of many thin ones
- Leave small gaps (1–2 inches) to reduce material usage
- Paint the entire fence in a matte black or dark grey finish for a modern look
If you have a small room or compact yard, keep the height moderate. A very tall horizontal fence can feel overwhelming.
Best for
- Modern homes or minimal outdoor spaces
- Small yards where visual width matters
- People who want privacy without full blockage
Pro tip
Pair this fence with simple greenery (like climbing plants). The contrast between straight metal lines and natural growth instantly upgrades the look without adding cost.
Mistake to avoid
Do not mix horizontal and vertical patterns randomly. It destroys the clean aesthetic and makes the design look unplanned.
2. Simple Vertical Bar Fence (Clean & Budget-Friendly)
Explanation (What it is)
This is the most basic metal fence design—but when done right, it does not look basic. It uses evenly spaced vertical bars attached to horizontal support rails. The simplicity is exactly what makes it effective.
Most people dismiss this design because they’ve seen poorly executed versions—uneven spacing, thin weak bars, or outdated finishes. But when proportions are correct, it becomes one of the cleanest and most timeless options available.
It does not try to hide the space. Instead, it defines boundaries while keeping everything visible. That makes it feel lighter compared to solid fences, especially in smaller areas.

How to implement (Practical steps)
Use steel or iron rods for vertical bars. The key here is spacing and thickness. Bars that are too thin look weak, while bars that are too thick make the fence feel heavy.
Keep spacing consistent—this is non-negotiable. Even small inconsistencies will stand out immediately. Use a template or spacer tool during installation to maintain uniform gaps.
Attach the bars to two or three horizontal rails for stability. The structure should feel solid even if the design is simple.
For a budget approach:
- Avoid decorative tops or curves—keep it straight
- Use a standard height instead of custom sizing
- Apply a basic anti-rust coating and a single-tone paint
If you have a small room or front boundary, this style works well because it doesn’t block light or airflow.
Best for
- Front yards or boundary fencing
- Homes where visibility and openness are important
- Tight budgets needing a reliable, simple solution
Pro tip
Consistency makes this style look expensive. Perfect spacing and alignment matter more than adding decorative features.
Mistake to avoid
Do not use low-quality thin metal to save money. It may reduce cost initially but will bend or rust faster, costing more in the long run.
3. Metal Frame with Wire Mesh Panels
Explanation (What it is)
This design combines a strong metal frame with wire mesh filling inside it. It is one of the most cost-effective fencing solutions because mesh is cheaper than solid panels while still providing coverage and structure.
At first glance, people assume mesh looks temporary or industrial—but that only happens when it’s poorly framed. When enclosed within a solid metal frame and finished properly, it can look clean, modern, and intentional.
The advantage here is practicality. It provides security, keeps pets or kids safe, and allows full airflow and visibility. It also works well for gardens because it can double as support for climbing plants.

How to implement (Practical steps)
Start by building or installing a rectangular metal frame using steel or iron. This frame gives the fence its structure and determines how “finished” it looks.
Attach wire mesh tightly inside the frame. Make sure it is stretched evenly—loose mesh instantly looks cheap and unprofessional.
Secure the mesh using welding or strong clips. Avoid temporary fasteners because they loosen over time.
For better appearance:
- Paint both frame and mesh the same color (black or dark green works best)
- Keep panel sizes consistent
- Use thicker framing bars to balance the thin mesh
If you have a small room or garden area, this is one of the best choices because it doesn’t visually block the space.
Best for
- Gardens, backyards, or pet enclosures
- Budget-focused projects needing durability
- Spaces where airflow and visibility are important
Pro tip
Let plants grow along the mesh. Over time, it softens the metal look and makes the fence feel more natural without extra cost.
Mistake to avoid
Do not leave the mesh loose or uneven. Poor tension ruins the entire look, no matter how strong the frame is.
4. Corrugated Metal Panel Fence (Industrial but Controlled)
Explanation (What it is)
Corrugated metal panels are those ridged sheets you usually see in roofing—but used vertically or horizontally in fencing, they become one of the cheapest solid privacy options available. The ridges add strength without needing thick material, which is why they’re cost-effective.
Most people either love or hate this look because they install it wrong. Done poorly, it looks like a temporary construction barrier. Done right, it looks intentionally industrial and modern.
This design is about contrast. The panels are visually “busy” because of the ridges, so the rest of the structure must stay simple. If you control that balance, you get a strong, durable fence that provides full privacy at a low cost.

How to implement (Practical steps)
Use a basic metal or even wood frame to hold the corrugated sheets. Metal frames last longer, but a treated wood frame can reduce initial cost.
Install panels tightly side by side to eliminate gaps if privacy is your goal. Align the ridges perfectly—misalignment is the fastest way to make this look cheap.
You can place panels vertically for height emphasis or horizontally for a more modern feel. Horizontal placement often looks more intentional for residential spaces.
For budget control:
- Use standard-size sheets to avoid cutting costs
- Choose galvanized panels to reduce rust issues
- Paint the panels matte black, charcoal, or even off-white to soften the industrial feel
If you have a small room or compact yard, avoid overly tall corrugated panels—they can feel too enclosed.
Best for
- Backyards needing privacy
- Budget builds where durability matters
- Modern or industrial-style homes
Pro tip
Frame the panels with thicker borders. A strong outer frame makes the entire fence look more expensive and intentional.
Mistake to avoid
Do not leave panels unpainted unless the finish is high-quality. Raw metal can look unfinished and age poorly in visible areas.
5. Metal Fence with Wooden Inserts (Budget Warm Contrast)
Explanation (What it is)
This design combines metal structure with wooden slats or panels inserted between the frame. It solves one of the biggest problems with metal fencing—it can feel cold and harsh. Adding wood instantly softens the look and makes it feel more residential and welcoming.
The key here is balance. Metal provides strength and structure, while wood adds warmth and visual interest. You don’t need expensive hardwood—simple, treated wood can achieve the same effect when spaced and finished correctly.
This is one of the smartest designs if you want something stylish on a budget without going fully industrial.

How to implement (Practical steps)
Start with a metal frame for durability. Then install wooden slats either horizontally or vertically inside that frame.
Spacing is critical. You can:
- Keep slats tight for privacy
- Leave small gaps for airflow and reduced material cost
Use treated or sealed wood to prevent moisture damage. Even budget wood will last longer if properly sealed.
For cost efficiency:
- Use fewer, wider wooden slats instead of many thin ones
- Stain instead of paint—staining often looks more natural and requires less maintenance
- Keep the metal frame simple (no decorative elements)
If you have a small room or narrow yard, horizontal wooden inserts can help visually expand the space.
Best for
- Homes that want a modern but warm look
- Front or backyard fencing
- People who dislike the cold feel of full metal
Pro tip
Use contrasting colors—dark metal with lighter wood creates a premium look without increasing cost.
Mistake to avoid
Do not ignore wood treatment. Unsealed wood will warp, fade, and ruin the overall appearance quickly.
6. Grid Panel Metal Fence (Modern Pattern Look)
Explanation (What it is)
A grid panel fence uses evenly spaced horizontal and vertical metal bars to create square or rectangular patterns. It looks structured, geometric, and modern when done correctly.
This design works because it creates visual rhythm. The repeated pattern draws attention in a controlled way, making the fence feel designed rather than random. It also maintains openness, allowing light and air to pass through.
However, this style can easily go wrong if proportions are not handled carefully. Uneven grids or inconsistent spacing will immediately make it look cheap.

How to implement (Practical steps)
Start with a strong outer frame. Inside that frame, create a grid using evenly spaced horizontal and vertical metal bars.
Keep spacing consistent across all panels—this is the most important part. Use measuring tools and templates to maintain accuracy.
Decide on grid size based on your space:
- Smaller grids feel more decorative and detailed
- Larger grids feel more minimal and modern
For budget control:
- Use thinner bars but increase spacing to reduce material
- Stick to square patterns instead of complex shapes
- Use a single-tone paint finish (black or dark grey works best)
If you have a small room or compact outdoor space, larger grid patterns will prevent the fence from feeling too busy.
Best for
- Modern or minimalist homes
- Decorative boundary fencing
- Spaces where visibility is important
Pro tip
Consistency is everything. Perfect alignment and spacing will make even a simple grid look high-end.
Mistake to avoid
Do not mix different grid sizes randomly. It breaks the visual flow and makes the design look unplanned.
7. Perforated Metal Sheet Fence (Modern Privacy with Style)
Explanation (What it is)
A perforated metal fence uses metal sheets with small, evenly spaced holes or patterns cut into them. It’s one of the smartest ways to get privacy without completely blocking light and airflow. From a distance, it looks solid and clean—but up close, it has texture and depth.
Most people either ignore this option or misuse it. When done right, it gives a high-end, architectural feel even on a budget. The perforations soften the harshness of solid metal and make the fence feel lighter, especially in compact spaces.
This works best when you want privacy but still don’t want your outdoor area to feel like a closed box.

How to implement (Practical steps)
Use pre-made perforated metal sheets to save cost on custom cutting. These are widely available and cheaper than fully custom panels.
Install the sheets inside a simple metal frame. Keep the frame clean and minimal—don’t overdesign it.
Choose hole size carefully:
- Smaller holes = more privacy, less visibility
- Larger holes = more airflow, more openness
Paint the entire structure in one consistent color (matte black, charcoal, or dark bronze works best). This keeps the look modern and avoids visual clutter.
If you have a small room or tight outdoor space, this design is ideal because it blocks direct views but still allows light through.
Best for
- Modern homes needing partial privacy
- Front yards or side boundaries
- Small spaces where airflow matters
Pro tip
Position lighting behind or near the fence. At night, the perforations create subtle shadow effects that make the design look more premium.
Mistake to avoid
Do not mix different perforation patterns in one fence. It creates visual chaos and makes the design look uncoordinated.
8. Recycled Metal Panel Fence (Ultra Budget Approach)
Explanation (What it is)
This is one of the lowest-cost fencing options if you’re willing to be practical instead of perfection-focused. It uses reclaimed or recycled metal sheets, panels, or parts—often sourced from scrap yards, old gates, or leftover construction materials.
The mistake most people make here is thinking “recycled” automatically means messy or unattractive. That only happens when there is no consistency. If you control color and alignment, even mixed materials can look intentional.
This approach is less about perfection and more about smart reuse. It’s ideal when the budget is extremely tight but you still want something durable.

How to implement (Practical steps)
Collect similar types of metal panels—don’t mix completely random sizes and styles. Try to keep at least one element consistent (height, width, or shape).
Build a simple frame to hold everything together. This frame is what gives structure and prevents the fence from looking temporary.
Align panels carefully during installation. Even if materials are different, straight alignment makes a huge difference.
To unify the look:
- Paint all panels the same color
- Sand rough edges before installation
- Use consistent spacing between panels
If you have a small room or visible front area, keep the design simpler—too much variation will make it look cluttered.
Best for
- Extremely tight budgets
- Backyard or secondary fencing
- DIY-focused projects
Pro tip
A single coat of matte black paint can completely transform mismatched metal into a cohesive, modern-looking fence.
Mistake to avoid
Do not leave panels in mixed raw finishes. Different colors and textures without unification will always look messy instead of intentional.
9. Metal Pipe Frame Fence (Lightweight & Open Design)
Explanation (What it is)
This fence uses metal pipes or hollow tubes arranged in simple patterns—usually vertical or slightly spaced—to create a lightweight, open structure. It’s one of the most cost-efficient designs because pipes are widely available and easy to work with.
The strength of this design is simplicity. It doesn’t try to create full privacy—instead, it defines the boundary clearly while keeping the space visually open. This is especially useful for front yards or areas where you don’t want a heavy, closed-off feel.
When done properly, it can look clean and modern rather than industrial.

How to implement (Practical steps)
Use metal pipes of consistent diameter. Avoid mixing sizes—it breaks the visual flow.
Install vertical pipes into a top and bottom rail for stability. Keep spacing even—this is critical for a clean look.
Decide spacing based on function:
- Closer spacing = more security
- Wider spacing = more openness
For budget efficiency:
- Use hollow pipes instead of solid rods
- Keep the design straight (no curves or decorations)
- Apply a rust-resistant coating before painting
If you have a small room or narrow outdoor space, this design works well because it doesn’t visually shrink the area.
Best for
- Front boundaries
- Minimalist outdoor designs
- Spaces where visibility is preferred over privacy
Pro tip
Stick to one clean color like black or dark grey. Simple finishes make this lightweight design look intentional instead of temporary.
Mistake to avoid
Do not space pipes unevenly. Even small inconsistencies will make the entire fence look poorly built.
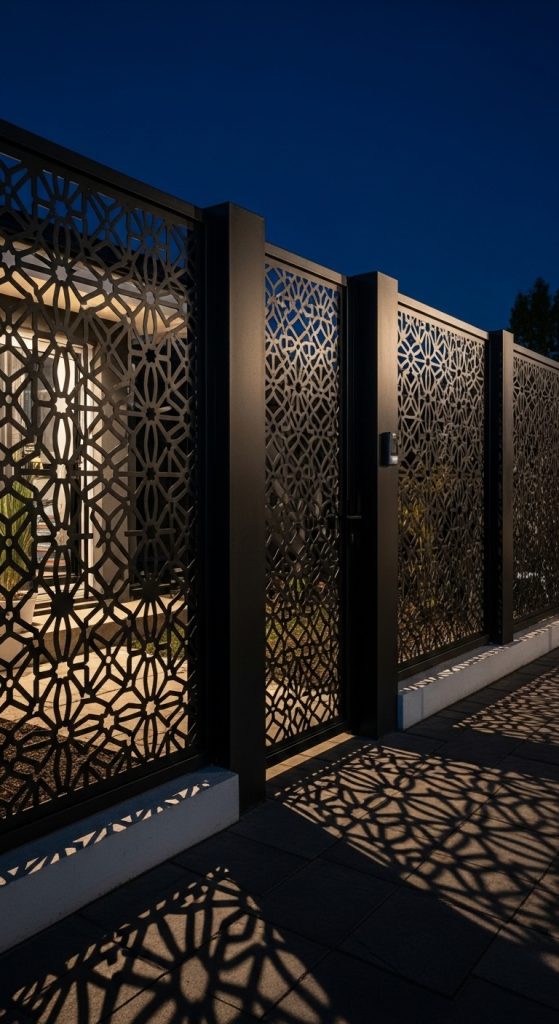
10. Laser-Cut Metal Panel Fence (Statement Design on a Budget—If Used Smartly)
Explanation (What it is)
Laser-cut metal panels feature decorative patterns cut directly into solid sheets. At first glance, this looks like a high-end, expensive option—and it can be—but there’s a smarter way to use it without blowing your budget.
The key is not to build your entire fence with laser-cut panels. That’s where people go wrong. Instead, you use them as accent sections within a simpler metal structure. This gives you a premium, custom-designed look while keeping most of the fence affordable.
These panels work as visual focal points. They break monotony and instantly elevate even the simplest fence design.
How to implement (Practical steps)
Build a basic fence using affordable materials (like vertical bars or simple panels). Then choose 1–2 sections where you insert laser-cut panels as highlights—usually near the entrance or most visible area.
Keep the pattern simple and consistent. Overly complex designs can look busy, especially in smaller spaces.
Frame the laser-cut panel with a thicker border to make it stand out as a feature instead of blending into the structure.
For budget control:
- Use standard pre-designed panels instead of custom patterns
- Limit usage to small sections
- Paint everything in one unified color for a clean finish
If you have a small room or compact yard, this approach works well because it adds style without overwhelming the space.
Best for
- Entry gates or focal fence sections
- Modern or decorative home exteriors
- People who want a premium look on a limited budget
Pro tip
Place laser-cut panels where lighting hits them. Shadows from the cut patterns create a high-end visual effect, especially in the evening.
Mistake to avoid
Do not use too many decorative panels. Overuse makes the design look crowded and removes the “premium” feel.
11. Chain-Link Fence with Upgraded Finish (Budget Reinvented)
Explanation (What it is)
Chain-link fencing is usually seen as the cheapest and least attractive option—but that’s only true when it’s left untreated. With a few smart upgrades, it can become a clean, functional, and even stylish solution.
The strength of chain-link is cost and durability. It’s widely available, easy to install, and lasts long with minimal maintenance. The problem is appearance—but that can be fixed with simple adjustments.
Instead of hiding it completely, the goal is to refine it so it looks intentional rather than temporary.

How to implement (Practical steps)
Start with a standard chain-link installation using galvanized or coated steel.
Upgrade the look by:
- Painting the frame and mesh in matte black or dark green
- Adding a clean top rail for structure
- Keeping the installation tight and well-aligned
You can also enhance it by adding:
- Climbing plants for a natural look
- Simple privacy strips if needed (but don’t overfill)
For budget control:
- Use standard sizes
- Avoid decorative add-ons
- Focus on clean installation instead of extra features
If you have a small room or garden, this is one of the best options because it keeps the space open and breathable.
Best for
- Large areas on a tight budget
- Gardens or backyard fencing
- Pet enclosures
Pro tip
A uniform dark color instantly upgrades chain-link from “temporary” to “intentional.”
Mistake to avoid
Do not leave it in its raw metallic finish. That’s what makes it look cheap and unfinished.
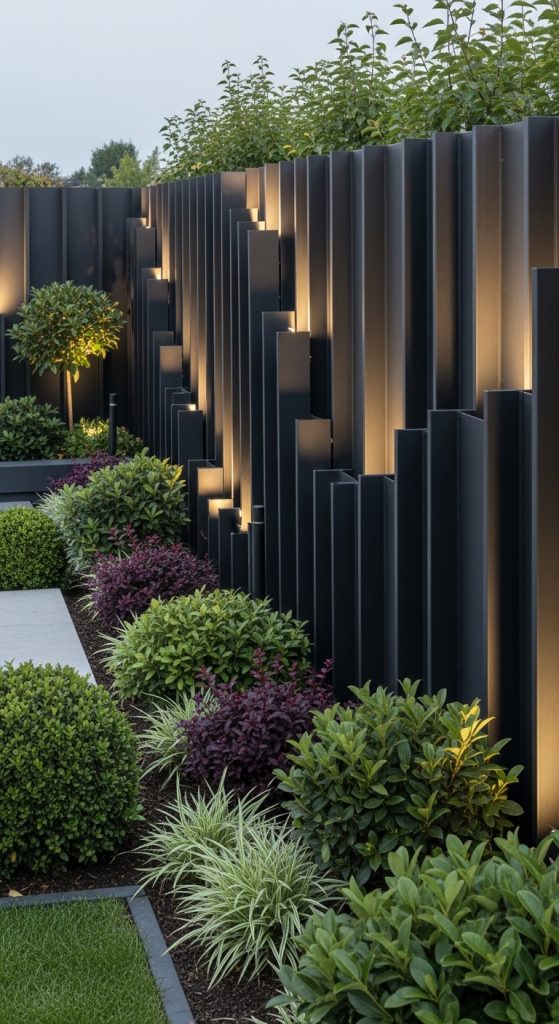
12. Mixed Height Metal Fence Design (Layered Modern Look)
Explanation (What it is)
This design uses sections of varying heights instead of a single flat fence line. It creates a layered, dynamic look that feels more custom and architecturally planned.
Most fences fail visually because they are too uniform. While consistency is important, complete uniformity can feel flat and uninteresting. Controlled variation—when done right—adds depth without increasing material cost significantly.
This approach works especially well when you want to define different zones within your outdoor space.
How to implement (Practical steps)
Plan your layout before installation. Decide where height changes will happen—usually near corners, entrances, or transitions between spaces.
Use the same material throughout (metal bars, panels, or slats) but vary the height of each section slightly. Keep the difference controlled—large jumps look unplanned.
Maintain alignment at the base. Even if heights vary, the bottom line should stay consistent for a clean structure.
For budget efficiency:
- Use standard panel sizes and adjust placement instead of custom cutting
- Keep design simple—no mixing of multiple patterns
- Use one consistent color across all sections
If you have a small room or compact yard, keep height variation subtle. Too much variation can make the space feel chaotic.
Best for
- Modern homes with structured outdoor layouts
- Properties with sections (garden, seating, entry)
- People wanting a custom look without custom cost
Pro tip
Use height changes to guide movement—taller sections for privacy, shorter ones for openness.
Mistake to avoid
Do not mix too many different heights randomly. Without a clear pattern, the design will look unplanned instead of modern.