
When October arrives, the desire to transform your home’s exterior into an enchanting, spooky wonderland is universal. However, modern life leaves very little room for spending entire weekends wrestling with complex wire frames, tangled extension cords, and tedious carpentry projects. Homeowners and renters alike crave outdoor Halloween decor solutions that deliver jaw-dropping curb appeal with minimal time investment. The secret to achieving an upscale, professionally styled exterior in under thirty minutes lies in smart placement, optical illusions, and high-impact visual statements.

By bypassing cheap plastic novelties in favor of clever, fast-assembling accents like glowing window silhouettes, cascading porch botanicals, and suspended floating elements, your home becomes the talk of the neighborhood instantly. These thirteen quick and easy outdoor Halloween decor ideas are specifically designed for rapid setup, requiring zero specialized tools or prior crafting expertise. Let us dive into brand-new, trendsetting concepts that will redefine your outdoor hosting space this October.
1. The Glowing Frosted Window Silhouette Phantoms
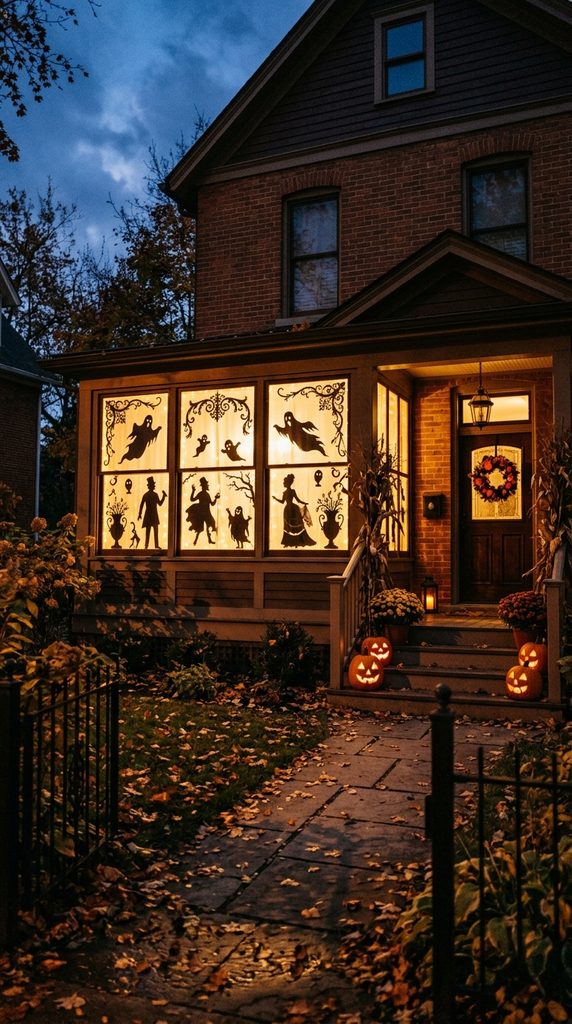
Instant Mansion Ambiance Using Budget-Friendly Tracing Paper and LEDs
Transforming your home’s exterior from the street view does not require climbing ladders or hanging roof lights. The Glowing Frosted Window Silhouette concept utilizes standard translucent parchment paper and battery-operated LED light panels. By sketching large, elegant Victorian phantom silhouettes and taping them to ground-floor windows, you create an instant haunted mansion atmosphere that looks remarkably high-end from the pavement.
Furthermore, this idea requires zero permanent hardware modifications, making it an absolute dream for apartment dwellers and rental properties. When evening falls, turning on the interior lights casts eerie, glowing shadow-plays across your entire front yard.
How to Set It Up in Under 30 Minutes
First, roll out a large sheet of translucent white parchment drafting paper across a flat table. Next, use a thick black marker to sketch the silhouette of a Victorian lady, a hooded raven, or a classical gothic urn. Cut out the shape cleanly using household craft scissors.
Then, secure the paper cutout directly to the interior glass of your front-facing windows using clear removable painter’s tape. Place a bright battery-operated LED work light or warm desk lamp on a small table directly behind the silhouette. Finally, turn off your room lights and step outside to admire the haunting glow.
Required Supplies and Tools
- Large rolls of translucent white parchment or tracing paper
- Thick black permanent marker and precision craft scissors
- Clear removable painter’s tape or window-safe adhesive dots
- Portable battery-operated LED work lights or table lamps
- Extension cords if using plug-in ambient lamps
2. The Suspended Floating Broomstick Porch Cluster
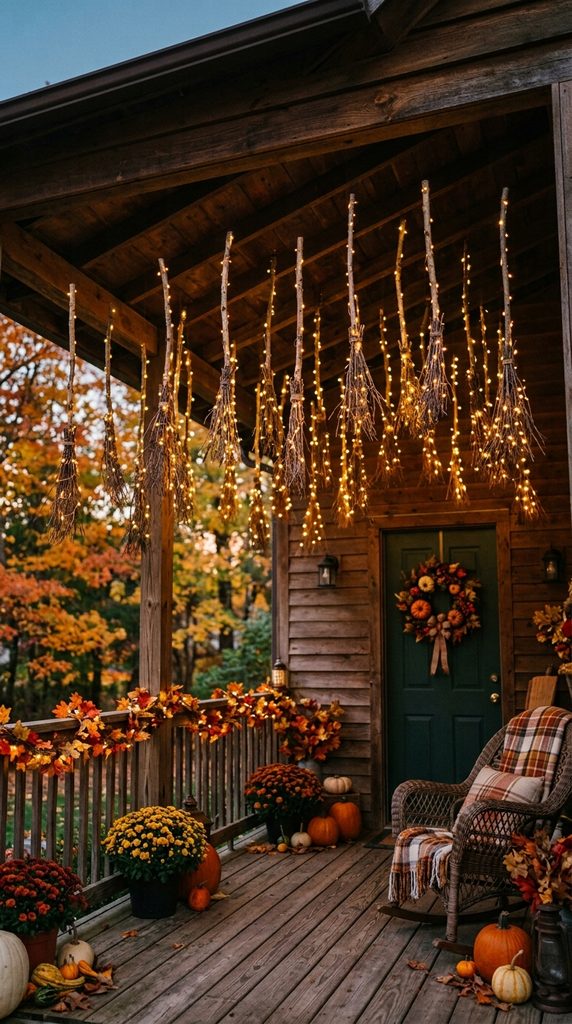
Witchcraft Aviation Floating Weightlessly Above Your Front Door
Instead of leaning standard rustic brooms uselessly against a porch wall, suspend them in mid-air to create a magical flying illusion. Hanging antique-style twig broomsticks at varying heights from your porch ceiling creates an unforgettable, whimsical welcome for trick-or-treaters.
Additionally, wrapping micro battery-operated fairy light strings around the bristle bases makes the brooms look as though they are charged with glowing witchcraft energy. This brilliant vertical display utilizes empty porch air space, maximizing visual impact with minimal physical effort.
How to Set It Up in Under 30 Minutes
Start by gathering three to five rustic twig broomsticks with natural wooden handles. Next, tie sturdy clear fishing monofilament line securely around the upper handle necks of each broom.
Then, press clear damage-free outdoor ceiling adhesive hooks into your porch roof overhang, staggering their placement at different depths. Hang the fishing lines from the hooks so the brooms hover at staggered head-height elevations. Afterward, wind a string of warm yellow micro fairy lights around the bristle ends, hiding the battery pack neatly behind a structural beam. Finally, step back to watch them sway gently in the autumn breeze.
Required Supplies and Tools
- 3 to 5 rustic twig broomsticks with wooden handles
- Clear nylon monofilament fishing line (6lb test)
- Outdoor-rated damage-free ceiling adhesive hooks
- Battery-operated warm yellow micro fairy light strings
- Scissors and a small step ladder for safe hanging
3. The Oversized Velvet Porch Pumpkin Cascade

Luxurious Soft Textures Overflowing Down Entryway Stairs
Traditional hard orange plastic pumpkins can look tacky and dated on front steps. Elevating your porch styling with oversized, weather-resistant velvet-covered pumpkins creates instant boutique elegance. Cascading varied sizes of deep plum, emerald, and charcoal fabric pumpkins down your entryway steps introduces rich tactical warmth.
Moreover, these fabric pumpkins absorb autumn evening moisture gracefully and won’t crack or rot like real gourds. They bring high-end indoor interior styling directly out to your front curb.
How to Set It Up in Under 30 Minutes
Begin by collecting six to eight large foam craft pumpkins in assorted organic shapes. Next, spray-apply a weather-resistant clear matte sealant over the foam surfaces to protect them from light rain.
Then, drape stretchy crushed velvet fabric in rich jewel tones over each pumpkin, tucking excess fabric neatly into the bottom core. Arrange the largest velvet pumpkins on the bottom porch landing, stepping up to medium sizes on middle steps, and smallest gourds near the front door threshold. Afterward, tuck foraged dried autumn oak leaves between the pumpkins to bridge gaps. Finally, check your stairway clearance to ensure a safe walking path for guests.
Required Supplies and Tools
- Assorted large foam craft pumpkins
- Crushed stretch velvet fabric in deep plum, emerald, and obsidian
- Weather-resistant clear matte spray sealant
- Real foraged dried autumn leaves or faux leaf garlands
- Heavy-duty craft scissors and utility hot glue gun
4. The Giant Mossy Tree-Bark Specter Face
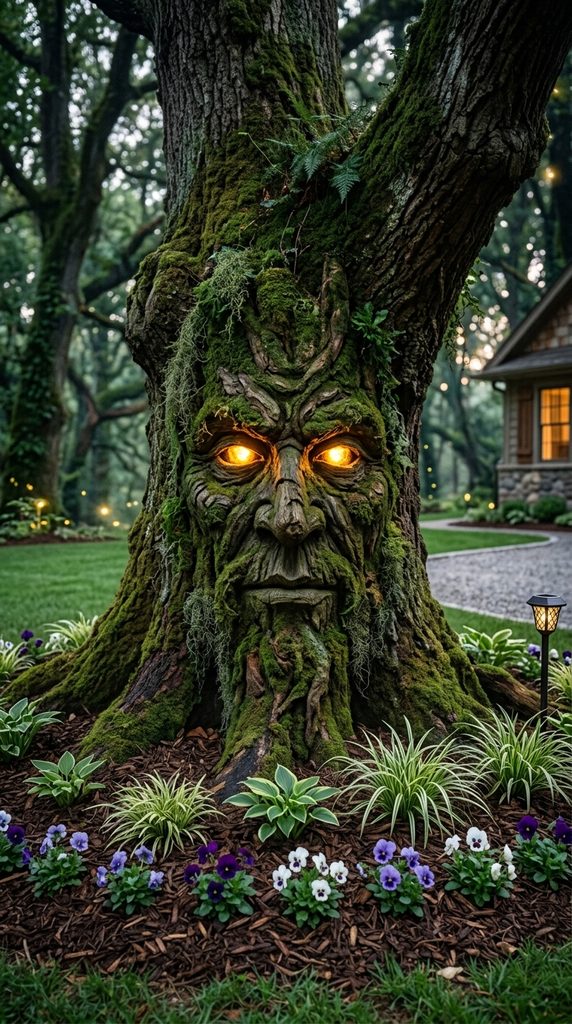
Ancient Woodland Spirits Awakening on Front Yard Oak Trunks
If you have large mature trees in your front yard, you possess the ultimate natural canvas for outdoor Halloween decor. Constructing a giant mossy tree-bark specter face brings silent forest guardians to life. Using lightweight craft foam carved and painted to resemble ancient tree bark, you can mount giant glowing eyes directly onto a tree trunk.
Additionally, this installation looks wonderfully mysterious during the day and deeply unsettling at night when porch spotlights hit the textured facial features.
How to Set It Up in Under 30 Minutes
Start by cutting two large almond-shaped eye sockets and a jagged mouth shape out of thick craft EVA foam sheets. Next, coat the foam pieces with matte brown and grey acrylic paint, pressing dried green sheet moss into the wet paint to mimic organic bark growth.
Then, install battery-operated glowing red or amber LED puck lights into the back of the foam eye sockets. Attach heavy-duty outdoor hook-and-loop fastening strips to the back of your foam facial pieces. Press the specter features firmly against your front yard oak or maple tree trunk. Finally, adjust the lighting angle to cast deep shadows across the bark.
Required Supplies and Tools
- Thick craft EVA foam sheets or flexible cardboard
- Matte brown, grey, and black acrylic craft paints
- Preserved green sheet moss and craft glue
- Battery-operated glowing red or amber LED puck lights
- Heavy-duty outdoor hook-and-loop adhesive fastening strips
- Utility craft scissors and paintbrushes
5. The Cascading Black Poison-Ivy Porch Railing Garland

Dark Botanical Elegance Wrapping Exterior Staircase Railings
Swap out cheerful orange-and-black autumn leaf garlands for a moody, high-fashion botanical statement. Wrapping your front porch handrails with dark artificial black ivy, black eucalyptus, and frosted silver seed pods creates a dramatic gothic entrance.
Furthermore, weaving slim battery-operated purple fairy lights through the dark foliage adds a subtle, venomous glow after sunset. It sets a sophisticated, cinematic tone before visitors even knock on your door.
How to Set It Up in Under 30 Minutes
Begin by purchasing three to four strands of artificial black ivy and dark eucalyptus garlands. Next, wrap the garlands tightly around your front porch handrail or staircase balusters, securing them every few feet with black zip ties.
Then, tuck silver-frosted seed pods and dried black flower heads organically into the woven plastic stems. Wind a string of purple micro fairy lights along the entire length of the garland, burying the battery pack discreetly behind a staircase post. Afterward, pull a few trailing ivy vines downward to hang loosely over the stair edges. Finally, test the lighting remote control from your front walkway.
Required Supplies and Tools
- 3 to 4 artificial black ivy and eucalyptus garlands
- Black plastic zip ties for secure railing attachment
- Silver-frosted dried seed pods and artificial black roses
- Battery-operated purple micro fairy light strings with remote
- Wire cutters for trimming zip-tie tails
6. The Floating Witch-Hat Porch Canopy
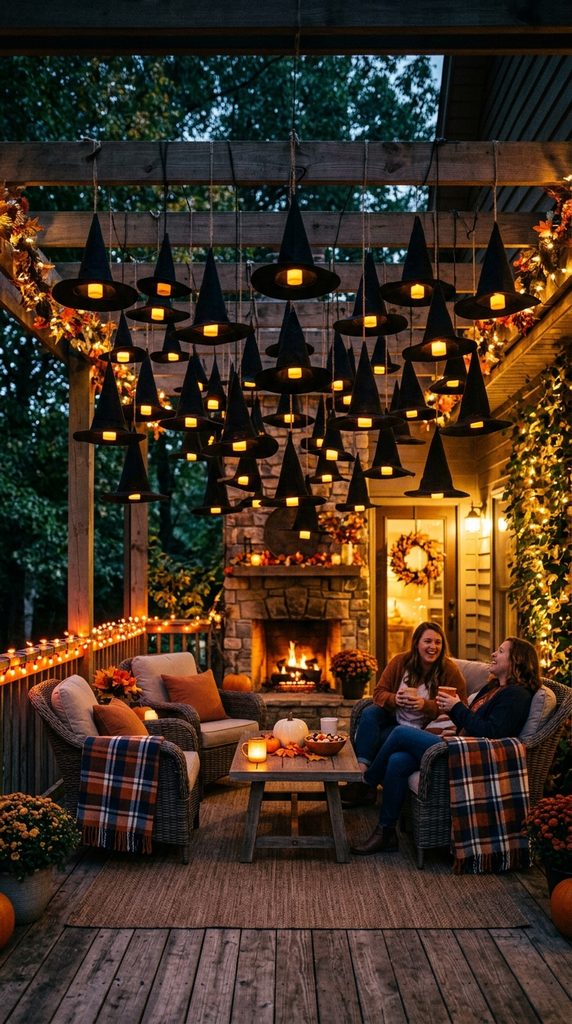
Magically Suspended Millinery Hovering Above Outdoor Seating
Bring classic witch-craft folklore outdoors by floating a cluster of pointed millinery hats right above your front porch seating area. Hanging lightweight black felt witch hats at varying vertical drops creates a playful yet stylish ceiling canopy.
Moreover, inserting glowing LED tea lights into the top crowns causes the hats to emit a warm, magical lantern glow downward. It is an inexpensive, fast-setup project that delights neighborhood children and adults alike.
How to Set It Up in Under 30 Minutes
Start by acquiring six to eight inexpensive black felt pointed witch hats. Next, secure a battery-operated floating LED tea light inside the very top crown point of each hat using double-sided mounting tape.
Then, thread a clear fishing line using a sewing needle through the brim of each hat. Tie the lines to an outdoor patio umbrella frame, tree branch, or porch ceiling hooks. Hang the hats at staggered heights so they float freely above head level. Afterward, switch on the internal tea lights using their wireless remote control. Finally, step back to enjoy your floating wizardry canopy.
Required Supplies and Tools
- 6 to 8 inexpensive black felt pointed witch hats
- Battery-operated warm LED tea light candles with remote
- Clear monofilament fishing line and sewing needle
- Outdoor ceiling adhesive hooks or patio frame ties
- Double-sided heavy-duty mounting tape
7. The Gilded Poison-Apple Porch Urn Fillers

Oversized Metallic Fruit Arrangements Replacing Traditional Mums
Potted mums and standard orange pumpkins in front porch urns can sometimes feel predictable. Swapping them out for an arrangement of oversized gilded poison apples creates high-fashion drama. Spray-painting large craft apples in obsidian black and liquid gold leaf elevates them into luxury art pieces.
Additionally, nestling these dark fruit arrangements inside stone urns alongside black willow branches requires zero watering or maintenance.
How to Set It Up in Under 30 Minutes
Begin by filling your permanent front porch stone urns with crumpled newspaper or dry floral foam blocks to create height. Next, coat a dozen large craft foam apples with matte black spray paint.
Then, apply quick dabs of liquid gold leaf sizing randomly across the dried black apples, pressing gold foil sheets onto the tacky spots. Arrange the gleaming gilded poison apples densely inside the stone urns. Afterward, stick several tall, foraged black willow or curly willow branches upright into the center of the arrangement. Finally, sweep up any loose foil flakes around your porch floor.
Required Supplies and Tools
- Pair of permanent front porch stone or concrete urns
- Dry floral foam blocks or crumpled packing newspaper
- 12 large foam craft apples and matte black spray paint
- Liquid gilding size adhesive and imitation gold leaf sheets
- Tall foraged dry willow or curly willow branches
- Utility scissors and clean-up brush
8. The Oversized Spidery Lace Porch Door Shield

Delicate Gothic Webbing Framed Across Front Entry Doors
Instead of covering your front door in messy, tangled cotton cobwebs, opt for sophisticated spidery black lace fabric. Draping a large panel of intricate gothic lace across your front door creates a regal, mysterious entryway shield.
Furthermore, placing a contrasting bright white or amber wreath hanger behind the lace makes the web pattern pop dramatically against your door color. It delivers high-impact gothic romance in under five minutes.
How to Set It Up in Under 30 Minutes
Start by purchasing a three-yard length of wide black gothic lace fabric with an open web pattern. Next, press the fabric flat with a warm iron to eliminate shipping creases.
Then, drape the lace panel horizontally and vertically across the exterior face of your front door. Secure the upper corners and top edge of the fabric using heavy-duty magnetic door clips or damage-free adhesive strips. Afterward, center a large artificial black raven prop or a preserved black wreath right in the middle of the lace panel. Finally, check that your door handle and lock mechanism remain fully accessible.
Required Supplies and Tools
- 3-yard cut of wide black gothic lace fabric
- Iron and ironing board for smoothing fabric
- Heavy-duty magnetic door clips or damage-free adhesive tabs
- Artificial black raven prop or black floral wreath
- Fabric scissors for trimming clean edges
9. The Retro 70s Neon Pumpkin Marquee Sign
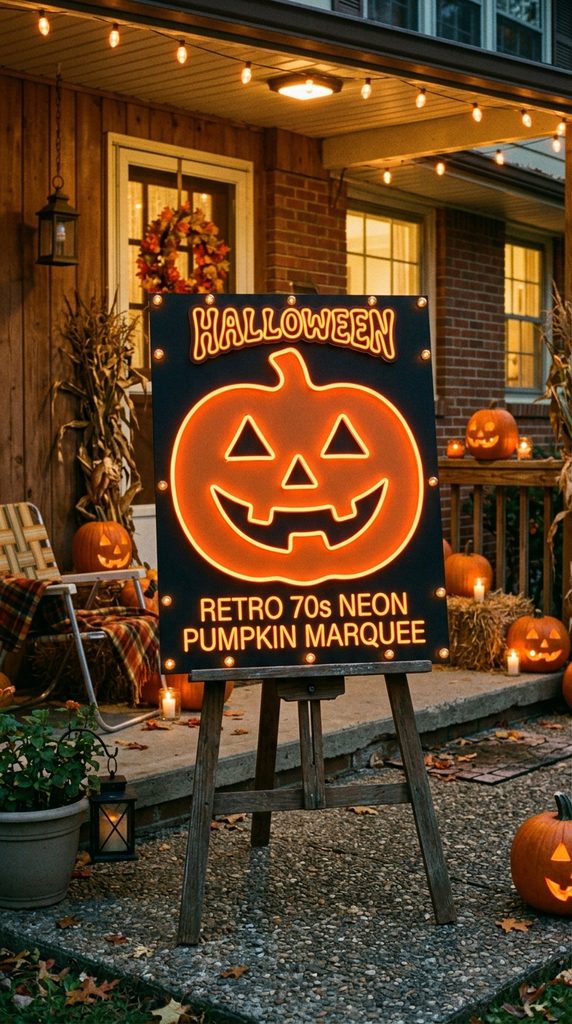
Bold Glowing Typography Welcoming Trick-or-Treaters with Vintage Edge
Add a pop of vibrant mid-century nostalgia to your porch with a DIY neon pumpkin marquee sign. Cutting a large pumpkin shape out of thick foam board and outlining its border with flexible LED neon rope lighting creates a brilliant glowing sign.
Additionally, mounting this illuminated sign on an easel or leaning it against your front wall makes it an incredible photo backdrop for visiting guests.
How to Set It Up in Under 30 Minutes
Start by drawing a large, stylish retro jack-o’-lantern pumpkin silhouette onto a thick black foam-core board. Next, cut out the pumpkin shape using a sharp utility razor knife.
Then, trace a facial expression featuring sleek geometric eyes and a smiling mouth, cutting those shapes out as transparent cutaways. Secure flexible battery-operated orange LED neon rope light along the outer perimeter of the pumpkin using hot glue. Afterward, insert warm white fairy lights behind the facial cutouts. Finally, prop your finished neon marquee sign securely on a wooden porch easel.
Required Supplies and Tools
- Large sheets of thick black foam-core display board
- Utility razor knife and self-healing cutting mat
- Battery-operated orange LED neon rope lighting kit
- Warm white micro fairy light string for facial cutaways
- Heavy-duty hot glue gun and glue sticks
- Wooden tabletop display easel for porch placement
10. The Floating Eyeball Porch Water Basin
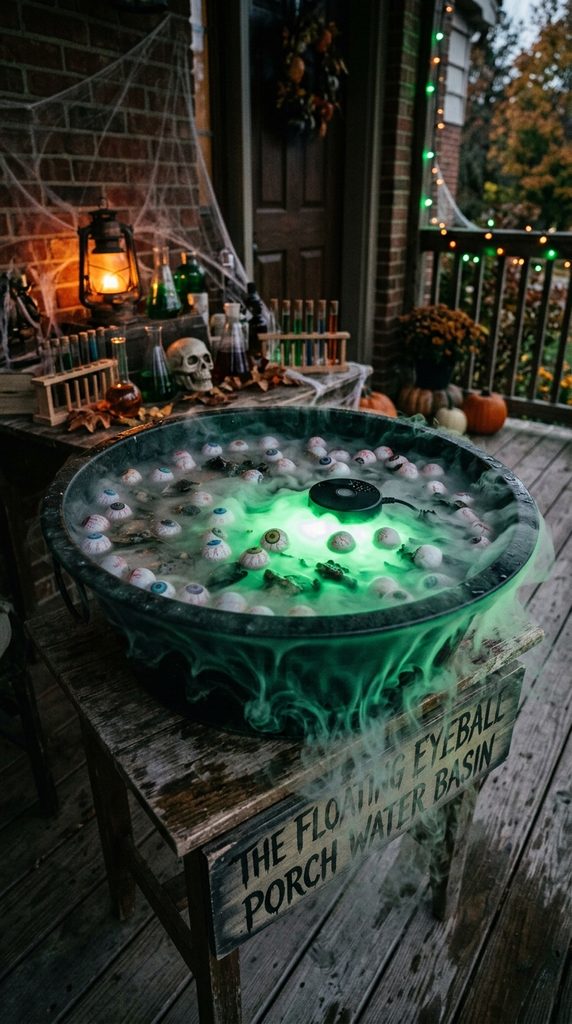
Eerie Glowing Orbs Bobbing in Mist-Covered Entryway Bowls
Create an unsettling science-laboratory aesthetic right on your front porch console table. Filling a wide, shallow antique copper or black metal basin with water and floating realistic spooky eyeballs inside sets a chilling scene.
Furthermore, dropping a small portable ultrasonic mist maker into the basin generates low-lying fog that rolls lazily over the container edges. It is a mesmerizing, tactile decor piece that stops trick-or-treaters in their tracks.
How to Set It Up in Under 30 Minutes
Start by placing a wide, shallow black metal or copper wash basin on your front porch table. Next, fill the basin with warm tap water to within two inches of the rim.
Then, drop a portable waterproof ultrasonic mini fogger disc into the center of the water basin and plug its cord into an outdoor outlet. Scatter twelve realistic glass or plastic painted spooky eyeballs across the water surface so they float and bob. Afterward, weave a string of green micro fairy lights around the outer rim of the basin to cast eerie reflections. Finally, watch as the low-lying fog rolls across your porch surface.
Required Supplies and Tools
- Wide, shallow black metal or antique copper wash basin
- 12 realistic glass or plastic painted spooky eyeball props
- Portable waterproof ultrasonic mini mist-maker fogger
- Battery or plug-in green micro fairy light string
- Outdoor extension cord and waterproof outlet cover
11. The Gothic Candelabra Pathway Stakes

Illuminated Iron-Style Markers Guiding Guests Safely Through Yards
Instead of generic plastic pumpkin path markers, guide your visitors with gothic candelabra pathway stakes. Constructing slim, elegant wooden stakes painted to resemble wrought iron and topped with flickering LED pillar candles adds historic manor charm to your front lawn.
Additionally, lining your front walkway with these glowing markers creates a grand, ceremonial entrance that elevates your entire property’s evening aesthetic.
How to Set It Up in Under 30 Minutes
Start by cutting thin square wooden dowel stakes to three-foot lengths, sharpening the bottom ends into points. Next, spray-paint the wooden stakes and small wooden platform circles with matte black cast-iron textured spray paint.
Then, secure the wooden platform circles to the top of each stake using sturdy wood screws or construction glue. Mount heavy-duty battery-operated flickering LED pillar candles onto the wooden platforms. Afterward, drive the sharpened wooden stakes firmly into your front lawn soil along both sides of your walkway. Finally, activate the candle timers so they light up automatically at dusk.
Required Supplies and Tools
- Thin square wooden dowel stakes (3 feet long)
- Small round wooden craft circles for candle platforms
- Matte black cast-iron multi-surface spray paint
- Battery-operated flickering LED wax pillar candles
- Heavy-duty construction adhesive or wood screws
- Rubber mallet for driving wooden stakes into lawn soil
12. The Giant Floating Cauldron Porch Brew

Witchcraft Cooking Vessels Overflowing with Giant Glowing Spheres
Make a monumental statement on your front porch with a giant witch’s cauldron overflowing with magical ingredients. Taking a large plastic cauldron bucket and filling it to the brim with oversized matte white and black sphere ornaments simulates a boiling witch’s brew.
Moreover, concealing a warm glow light inside the sphere cluster makes the entire bubbling concoction illuminate the dark corner of your porch.
How to Set It Up in Under 30 Minutes
Start by acquiring a large black plastic cauldron prop bucket. Next, fill the interior of the cauldron with crushed cardboard boxes or packing pillows to elevate the surface level.
Then, pile a large cluster of oversized matte white, silver, and black shatterproof Christmas tree ornaments inside the bucket so they spill over the rim like bubbles. Thread a string of warm yellow micro fairy lights deep within the sphere cluster. Afterward, drape a tattered piece of black cheesecloth loosely over one side of the cauldron rim. Finally, position a weathered wooden broomstick leaning against the bubbling brew base.
Required Supplies and Tools
- Large black plastic cauldron prop bucket
- Packing pillows or cardboard boxes for interior filler
- 25 to 30 oversized matte white, silver, and black sphere ornaments
- Battery-operated warm yellow micro fairy light string
- Tattered black cheesecloth fabric strip (2 yards)
- Rustic wooden broomstick prop accessory
13. The Minimalist Floating Bat Migration Front Wall
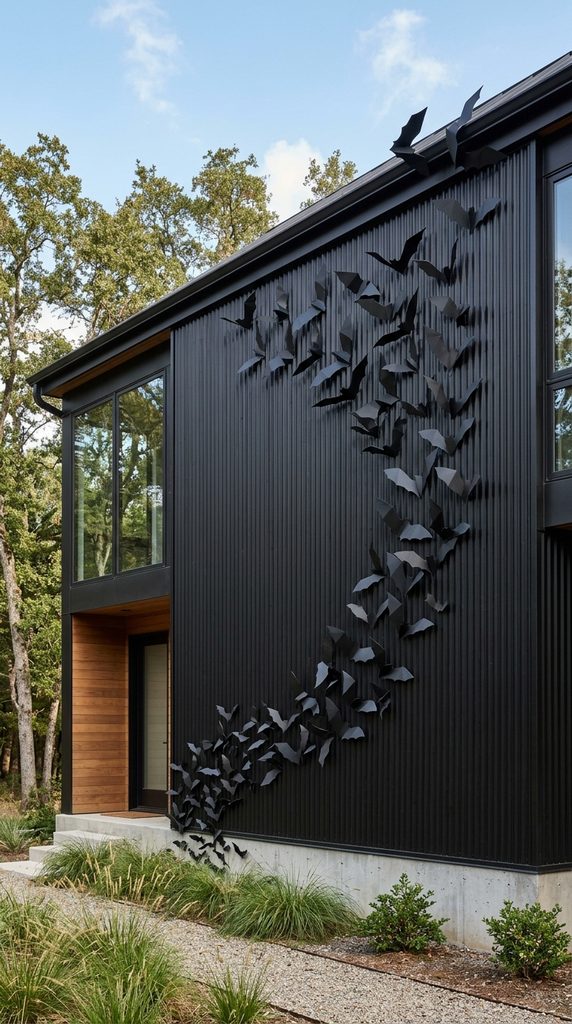
Sleek Geometric Silhouettes Soaring Across Exterior Siding
Ditch messy plastic stick-on bats that curl and peel off your walls after one afternoon of rain. Crafting a minimalist migration of sleek matte black aluminum or thick PVC bats soaring across your exterior siding creates high-fashion architectural art.
Furthermore, arranging the bats in a fluid, sweeping wave pattern from your foundation up toward your roofline draws the eye upward, maximizing your home’s vertical presence.
How to Set It Up in Under 30 Minutes
Start by tracing varied geometric bat silhouette templates onto durable, weather-resistant black corrugated plastic sheets. Next, cut out fifteen to twenty bats in graduated small, medium, and large sizes using utility scissors.
Then, bend the wings slightly upward along the center body line to create a realistic 3D aerodynamic flight posture. Apply outdoor-rated double-sided mounting tape or removable exterior adhesive tabs to the back of each bat. Afterward, press the bats onto your exterior brick, wood siding, or stucco wall in a sweeping, organic upward migration wave. Finally, step back to review the fluid flight path from your front sidewalk.
Required Supplies and Tools
- Durable weather-resistant black corrugated plastic sheets
- Printed bat silhouette templates and marker
- Precision utility scissors or craft razor knife
- Outdoor-rated double-sided heavy-duty mounting tape
- Step ladder for reaching upper exterior wall sections