Busy mornings don’t care about your plans. They don’t care that you want to look put together, that you have somewhere important to be, or that your hair refuses to cooperate. You wake up late, you rush through everything, and your hair becomes the last problem you try to fix in the mirror—with almost no time left. That’s where most people get it wrong. They treat hair as something that needs extra time, when in reality, the right hairstyles should be designed for no time at all.

The problem isn’t your schedule. It’s your system.
Most people rely on complicated tutorials, styles that look easy but actually require multiple steps, tools, or perfect hair texture. You try them once, fail, and then go back to the same boring ponytail every single day. That’s not efficiency—that’s a lack of strategy. Quick hairstyles are not about doing less randomly. They are about doing the right minimal steps that create maximum visual impact.
In 2026, quick hairstyles have evolved into something smarter. They are no longer just “lazy styles.” They are structured, repeatable, and built for real-life routines. The goal is simple: look like you tried, without actually spending time trying. That means styles that take under a few minutes, require minimal tools, and still hold their shape throughout the day.
Another reality people ignore is hair behavior. Your hair in the morning is not the same as your hair after styling. It might be slightly oily, flattened, frizzy, or uneven—and that’s not a problem. In fact, many of the best quick hairstyles work better on second-day or imperfect hair. The mistake is trying to “fix” your hair completely instead of using its natural state to your advantage.
There’s also the issue of overthinking. When you’re in a rush, decision fatigue is real. Standing in front of the mirror trying to decide what hairstyle to do wastes more time than the hairstyle itself. That’s why you need a set of go-to styles—options that you don’t have to think about. You just pick one based on your mood, your outfit, or how your hair feels that day.
Placement is another detail people overlook. A high ponytail, low bun, or side style can completely change your look—even if the effort is the same. Small adjustments create variety without adding time. That’s how you avoid looking repetitive while still keeping things simple.
Tools matter too—but not in the way you think. You don’t need a drawer full of styling products. A few essentials like a good elastic, a claw clip, or a scrunchie can completely change how your hair holds and looks. The right tool reduces effort. The wrong one creates frustration.
Then there’s the biggest mistake of all—trying to make “quick hairstyles” look perfect. Perfection takes time. The goal here is controlled imperfection. Slight looseness, natural texture, and soft shaping are what make these styles look modern and effortless. If you try to make them too neat, you defeat the purpose.
If you have a small room or limited space to get ready, these styles become even more important. You don’t have the luxury of setting up tools, sectioning your hair perfectly, or spending 20 minutes styling. You need something that works fast, with minimal movement and maximum result.
This guide is built for real mornings—the rushed ones, the lazy ones, the unpredictable ones. You’re not getting complicated tutorials that look good only on camera. You’re getting hairstyles that actually work when time is limited, energy is low, and you still want to look like you have everything under control.
Each idea is designed to be fast, practical, and repeatable. No unnecessary steps. No unrealistic expectations. Just styles that solve the problem directly.
Now let’s get into the hairstyles that actually save your time—and still make you look put together.
1. Low Sleek Ponytail (Fast Polished Fix)
What it is
This is the most reliable “I have zero time” hairstyle—but most people still manage to make it look basic. The low sleek ponytail is not about just tying your hair back. It’s about controlling shape and finish so it looks intentional instead of rushed.
Done right, it gives a clean, put-together look in under a minute. Done wrong, it looks flat, uneven, and lazy.

How to implement (practical steps)
Start by brushing your hair lightly to remove major tangles, but don’t over-smooth it—you don’t want to flatten everything.
Create a clean middle or soft side part, depending on what suits your face. This step alone upgrades the entire look.
Gather your hair at the nape of your neck. Keep it slightly firm, not overly tight.
Secure with an elastic. If you have time, take a small strand from the ponytail and wrap it around the elastic to hide it.
Use your fingers—not a comb—to gently smooth the top. This keeps it natural instead of stiff.
If needed, apply a tiny amount of serum or oil to control frizz at the front.
Best for (who should use it)
This works best for literally everyone, especially when your hair isn’t cooperating. It’s ideal for school, work, or quick outings.
Pro tip
If your hair looks flat, slightly lift the crown area with your fingers after tying the ponytail. This adds subtle volume without extra effort.
Mistake to avoid
Do not pull the ponytail too tight. A tight base makes your hair look flat and harsh instead of clean and effortless.
2. Claw Clip Twist (30-Second Style)
What it is
This is one of the fastest hairstyles you can do—and still look stylish. The claw clip twist uses a simple twist-and-clip method to hold your hair in place while keeping it soft and relaxed.
It works because it adds structure without needing precision. That’s why it’s perfect for rushed mornings.
How to implement (practical steps)
Gather your hair at the back as if you’re making a low ponytail.
Twist the length of your hair upward toward your head.
Fold the twisted hair against your scalp and secure it with a claw clip placed vertically.
Let the ends either stick out slightly at the top or tuck them in loosely, depending on your preference.
Pull a few strands near your face to soften the look.

Best for (who should use it)
This works best for medium to long hair and is especially useful if your hair is slightly messy or unwashed.
Perfect for home, school, or quick errands.
Pro tip
Use a clip that matches your hair color or outfit. This makes the style look intentional instead of random.
Mistake to avoid
Do not twist your hair too tightly before clipping. Tight twisting makes the style look stiff and uncomfortable instead of relaxed.
3. Half-Up Clip Style (Balanced Quick Look)
What it is
The half-up clip style gives you the best of both worlds—your hair stays out of your face while still looking soft and open. It’s one of the easiest ways to look styled without doing much at all.
The key here is balance. Too little hair in the top section looks weak. Too much makes it look heavy.

How to implement (practical steps)
Take the top section of your hair—from temples to crown.
Lightly gather it at the back without pulling too tight.
Secure it using a small claw clip or mini clip.
Let the rest of your hair fall naturally.
If needed, use your fingers to adjust volume at the crown and soften the sides.
Best for (who should use it)
This works best for medium to long hair and suits almost all face shapes.
It’s ideal when you want a quick style that still feels feminine and put together.
Pro tip
Flip your head slightly forward before clipping the top section. This naturally adds volume without styling.
Mistake to avoid
Do not make the top section too thin. A small section creates a weak, unfinished look instead of a balanced hairstyle.
4. Quick Messy Bun (60-Second Fix That Actually Works)
What it is
This is the hairstyle everyone thinks they can do in seconds—but most end up with a collapsing knot or something that looks unfinished. A proper quick messy bun is not random. It’s structured looseness. The goal is to create volume and softness without spending time shaping it perfectly.
When done right, it hides bad hair days, uneven texture, and even slight oiliness. That’s why it’s one of the most reliable “no effort” styles.

How to implement (practical steps)
Start by gathering your hair into a mid or high ponytail using your fingers, not a brush. This keeps natural texture.
Secure the ponytail loosely with an elastic.
On the final loop, don’t pull the hair completely through—leave it folded to create a bun base.
Take the loose ends and wrap them casually around the base, then tuck them under the elastic.
Now gently pull at the bun to create volume. Focus on widening it instead of tightening it.
Pull a few strands around your face and slightly lift the crown area so the style doesn’t look flat.
Best for (who should use it)
This works best for medium to long hair and is perfect for rushed mornings when your hair isn’t freshly styled.
Pro tip
If your hair is too soft or slippery, flip your head down before tying the ponytail. This adds instant grip and volume.
Mistake to avoid
Do not try to “fix” every loose strand. The moment you over-adjust, the bun loses its effortless look and starts looking messy in the wrong way.
5. Braided Front + Loose Hair (Fast Detail Upgrade)
What it is
This style adds one simple braid at the front while leaving the rest of your hair down. It takes less than two minutes but instantly makes your hair look styled and intentional.
It works because it shifts attention to the front, so even if the rest of your hair is simple, the overall look feels complete.

How to implement (practical steps)
Take a small section of hair from the front or side of your part.
Create a quick loose braid—don’t worry about perfection.
Secure the end with a tiny elastic or pin it back behind your ear.
Let the rest of your hair fall naturally. You can leave it straight or slightly tousled.
Gently pull at the braid to make it look fuller and softer.
Best for (who should use it)
This works best for medium to long hair and is ideal when you want a quick upgrade without tying all your hair back.
Pro tip
Use a slightly messy braid instead of a tight one. Looser braids look fuller and more modern with less effort.
Mistake to avoid
Do not make the braid too thin or too tight. A small, tight braid disappears and doesn’t add any visible impact.
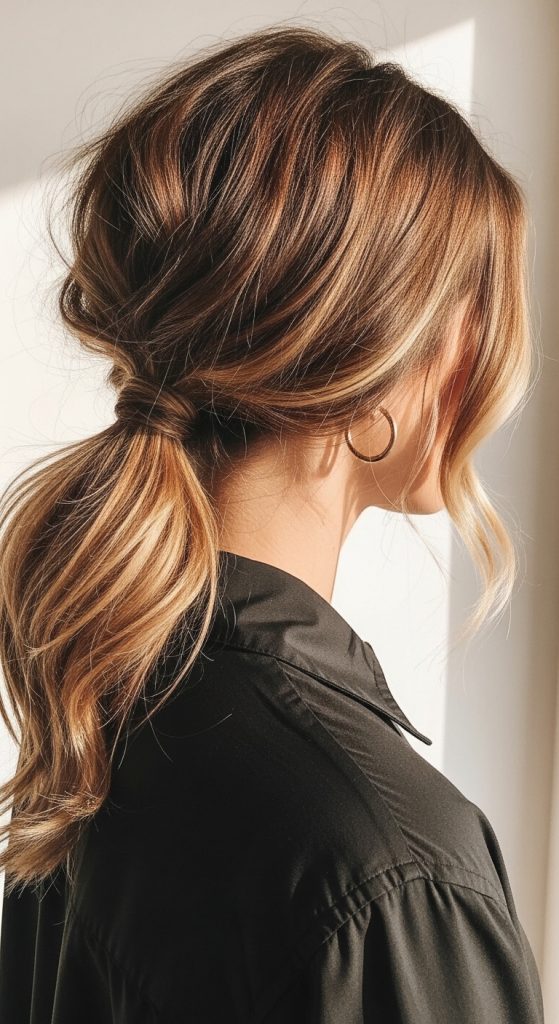
6. Low Twisted Ponytail (Effortless Upgrade Style)
What it is
This is a simple ponytail with one small twist detail that makes it look more styled than it actually is. It takes almost the same time as a regular ponytail but looks more intentional.
It’s perfect when you don’t want a basic look but also don’t have time for anything complicated.

How to implement (practical steps)
Start by tying a low ponytail at the nape of your neck.
Loosen the base slightly by pulling it down just a bit.
Create a small gap above the elastic using your fingers.
Flip the ponytail upward and pass it through the gap (this creates a twist effect).
Tighten it gently and adjust the shape.
Pull a few strands at the front for softness and slightly lift the crown if needed.
Best for (who should use it)
This works best for all hair types and lengths that can be tied into a ponytail.
It’s ideal for school, work, or quick polished looks.
Pro tip
If your ponytail looks flat, lightly pull the twist apart. This adds volume and makes the detail more visible.
Mistake to avoid
Do not make the twist too tight. A tight twist looks stiff and removes the relaxed, effortless feel.
7. High Half-Up Messy Knot (Lifted Quick Style)
What it is
This is a faster, cleaner version of the half-up bun—but with more height and attitude. Instead of fully tying your hair up or leaving it all down, you pull only the top section into a small messy knot. It gives instant structure to your face while keeping the rest of your hair natural and free.
The key difference from a basic half-up style is the height and looseness. It’s not neat. It’s slightly undone on purpose so it doesn’t look overdone in a rushed morning.

How to implement (practical steps)
Take the top section of your hair from temple to crown area.
Pull it upward toward the top of your head, not the back.
Twist this section loosely once or twice and wrap it into a small bun or knot.
Secure it with a small elastic or pins.
Gently pull the bun apart slightly so it looks soft and airy.
Let the rest of your hair fall naturally and use your fingers to adjust the front pieces.
If needed, lift the crown slightly for volume so it doesn’t sit flat.
Best for (who should use it)
This works best for medium to long hair and is ideal when you want something quick but still visibly styled.
It suits almost all face shapes because it lifts the top section and keeps the lower half soft.
Pro tip
If your hair looks too flat on top, flip your head forward before tying the half section. This instantly creates natural lift without heat or tools.
Mistake to avoid
Do not make the top section too small. A tiny bun looks weak and unbalanced instead of stylish and intentional.
8. Lazy Side Ponytail with Face Framing Strands
What it is
This is a relaxed side-position ponytail that feels soft, feminine, and slightly casual. It’s not centered, which makes it look more natural and less “done.” The face-framing strands are what elevate it from basic to stylish.
This is one of those styles that looks like you didn’t try—but still look good.
How to implement (practical steps)
Sweep your hair gently to one side—left or right depending on your preference.
Gather it loosely just below the ear or at mid-neck level.
Secure with an elastic without tightening too much.
Pull a few strands out around your face and near the temples.
Loosen the ponytail slightly by pulling it outward for softness.
If your hair feels too smooth, lightly tug at the crown to create subtle volume.
Best for (who should use it)
This works best for medium to long hair and is great when you want a soft, romantic everyday look.
It suits people who prefer relaxed styles instead of structured buns or tight ponytails.
Pro tip
Curling or slightly waving the loose strands makes the style look instantly more intentional, even if you spent no extra time.
Mistake to avoid
Do not place the ponytail too low and too far behind the ear. That makes it look droopy instead of softly styled.
9. Fast Top Knot with Loose Ends (Controlled Mess Style)
What it is
This is the quickest high bun variation designed for mornings when you have almost no time. Unlike a perfect top knot, this version embraces loose ends and imperfect shape while still keeping a controlled structure.
It works because it looks like a deliberate “effortless mess,” not an accidental one.

How to implement (practical steps)
Gather your hair into a high ponytail at the crown.
Secure it with an elastic, keeping it slightly loose at the roots.
Twist the ponytail and wrap it around the base once or twice.
Don’t try to tuck everything in perfectly—leave some ends slightly sticking out.
Secure with pins or another elastic.
Pull the bun gently outward to add volume and softness.
Loosen the crown slightly so it doesn’t sit too tight against the head.
Add a few face-framing strands if needed.
Best for (who should use it)
This works best for all hair types and is ideal for extremely busy mornings when time is minimal.
It’s especially useful for second-day hair when texture already exists.
Pro tip
If your bun keeps looking too tight, stop adjusting it. Over-fixing is what removes the effortless look.
Mistake to avoid
Do not try to make it perfectly round. A flawless top knot defeats the purpose of this style—it should always feel slightly undone but secure.