St. Patrick’s Day is one of those holidays that instantly sparks creativity, especially when it comes to fashion and beauty. From green outfits to festive accessories, everything gets a playful, cheerful upgrade. But if there’s one detail that truly completes your look, it’s your nails. Acrylic nails, in particular, are perfect for St. Patrick’s Day because they allow you to experiment with length, shape, color layering, encapsulated glitter, and adorable 3D designs that regular polish simply can’t achieve.

Cute and simple St. Patrick’s Day acrylic nails strike the perfect balance between festive and wearable. You don’t need over-the-top neon greens or loud patterns to celebrate the holiday. Instead, think soft sage tones, minimalist shamrocks, delicate gold foil, subtle glitter fades, and classy emerald French tips. These styles are Pinterest-favorite, beginner-friendly, and ideal whether you’re heading to a brunch, school event, office celebration, or just want your nails to match the March vibe.
Acrylic nails are especially great because they provide durability and structure. You can go short and natural for a subtle everyday look, or long and almond-shaped for a trendy aesthetic. Plus, acrylic extensions allow you to embed glitter, dried clovers, or gold flakes inside the nail, creating depth and dimension. If you’re new to acrylic nails, don’t worry. Many of the ideas in this guide can be recreated at home with beginner-friendly kits, or you can simply bring these ideas to your nail technician as inspiration.
Pinterest trends this year show a shift toward soft glam holiday nails. Instead of bold novelty designs, people are saving looks that feel aesthetic, cozy, and wearable beyond just one day. Think neutral green palettes, gold accents, milky bases, and micro nail art. The goal is to celebrate without sacrificing elegance.
In this guide, you’ll find detailed acrylic nail ideas that are cute, simple, and achievable. Each idea includes a clear explanation, a beginner-friendly step-by-step guide, and a materials list so you can recreate the look confidently. Whether you love minimalist styles or a bit of sparkle, there’s something here for you.
Get ready to screenshot, save, and recreate these Pinterest-worthy St. Patrick’s Day acrylic nail designs 🍀✨
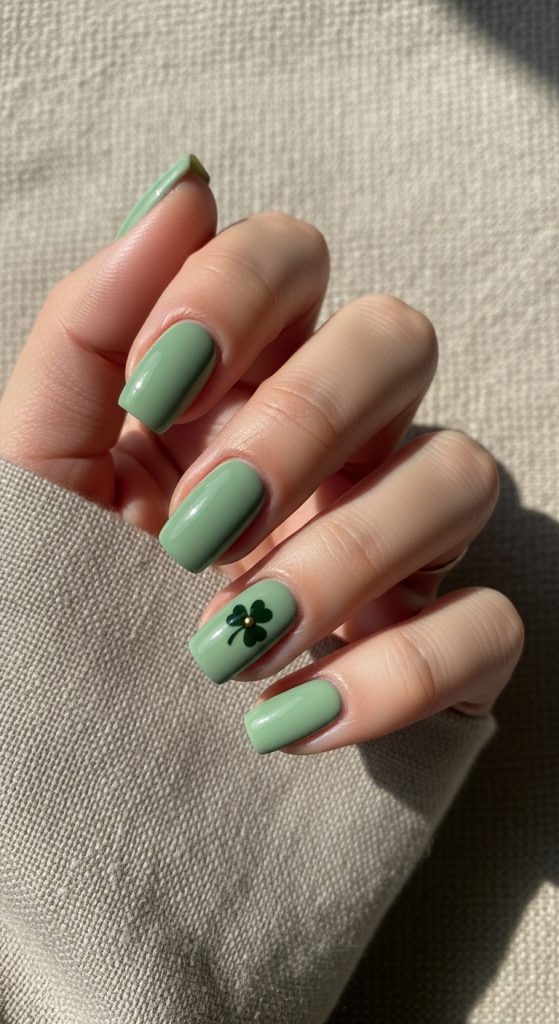
1. Minimal Sage Green Acrylic Nails with Tiny Shamrock Accent
Introduction
If you love subtle, classy nails but still want a festive touch, this minimalist sage green acrylic design is perfect. Instead of bold, bright green, this look uses a soft sage shade that feels calm, modern, and aesthetic. Sage green has become incredibly popular on Pinterest because it pairs beautifully with neutral outfits and works beyond just St. Patrick’s Day.
The design focuses on simplicity: solid sage acrylic nails on most fingers, with one tiny shamrock accent nail. The small detail keeps the look playful without overwhelming your manicure. This style is ideal for short square or short almond acrylics, making it beginner-friendly and practical for everyday wear.
The beauty of this idea is that it feels wearable all month long. Even after March 17th, you’ll still love the soft green tones. If you’re someone who prefers clean, elegant nail designs but wants a little holiday charm, this one is for you.
What This Design Is
A soft sage acrylic manicure featuring one minimalist shamrock accent nail.
How To Recreate This Look
- Prep nails by cleaning, pushing cuticles back, and buffing.
- Apply acrylic extensions in your desired shape (short square or almond recommended).
- File and shape evenly.
- Apply a sage green gel polish to all nails except one accent nail.
- On the accent nail, use a thin nail art brush to draw a tiny shamrock using a slightly darker green.
- Add a small gold dot in the center (optional).
- Apply top coat and cure.
Materials Needed
- Acrylic powder & liquid
- Nail forms or tips
- Sage green gel polish
- Dark green nail art polish
- Thin nail art brush
- Gold dotting tool or polish
- UV/LED lamp
- Top coat
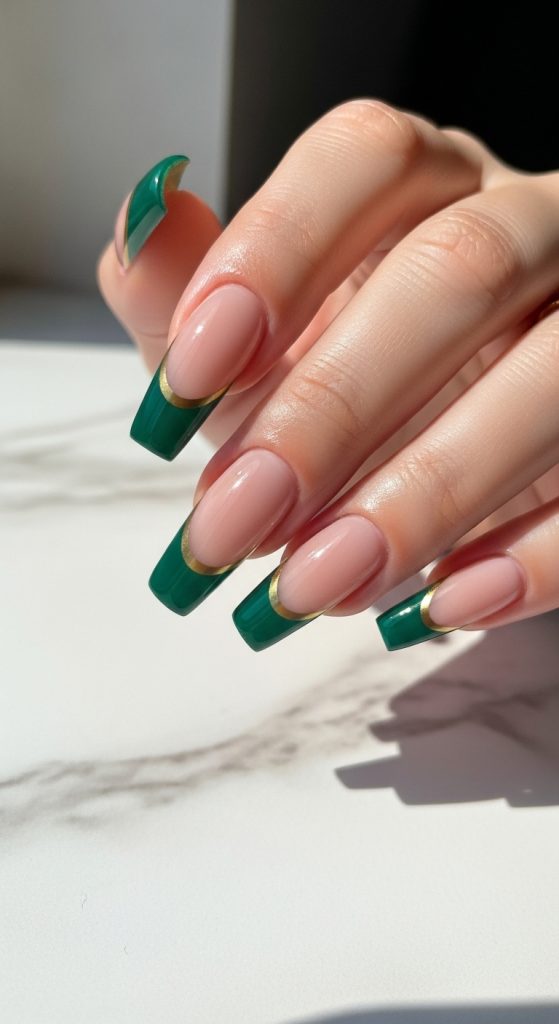
2. Emerald Green French Tip Acrylic Nails
Introduction
French tips are timeless, but adding a St. Patrick’s Day twist makes them trendy and festive. Instead of classic white tips, this design features deep emerald green tips over a nude or milky pink base. The contrast looks elegant, bold, and stylish without being overwhelming.
Emerald green gives a richer, more luxurious vibe compared to bright green shades. It feels sophisticated and perfect for longer acrylic shapes like coffin or almond. If you love classy nail designs but want a seasonal update, this is a perfect balance.
This design is also very Pinterest-friendly because it blends minimalism with color. You can even elevate it further with a thin gold line separating the nude base and green tip.
What This Design Is
Classic French tip acrylic nails featuring emerald green instead of white.
How To Recreate This Look
- Apply acrylic extensions and shape (almond or coffin works best).
- Apply a nude or milky pink base color.
- Use tape or a steady hand to paint emerald green tips.
- Optional: add a thin gold liner between base and tip.
- Apply glossy top coat.
Materials Needed
- Nude acrylic powder
- Emerald green gel polish
- Gold striping polish (optional)
- Nail art brush
- Top coat
- UV/LED lamp
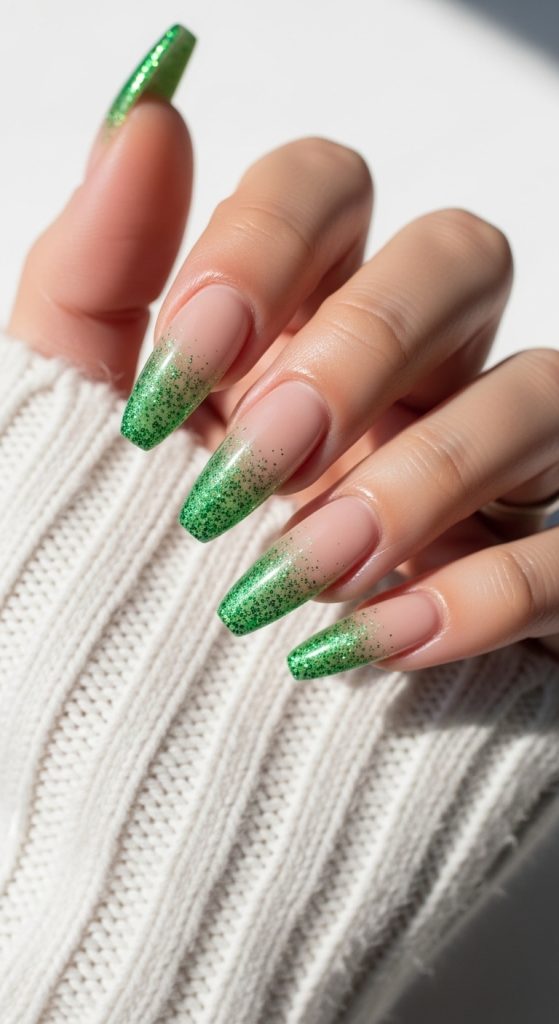
3. Glitter Fade Green Ombre Acrylic Nails
Introduction
If you want sparkle without going overboard, a glitter ombre fade is the perfect solution. This design blends a soft nude or clear base into green glitter at the tips. It’s festive, eye-catching, and incredibly Instagram-worthy.
The ombre effect makes the glitter look soft and diffused rather than chunky and overwhelming. This design works beautifully on longer coffin or almond acrylic nails, giving you space to create a smooth gradient.
It’s ideal for parties, parades, or dinner celebrations. Plus, it’s surprisingly easy to achieve with loose glitter or glitter gel polish.
What This Design Is
A nude-to-green glitter ombre acrylic manicure.
How To Recreate This Look
- Apply clear or nude acrylic base.
- While still tacky, dab green glitter starting from the tip upward.
- Blend gently with a brush to soften transition.
- Seal with clear acrylic.
- File smooth and apply top coat.
Materials Needed
- Clear acrylic powder
- Green cosmetic glitter
- Nude base polish
- Flat blending brush
- Top coat
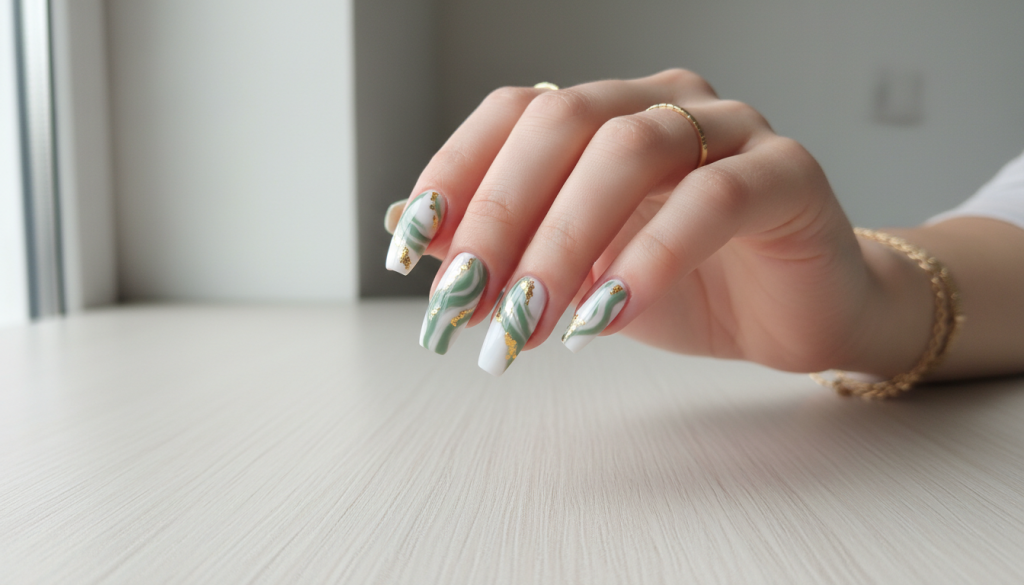
4. White Base with Gold Foil and Green Swirls
Introduction
This design is perfect if you love aesthetic, modern nail art. A clean white acrylic base paired with soft green swirls and gold foil flakes creates a dreamy, Pinterest-inspired look.
It’s festive without screaming holiday nails. The gold foil adds a lucky charm vibe while keeping things classy.
What This Design Is
White acrylic nails with abstract green swirls and gold foil accents.
How To Recreate This Look
- Apply white acrylic base.
- Cure and file smooth.
- Use thin brush to draw green swirls.
- Add small pieces of gold foil randomly.
- Seal with top coat.
Materials Needed
- White acrylic powder
- Green gel polish
- Gold foil flakes
- Nail art brush
- Top coat
5. Matte Olive Green Short Acrylic Nails
Introduction
Matte nails feel modern and chic. Olive green gives a muted St. Patrick’s Day vibe that’s subtle yet stylish.
This look is perfect for short acrylics and beginners.
What This Design Is
Solid olive green matte acrylic manicure.
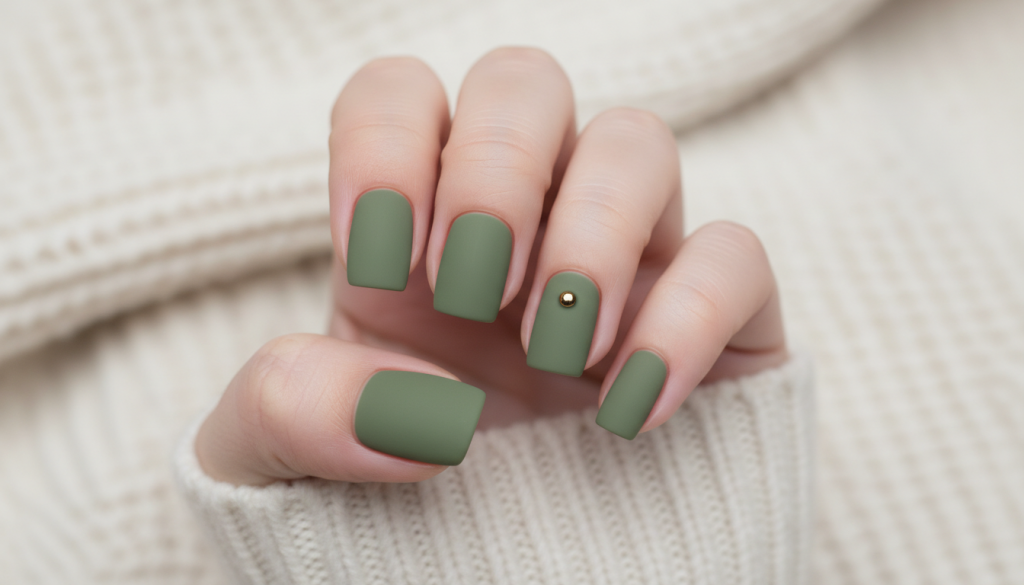
How To Recreate This Look
- Apply acrylic extensions (short length).
- Paint olive green polish.
- Apply matte top coat.
- Optional: Add tiny gold stud.
Materials Needed
- Olive green polish
- Matte top coat
- Gold studs (optional)
6. Clear Acrylic Nails with Encapsulated Green Glitter
Introduction
If you love modern, glossy, glass-like nails, clear acrylics with encapsulated green glitter are one of the most elegant ways to celebrate St. Patrick’s Day. Unlike surface glitter that can feel chunky or rough, encapsulated glitter is sealed inside layers of clear acrylic. This creates depth, dimension, and a smooth professional finish that looks salon-quality.
The beauty of this design is its versatility. You can go full glitter on all nails, or choose one or two accent nails while keeping the rest minimal. The clear base makes the glitter look suspended, almost like tiny sparkles floating inside the nail. This style works beautifully on coffin, almond, or even long square shapes because the length enhances the glass effect.
It’s perfect if you want something festive but still chic and modern. The glitter catches light beautifully in photos, making it extremely Pinterest-worthy. Plus, because the base is clear, it pairs well with any outfit — from casual green sweaters to dressy gold accessories.
If you want something eye-catching yet classy, encapsulated glitter acrylics are a must-try.
What This Design Is
Clear acrylic extensions with green glitter embedded between acrylic layers for a smooth, glass-like effect.
How To Recreate This Look
- Prep nails thoroughly by pushing back cuticles and buffing.
- Apply nail forms or tips.
- Lay down a thin layer of clear acrylic.
- While still slightly wet, sprinkle fine green glitter onto the nail.
- Add another layer of clear acrylic over the glitter to encapsulate it.
- Allow to fully cure.
- File and shape carefully to smooth the surface.
- Buff until glossy.
- Apply clear top coat for extra shine.
Materials Needed
- Clear acrylic powder
- Acrylic liquid (monomer)
- Nail forms or tips
- Fine green glitter
- Acrylic brush
- Nail file & buffer
- High-gloss top coat
7. Pastel Mint Almond Acrylic Nails
Introduction
Pastel mint is one of the softest and prettiest shades you can choose for St. Patrick’s Day. Instead of bold emerald or neon green, mint offers a delicate, fresh look that feels spring-ready and feminine. It’s perfect for anyone who prefers soft glam over bold statement nails.
Almond-shaped acrylics pair beautifully with pastel mint because the curved shape enhances the softness of the color. This style feels romantic, clean, and modern — ideal for brunch dates, casual outings, or even office settings.
What makes pastel mint special is its versatility. You can keep it completely solid for a minimalist aesthetic or add tiny gold dots, a micro shamrock, or a subtle glitter top coat. Even alone, this shade feels festive without screaming holiday nails.
If you’re someone who loves Pinterest’s “clean girl” aesthetic but wants a seasonal twist, pastel mint almond acrylic nails are a perfect choice.
What This Design Is
Almond-shaped acrylic nails painted in soft pastel mint green with a glossy finish.
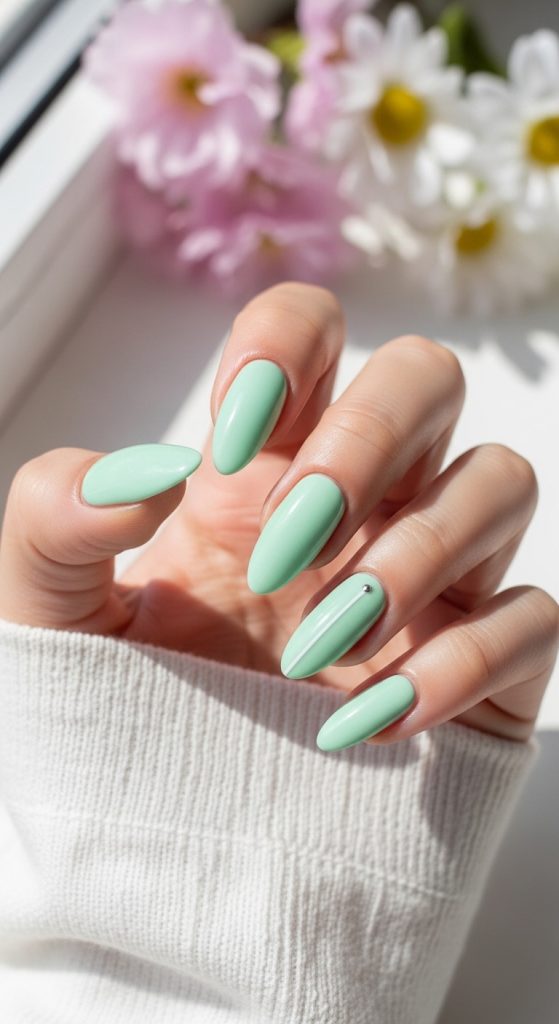
How To Recreate This Look
- Prep and apply almond-shaped acrylic extensions.
- File sides evenly to maintain symmetry.
- Apply two thin coats of pastel mint gel polish.
- Cure each layer properly.
- Optional: add tiny gold dot near cuticle for accent.
- Apply glossy top coat.
- Cure and wipe clean.
Materials Needed
- Acrylic powder & monomer
- Almond nail forms or tips
- Pastel mint gel polish
- UV/LED lamp
- Thin nail art brush (optional)
- Gold polish (optional)
- Top coat
8. Gold Chrome Accent Nail with Green Base Set
Introduction
If you want a trendy, eye-catching design that still feels simple, combining solid green acrylic nails with one gold chrome accent nail is a stunning choice. Gold and green naturally complement each other, especially for St. Patrick’s Day. The gold chrome gives a metallic mirror effect, making your manicure feel luxurious and elevated.
This design is perfect for medium to long acrylic nails, particularly coffin or almond shapes. Keeping most nails solid green balances the boldness of the chrome accent. It creates a focal point without overwhelming the entire look.
The chrome nail reflects light beautifully, especially under flash photography, making it extremely social-media ready. This is a perfect design if you want festive vibes but prefer something more fashion-forward rather than themed nail art.
It’s bold, modern, and surprisingly easy to recreate.
What This Design Is
Solid green acrylic nails paired with one fully gold chrome accent nail.
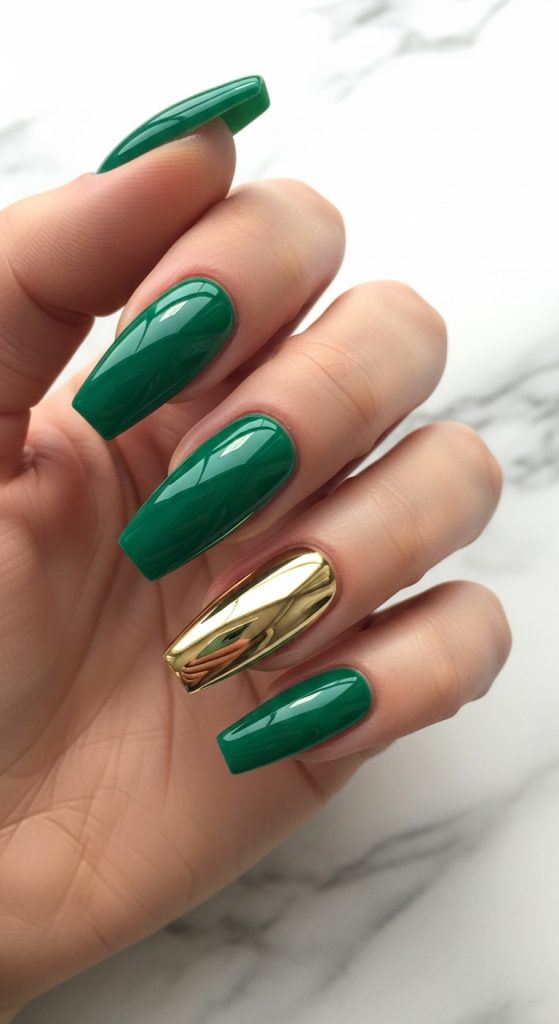
How To Recreate This Look
- Apply acrylic extensions and shape.
- Paint most nails emerald or sage green.
- Cure fully.
- On accent nail, apply black or dark base (chrome sticks better).
- Apply no-wipe top coat and cure.
- Rub gold chrome powder onto nail.
- Seal with top coat.
Materials Needed
- Green gel polish
- Black gel polish (for chrome base)
- Gold chrome powder
- No-wipe top coat
- Acrylic kit
- UV/LED lamp
9. Nude Acrylic Nails with Tiny Shamrock Accent
Introduction
If you love minimalist manicures, nude acrylic nails with one tiny shamrock accent are perfect. This design keeps things clean and subtle while still celebrating St. Patrick’s Day in a delicate way.
The nude base makes your hands look polished and elongated. It’s professional enough for work yet festive enough for holiday fun. The tiny shamrock detail — placed on one nail only — prevents the design from looking busy.
This style works beautifully on short square or almond nails. It’s especially great for beginners because the design is simple and forgiving. Even if your shamrock isn’t perfect, its small size keeps the look cute.
This manicure is proof that you don’t need bold colors to celebrate. Sometimes less truly is more.
What This Design Is
Neutral nude acrylic manicure with one miniature green shamrock accent nail.
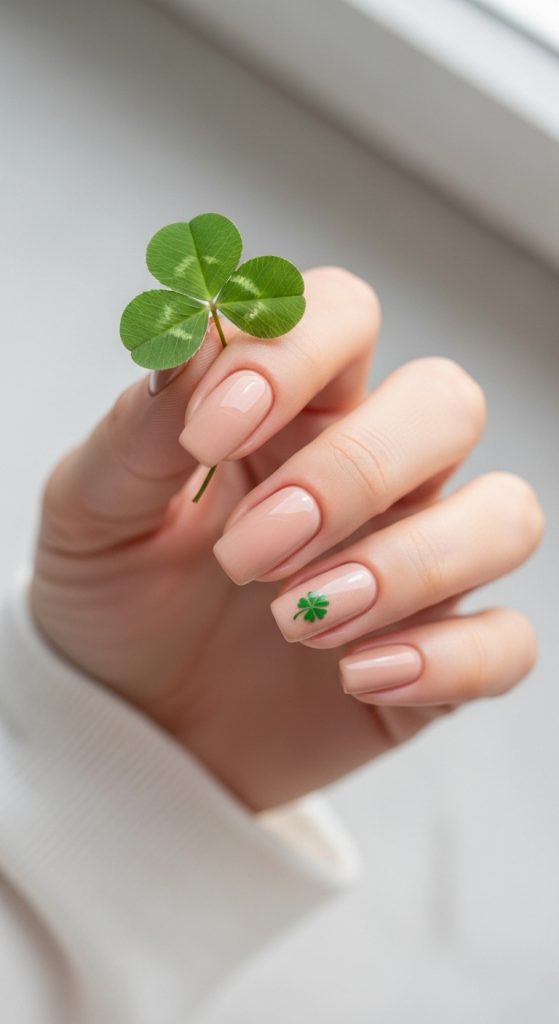
How To Recreate This Look
- Apply short or medium acrylic extensions.
- Paint all nails with nude gel polish.
- Cure completely.
- On accent nail, use dotting tool to create three small green circles.
- Add small stem using thin brush.
- Seal with glossy top coat.
Materials Needed
- Nude gel polish
- Green nail polish
- Dotting tool
- Thin nail art brush
- Acrylic powder & liquid
- UV/LED lamp
- Top coat
10. Green and White Marble Acrylic Nails
Introduction
Marble nails are elegant, artistic, and endlessly customizable. For St. Patrick’s Day, combining white and soft green marble creates a chic, modern look that feels festive without being literal.
The marble effect mimics natural stone, giving your manicure a luxury vibe. It works beautifully on medium to long coffin or square nails because the extra space allows the marble pattern to flow naturally.
You can keep all nails marble or mix solid green nails with one or two marble accent nails. Adding a tiny touch of gold foil enhances the design even more.
This look feels high-end, Pinterest-ready, and perfect for anyone who loves artistic nail designs.
What This Design Is
Acrylic nails featuring a swirling white and green marble pattern sealed with glossy top coat.
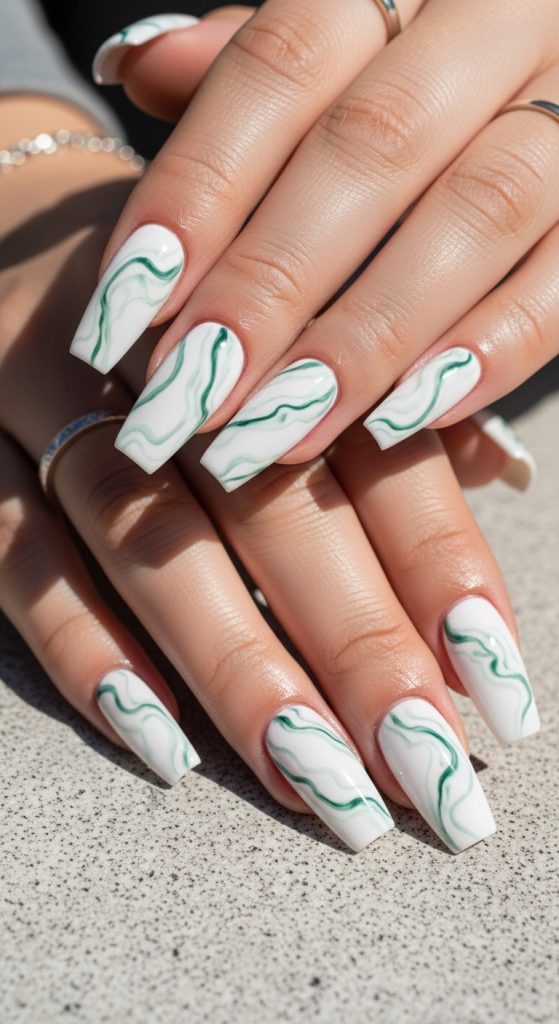
How To Recreate This Look
- Apply acrylic extensions and shape.
- Paint nails white base and cure.
- Add small drops of green polish.
- Use thin brush or toothpick to swirl gently.
- Do not overmix — keep pattern soft.
- Cure and apply top coat.
Materials Needed
- White gel polish
- Light or emerald green polish
- Thin nail art brush
- Acrylic kit
- Top coat
- UV/LED lamp
11. Milky White Acrylic Nails with Gold Shamrock Decals
Introduction
If you love clean, soft, Pinterest-aesthetic nails, milky white acrylics with subtle gold shamrock decals are the perfect balance between minimal and festive. Milky white nails have become extremely popular because they look elegant, soft-focus, and flattering on every skin tone. Instead of a stark white, this semi-sheer milky finish gives your manicure a delicate glow.
Adding tiny gold shamrock decals elevates the look without overpowering it. The metallic gold reflects light beautifully and gives a “lucky charm” feel that’s ideal for St. Patrick’s Day celebrations. This design works especially well on almond or coffin shapes, but it also looks beautiful on short square nails if you prefer a practical everyday length.
The best part? This design transitions easily beyond March. Once St. Patrick’s Day passes, you can remove the decals and still enjoy the milky base. It’s classy enough for work, brunch, or dinner events while still feeling festive. If you want a subtle, save-worthy nail idea that feels expensive and polished, this is one of the easiest yet most elegant options to recreate.
What This Design Is
Soft milky white acrylic nails with small gold shamrock accents placed strategically on one or two fingers.
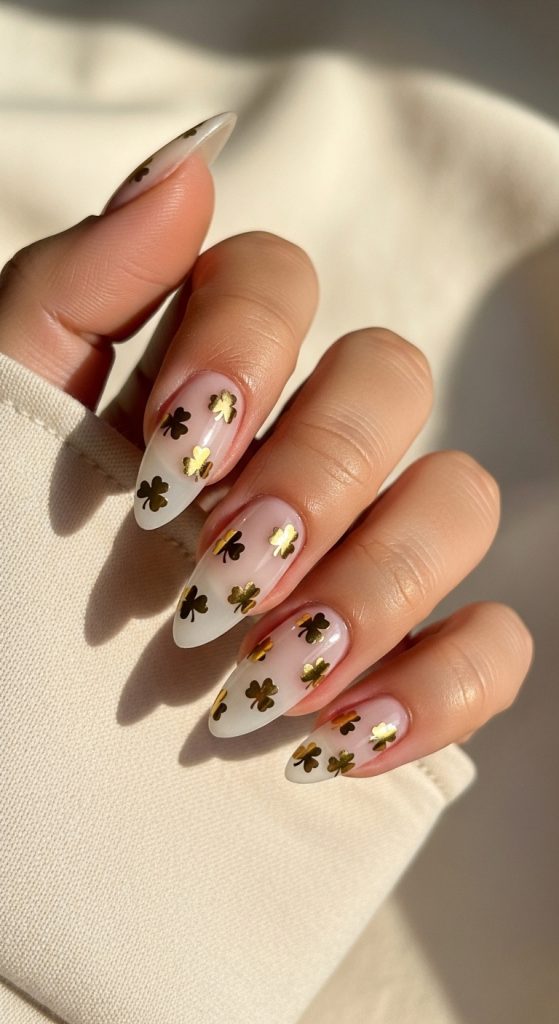
How To Recreate This Look
- Prep nails by cleaning, trimming cuticles, and lightly buffing.
- Apply nail forms or tips and build your acrylic extensions.
- Mix clear acrylic with a tiny amount of white pigment to create a milky tone.
- Apply evenly and shape to almond or coffin.
- File and buff until smooth.
- Apply glossy top coat and cure.
- Use nail glue or gel to place small gold shamrock decals on one or two accent nails.
- Seal again with top coat for durability.
Materials Needed
- Clear acrylic powder
- White pigment powder
- Nail forms or tips
- Gold shamrock decals
- Nail glue or builder gel
- UV/LED lamp
- Glossy top coat
12. Deep Emerald Coffin Acrylics with Subtle Glitter Cuticle Line
Introduction
For those who love bold but polished nail looks, deep emerald coffin acrylics with a glitter cuticle accent are stunning. Emerald green represents richness, luck, and celebration — making it perfect for St. Patrick’s Day. Instead of covering the entire nail with glitter, placing a thin glitter line near the cuticle creates a sophisticated sparkle without overwhelming the design.
This style works beautifully on long coffin nails because the length allows the deep color to shine. The cuticle glitter detail draws attention in a subtle way, making the manicure look professionally done. It’s perfect for parties, dinners, or evening celebrations.
The contrast between glossy emerald and fine gold glitter makes the nails look dimensional and high-end. It’s also a great option if you’re not into shamrock designs but still want something festive. This idea feels grown-up, classy, and Pinterest-worthy.
What This Design Is
Long coffin acrylic nails painted emerald green with a thin gold glitter arc along the cuticle line.
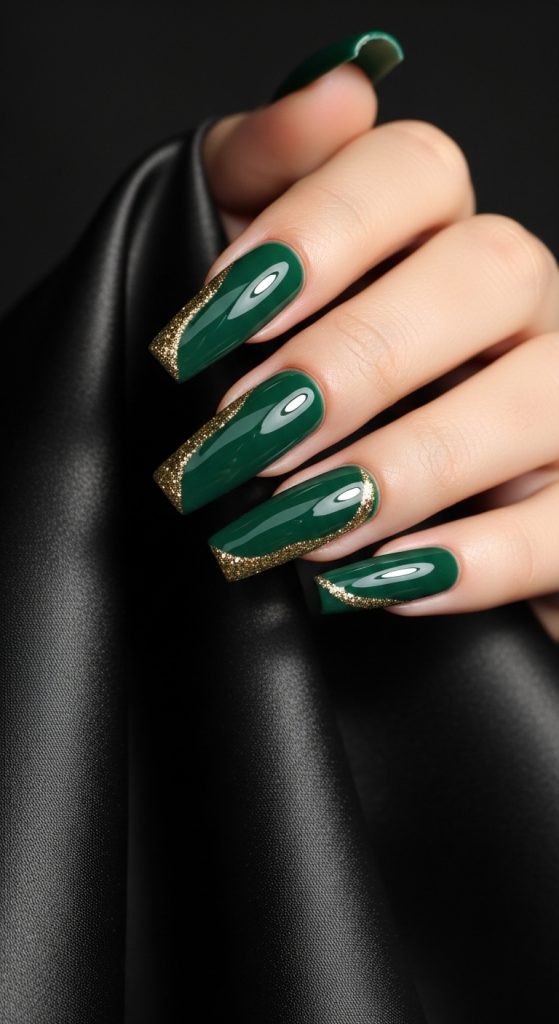
How To Recreate This Look
- Apply long coffin acrylic extensions.
- Paint two coats of emerald green gel polish.
- Cure fully under UV/LED lamp.
- Using a thin brush, apply a curved line of gold glitter polish near the cuticle.
- Refine the curve for symmetry.
- Seal with glossy top coat.
Materials Needed
- Emerald green gel polish
- Gold glitter liner
- Thin nail art brush
- Acrylic powder and liquid
- UV/LED lamp
- Top coat
13. Green Chrome Acrylic Nails with Gloss Finish
Introduction
Chrome nails have dominated Pinterest trends for multiple seasons, and a green chrome version for St. Patrick’s Day is both trendy and festive. Instead of traditional glitter, chrome powder creates a mirror-like metallic effect that looks futuristic and eye-catching.
Green chrome nails reflect light beautifully and shift slightly depending on lighting, giving a multidimensional appearance. This style is ideal for almond or stiletto shapes because the reflective surface elongates the fingers. It feels bold yet clean since there’s no extra nail art involved.
If you want something modern and statement-making without detailed designs, this is perfect. It’s especially great for evening events or photos because chrome captures flash lighting beautifully.
What This Design Is
Acrylic nails coated in green chrome powder for a metallic, reflective finish.

How To Recreate This Look
- Apply acrylic extensions and shape.
- Paint nails with dark green gel polish base.
- Cure fully.
- Apply no-wipe top coat and cure.
- Rub green chrome powder onto nail surface using applicator sponge.
- Dust off excess and seal with top coat.
Materials Needed
- Dark green gel polish
- Green chrome powder
- Applicator sponge
- No-wipe top coat
- UV/LED lamp
14. Short Square Acrylics with Green Heart Accent
Introduction
For a cute and playful twist, green heart accents instead of shamrocks create a sweet and simple St. Patrick’s Day look. This design is perfect for short square acrylic nails, making it beginner-friendly and practical for everyday activities.
The base can be nude, milky white, or pale green. One or two nails feature a tiny green heart placed in the center. The simplicity keeps the manicure looking fresh and not overly themed.
This style works beautifully for students or office environments where bold nail art may not be ideal. It’s subtle but still celebratory.
What This Design Is
Short square acrylic nails with a neutral base and tiny green heart detail.
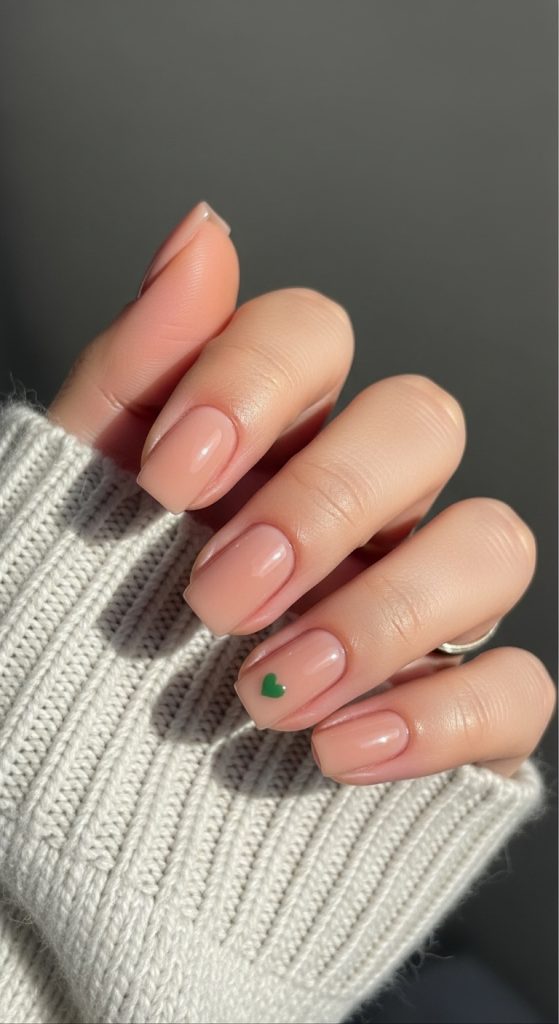
How To Recreate This Look
- Apply short square acrylic extensions.
- Paint with nude or milky base.
- Use dotting tool to create two small green dots side by side.
- Drag downward to form heart shape.
- Seal with glossy top coat.
Materials Needed
- Nude gel polish
- Green nail polish
- Dotting tool
- Acrylic kit
- Top coat
15. Lucky Four-Leaf Clover Accent Nail Set
Introduction
This design focuses on one detailed accent nail featuring a four-leaf clover while the remaining nails stay solid green or nude. It’s perfect if you want one statement nail without decorating all ten fingers.
The four-leaf clover symbolizes luck, making it the star of this manicure. Keeping the rest of the nails simple ensures balance.
What This Design Is
Acrylic manicure with one detailed four-leaf clover nail and simple base on others.
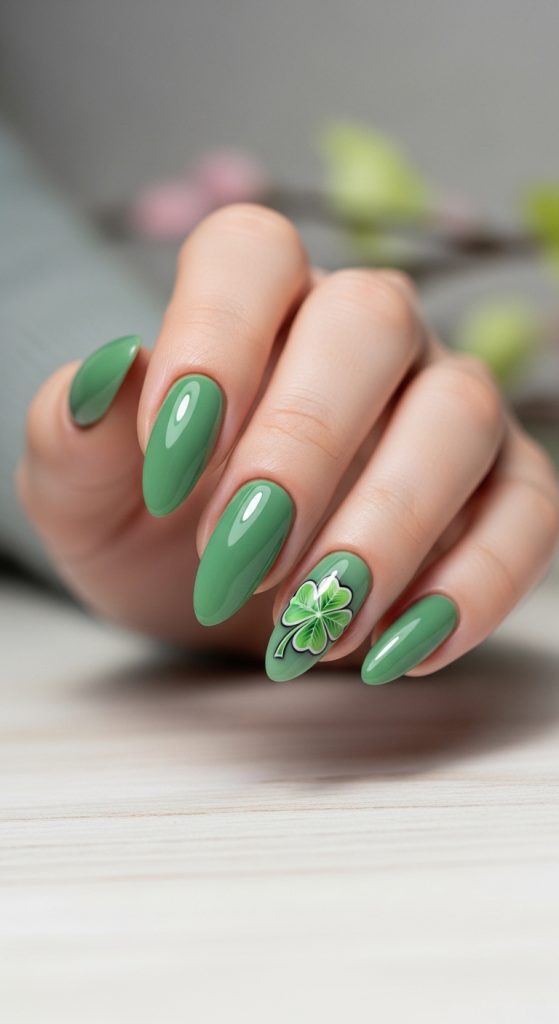
How To Recreate This Look
- Apply acrylic base.
- Paint most nails solid sage or emerald.
- On accent nail, use thin brush to paint four tiny heart-shaped leaves.
- Add small stem.
- Seal with top coat.