The garage is often one of the most overlooked areas in a home, yet it offers enormous potential for both functionality and style. Many homeowners treat it merely as a space to park vehicles or store miscellaneous items, which can quickly lead to cluttered floors, misplaced tools, and chaotic storage. But what if your garage could become not only highly organized but also visually inspiring? That’s where unique garage storage wall ideas come into play. With the right planning, materials, and layout, a garage storage wall can completely transform your space, offering a perfect blend of practicality, efficiency, and Pinterest-worthy aesthetics.

A storage wall is more than just a collection of shelves or hooks—it’s a thoughtfully designed system tailored to your needs. It provides designated spaces for tools, seasonal gear, sports equipment, and DIY supplies, keeping everything easily accessible while maximizing the vertical space. Unlike traditional cabinets that simply hide items behind doors, a storage wall can be both functional and decorative, showcasing clever solutions while maintaining a cohesive, visually pleasing design. This dual-purpose approach is why storage walls are highly popular on Pinterest—they combine utility with creativity, making even the busiest or smallest garages feel intentional and inspiring.
One of the key advantages of installing a garage storage wall is space optimization. Garages are often filled with bulky items such as bicycles, lawnmowers, gardening tools, and storage bins, leaving little room for movement. By moving these items off the floor and onto a wall system, you free up critical floor space, creating a clean and navigable environment. Vertical storage solutions like wall-mounted cabinets, slatwalls, pegboards, hooks, and floating shelves allow for efficient storage of everything from hand tools to power tools, sports gear, and even hobby supplies. This approach is especially beneficial for smaller garages, where every inch counts.
Another important aspect of a functional garage storage wall is customization. Every homeowner’s needs are unique, and a well-designed wall allows for personalization based on lifestyle and usage. Families with children may incorporate labeled bins for toys, sporting equipment, or school supplies, while car enthusiasts might create dedicated sections for automotive tools and maintenance items. Adjustable pegboards, magnetic strips, modular shelving, and hooks offer flexibility, so you can rearrange items as your storage requirements change over time. This adaptability ensures that your garage remains both organized and visually appealing.
Aesthetic appeal has become increasingly important in modern garage design. Gone are the days of purely utilitarian, gray garages with mismatched shelving and cluttered floors. Today’s Pinterest-inspired garages often feature coordinated color schemes, stylish materials, and clean, minimalist layouts. Metal cabinets with matte finishes, wooden shelves, and modular storage units can be arranged to complement the overall aesthetic of your home while maintaining maximum functionality. Even small decorative elements—like labeled containers, artistic hooks, or custom signage—can elevate a garage storage wall from purely functional to visually striking.
Lighting is another crucial consideration when designing a garage storage wall. Proper illumination enhances both safety and aesthetics. A combination of overhead lighting, task lighting, and strategically placed LED strips or under-shelf lights ensures that tools and items are easily visible while adding depth to the space. Warm, natural-toned lights make the garage feel inviting and polished, rather than cold and industrial. This is particularly important when planning a Pinterest-worthy garage, as lighting plays a major role in creating a clean and organized visual impression.
One of the most appealing aspects of garage storage walls is their versatility and scalability. Whether you are working with a small, one-car garage or a large two-car space, storage walls can be tailored to fit your environment. High-end options include custom cabinetry with pull-out drawers, sliding racks, and integrated workbenches, while budget-friendly solutions can be achieved using DIY pegboards, floating shelves, and repurposed crates. Even renters or homeowners with minimal tools can implement clever solutions to create an organized and stylish wall, making these ideas highly accessible to a wide audience.
Functionality and efficiency are at the heart of every great storage wall. By providing a specific place for each item, these walls reduce clutter, minimize searching for tools, and encourage a tidier environment. A garage designed with intentional storage solutions not only looks neat but also improves workflow and usability. You can sort items by category—gardening, automotive, sports, seasonal—making your garage easy to navigate and visually coherent. This system encourages ongoing organization, as every item has a designated home, eliminating the frustration of misplaced or forgotten tools.
In this article, we will explore 10 unique garage storage inspiration wall ideas designed to inspire creativity while offering practical solutions for real-life storage challenges. Each idea includes step-by-step guidance, recommended materials, and styling tips so that even beginners can execute them successfully. From wall-mounted cabinets and pegboards to modular shelves and inventive DIY solutions, these concepts demonstrate how a well-planned storage wall can transform your garage into a functional, stylish, and Pinterest-worthy space.
By investing in a thoughtfully designed storage wall, your garage can evolve from a cluttered, chaotic space into a well-organized, visually appealing, and highly functional environment. It becomes more than a storage area—it’s a reflection of your creativity, planning, and attention to detail. With the right materials, organization system, and aesthetic touches, your garage can be both practical and inspirational, ready to impress visitors and enhance your daily routine.
Idea 1: Pegboard Wall for Tools and Accessories
Introduction
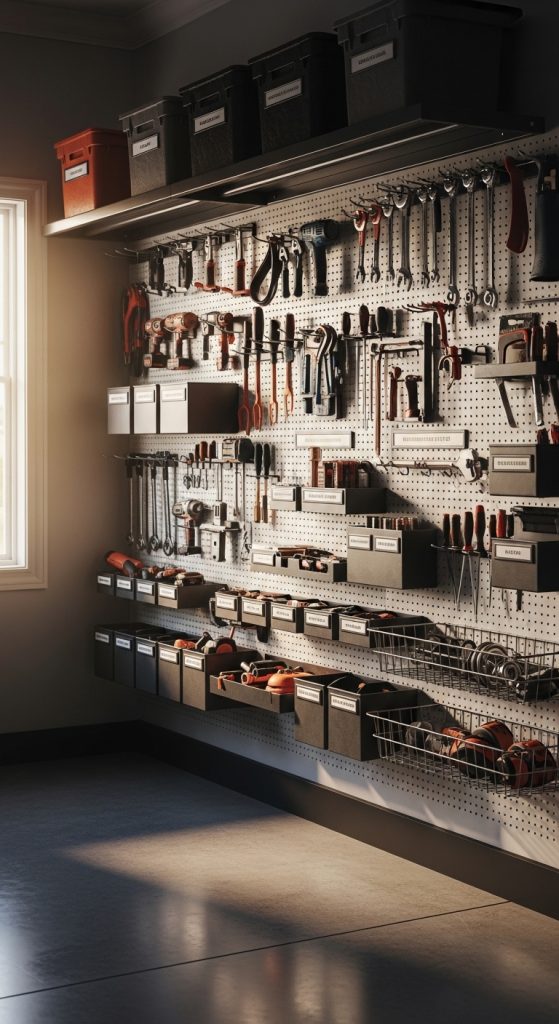
A pegboard wall is one of the most versatile and beginner-friendly garage storage solutions, offering both function and visual appeal. It transforms chaotic tool storage into a clean, organized display while keeping frequently used items within easy reach. Pegboards are ideal for DIY enthusiasts, crafters, and homeowners who want a flexible storage system that evolves with their needs. Unlike traditional shelves or cabinets, a pegboard allows for dynamic customization: hooks, baskets, and shelves can be repositioned, and tools of all shapes and sizes can be arranged efficiently.
A pegboard wall is not just practical—it’s Pinterest-worthy. When styled correctly, it becomes a focal point in the garage, showcasing a harmonious blend of utility and design. Painting your pegboard in a bold color or coordinating it with your garage’s existing aesthetic can turn an ordinary wall into an eye-catching display. You can even use decorative labels for tools, small hanging shelves for accessories, and hooks arranged symmetrically or in a creative pattern to elevate the look.
Benefits:
- Maximum vertical storage for tools and accessories.
- Easy access to frequently used items.
- Flexible and customizable layout.
- Can double as a decorative element.
Step-by-Step How-to Style
- Choose Your Wall: Pick a sturdy wall in the garage that is easily accessible. Ensure the wall can support the weight of the pegboard and your tools.
- Prepare the Surface: Clean the wall, remove nails or debris, and make it smooth for installation.
- Mount the Pegboard: Use screws and anchors suitable for your wall type. Ensure the pegboard is level to prevent tools from sliding or tilting.
- Plan Your Layout: Before hanging items, arrange hooks, small baskets, and mini shelves. Designate zones for hammers, screwdrivers, wrenches, gardening tools, or other items.
- Hang Tools: Start with frequently used items within easy reach. Group similar tools together and consider hanging labels or color-coded tags for easy identification.
- Add Decorative Touches: Incorporate small framed quotes, mini shelves for decorative containers, or small potted plants to make the wall visually appealing.
- Maintain Flexibility: Periodically reassess your layout as your tool collection grows or changes. Reposition hooks, add baskets, or replace accessories as needed.
Materials Needed
- Pegboard panels (wood or metal)
- Screws and wall anchors
- Hooks, baskets, and mini shelves
- Drill, screwdriver, level, measuring tape
- Optional: paint, labels, or decorative accessories
Idea 2: Slatwall Panels with Modular Storage
Introduction
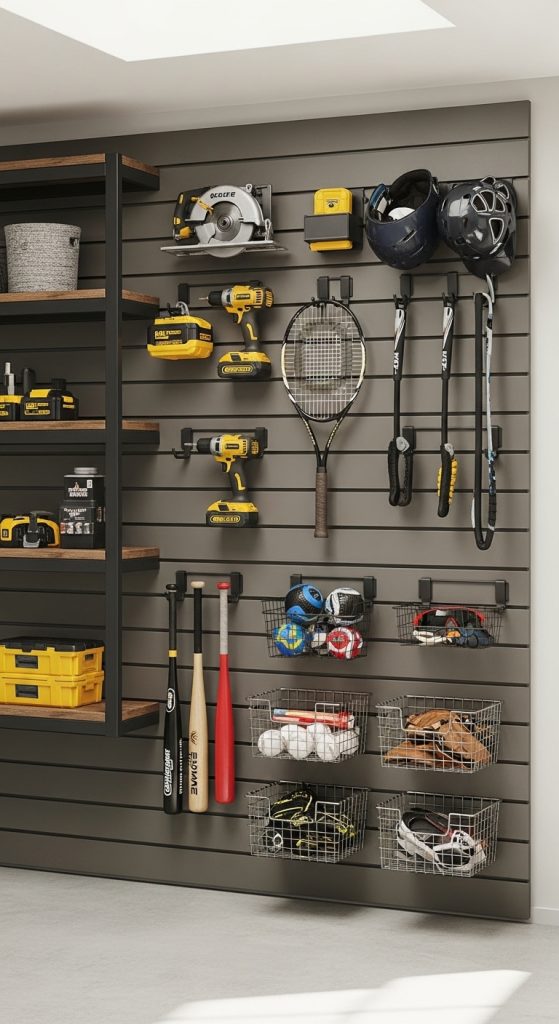
Slatwall panels are a modern, high-end garage storage solution designed to maximize organization and accessibility. Unlike pegboards, slatwalls allow for heavier tools and bulkier items to be stored securely. Modular storage components such as shelves, hooks, and bins can be attached and rearranged according to your needs. This flexibility makes slatwall panels ideal for families, hobbyists, or anyone who needs to organize large amounts of equipment while maintaining a polished look.
Slatwalls are popular on Pinterest for their clean, professional appearance. They work beautifully in combination with other storage elements such as pegboards or wall-mounted cabinets. With slatwalls, your garage can feel like a carefully curated workspace, displaying tools and equipment in a structured, aesthetically pleasing manner. They also allow vertical stacking of items, freeing up floor space and creating an open, airy feel even in small garages.
Benefits:
- Holds heavy tools and equipment securely.
- Modular and flexible for evolving storage needs.
- Stylish and visually organized.
- Maximizes vertical space efficiently.
Step-by-Step How-to Style
- Measure Your Wall: Determine the height and width of your slatwall panels to maximize coverage.
- Install Panels: Secure panels to wall studs using appropriate screws and anchors. Ensure the panels are level and aligned.
- Add Modular Components: Attach shelves, hooks, racks, and baskets as per your storage requirements.
- Organize Items: Group tools by type—hand tools, power tools, sports gear, or gardening equipment.
- Incorporate Labels: Use labeled bins or hooks to make it easier to locate items quickly.
- Adjust Layout: As your collection grows, reposition shelves, hooks, or racks to accommodate new items.
- Styling Touches: Paint the slatwall in a neutral or bold color, or add decorative containers to enhance aesthetics.
Materials Needed
- Slatwall panels
- Screws and anchors
- Modular shelves, hooks, and racks
- Drill, level, measuring tape
- Optional: paint, labels, decorative containers
Idea 3: Wall-Mounted Cabinets for Concealed Storage
Introduction
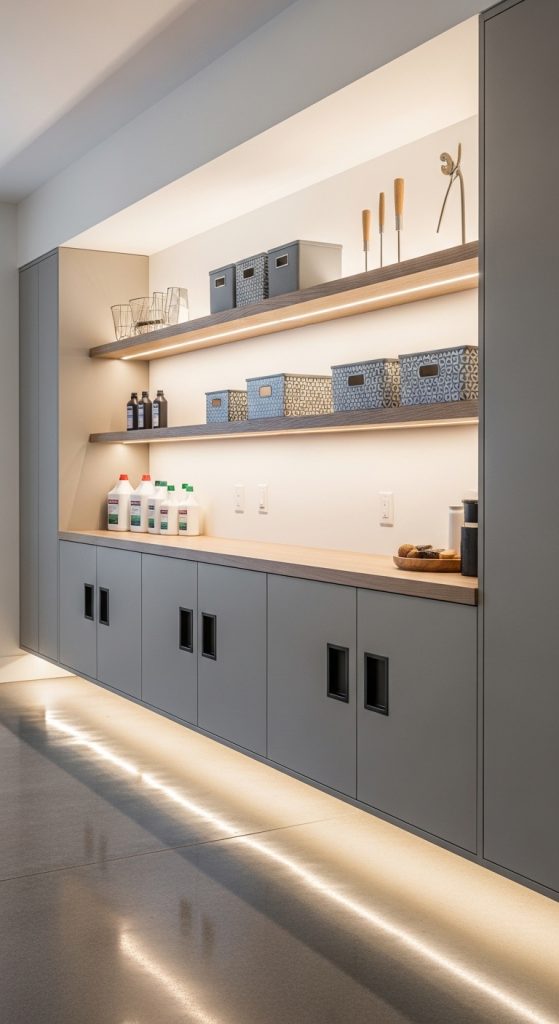
Wall-mounted cabinets are perfect for homeowners who want a polished, clutter-free garage. These cabinets provide concealed storage for chemicals, paints, cleaning supplies, or items that are not frequently used. By keeping storage off the floor, wall-mounted cabinets create a clean, professional, and visually appealing space.
On Pinterest, garages with cabinets often appear highly organized and stylish. You can choose metal cabinets for durability or wooden cabinets for a warmer, earthy feel. Cabinets also allow for a mix of open and closed storage—combining them with pegboards or slatwalls ensures both accessibility and tidiness. Labeling each cabinet or using magnetic strips for smaller tools can further enhance functionality.
Benefits:
- Clean and professional look.
- Protects items from dust and damage.
- Frees up floor space for other uses.
- Can be combined with other storage systems for versatility.
Step-by-Step How-to Style
- Choose Cabinet Type: Metal, wood, or laminate based on durability and aesthetic preference.
- Determine Placement: Install cabinets at a height that is convenient for daily use but does not block access to other wall-mounted storage.
- Secure to Wall: Use screws and anchors appropriate for wall type and cabinet weight.
- Organize Inside: Use bins, dividers, or trays for small items. Group similar items together.
- Add Accessories: Magnetic strips for tools, door hooks, or small decorative elements enhance functionality.
- Maintenance: Periodically reorganize contents for efficiency and cleanliness.
Materials Needed
- Wall-mounted cabinets
- Screws and anchors
- Drill, level, measuring tape
- Organizational bins or dividers
- Optional: magnetic strips or labels
Idea 4: DIY Hanging Bike Rack Wall
Introduction
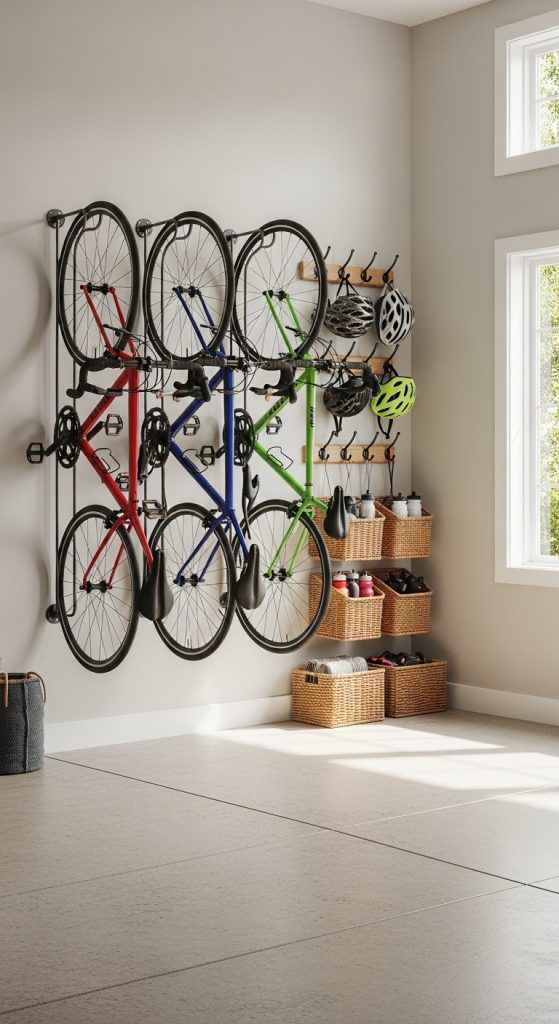
For bike owners, a DIY hanging bike rack wall is a highly efficient and visually appealing solution. Vertical storage frees up floor space, making your garage safer and more navigable. Hanging bikes on hooks or racks keeps them organized, reduces the risk of damage, and allows for easy access. This solution is especially popular on Pinterest for its clever use of limited vertical space and the added potential for creative styling.
Bike racks can be customized for multiple bikes, including children’s bikes or larger mountain bikes. Adding small shelves or hooks nearby for helmets, pumps, and biking accessories enhances usability while keeping everything consolidated in one area. This makes the garage not only functional but also aesthetically cohesive.
Benefits:
- Frees up floor space.
- Easy access to bicycles and biking accessories.
- Keeps garage organized and visually clean.
- Customizable for multiple bikes and accessories.
Step-by-Step How-to Style
- Select Wall Space: Choose a tall wall free of obstructions.
- Install Hooks or Racks: Use heavy-duty, weight-rated hardware for safety.
- Position Bikes: Hang each bike carefully, ensuring handlebars and pedals do not damage the wall.
- Add Accessories: Include small hooks or baskets for helmets, locks, and pumps.
- Style Visually: Arrange hooks symmetrically or creatively for aesthetic appeal.
- Safety Check: Test hooks for stability and adjust as necessary.
Materials Needed
- Heavy-duty wall hooks or bike racks
- Drill, screws, and anchors
- Level and measuring tape
- Optional: protective padding for walls
- Small baskets or hooks for accessories
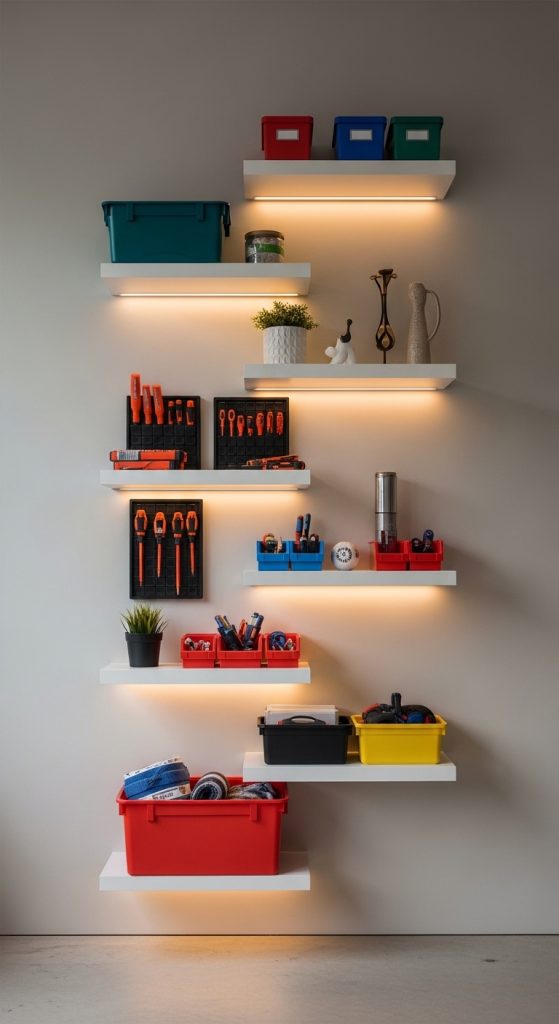
Idea 5: Floating Shelves for Display and Storage
Introduction
Floating shelves offer a modern, stylish solution for organizing smaller items while keeping them visible and accessible. Unlike traditional shelving units, floating shelves appear sleek and “hover” on the wall, adding dimension and sophistication. They are perfect for storing bins, tools, decorative containers, or seasonal items while maintaining a clean garage aesthetic.
Pinterest trends highlight floating shelves for their versatility and design flexibility. You can mix different lengths, stagger heights, or incorporate decorative elements to make them visually interesting. Floating shelves also complement other storage solutions like pegboards, slatwalls, or wall-mounted cabinets, creating a layered, functional, and visually appealing storage system.
Benefits:
- Stylish and modern look.
- Keeps frequently used items accessible.
- Complements other storage systems.
- Customizable for size, height, and style.
Step-by-Step How-to Style
- Measure Wall Space: Determine number and length of shelves based on available space.
- Install Brackets or Hardware: Use concealed hardware for a clean look or visible brackets for industrial style.
- Secure Shelves: Ensure they are level and sturdy enough to hold intended items.
- Organize Items: Use bins, jars, or decorative containers to categorize items.
- Add Style: Mix colors, textures, and heights to create visual interest.
- Maintenance: Regularly declutter shelves to maintain an organized, Pinterest-worthy look.
Materials Needed
- Floating shelves
- Shelf brackets or concealed hardware
- Screws, anchors, drill, and level
- Bins or containers for organization
- Optional: labels or decorative items
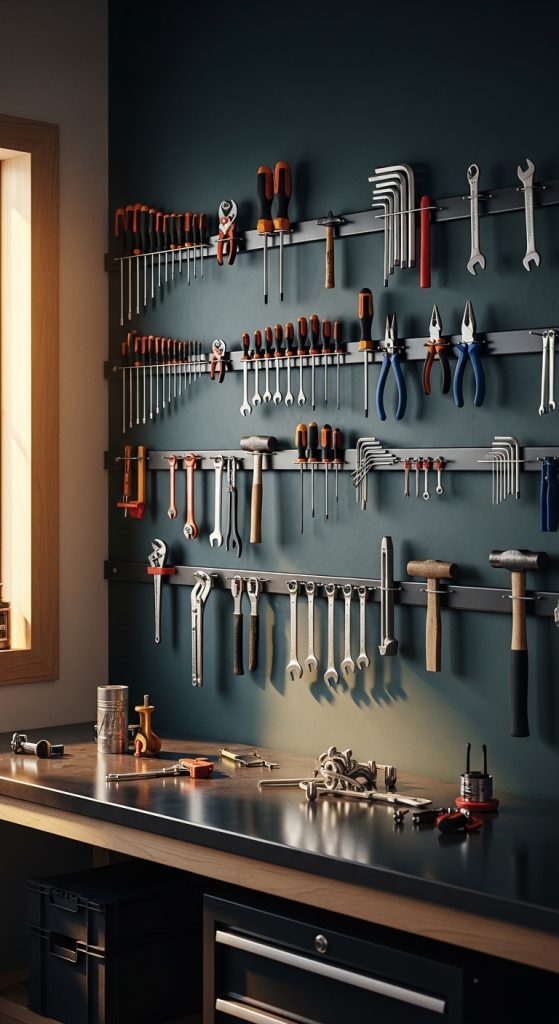
Idea 6: Magnetic Tool Wall for Quick Access
Introduction
A magnetic tool wall is a sleek and modern garage storage solution that combines functionality and style. By attaching strong magnets to a wall or a metal board, you can store metal tools such as screwdrivers, pliers, wrenches, and even smaller power tools securely and visibly. This approach keeps frequently used items within easy reach while eliminating clutter from drawers or toolboxes.
Magnetic walls are a Pinterest favorite because they are visually striking and extremely practical. Tools arranged neatly on a magnet wall not only look organized but also allow you to immediately see what you have and what might be missing. They are especially ideal for garages where workspace efficiency is a priority, as they reduce time spent searching for the right tool.
Step-by-Step How-to Style
- Select a Wall or Panel: Use a metal sheet or steel board secured to the wall. Ensure it is large enough for the number of tools you plan to store.
- Attach Magnets: Use strong neodymium magnets or magnetic strips in a grid or pattern for optimal storage.
- Organize Tools by Type: Hang frequently used tools at eye level and less-used items higher or lower.
- Label Sections: Optional labels help keep tools categorized and easy to find.
- Styling Touches: Paint the wall or panel in a neutral or bold tone to make tools pop. Decorative small hooks or containers can hold non-metal items nearby.
Materials Needed
- Metal wall panel or steel sheet
- Strong magnets or magnetic strips
- Screws, anchors, drill, and level
- Optional labels, small hooks, or containers
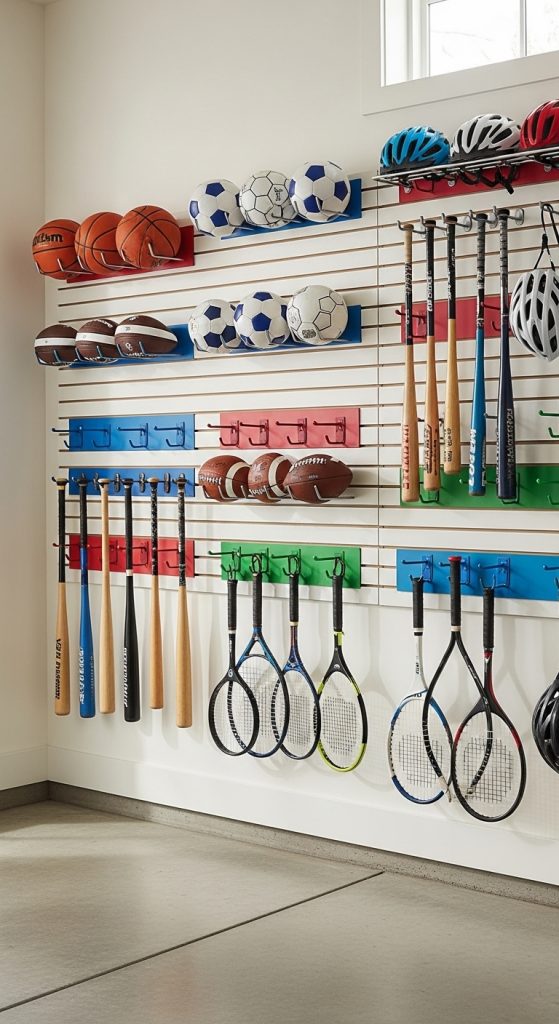
Idea 7: Wall-Mounted Sports Equipment Organizer
Introduction
For families or active individuals, a wall-mounted sports equipment organizer is a game-changer. It keeps balls, bats, rackets, helmets, and other gear neatly stored, freeing up floor space and reducing clutter. Pinterest users love this solution because it’s both practical and visually appealing: organized sports equipment displayed vertically creates an eye-catching, functional wall.
Sports walls are fully customizable. You can combine hooks, mesh baskets, cubbies, and slotted shelves to suit your household’s gear. Adding labels or color-coded sections for each family member adds a personal touch while maintaining order. This solution encourages children to put away their equipment, keeping the garage tidy and organized.
Step-by-Step How-to Style
- Measure the Wall: Determine space needed for all sports gear.
- Install Mounting System: Use slatwall panels, pegboards, or wall hooks.
- Add Baskets and Hooks: Hang balls, helmets, and rackets strategically.
- Organize by Type or User: Assign specific areas to each family member or equipment category.
- Decorative Styling: Add small shelves for trophies or a corkboard for schedules.
- Adjust Layout: Modify as sports gear or household needs change.
Materials Needed
- Slatwall or pegboard panels
- Hooks, baskets, and cubbies
- Screws, anchors, drill, and level
- Labels or name tags
- Optional decorative shelves or corkboard
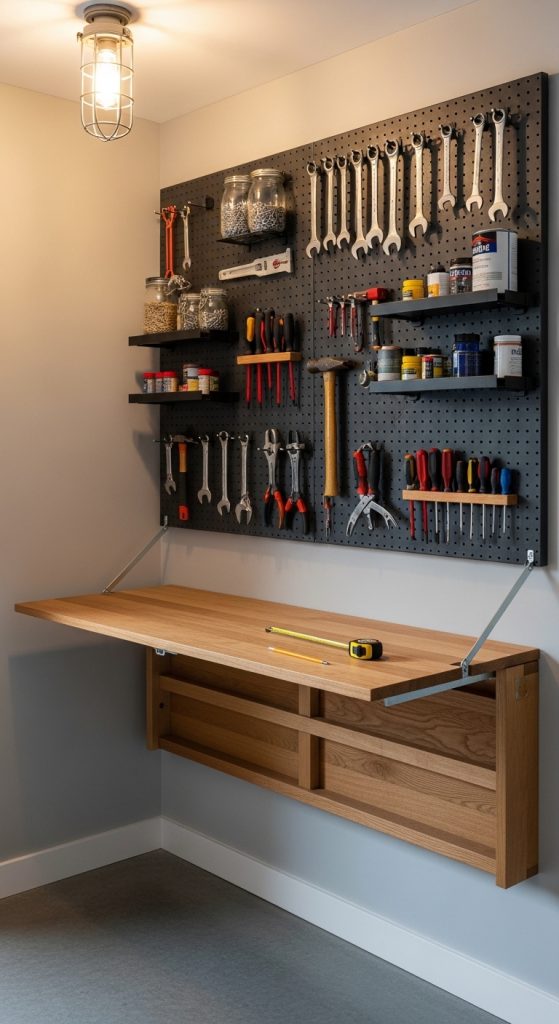
Idea 8: Fold-Down Workbench Wall
Introduction
A fold-down workbench is an excellent solution for small or multi-purpose garages. It provides a functional workspace without permanently occupying floor space, making it perfect for DIY projects, gardening tasks, or tool repair. Pinterest enthusiasts showcase fold-down workbenches as a clever blend of style, practicality, and efficiency.
This solution works particularly well when combined with pegboards, slatwalls, or wall-mounted cabinets. When folded up, it clears space for vehicles, bikes, or other large items. When folded down, it provides a solid, accessible work surface. Pairing the workbench with tool storage and wall-mounted shelves enhances organization and keeps the area clean and efficient.
Step-by-Step How-to Style
- Choose a Wall: Select a sturdy wall capable of supporting the weight of the bench and tools.
- Install Folding Brackets: Attach heavy-duty folding brackets at the desired height.
- Attach Workbench Surface: Secure a solid wooden or metal top to the brackets.
- Add Storage: Incorporate wall-mounted cabinets or pegboards above the bench for tools.
- Fold and Test: Ensure the bench folds up and down smoothly and safely.
- Styling Tips: Paint or stain the bench to complement your garage color palette. Add hooks for frequently used tools.
Materials Needed
- Fold-down workbench brackets
- Wooden or metal workbench top
- Wall-mounted storage (pegboard, cabinets, hooks)
- Screws, anchors, drill, level
- Optional paint or stain
Idea 9: Vertical Garden Wall for a Green Touch
Introduction
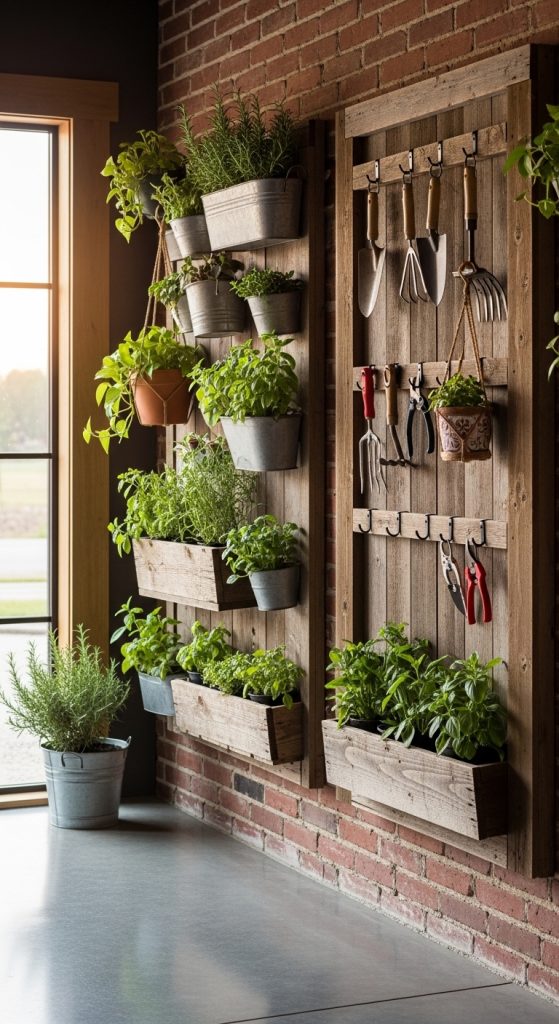
A vertical garden wall is a creative and unexpected garage storage idea that adds life and vibrancy. Perfect for those who enjoy gardening, herbs, or simply want to introduce greenery into a functional space, a vertical garden can be combined with tool storage or shelving for a dual-purpose wall. Pinterest highlights this as a cozy and inspiring way to make garages feel less industrial and more welcoming.
Using planters, hanging pockets, or modular plant containers, a vertical garden adds texture, color, and a natural aesthetic. It also creates a calming environment while maintaining practicality. Pairing this with nearby storage for gardening tools ensures a cohesive and functional setup.
Step-by-Step How-to Style
- Choose Wall Space: Ensure access to light or supplement with grow lights.
- Install Planters or Pockets: Use wall-mounted pots, hanging planters, or fabric pockets.
- Arrange Plants: Group herbs, small indoor plants, or succulents based on light requirements.
- Incorporate Storage: Place small hooks or bins nearby for garden tools and supplies.
- Watering and Maintenance: Use a drip system or removable pots for easy care.
- Styling Touches: Add decorative labels, small shelves, or pebbles for visual interest.
Materials Needed
- Wall-mounted planters or hanging pockets
- Small indoor plants or herbs
- Hooks or bins for tools
- Screws, anchors, drill, and level
- Optional grow lights or decorative accents
Idea 10: Chalkboard or Whiteboard Planning Wall
Introduction
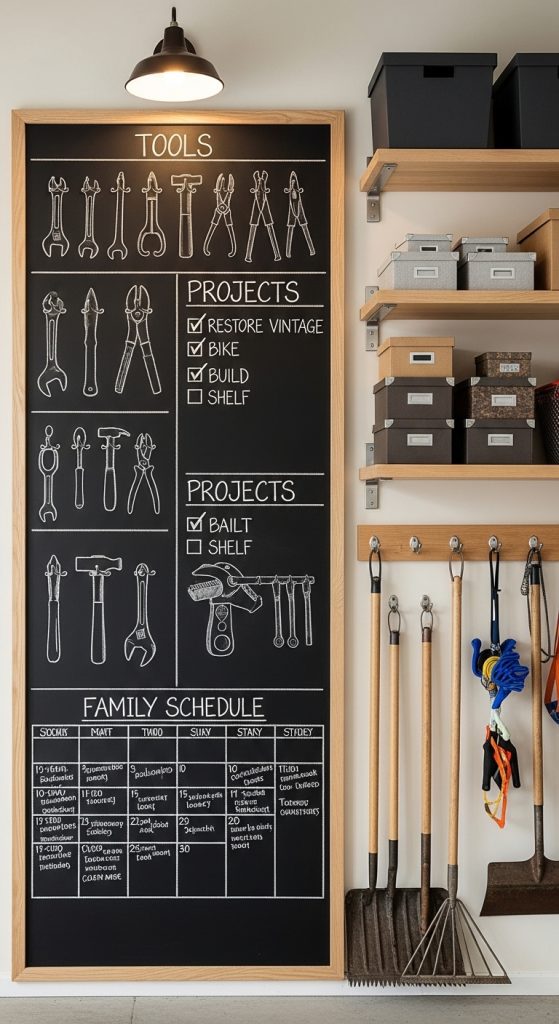
A chalkboard or whiteboard wall is a functional, creative solution for organizing your garage and planning projects. It allows you to track tasks, label storage zones, and jot down reminders in a visually engaging way. Pinterest highlights chalkboard walls as a stylish method to combine organization with creativity, transforming your garage into a productive, interactive space.
This idea works beautifully alongside slatwalls, pegboards, or floating shelves. You can divide the wall into zones: one for tool inventory, another for ongoing projects, and a section for family schedules or notes. Using color-coded markers or chalk creates a dynamic and attractive system, keeping your garage both organized and Pinterest-ready.
Step-by-Step How-to Style
- Choose Wall or Panel: Pick a smooth surface for paint or mount a large board.
- Apply Chalkboard or Whiteboard Paint: Follow manufacturer instructions for a durable finish.
- Divide Zones: Draw sections for tools, projects, and schedules.
- Add Accessories: Incorporate wall-mounted trays for markers, erasers, or chalk.
- Label Storage Areas: Use the board to identify cabinets, hooks, or bins nearby.
- Maintain and Update: Regularly update the board for clarity and functionality.
Materials Needed
- Chalkboard or whiteboard paint / panel
- Markers, chalk, or chalk pens
- Wall-mounted trays or containers
- Optional rulers or decorative borders
- Screws, anchors, drill, and level