Bathrooms are often one of the most overlooked spaces when it comes to creative interior design. While living rooms and bedrooms typically receive the most attention, your bathroom holds incredible potential to become a stylish, expressive, and even magical part of your home. This is where whimsy bathroom decor comes in—a playful, imaginative approach to design that breaks away from traditional rules and embraces personality, creativity, and charm. Whimsical decor is all about creating a space that feels joyful, unexpected, and uniquely yours, turning everyday routines into delightful experiences.
Whimsy in bathroom decor doesn’t mean clutter or chaos; instead, it’s a thoughtful blend of quirky elements, bold accents, and artistic touches that create visual interest without overwhelming the space. It allows you to experiment with color, patterns, textures, and accessories in a way that feels lighthearted and fun. From unusual wall art and playful shower curtains to creatively styled shelves and unexpected color combinations, whimsical bathrooms are designed to spark happiness and inspire creativity. This style is especially popular on Pinterest, where unique, eye-catching spaces often go viral for their originality and charm.
One of the key elements of whimsical bathroom decor is personal expression. Unlike minimalist or traditional designs that follow strict guidelines, whimsy encourages you to mix and match styles, colors, and themes. You might combine vintage elements with modern accents, or pair soft pastel tones with bold, vibrant hues. The goal is to create a space that reflects your personality while still maintaining functionality. Whether you prefer a soft, dreamy aesthetic or a bold, eclectic look, whimsical decor allows you to design a bathroom that feels truly one-of-a-kind.
Color plays a significant role in achieving a whimsical aesthetic. While neutral tones can still be used as a base, whimsical bathrooms often feature pops of unexpected color—think blush pink paired with emerald green, sky blue with gold accents, or even rainbow-inspired palettes. These color combinations add depth and excitement, transforming a simple bathroom into a visually engaging space. Wallpaper, painted cabinets, or colorful tiles can instantly elevate the room and serve as focal points. Even small additions like colorful towels or accessories can make a big impact.
Another defining feature of whimsical decor is the use of creative and unexpected elements. This could include uniquely shaped mirrors, artistic lighting fixtures, or decorative objects that double as functional pieces. For example, a cloud-shaped mirror, a vintage ladder used as a towel rack, or a quirky soap dispenser can instantly add character to your bathroom. These elements not only enhance the aesthetic but also make the space feel more personalized and inviting. The key is to choose items that bring joy and align with your overall design vision.
Texture and layering are also essential in whimsical bathroom design. Mixing different materials—such as wood, metal, glass, and fabric—creates depth and visual interest. Soft textiles like rugs and shower curtains can be paired with sleek surfaces like tiles and mirrors to achieve a balanced look. Adding plants, baskets, or decorative trays further enhances the layered effect, making the space feel cozy and lived-in. This combination of textures contributes to the overall charm and warmth of a whimsical bathroom.
Lighting is another powerful tool in creating a whimsical atmosphere. Soft, warm lighting can make the space feel cozy and relaxing, while statement fixtures like pendant lights or decorative sconces can add a dramatic and artistic touch. Fairy lights, LED strips, or backlit mirrors can also be used to create a dreamy ambiance, especially in smaller bathrooms. Proper lighting not only enhances functionality but also highlights the unique decor elements within the space.
Functionality remains an important consideration, even in a whimsical design. A well-designed bathroom should still be practical and organized. Clever storage solutions—such as floating shelves, decorative baskets, or multi-purpose furniture—help maintain a clutter-free environment while complementing the overall aesthetic. The goal is to strike a balance between creativity and usability, ensuring that the space is both beautiful and functional.
Whimsical bathroom decor is particularly appealing for small spaces, such as apartment bathrooms or guest bathrooms. Because these areas are typically compact, even small design changes can have a big impact. Adding a bold shower curtain, a statement mirror, or a few decorative accents can completely transform the look and feel of the room. This makes whimsical decor an accessible and budget-friendly option for those who want to refresh their space without a full renovation.
In this article, you’ll discover 10 unique whimsy bathroom decor ideas that are designed to inspire and guide you in creating a playful, stylish, and Pinterest-worthy space. Each idea will include a detailed explanation, step-by-step implementation, and a list of materials to help you bring the concept to life. Whether you’re looking to make small changes or completely transform your bathroom, these ideas will provide practical solutions and creative inspiration.
By embracing whimsical decor, you can turn your bathroom into more than just a functional space—it becomes a reflection of your creativity, personality, and style. It’s about finding joy in the details, experimenting with design, and creating an environment that makes you smile every day. With the right approach, even the simplest bathroom can be transformed into a charming, imaginative retreat that feels both refreshing and inspiring.
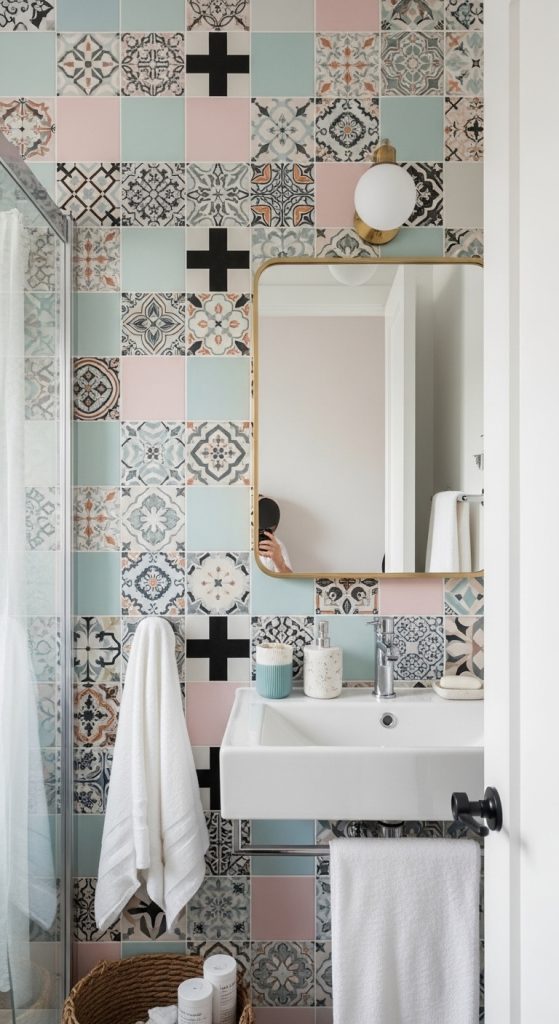
Idea 1: Colorful Mismatched Tile Accent Wall
Introduction
A colorful mismatched tile accent wall is one of the most eye-catching ways to bring whimsical charm into your bathroom. Instead of sticking to uniform tiles, this idea embraces variety—mixing colors, patterns, and textures to create a playful yet artistic focal point. This design instantly transforms a plain bathroom into a vibrant, personality-filled space. The beauty of mismatched tiles lies in their imperfection; no two sections look exactly the same, which adds depth and character.
This style is especially popular on Pinterest because it feels creative and unique while still being achievable for beginners. You can use leftover tiles, thrifted pieces, or budget-friendly options to create a custom look without overspending. Whether you prefer soft pastel tones for a dreamy aesthetic or bold colors for a lively vibe, mismatched tiles allow complete creative freedom. When paired with simple fixtures and neutral elements, the wall becomes the highlight of the room without overwhelming the space.
Step-by-Step How-to Create a Mismatched Tile Wall
- Choose a Wall: Select a focal wall, such as behind the sink or shower area.
- Gather Tiles: Collect tiles in different colors, shapes, and patterns.
- Plan Layout: Arrange tiles on the floor first to visualize the design.
- Apply Adhesive: Use tile adhesive to secure each tile onto the wall.
- Grouting: Fill gaps with grout and clean excess for a polished finish.
- Seal the Surface: Apply a sealant for durability and moisture protection.
Materials Needed
- Assorted tiles (ceramic, mosaic, or recycled)
- Tile adhesive
- Grout and grout spreader
- Tile cutter (if needed)
- Sealant
- Cleaning cloth
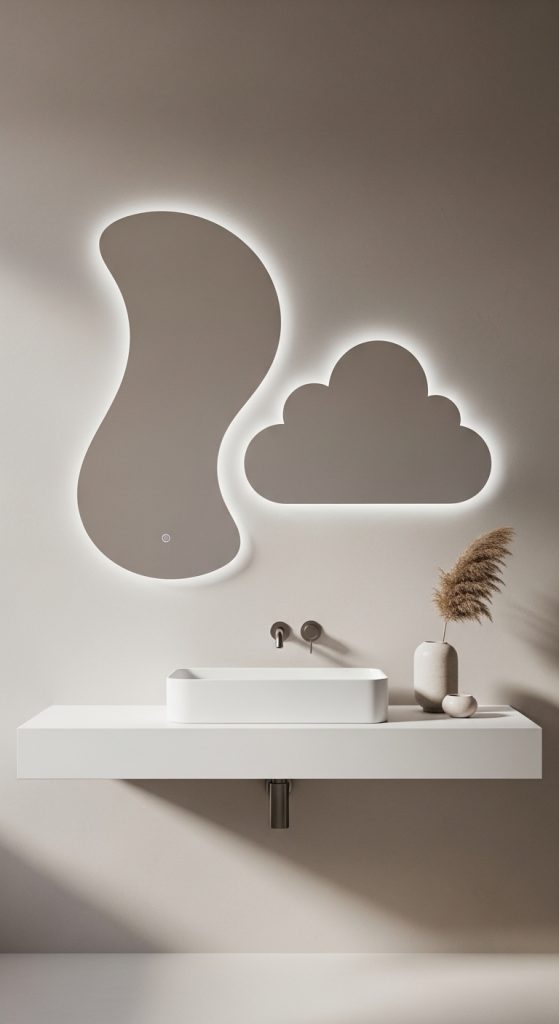
Idea 2: Quirky Statement Mirror Shapes
Introduction
Mirrors are essential in bathrooms, but they can also be a major design statement. Swapping a standard mirror for a quirky, uniquely shaped one instantly adds whimsical personality. Think cloud shapes, asymmetrical designs, wavy edges, or vintage-inspired frames. These mirrors not only serve a practical purpose but also act as artistic decor pieces that elevate the entire bathroom aesthetic.
On Pinterest, statement mirrors are a trending decor element because they photograph beautifully and create visual impact with minimal effort. A whimsical mirror can make even the smallest bathroom feel stylish and thoughtfully designed. When paired with simple vanities and clean backgrounds, the mirror becomes the centerpiece of the space. This idea is perfect for renters or beginners since it requires minimal installation and can be easily updated.
Step-by-Step How-to Style with a Statement Mirror
- Choose a Design: Select a mirror shape that complements your theme.
- Measure Space: Ensure the mirror fits proportionally above your sink or vanity.
- Install Securely: Use proper hooks or wall mounts for stability.
- Enhance Lighting: Add sconces or LED lighting around the mirror.
- Style the Area: Keep surrounding decor minimal to highlight the mirror.
Materials Needed
- Decorative mirror (cloud, wavy, asymmetrical)
- Wall hooks or mounting hardware
- Measuring tape
- Optional: LED lights or sconces
- Minimal decor accessories
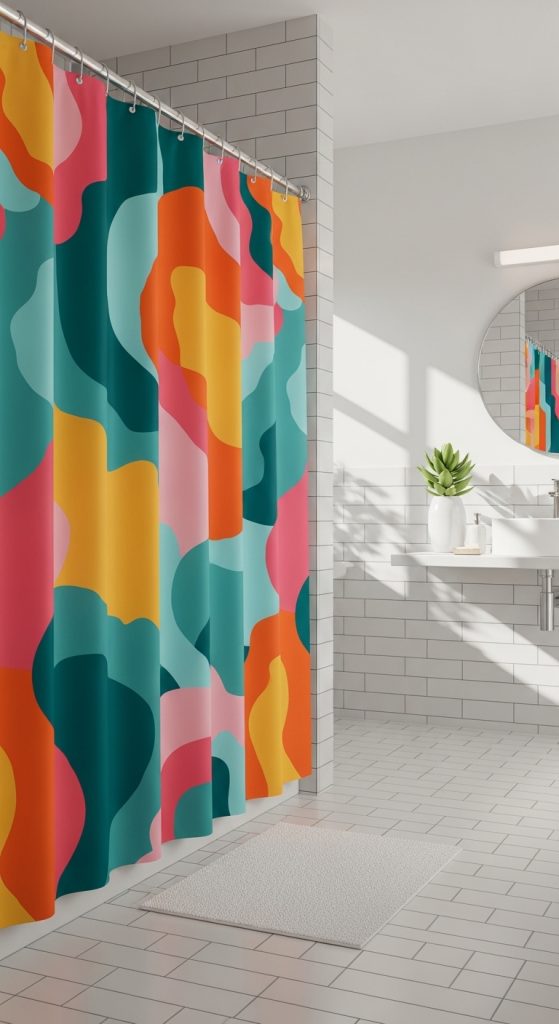
Idea 3: Playful Shower Curtain with Bold Prints
Introduction
A playful shower curtain is one of the easiest and most affordable ways to introduce whimsy into your bathroom. Bold prints, quirky illustrations, or unexpected patterns can instantly transform the space without requiring permanent changes. From abstract art and florals to humorous designs and vibrant colors, a statement curtain becomes a focal point that sets the tone for the entire room.
This idea is highly popular on Pinterest because it offers maximum impact with minimal effort. It’s perfect for renters or anyone looking for a quick refresh. A whimsical shower curtain can be paired with neutral walls and simple accessories to create a balanced look, or combined with other bold elements for a more eclectic style. The versatility of this decor piece makes it a must-have for anyone exploring creative bathroom design.
Step-by-Step How-to Style a Bold Shower Curtain
- Choose a Design: Select a curtain with vibrant colors or unique patterns.
- Match Color Scheme: Pick accessories that complement the curtain.
- Install Properly: Use sturdy hooks and a rod to hang the curtain evenly.
- Balance the Space: Keep other elements simple to avoid visual clutter.
- Add Coordinating Items: Use matching towels or rugs for cohesion.
Materials Needed
- Decorative shower curtain
- Curtain hooks and rod
- Matching towels or bath mat
- Optional: Wall art or accessories
Idea 4: Floating Shelves with Eclectic Decor
Introduction
Floating shelves are both functional and decorative, making them perfect for whimsical bathroom styling. By displaying a mix of practical items and quirky decor pieces, you can create a personalized and visually interesting space. The key is to combine different textures, colors, and objects—such as plants, candles, jars, and small art pieces—to achieve a curated yet playful look.
This idea is trending on Pinterest because it allows for creativity and flexibility. Shelves can be easily updated with seasonal decor or new accessories, keeping the bathroom fresh and exciting. They also maximize vertical space, making them ideal for small bathrooms. When styled thoughtfully, floating shelves become a focal point that reflects your personality while maintaining organization.
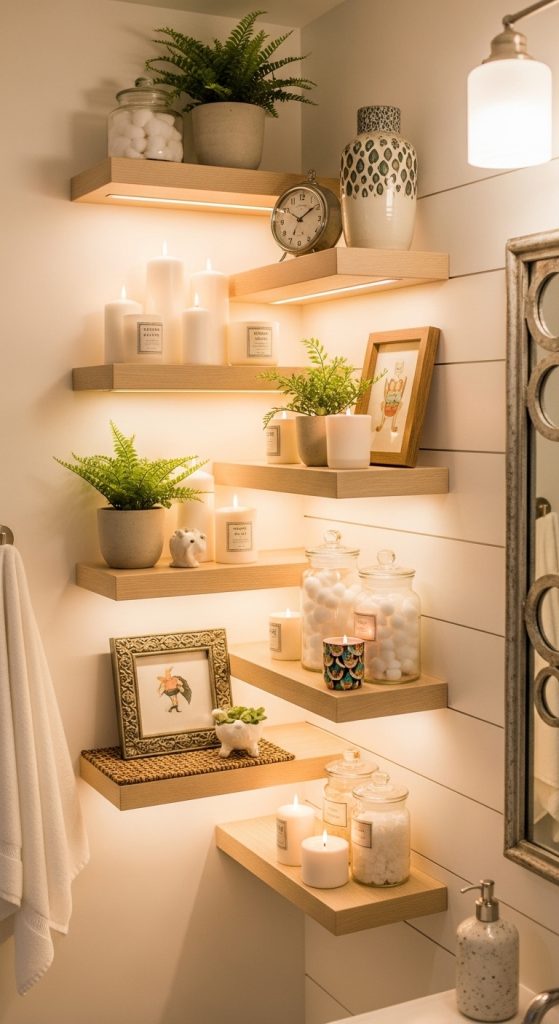
Step-by-Step How-to Style Floating Shelves
- Install Shelves: Mount shelves securely on the wall.
- Choose Decor Items: Mix functional items with decorative pieces.
- Layer Objects: Place larger items at the back and smaller ones in front.
- Add Greenery: Include small plants for a fresh, lively touch.
- Maintain Balance: Avoid overcrowding by leaving some empty space.
Materials Needed
- Floating shelves
- Wall mounting hardware
- Decorative jars, candles, or art
- Small plants
- Storage baskets
Idea 5: Vintage Ladder Towel Rack
Introduction
A vintage ladder used as a towel rack is a creative and charming way to add whimsy to your bathroom. Instead of traditional hooks or bars, a ladder introduces a rustic, unexpected element that doubles as decor. This idea blends functionality with style, making it both practical and visually appealing.
This concept is popular on Pinterest because it transforms an everyday object into a statement piece. A wooden ladder adds warmth and texture, contrasting beautifully with modern bathroom elements. It’s also a great way to display towels in an organized yet stylish manner. Whether you choose a distressed finish for a rustic look or paint the ladder in a bold color for a playful vibe, this idea offers endless customization options.
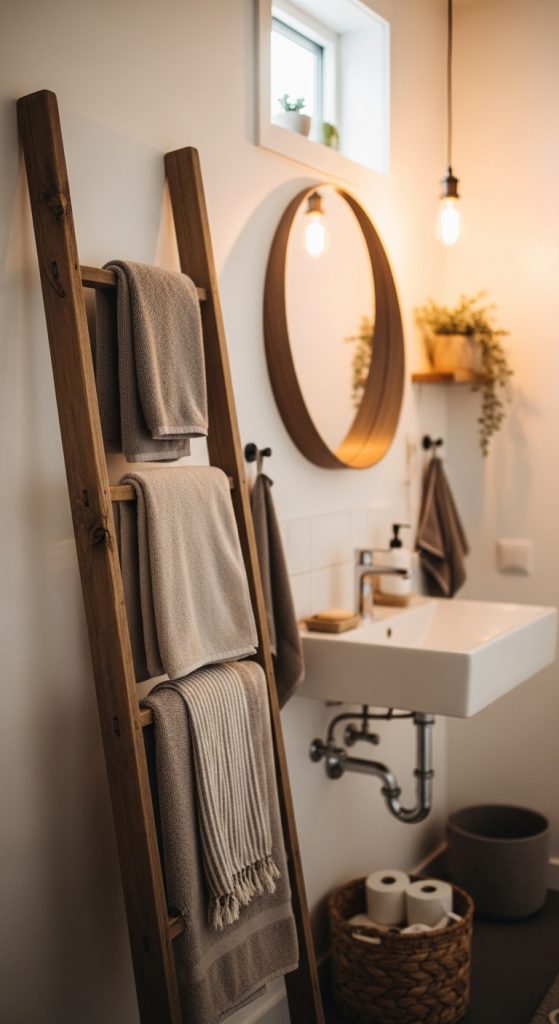
Step-by-Step How-to Create a Ladder Towel Rack
- Choose a Ladder: Select a sturdy wooden ladder.
- Clean and Prep: Sand and clean the surface if needed.
- Paint or Finish: Customize with paint or stain.
- Position the Ladder: Lean it securely against the wall.
- Hang Towels: Drape towels over the rungs neatly.
Materials Needed
- Wooden ladder
- Sandpaper
- Paint or wood stain
- Towels
- Optional: Wall anchors for safety
Idea 6: Pastel Painted Vanity with Gold Accents
Introduction
A pastel-painted vanity paired with gold accents is the perfect blend of soft whimsy and elegant charm. This idea transforms a basic bathroom cabinet into a statement piece that instantly brightens the space. Soft hues like blush pink, mint green, lavender, or baby blue create a dreamy, lighthearted atmosphere, while gold hardware adds a touch of sophistication and contrast. This combination is trending on Pinterest because it feels both playful and luxurious at the same time.
This design works especially well in small bathrooms where a single standout element can define the entire aesthetic. The pastel tones keep the space feeling open and airy, while the gold details catch the light and add warmth. It’s also a highly customizable idea—you can choose colors that match your personality or coordinate with existing decor. Whether you prefer a subtle transformation or a bold refresh, this vanity upgrade offers a simple yet impactful way to introduce whimsy into your bathroom.
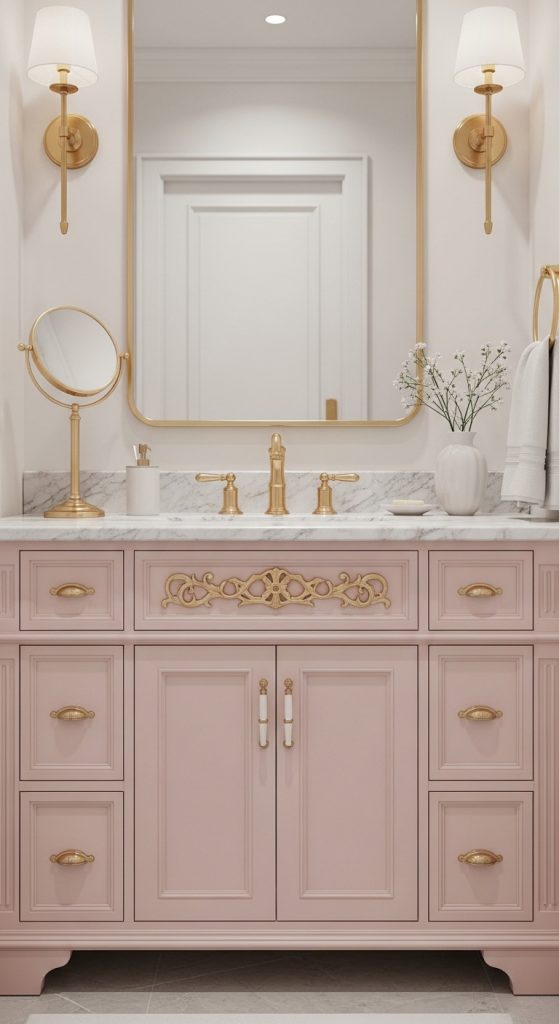
Step-by-Step How-to Create a Pastel Vanity
- Prepare the Surface: Remove cabinet doors and clean thoroughly to remove grease or residue. Lightly sand surfaces for better paint adhesion.
- Apply Primer: Use a high-quality primer to ensure smooth and long-lasting color.
- Paint the Vanity: Apply 2–3 coats of pastel paint, allowing each coat to dry completely.
- Update Hardware: Replace old handles with gold knobs or pulls for a chic contrast.
- Seal the Finish: Use a protective sealant to prevent moisture damage.
- Style the Top: Add minimal decor like a tray, candle, or small plant to complete the look.
Materials Needed
- Sandpaper
- Primer
- Pastel paint (blush, mint, lavender, etc.)
- Gold cabinet handles or knobs
- Paintbrush or roller
- Sealant
- Decorative tray or small accessories
Idea 7: Whimsical Wallpaper Feature Wall
Introduction
Wallpaper is one of the easiest ways to inject personality into a bathroom, and whimsical patterns take it to the next level. From abstract prints and botanical designs to quirky illustrations and dreamy motifs, wallpaper can instantly transform a plain wall into a piece of art. This idea is highly popular on Pinterest because it creates a bold visual statement while still being relatively easy to install and update.
A whimsical wallpaper feature wall works best when balanced with simple fixtures and neutral tones elsewhere in the room. It allows you to experiment with bold patterns without overwhelming the space. This is especially useful in apartments or small bathrooms where full renovations may not be possible. Peel-and-stick wallpaper options make this project beginner-friendly and renter-approved, offering flexibility and creativity.
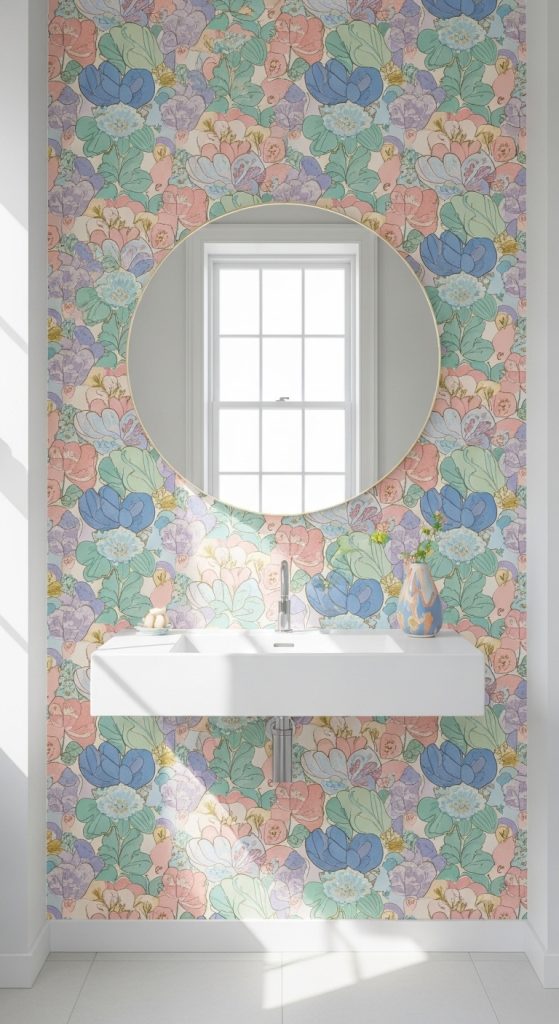
Step-by-Step How-to Apply Wallpaper
- Choose Your Design: Select a pattern that reflects your style—floral, abstract, or playful prints.
- Measure the Wall: Calculate how much wallpaper you’ll need.
- Prepare the Surface: Clean and smooth the wall to ensure proper adhesion.
- Apply Wallpaper: Start from the top and work downward, smoothing out air bubbles.
- Trim Edges: Use a cutter for clean edges around corners and fixtures.
- Style Around It: Keep surrounding decor minimal to let the wallpaper shine.
Materials Needed
- Wallpaper (peel-and-stick or traditional)
- Measuring tape
- Utility knife or cutter
- Smoothing tool or cloth
- Adhesive (if required)
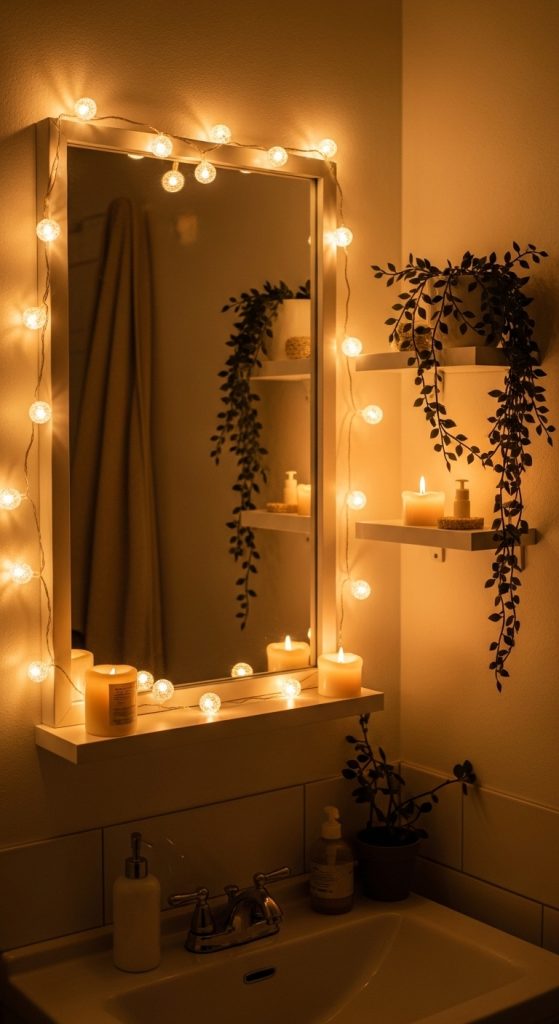
Idea 8: Decorative Lighting with Fairy Lights or LED Glow
Introduction
Lighting has the power to completely change the mood of a bathroom, and whimsical lighting takes that transformation even further. Adding fairy lights, LED strips, or soft glowing fixtures creates a dreamy, magical atmosphere that feels cozy and unique. This idea is especially popular on Pinterest because it enhances both aesthetics and ambiance without requiring major renovations.
Whimsical lighting works beautifully in small bathrooms, where even subtle changes can have a big impact. Wrapping fairy lights around mirrors, placing LED strips under shelves, or adding soft glowing fixtures creates layers of light that feel warm and inviting. This type of lighting is perfect for relaxing baths, evening routines, or simply adding a touch of personality to your space. It’s also highly customizable, allowing you to experiment with warm tones, cool hues, or even color-changing options.
Step-by-Step How-to Add Whimsical Lighting
- Choose Lighting Type: Select fairy lights, LED strips, or small decorative fixtures.
- Plan Placement: Decide where lighting will have the most impact (mirror, shelves, ceiling edges).
- Install Securely: Use adhesive hooks or clips to position lights neatly.
- Test Lighting: Adjust brightness and placement for the desired effect.
- Layer the Look: Combine different light sources for depth and dimension.
- Keep It Safe: Ensure all electrical elements are suitable for bathroom use.
Materials Needed
- Fairy lights or LED strips
- Adhesive hooks or clips
- Extension cords (if needed)
- Optional: Smart lighting controller
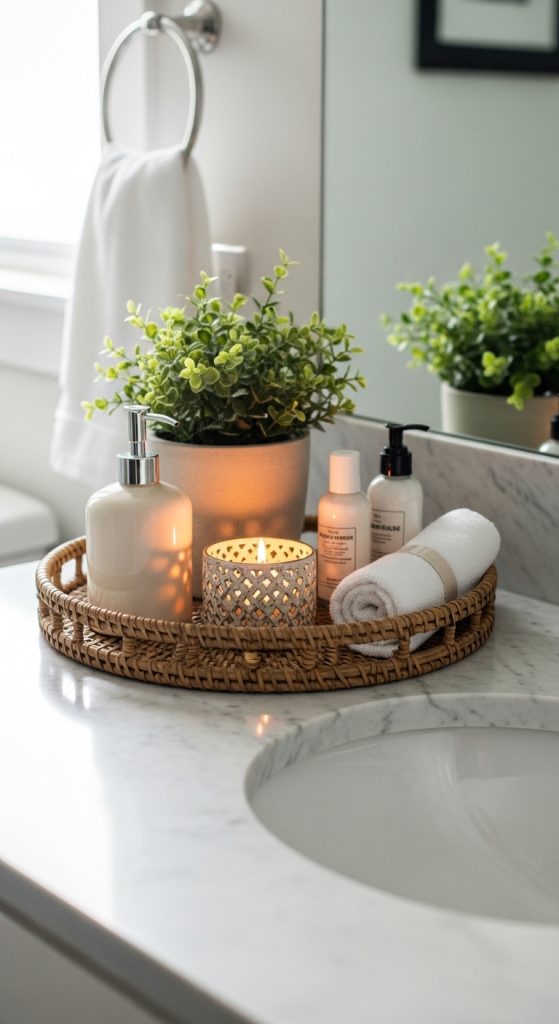
Idea 9: Artistic Sink Accessories and Display Trays
Introduction
Small details often make the biggest difference, and artistic sink accessories are a perfect example of this. Swapping out basic soap dispensers, toothbrush holders, and trays for more creative designs can instantly elevate your bathroom’s look. This idea focuses on turning everyday essentials into decorative elements, adding charm and personality without overwhelming the space.
On Pinterest, styled sink areas are highly popular because they are visually appealing and easy to recreate. Using trays to organize items creates a clean, curated look while allowing you to showcase unique pieces. Materials like ceramic, glass, marble, or wood can be mixed to create texture and interest. This approach is perfect for those who want a subtle yet effective way to introduce whimsy into their bathroom.
Step-by-Step How-to Style Sink Accessories
- Choose a Tray: Select a decorative tray as a base for organization.
- Add Essentials: Place soap dispensers, toothbrush holders, and small containers on the tray.
- Mix Materials: Combine different textures like glass, wood, and metal.
- Add Decor: Include a small plant, candle, or decorative item.
- Keep It Balanced: Avoid overcrowding by limiting the number of items.
- Maintain Cleanliness: Regularly wipe and organize the area.
Materials Needed
- Decorative tray
- Soap dispenser
- Toothbrush holder
- Small jars or containers
- Candle or plant
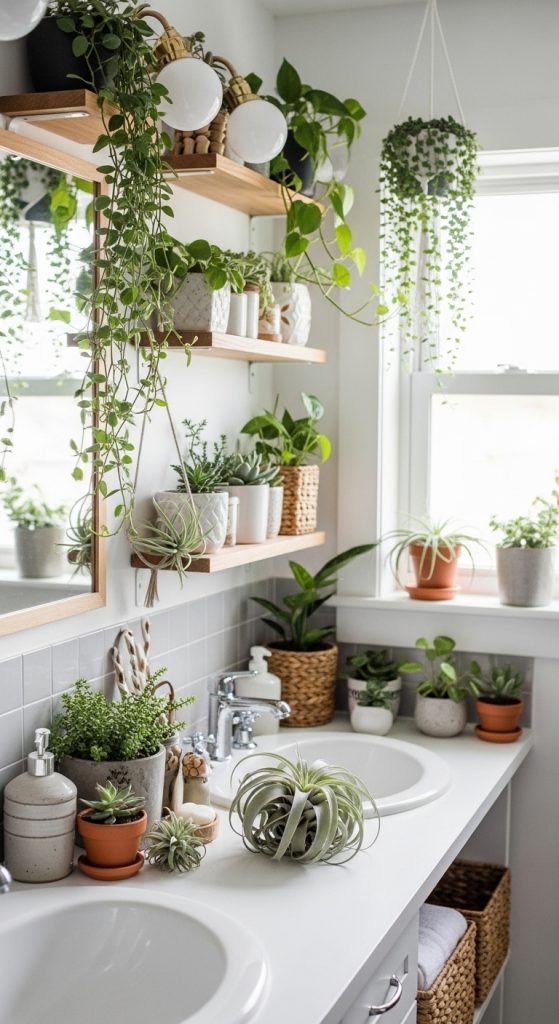
Idea 10: Mini Indoor Plants for a Fresh Whimsical Touch
Introduction
Adding mini indoor plants to your bathroom is one of the simplest yet most effective ways to create a whimsical and refreshing atmosphere. Plants bring life, color, and a natural element that balances playful decor. Whether placed on shelves, windowsills, or countertops, greenery enhances the overall aesthetic while making the space feel calm and inviting.
This idea is widely loved on Pinterest because it combines beauty with wellness. Plants thrive in bathroom environments due to humidity, making them a practical choice as well. Small potted plants, hanging vines, or even faux greenery can be used depending on maintenance preferences. The addition of decorative pots—such as patterned, pastel, or uniquely shaped ones—adds an extra layer of whimsy and creativity.
Step-by-Step How-to Style Bathroom Plants
- Choose Plants: Select low-maintenance plants like pothos, ferns, or succulents.
- Pick Pots: Use decorative pots that match your theme.
- Place Strategically: Position plants on shelves, counters, or window areas.
- Layer Heights: Mix small and slightly taller plants for visual interest.
- Maintain Care: Water and clean plants regularly.
- Enhance Decor: Pair plants with candles or small decorative items.
Materials Needed
- Indoor plants (real or faux)
- Decorative pots
- Watering can
- Plant tray or stand
- Optional: Hanging planters