Attics are some of the most underutilized spaces in a home, often filled with forgotten boxes, old furniture, or simply empty air. Yet with the right vision, an attic can be transformed into a modern, functional, and stylish area without breaking the bank. Budget-friendly attic makeovers combine creativity, smart storage solutions, and DIY-friendly techniques to turn what was once an overlooked space into the heart of your home.
The appeal of an attic makeover lies in its potential for versatility. Whether you want a cozy reading nook, a minimalist home office, a guest bedroom, or a playful lounge, a thoughtful design can maximize space while reflecting your personal style. Modern design emphasizes clean lines, light color palettes, functional furniture, and subtle accents—qualities that make even small or oddly shaped attic spaces feel open, organized, and inviting.

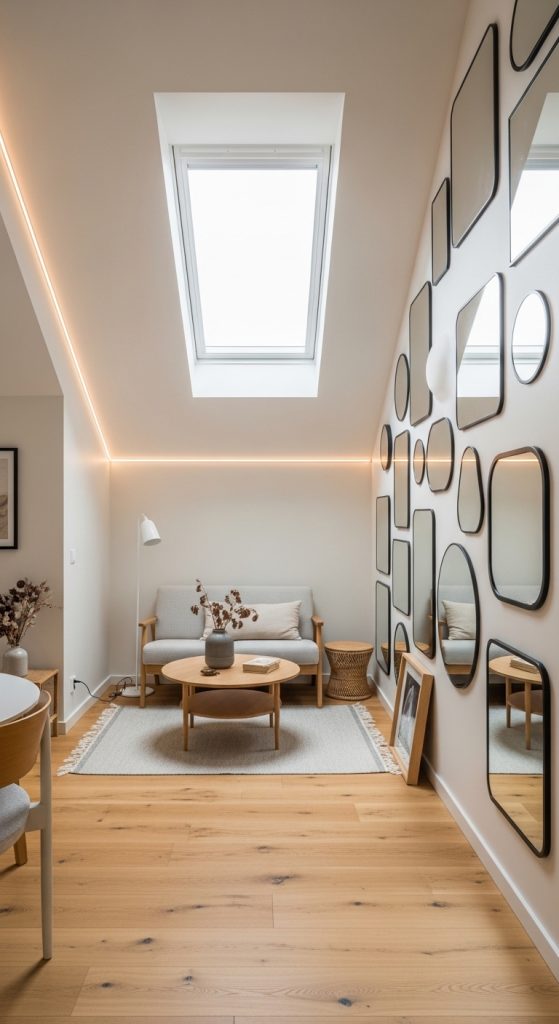
Neutral tones are key in budget-friendly attic renovations. Whites, soft grays, creams, and muted beiges not only make the space appear brighter and larger but also provide a versatile backdrop for furniture and decor. Natural light, if available through skylights or dormer windows, enhances the airy feel. If light is limited, strategic lighting choices—such as string lights, affordable floor lamps, or DIY sconces—can create warmth and a modern aesthetic.
Maximizing an attic’s layout requires thoughtful planning. Sloped ceilings, exposed beams, and irregular shapes can be challenging, but they also offer unique opportunities for design. Custom-built furniture might be expensive, but modular pieces, low-profile shelving, and repurposed items can provide both function and style on a budget. Vertical space is especially important: wall-mounted shelves, hanging organizers, and loft-style storage help keep clutter off the floor while maintaining open sightlines.
Textures and materials play an essential role in budget-conscious attic makeovers. Rugs, cushions, throws, and lightweight curtains in soft fabrics can make the space feel cozy without heavy investment. DIY options—like painting old furniture, repurposing crates, or using peel-and-stick wallpaper—allow personalization and cost savings. Even inexpensive lighting, combined with mirrors or light-colored walls, can dramatically change the perception of space.
A modern attic makeover also emphasizes multi-functionality. With limited square footage, furniture that doubles as storage, convertible seating, or modular desks ensures that every inch serves a purpose. A reading nook might include a bench with hidden compartments, while a home office could feature a wall-mounted fold-down desk. Keeping the design minimalist and clutter-free ensures that the space feels larger and more inviting.
Budget-friendly attic design doesn’t mean sacrificing aesthetics. With a focus on neutral palettes, functional furniture, DIY decor, and smart lighting, attics can be transformed into visually pleasing, cozy, and practical spaces. Small touches—like hanging artwork, adding houseplants, or layering textiles—can elevate the look without adding significant cost.
In this guide, we will explore detailed attic makeover ideas designed to help you create a modern, stylish space while staying on a budget. Each idea includes a clear introduction, step-by-step instructions, and a materials list, making it easy for anyone to implement. By the end of this section, you will have actionable solutions for transforming your attic into a functional, modern, and inviting part of your home without overspending.
Whether your attic is small, cramped, or oddly shaped, these budget-friendly strategies will show you how to maximize light, optimize storage, and create a modern aesthetic that feels intentional, comfortable, and Pinterest-ready.
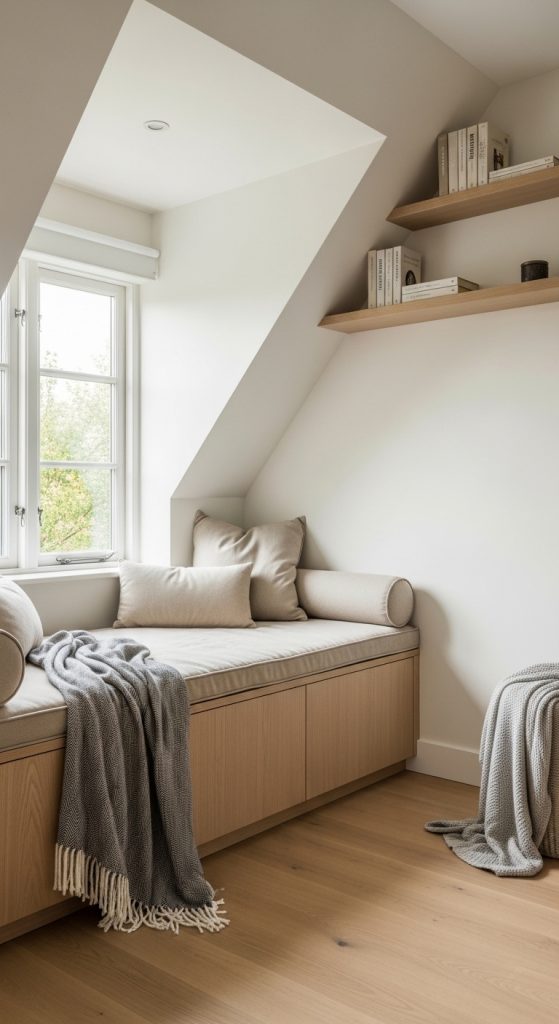
1. Cozy Reading Nook with Built-in Window Seat
Introduction
Attics are perfect for creating a cozy reading nook, especially under dormer windows or sloped ceilings. A built-in window seat instantly transforms an unused corner into a warm and inviting space without requiring expensive furniture. Opting for a neutral palette—soft beige cushions, light gray throws, and cream-colored walls—keeps the area feeling modern and airy. Adding inexpensive storage under the seat, like open cubbies or hidden drawers, maximizes functionality, allowing you to store books, blankets, or seasonal items.
A reading nook in the attic combines comfort, style, and practicality. Layering textures with soft cushions, a small rug, and wall-mounted shelves adds dimension without overwhelming the space. Even budget-friendly LED string lights or a small floor lamp can create soft ambient lighting that makes the nook feel cozy and inviting. Using existing windows and natural light reduces the need for additional fixtures, making the makeover cost-effective while retaining a modern aesthetic.
Clear Explanation
A built-in window seat with storage creates a functional and stylish reading area. Neutral tones, layered textures, and efficient use of space make the attic feel open, cozy, and Pinterest-worthy on a budget.
Step-by-Step How-To
- Measure the width and depth of your window or sloped wall.
- Construct a simple wooden frame using plywood or repurposed boards.
- Add a cushioned bench using foam and a neutral fabric cover.
- Include hidden drawers or cubbies beneath for storage.
- Layer cushions and a throw for comfort.
- Add wall-mounted shelves or small LED lamps for reading light.
Materials Needed
- Plywood or repurposed wood boards
- Foam cushion and neutral fabric
- Drawer slides (optional)
- Wall brackets for shelves
- LED string lights or small lamp
2. Neutral Accent Wall with Budget Paint or Peel-and-Stick Panels
Introduction
A simple accent wall can dramatically transform an attic without major construction. Using soft neutral tones like muted beige, gray, or cream keeps the space bright while introducing modern depth. Budget-friendly options such as paint or peel-and-stick wood/laminate panels make this project accessible to almost any homeowner. Accent walls draw the eye upward, highlighting unique attic features like sloped ceilings or exposed beams, and provide a backdrop for furniture or wall decor.
This approach allows homeowners to introduce subtle personality while staying within a minimalist budget. Even a small wall section behind a bed, reading nook, or desk can create visual interest. DIY-friendly peel-and-stick panels can mimic the look of expensive materials like shiplap or reclaimed wood, giving the attic a modern aesthetic without overspending. Combined with complementary neutral tones on adjacent walls, an accent wall elevates the overall design while maintaining an airy and cohesive feel.
Clear Explanation
Neutral accent walls using affordable paint or peel-and-stick panels provide depth, interest, and a modern look while keeping costs low.

Step-by-Step How-To
- Choose a wall or sloped section for the accent.
- Select a neutral paint or peel-and-stick panel in your preferred shade.
- Prep the wall (clean, sand, prime if needed).
- Apply paint or adhere panels according to instructions.
- Finish edges neatly with painter’s tape or trim.
- Add minimal wall decor or lighting to highlight the wall.
Materials Needed
- Neutral paint or peel-and-stick panels
- Painter’s tape
- Roller or paintbrush
- Level (for panel alignment)
- Optional trim pieces
3. Low-Cost Skylight or Reflective Light Enhancement
Introduction
Attics often struggle with limited natural light. Installing an affordable skylight is ideal but can be costly, so budget-friendly alternatives include reflective surfaces, mirrors, or light tubes. Even small skylight upgrades or reflective panels on sloped ceilings can brighten dark corners, making the attic feel larger and more modern. Pairing neutral wall colors with reflective surfaces amplifies available light, enhancing the open, airy aesthetic.
Light optimization is particularly important in attics because dark, cramped spaces can feel claustrophobic. By using mirrors strategically or light-colored paint on ceilings and walls, homeowners can achieve a bright and inviting modern look without extensive construction. Adding inexpensive LED strip lights or wall-mounted lamps can further enhance illumination, creating a functional and visually appealing space suitable for a home office, lounge, or reading nook.
Clear Explanation
Enhancing natural or reflective light in the attic improves visibility, creates a modern airy feel, and keeps costs low with mirrors, light-colored paint, or small skylight upgrades.
Step-by-Step How-To
- Identify areas that are dark or poorly lit.
- Add wall-mounted mirrors or reflective surfaces opposite light sources.
- Use light neutral paint on walls and sloped ceilings.
- Consider budget-friendly skylight kits or light tubes for extra daylight.
- Supplement with LED strip lights or plug-in wall lamps for ambient light.
- Arrange furniture to maximize exposure to light.
Materials Needed
- Wall-mounted mirrors or reflective panels
- Neutral paint
- LED strip lights or lamps
- Optional budget skylight or light tube
- Painter’s tape and basic tools
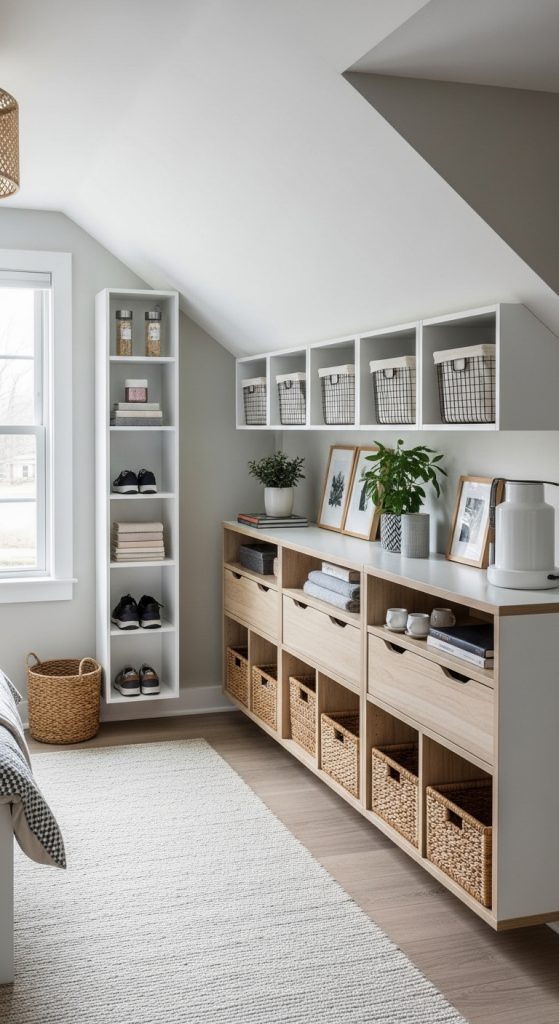
4. DIY Loft-Style Storage Solutions
Introduction
Attics often suffer from limited floor space, making smart storage essential. Loft-style storage—using vertical shelving, hanging racks, or wall-mounted cubbies—maximizes usable space without cluttering the floor. Neutral-colored shelving units, bins, and baskets maintain a clean, modern look. These budget-friendly solutions allow for organized storage of seasonal clothing, toys, books, or decor, while keeping the attic visually appealing.
Utilizing vertical space is particularly effective in sloped-ceiling attics, where low-profile shelves or floating cubbies can fit under eaves. DIY-friendly options include repurposing wooden crates, stacking modular shelving units, or building simple plywood wall-mounted cubbies. This creates multi-functional storage that is easy to maintain, flexible, and cost-effective. Neutral tones unify the space, preventing visual chaos and maintaining a bright, open feel.
Clear Explanation
Loft-style or vertical storage solutions maximize space in sloped attics while keeping a modern, budget-friendly aesthetic.
Step-by-Step How-To
- Identify underutilized vertical space (walls, eaves, corners).
- Choose budget-friendly shelves, crates, or cubbies in neutral tones.
- Install securely with brackets, anchors, or stacking units.
- Organize items into baskets or bins for a clean look.
- Maintain an uncluttered arrangement to preserve airy feel.
Materials Needed
- Modular shelving units, crates, or plywood boards
- Wall brackets or anchors
- Neutral storage baskets or bins
- Screws and screwdriver
- Measuring tape
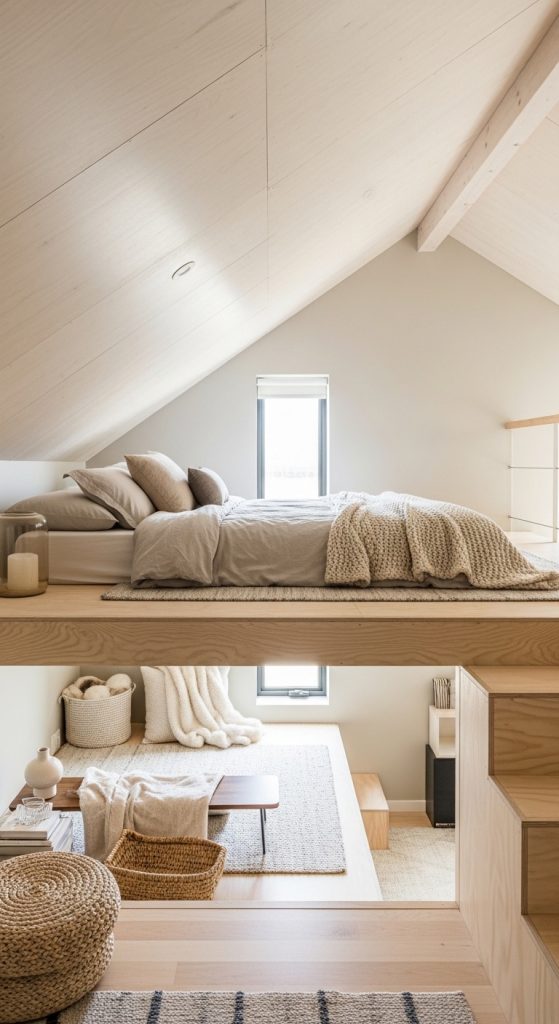
5. Budget-Friendly Loft Bed or Platform Space
For attic bedrooms or multi-functional spaces, a loft bed or raised platform provides both sleeping and storage areas without occupying excessive floor space. Budget-friendly designs can use plywood, MDF, or repurposed wood to construct platforms, reducing the need for expensive pre-made furniture. Neutral bedding, soft rugs, and simple curtains under the loft can create cozy corners for work, play, or lounging.
A loft bed or platform maximizes vertical space, particularly useful in sloped-ceiling attics. Open space underneath can serve as a study area, mini-lounge, or storage. The design remains modern with clean lines, light wood or white finishes, and minimalist decor. DIY-friendly options, combined with budget-conscious materials, allow homeowners to achieve a functional, stylish space without overspending.
Clear Explanation
Loft beds or platforms optimize vertical space in attics, providing multifunctional living areas that are practical, modern, and budget-friendly.
Step-by-Step How-To
- Measure available floor and ceiling height for loft or platform.
- Choose sturdy but inexpensive materials (plywood or MDF).
- Build platform frame with supportive legs and braces.
- Add ladder or steps for access.
- Arrange mattress and bedding in neutral tones.
- Utilize under-platform space for storage, desk, or seating.
Materials Needed
- Plywood or MDF boards
- Screws, brackets, and supports
- Ladder or steps
- Mattress and neutral bedding
- Storage bins or desk (optional)
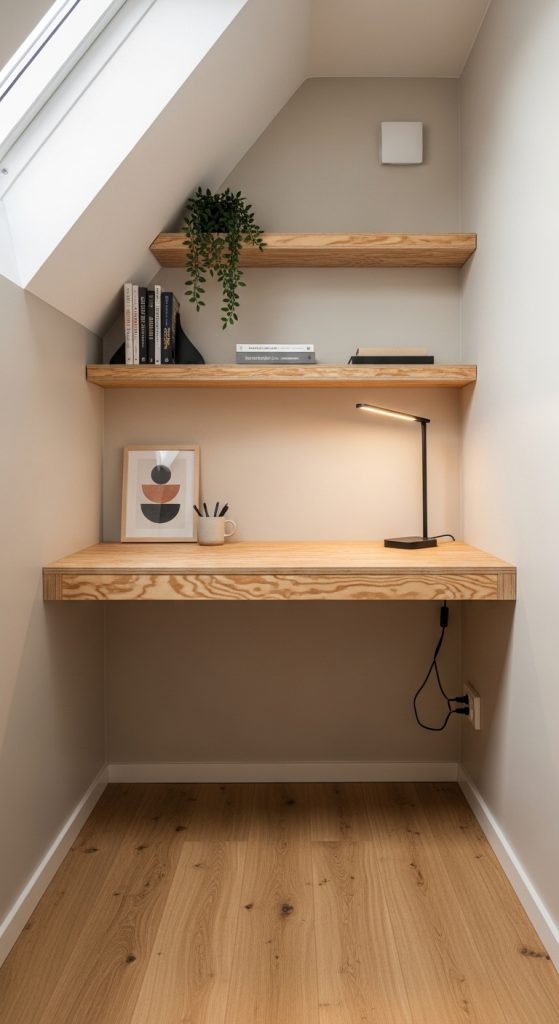
6. DIY Attic Home Office Corner
Introduction
Transforming a small attic corner into a modern home office can be surprisingly budget-friendly. Even sloped ceilings or tight spaces can accommodate a compact desk and functional storage if designed carefully. Neutral tones such as soft white, beige, or light gray walls keep the area bright, while inexpensive DIY desks, shelves, and floating organizers make the corner both functional and stylish.
A modern home office in the attic maximizes space efficiency. DIY floating shelves, pegboards, or wall-mounted storage baskets allow organization without crowding the floor. Adding a small budget-friendly chair with a neutral cushion and a simple LED desk lamp completes the setup. Utilizing existing natural light or affordable task lighting ensures a bright, welcoming workspace. This approach emphasizes clean lines, minimal decor, and functional storage—core elements of modern attic design. By carefully arranging furniture and accessories, even the tiniest corner can feel spacious, stylish, and ready for productivity without overspending.
Clear Explanation
A budget-friendly DIY attic office corner combines neutral colors, smart vertical storage, and minimalist furniture, creating a functional modern workspace in small spaces.
Step-by-Step How-To
- Measure the corner and ceiling height for desk placement.
- Build or repurpose a small desk using plywood or an old table.
- Install floating shelves or wall-mounted baskets for storage.
- Add a comfortable budget-friendly chair with neutral cushion.
- Position a small LED desk lamp or task light.
- Decorate minimally with a small plant or notebook organizer.
Materials Needed
- Plywood or small desk
- Wall-mounted shelves or baskets
- Chair with cushion
- LED desk lamp
- Neutral decor items (plant, small organizer)
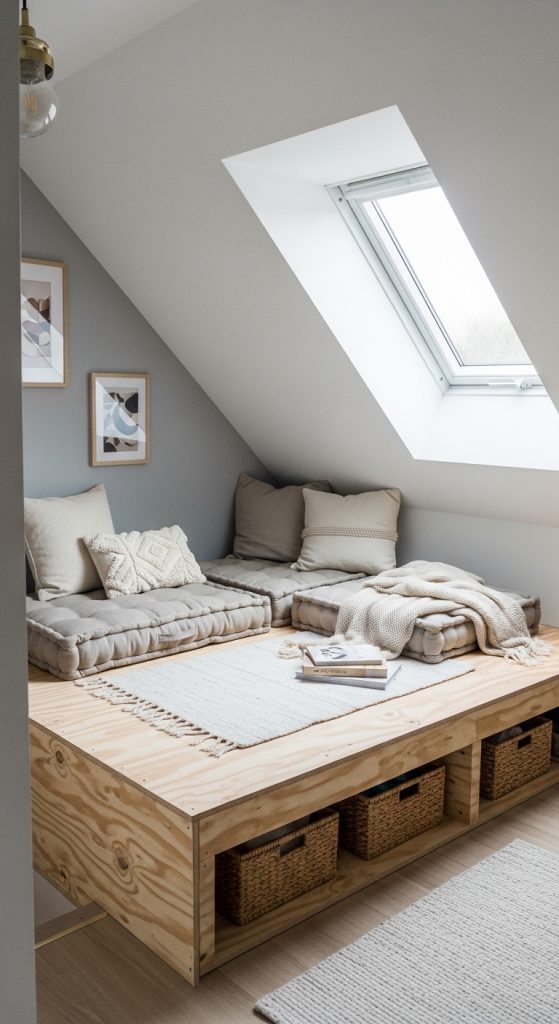
7. Affordable Attic Reading Loft with Cushions
Introduction
A reading loft is a perfect attic upgrade on a budget, turning an underused area into a cozy retreat. Using inexpensive plywood platforms or low-cost furniture, you can create a raised reading space under sloped ceilings or near dormer windows. Neutral-toned cushions, throws, and rugs add comfort and a modern aesthetic.
This design makes use of vertical attic space without cluttering the floor. The loft can serve multiple purposes: a reading nook, a small play area, or additional sleeping space. Incorporating budget-friendly storage underneath—like baskets, crates, or small cabinets—keeps the area organized. Layering textures with cushions, throws, and a rug adds warmth and coziness while maintaining a minimalist neutral palette. Proper lighting, whether natural from skylights or simple LED string lights, completes the look, creating an inviting space that is practical, stylish, and cost-effective.
Clear Explanation
A DIY reading loft maximizes attic vertical space, adds comfort and functionality, and maintains a modern aesthetic on a budget.
Step-by-Step How-To
- Measure the loft area and ceiling clearance.
- Build a simple plywood platform raised off the floor.
- Add neutral cushions and throws for comfort.
- Place a rug or mat to define the loft space.
- Include baskets or crates underneath for storage.
- Add lighting with string lights or small LED fixtures.
Materials Needed
- Plywood for platform
- Cushions and throws in neutral tones
- Small rug or mat
- Storage baskets or crates
- LED string lights or lamp
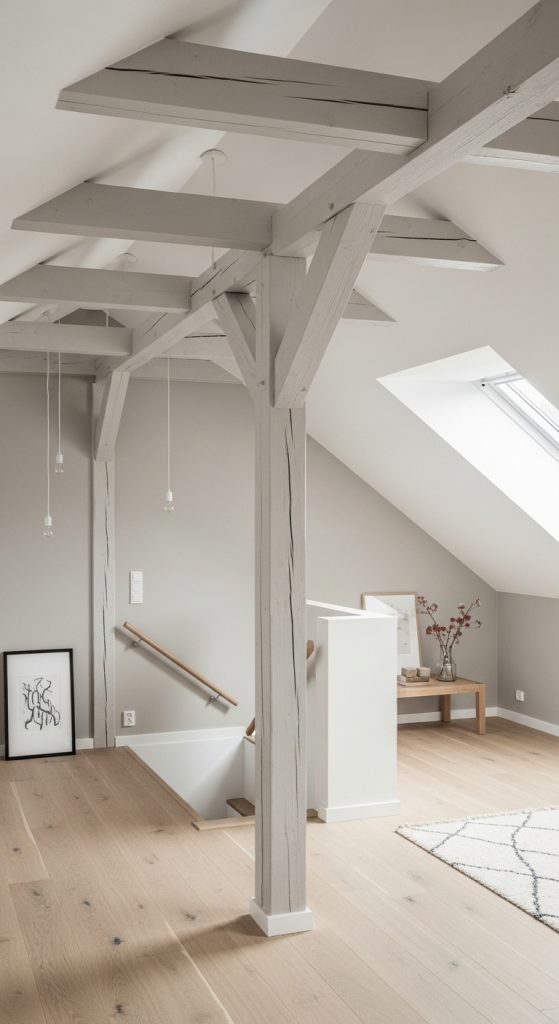
8. Exposed Beam Accent with Budget-Friendly Paint
Introduction
Exposed beams are a hallmark of attic character, and modernizing them on a budget can transform the space. Instead of replacing beams, consider painting them in a neutral tone or whitewash effect to maintain a modern aesthetic. This approach highlights architectural features while blending them seamlessly into the room’s overall palette.
Budget-friendly attic makeovers often involve minimal structural changes, making painted beams an ideal choice. Highlighting beams with a light neutral shade increases visual height and enhances the airy, modern feel. Even small decorative elements, like hanging minimal pendant lights or attaching wall-mounted shelves to beams, enhance the design. This cost-effective technique transforms traditional or old beams into a chic feature without extensive renovation.
Clear Explanation
Neutral-painted beams add architectural interest, highlight attic structure, and integrate modern aesthetics on a budget without heavy construction costs.
Step-by-Step How-To
- Clean the beams and lightly sand surfaces.
- Apply primer if needed to ensure paint adhesion.
- Paint or whitewash beams in soft neutral tones.
- Allow to dry and apply a second coat if necessary.
- Optional: Install minimal lighting or small shelves attached to beams.
Materials Needed
- Paint or whitewash in neutral tone
- Primer (optional)
- Paintbrushes or rollers
- Sandpaper
- Ladder for beam access
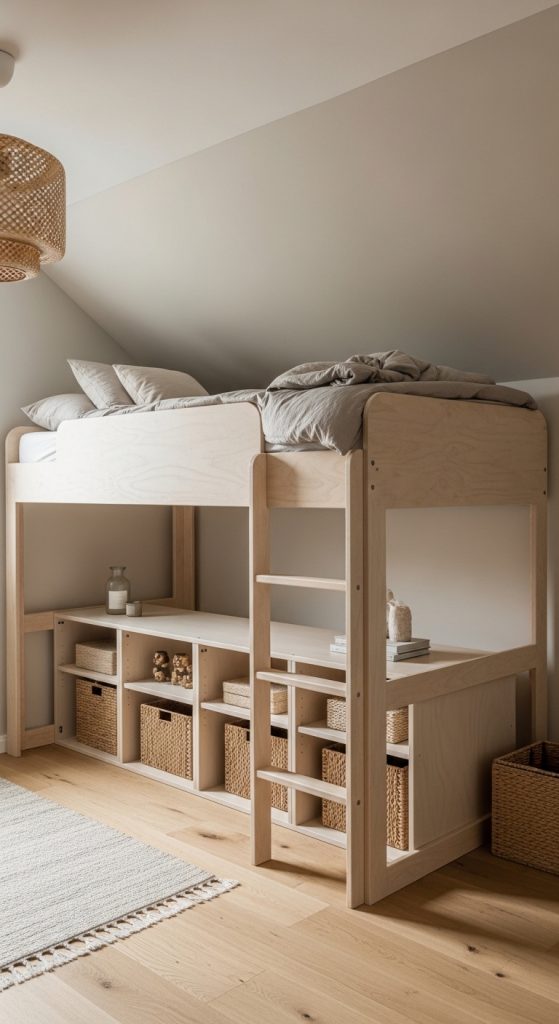
9. DIY Attic Loft Bed with Under Storage
Introduction
Attic bedrooms often have limited floor space, making a loft bed an ideal modern, budget-friendly solution. A simple DIY loft bed frame using plywood or MDF creates sleeping space above while leaving room underneath for storage, a small desk, or a cozy lounge area. Neutral bedding, rugs, and minimalist decor maintain a modern aesthetic.
A loft bed maximizes functionality, particularly in smaller attics. Affordable construction materials and DIY assembly keep costs low while creating a practical sleeping area. Under-bed storage using crates, bins, or shelves ensures the space remains organized and clutter-free. The result is a functional, stylish attic bedroom that maintains a modern minimalist look without expensive furniture purchases.
Clear Explanation
A DIY loft bed optimizes attic vertical space, offering both a sleeping area and functional storage while remaining stylish and budget-conscious.
Step-by-Step How-To
- Measure ceiling height and floor area for loft bed placement.
- Construct a simple plywood or MDF loft frame with sturdy supports.
- Add mattress and neutral bedding on top.
- Use storage bins, shelves, or a small desk under the loft.
- Optional: Add minimalist railing or safety barrier on top.
- Keep decor minimal for modern, airy look.
Materials Needed
- Plywood or MDF boards
- Screws, brackets, and supports
- Mattress and bedding
- Storage bins or crates
- Optional railing
10. Budget-Friendly Attic Lounge with Floor Cushions
Introduction
Floor cushions and low seating create a cozy, flexible attic lounge without expensive furniture. Neutral-toned cushions, poufs, and rugs can transform an empty attic into a modern relaxation area. Layering textures, such as soft cotton cushions and woven rugs, adds comfort while maintaining an uncluttered aesthetic.
A lounge using floor seating is ideal for budget-conscious makeovers because it requires minimal investment and can be rearranged easily. Adding small side tables, inexpensive shelving, or hanging string lights enhances functionality and visual appeal. The neutral color palette keeps the space bright and airy, and natural light from skylights or dormer windows enhances the open feel. This solution provides a versatile attic area for reading, playing, or relaxing without spending much, making it perfect for modern budget-friendly design.
Clear Explanation
Floor cushions and layered textures create a budget-friendly modern lounge, optimizing attic space for comfort, flexibility, and style.
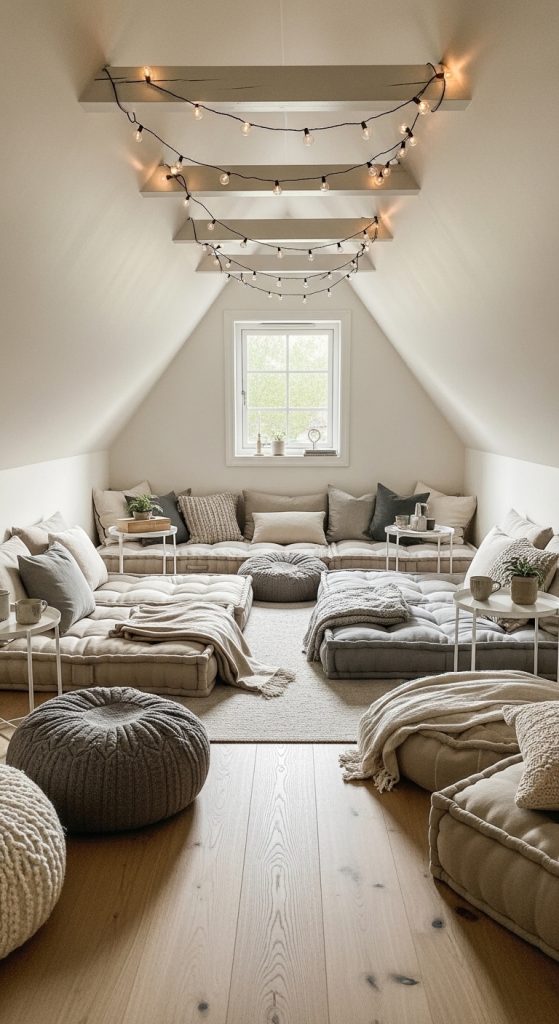
Step-by-Step How-To
- Choose a neutral area rug as a base.
- Place large floor cushions or poufs in a semi-circle.
- Add small side tables or crates for functionality.
- Layer throws and pillows for comfort.
- Install string lights or lamps for ambient lighting.
- Keep decor minimal to maintain airy modern aesthetic.
Materials Needed
- Floor cushions or poufs
- Neutral rug
- Throws and pillows
- Small side tables or crates
- String lights or small lamps
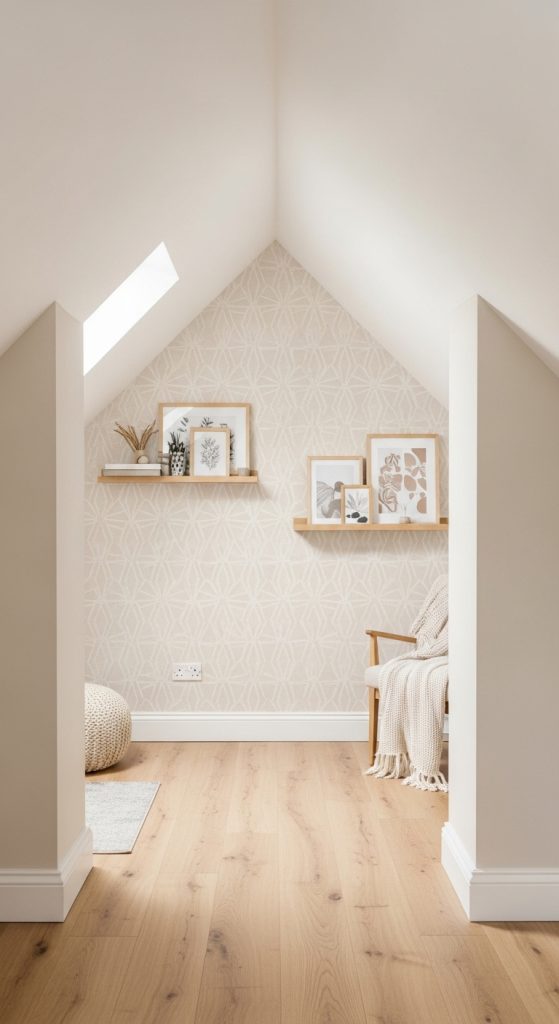
11. DIY Neutral Accent Wall with Removable Wallpaper
Introduction
An accent wall instantly elevates an attic without major renovation costs. Using budget-friendly, removable wallpaper in soft neutral tones—like muted beige, light gray, or taupe—creates a modern focal point while maintaining a bright, airy feel. This is particularly effective for small or sloped attics where painting a whole wall might feel overwhelming.
Removable wallpaper offers flexibility, making it perfect for renters or those who want to experiment with texture and patterns without long-term commitment. Subtle geometric designs, linen textures, or light wood patterns add dimension and depth, complementing minimalist furniture and décor. Pairing the accent wall with neutral furniture, soft textiles, and minimal accessories maintains a cohesive modern aesthetic. The wall can act as a backdrop for a bed, reading nook, desk area, or gallery-style display, enhancing functionality and style simultaneously.
By choosing light tones and simple patterns, this inexpensive solution makes the attic feel larger, brighter, and more inviting. Even small DIY touches, like adding budget-friendly wall shelves, framed prints, or string lights, can further enhance the accent wall while keeping costs low. The combination of neutral color, texture, and functional style makes this attic makeover idea both practical and Pinterest-worthy.
Clear Explanation
A neutral removable wallpaper accent wall provides a modern, budget-friendly focal point in the attic, enhancing style and functionality while keeping the space light and airy.
Step-by-Step How-To
- Measure the wall area and choose a removable wallpaper pattern in neutral tones.
- Prep the wall: clean, smooth, and dry.
- Align wallpaper at the top, peeling backing gradually while smoothing downward.
- Use a smoothing tool to remove bubbles and wrinkles.
- Trim excess wallpaper at edges with a sharp utility knife.
- Optional: Install small floating shelves, framed prints, or string lights to enhance the accent wall.
Materials Needed
- Removable wallpaper in neutral tones
- Measuring tape
- Level tool
- Smoothing tool or plastic card
- Utility knife
- Optional small shelves or wall décor