Summer is the perfect season to experiment with bright colors, playful patterns, and creative nail designs that reflect your personality and mood. With sunny days, beach trips, and casual outdoor events, your nails become a canvas for self-expression. The best part? You don’t need to visit a salon to achieve gorgeous, Instagram-worthy nails—many stunning summer designs can be done at home using simple tools and a bit of creativity.

At-home nail art has grown incredibly popular because it allows you to control your style, experiment freely, and save money while still creating polished, professional-looking results. Easy summer nail designs can range from bold neon shades and pastel gradients to intricate florals, fruit-inspired motifs, and abstract patterns that capture the carefree, vibrant essence of the season. Whether you’re looking for something minimalistic or dramatic, there’s a summer nail design for every personality and occasion.
The beauty of DIY summer nails is their flexibility. You can start with basic nail polish and gradually incorporate more tools like dotting pens, thin brushes, or nail stickers. Even beginners can create striking designs with step-by-step guidance. By following easy techniques, you can achieve salon-quality results in the comfort of your home, saving time and money while having fun.
Summer nails also serve as a confidence booster. Bright, lively designs instantly enhance your overall look and give you a mood lift. They can complement your summer wardrobe, swimwear, or even accessories, creating a cohesive, stylish appearance from fingertips to toes. Whether you’re attending a picnic, pool party, or casual brunch, a fun summer nail design makes your hands stand out in a positive, playful way.
In addition to aesthetic appeal, experimenting with at-home nails encourages creativity and relaxation. Nail art is therapeutic, giving you time to focus, experiment with color combinations, and enjoy a form of self-expression that is both quick and rewarding. It’s also a fun way to involve friends or family—imagine hosting a mini summer nail night where everyone shares ideas and creates designs together.
In this guide, you’ll discover easy summer nail inspiration ideas that are beginner-friendly, budget-conscious, and stylish. Each design includes step-by-step instructions and a full list of materials needed, so you can replicate them easily at home. From fruity patterns and neon pops to subtle ombrés and abstract lines, these ideas are perfect for summer aesthetics and are optimized to be Pinterest-friendly, save-worthy, and visually appealing.
By the end of this guide, you’ll have endless inspiration to make your nails a reflection of summer’s brightness, fun, and creativity. Whether you want subtle elegance or bold, eye-catching designs, these at-home summer nail ideas will keep your nails trendy, playful, and ready for every seasonal adventure.
1. Bright Neon Tips with Clear Base
Introduction
Neon tips are one of the boldest and most playful summer nail trends. They instantly make your nails pop and bring a fun, energetic vibe to your look. Instead of the classic French manicure, which uses soft white tips, neon tips use vibrant shades like electric pink, lime green, neon orange, or bright yellow. The clear base keeps your nails looking fresh and clean while ensuring the neon tips stand out, perfect for summer festivals, beach days, or even casual brunches with friends.
This design is beginner-friendly because you can use simple tools like tape guides or a thin brush to create crisp, straight lines, giving your nails a professional finish without needing salon skills. Neon tips also complement any nail shape, whether square, oval, almond, or coffin, and can be combined with optional glitter or a subtle shimmer for extra glamour.
Neon shades are also highly reflective under sunlight, making them perfect for outdoor summer activities. This design allows endless customization—you can alternate colors, create ombre neon tips, or even pair them with small summer decals like suns or palm leaves.
Explanation
A clear or nude base is applied first, followed by neon polish painted onto the tips. Optional glitter or topcoat can enhance shine and durability.
Step-by-Step How-To
- Prep Nails: File, buff, and clean nails for a smooth surface.
- Base Coat: Apply a clear base coat to protect your natural nails.
- Neon Tips: Use tape guides or a thin brush to paint neon polish along the tips. For a more playful look, alternate neon colors on different nails.
- Clean Edges: Use a small brush dipped in nail polish remover to perfect the lines.
- Optional Glitter: Add a thin line of glitter polish above the neon tips for sparkle.
- Topcoat: Seal with a clear topcoat for shine and durability.
Materials Needed
- Clear base coat
- Neon nail polish (pink, green, orange, yellow)
- Nail file and buffer
- Tape guides or thin brush
- Glitter polish (optional)
- Clear topcoat
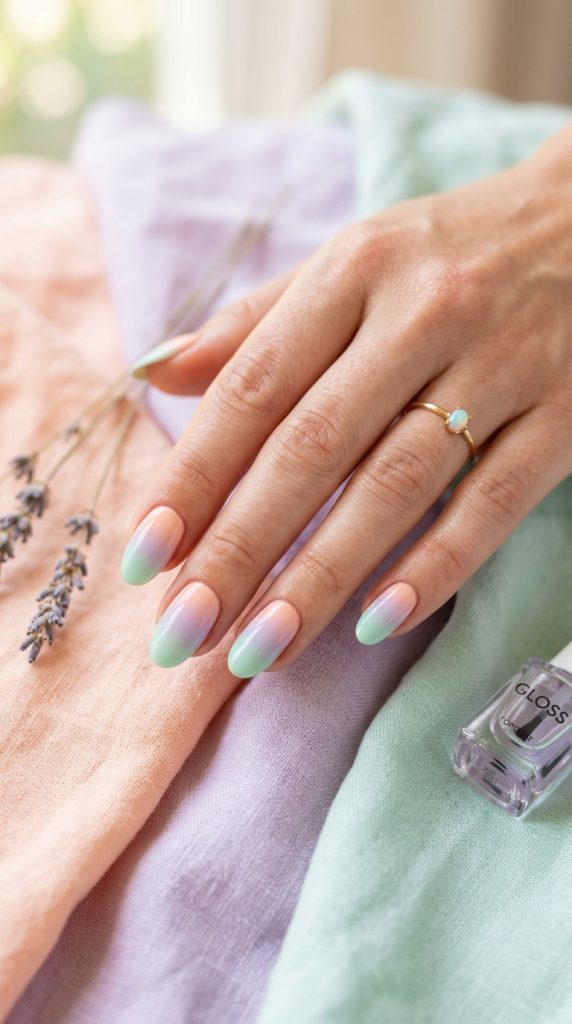
2. Ombre Pastel Summer Nails
Introduction
Ombre pastel nails are dreamy and elegant, offering a soft gradient that captures the essence of summer. Popular combinations include peach blending into lilac, mint fading into sky blue, or soft pink transitioning into baby yellow. This design is perfect for anyone who wants chic, sophisticated nails without bold colors overwhelming their style. Pastel ombre nails work well for daily wear, summer weddings, or casual outings, creating a fresh, polished look.
The gradient effect gives the illusion of longer nails and is surprisingly easy to achieve at home. Using a makeup sponge to blend two or three pastel shades allows you to create a seamless transition without any specialized tools. This design is forgiving for beginners because slight imperfections blend naturally into the gradient. You can also enhance the nails with subtle glitter or tiny decals to add personal flair.
Pastel ombre nails not only look beautiful under natural sunlight but also complement summer fashion trends, such as flowy dresses, beachwear, or bright accessories. This versatile style can be adapted for any nail length or shape.
Explanation
Two or more pastel shades are blended from base to tip using a sponge, creating a smooth gradient effect.
Step-by-Step How-To
- Prep Nails: File, shape, and buff nails for smooth application.
- Base Coat: Apply a clear or white base coat to enhance pastel colors.
- Prepare Sponge: Paint strips of pastel colors onto a makeup sponge in gradient order.
- Apply Gradient: Press the sponge gently onto nails to transfer the colors. Repeat until opacity is achieved.
- Clean Edges: Use a small brush dipped in nail polish remover to clean cuticles and sides.
- Topcoat: Apply a clear topcoat to blend the colors further and add shine.
Materials Needed
- Base coat
- Pastel nail polishes (2–3 shades)
- Makeup sponge
- Small clean-up brush
- Clear topcoat
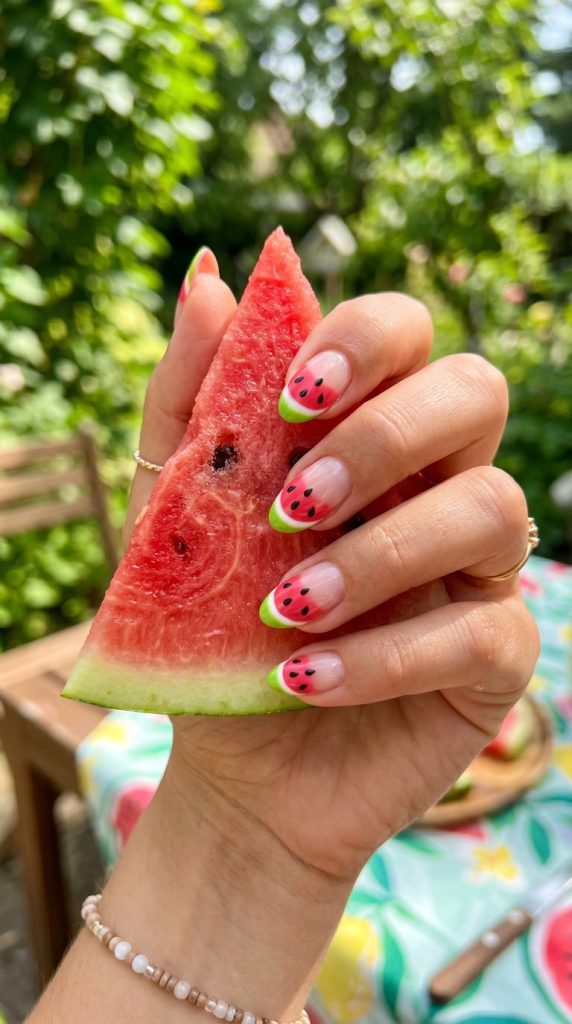
3. Watermelon Slice Nail Art
Introduction
Watermelon nails are fun, whimsical, and perfect for summer. This design features pink or red tips to mimic the juicy flesh, a thin green line for the rind, and small black dots resembling seeds. The playful, fruit-inspired design is ideal for pool parties, summer picnics, or simply adding a cheerful touch to your daily look.
Watermelon nails are easy to customize: you can apply them on all nails or make a single accent nail. The design works best on medium-length nails to allow enough space for the detailed fruit pattern. Using a dotting tool or a toothpick for seeds ensures precision and neat results. Adding a glossy topcoat gives the nails a juicy, realistic look, enhancing the summer vibe.
This design allows creativity—you can alternate watermelon colors, add glitter, or combine with pastel shades for a fun, fruity manicure.
Explanation
Tips are painted like watermelon slices: pink/red center, green edge, and black seed dots.
Step-by-Step How-To
- Prep Nails: File, buff, and clean nails.
- Base Coat: Apply a clear or light green base coat.
- Paint Tips: Use pink or red polish for the flesh of the watermelon.
- Add Green Edge: Paint a thin green line along the tip for the rind.
- Add Seeds: Use a dotting tool or toothpick to place small black dots.
- Topcoat: Seal with clear topcoat for shine and longevity.
Materials Needed
- Clear base coat
- Pink/red polish
- Green polish
- Black polish
- Dotting tool or toothpick
- Clear topcoat
4. Minimalist Summer Line Nails
Introduction
Minimalist line nails are perfect for a modern, understated summer look. Thin lines in bright or metallic colors on a nude or pastel base add sophistication without overwhelming your nails. This design is versatile and works for workdays, casual outings, or a summer night out.
The beauty of line nails is in their simplicity. You can place vertical, horizontal, or diagonal lines and even combine two colors for an interesting effect. Minimalist designs are beginner-friendly because you only need a thin brush or striping tape. They are also forgiving—slightly uneven lines still look stylish.
This design pairs well with summer fashion trends, such as flowy dresses, sandals, or casual shorts, offering a chic manicure that complements your look without stealing focus.
Explanation
A nude or clear base is enhanced with thin colored lines using a striping brush or tape.

Step-by-Step How-To
- Prep Nails: File and buff nails for a smooth base.
- Base Coat: Apply nude or clear base coat.
- Draw Lines: Use a thin brush or striping tape to create straight lines vertically, diagonally, or horizontally.
- Accent Options: Add small triangles or dots for variety.
- Topcoat: Seal with clear topcoat for shine and durability.
Materials Needed
- Nude or clear base coat
- Colored nail polish for lines
- Thin striping brush or striping tape
- Clear topcoat
5. Polka Dot Summer Nails
Introduction
Polka dots are timeless, playful, and ideal for summer nails. This design allows you to experiment with color combinations—pastel bases with white dots, bright yellow with black dots, or rainbow patterns for extra fun. Polka dots are beginner-friendly, easy to replicate, and suitable for both casual and party occasions.
Dots can be randomly scattered or precisely lined up. You can apply them on all nails or just use an accent nail. Using a dotting tool or toothpick ensures neat, uniform dots. This simple design creates a cheerful, vibrant manicure without complicated techniques.
Polka dots pair beautifully with other designs such as stripes, pastel gradients, or fruit motifs, giving endless summer-inspired options.
Explanation
Dots are created on a base color using a dotting tool for uniform or playful patterns.

Step-by-Step How-To
- Prep Nails: File and buff for a smooth surface.
- Base Coat: Apply pastel or bright base color.
- Add Dots: Use dotting tool or toothpick dipped in contrasting polish.
- Arrange: Place dots evenly or randomly depending on your style.
- Topcoat: Seal with clear topcoat to protect the design and add shine.
Materials Needed
- Base coat
- Base color polish
- Contrasting color polish
- Dotting tool or toothpick
- Clear topcoat
6. Tropical Palm Tree Accent Nail
Introduction
Tropical palm tree nails instantly bring a beach vibe to your fingertips. Usually, one accent nail is painted with a sunset gradient background and a small black palm tree silhouette. Other nails can be painted in complementary pastel or neutral shades. This design is ideal for pool parties, beach vacations, or summer photoshoots.
Palm tree nails are beginner-friendly with either thin brushes or nail stickers. The gradient background gives a professional look while the palm silhouette adds a playful summer touch. This design can be adapted to multiple nail lengths, and adding a glossy topcoat enhances its sunset effect.
Explanation
Gradient background simulates a sunset; black polish creates palm tree silhouette.

Step-by-Step How-To
- Prep Nails: File and buff nails for smooth application.
- Base Coat: Apply clear or light base coat.
- Gradient: Use a sponge to blend sunset colors (yellow, orange, pink) on accent nail.
- Palm Tree: Draw palm tree silhouette with thin brush or use nail sticker.
- Other Nails: Paint solid complementary colors.
- Topcoat: Seal with clear topcoat for shine and durability.
Materials Needed
- Base coat
- Sunset gradient polishes (yellow, orange, pink)
- Black polish for tree
- Thin brush or nail sticker
- Clear topcoat
7. Neon Stripes Nails
Introduction
Neon stripes are bold, modern, and perfect for summer energy. Multiple thin neon stripes over nude or white nails create a playful yet chic look. Stripes can run horizontal, vertical, or diagonal, allowing customization. Using tape or a thin brush helps beginners achieve precise lines.
This design is highly versatile—you can mix different neon colors on each nail or create alternating patterns. Neon stripes are especially eye-catching under sunlight, making your manicure stand out during summer outings or festivals.
Explanation
Colored stripes are painted over a nude base using striping tape or thin brush.

Step-by-Step How-To
- Prep Nails: File, buff, and clean nails.
- Base Coat: Apply nude or white polish.
- Apply Tape/Draw Lines: Use striping tape or freehand lines with thin brush.
- Paint Neon Stripes: Fill in with neon polishes.
- Remove Tape: Peel off carefully after drying.
- Topcoat: Seal for shine and durability.
Materials Needed
- Base coat
- Nude/white polish
- Neon polishes
- Striping tape or thin brush
- Clear topcoat
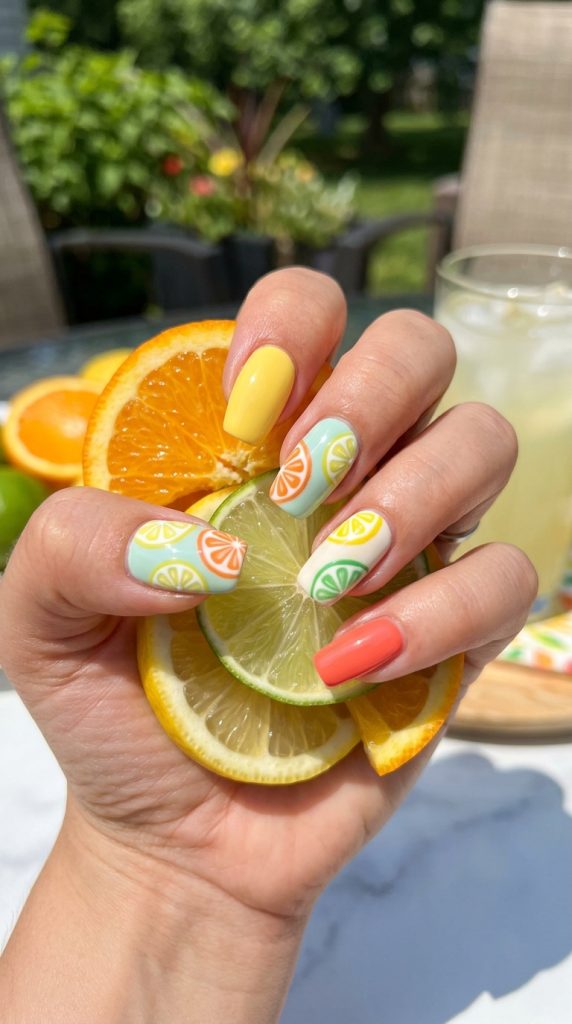
8. Citrus Fruit Nail Art
Introduction
Citrus fruit nails bring bright, playful summer energy. Accent nails feature painted slices of oranges, lemons, or limes on a neutral or white base, while other nails remain solid for balance. This fun design is perfect for poolside days, picnics, or summer parties.
Citrus nails are beginner-friendly with small brushes or dotting tools. You can customize colors and patterns to match your mood or outfit. Adding a glossy topcoat mimics juicy fruit texture and enhances realism.
Explanation
Accent nails feature fruit slices painted over a neutral base using small brushes or dotting tools.
Step-by-Step How-To
- Prep Nails: File and buff nails.
- Base Coat: Apply neutral or white polish.
- Paint Fruit Slices: Use thin brush or dotting tool to create circles and lines for citrus segments.
- Other Nails: Keep solid pastel or bright colors.
- Topcoat: Apply clear topcoat for shine and durability.
Materials Needed
- Base coat
- White/neutral polish
- Citrus colors (yellow, orange, green)
- Thin brush or dotting tool
- Clear topcoat
9. Glitter Gradient Nails
Introduction
Glitter gradient nails add sparkle to summer without being overwhelming. Glitter is concentrated at tips or base, fading toward the middle, creating a subtle but festive look. This design is perfect for pool parties, brunches, or everyday summer glam.
Beginner-friendly methods include using a sponge to apply glitter for smooth gradient blending. Glitter gradient nails are versatile—you can choose chunky glitter for dramatic effect or fine glitter for a delicate shimmer.
Explanation
Glitter polish is applied at tips or base over a pastel or nude base, fading towards the center.

Step-by-Step How-To
- Prep Nails: File, buff, and clean nails.
- Base Coat: Apply pastel or nude base polish.
- Apply Glitter: Use sponge or brush to concentrate glitter at tips/base and blend.
- Repeat: Add layers if needed for intensity.
- Topcoat: Seal with clear polish for shine and durability.
Materials Needed
- Base coat
- Pastel/nude polish
- Glitter polish
- Makeup sponge or brush
- Clear topcoat
10. Polished White with Neon Accent
Introduction
A simple white base with a neon accent nail is a stylish, easy-to-do summer design. The white nails act as a blank canvas for neon colors to pop. You can add stripes, dots, or small decals on the neon accent nail for extra flair. This design is beginner-friendly, modern, and versatile for casual or formal summer events.
White and neon combinations pair well with summer outfits and accessories, making your manicure coordinated and eye-catching.
Explanation
White polish on all nails except one accent nail painted in neon; optional small design on accent nail.

Step-by-Step How-To
- Prep Nails: File, buff, and clean.
- Base Coat: Apply clear coat.
- White Polish: Paint all nails except accent nail.
- Neon Accent: Paint one nail neon; add optional design.
- Topcoat: Apply clear topcoat for shine and durability.
Materials Needed
- Base coat
- White polish
- Neon polish
- Striping brush/dotting tool (optional)
- Clear topcoat
11. Rainbow Summer Nails
Introduction
Rainbow summer nails are one of the most cheerful and effortless nail designs you can create at home. This look is perfect for summer because it captures the vibrant energy of the season with bright, colorful shades. Instead of painting every nail the same color, each nail features a different shade from the rainbow, creating a playful and eye-catching manicure.
This design is extremely beginner-friendly because it doesn’t require complicated techniques, tools, or drawing skills. All you need is a few bright nail polishes and a bit of patience while applying each layer evenly. The finished look is bold, fun, and perfect for summer vacations, beach trips, festivals, or casual everyday wear.
Rainbow nails also allow you to experiment with different color palettes. You can choose traditional rainbow shades like red, orange, yellow, green, blue, and purple, or create a softer pastel rainbow for a more subtle look. Some people even add glitter or tiny decals to one or two nails for extra sparkle.
Because each nail is a different color, rainbow nails automatically create a lively manicure that pairs beautifully with summer outfits, sandals, and colorful accessories.
Explanation
Each nail is painted with a different bright shade to create a rainbow effect across your hand.

Step-by-Step How-To
- Prepare your nails: File and shape nails evenly, then gently buff the surface.
- Apply base coat: This protects your natural nails and helps polish last longer.
- Choose rainbow colors: Pick 5 different bright shades.
- Paint each nail: Apply a different color to every nail.
- Add second layer: Apply a second coat for stronger color and even coverage.
- Optional glitter: Add glitter polish to one nail for an accent effect.
- Seal with topcoat: Apply clear topcoat for shine and durability.
Materials Needed
- Nail file and buffer
- Base coat
- 5 colorful nail polishes
- Glitter polish (optional)
- Clear topcoat
12. Beach Wave Blue Nails
Introduction
Beach wave nails are inspired by the calming colors and movement of ocean water. This design captures the feeling of summer vacations, sandy beaches, and relaxing seaside views. Blue shades blended together create a wave-like pattern that looks both refreshing and elegant.
This manicure is perfect for people who love ocean-inspired aesthetics. It combines soft blues, white accents, and sometimes subtle shimmer to mimic the appearance of waves hitting the shore. Even though it looks artistic, the design is surprisingly easy to recreate at home with a sponge or small brush.
Beach wave nails are also very versatile. You can keep the design minimal with soft blue swirls or make it more dramatic by adding white foam lines or glitter accents that resemble sunlight reflecting on water.
Because blue shades are naturally calming, this nail design pairs beautifully with summer clothing such as denim, white outfits, and beachwear.
Explanation
Different shades of blue are blended together to create a wave-like pattern on the nails.

Step-by-Step How-To
- Prep nails: File and shape nails to your preferred style.
- Apply base coat: This protects nails and improves polish adhesion.
- Paint base color: Apply a light blue polish to all nails.
- Create waves: Use a thin brush or sponge to blend darker blue shades across the nail in curved patterns.
- Add foam detail: Use white polish to paint thin wave lines.
- Optional shimmer: Add a small amount of glitter polish for a sunlit water effect.
- Topcoat: Finish with a clear glossy topcoat.
Materials Needed
- Base coat
- Light blue nail polish
- Dark blue nail polish
- White nail polish
- Thin brush or makeup sponge
- Glitter polish (optional)
- Clear topcoat
13. Daisy Flower Summer Nails
Introduction
Daisy flower nails are a timeless summer manicure that feels fresh, feminine, and cheerful. Small white daisies painted over pastel or nude nails instantly create a soft floral design that perfectly suits warm weather. This design is very popular on Pinterest because it is simple yet incredibly pretty.
Daisy nails are also beginner-friendly since the flowers can be created using basic tools like a dotting tool or even a toothpick. The petals are made with small white dots arranged in a circle, and the center of the flower is usually a yellow dot. Despite its simplicity, the finished manicure looks detailed and delicate.
This design works beautifully on both short and medium-length nails. Some people prefer to add daisies to all nails, while others create just one or two accent nails for a minimalist look.
Daisy nail art pairs wonderfully with pastel summer outfits, floral dresses, and casual everyday styles. It’s perfect for picnics, brunches, or simply adding a sweet seasonal touch to your nails.
Explanation
Small daisy flowers are created using white dots for petals and a yellow center over a pastel or nude base.

Step-by-Step How-To
- Prepare nails: File and buff nails to smooth the surface.
- Apply base coat: Protect nails with a clear base coat.
- Paint base color: Apply pastel pink, nude, or light blue polish.
- Create petals: Use a dotting tool or toothpick to place five small white dots in a circle.
- Add flower center: Place a small yellow dot in the middle.
- Repeat design: Add daisies to multiple nails or just one accent nail.
- Topcoat: Apply a glossy topcoat to seal the design.
- Materials Need