Minecraft Survival mode transforms building into something deeply strategic, emotional, and rewarding. Unlike Creative mode, where unlimited blocks allow instant architectural masterpieces, Survival mode demands planning, resource management, and smart design decisions. Every block placed represents time, effort, and progress. That is why building a survival house is not just construction — it is survival strategy combined with creativity.
When you first spawn into a Minecraft world, your priorities are simple: gather wood, craft tools, build shelter before nightfall. Most players start with a dirt box or basic wooden cube. It protects from mobs, but it does not inspire. As you progress, however, your survival base becomes the heart of your world. It stores your diamonds. It protects your enchanted gear. It organizes your farms. It reflects your personality.

A well-designed survival house improves gameplay efficiency dramatically. Instead of scattered chests and messy crafting tables, you create systems. Instead of mob-spawning dark corners, you build properly lit safe zones. Instead of rebuilding every few days, you construct expandable bases that grow with your world.
Pinterest-worthy Minecraft builds focus on:
- Depth in walls (not flat surfaces)
- Block contrast (mixing wood, stone, glass)
- Roof variation (slabs + stairs layering)
- Landscaping (paths, flowers, fences)
- Functional layouts (storage zones, farms, crafting areas)
- Cohesive color palettes (spruce + stone, oak + cobble, dark oak + brick)
But here’s the key difference: in Survival, your materials depend on your biome. A spruce forest biome inspires different architecture than a desert biome. Mountains create vertical builds. Plains allow large farmhouses. Rivers encourage dock houses.
Your survival house should always answer these questions:
- Is it mob-proof?
- Is it well-lit?
- Is storage organized?
- Can it expand later?
- Does it match the environment?
- Is it efficient for daily tasks?
In this detailed guide, we will explore 10 fully developed Minecraft Survival World House Building Ideas. Each idea is designed to be practical, beginner-friendly, scalable, and visually appealing. You will find detailed introductions, material lists, layout planning, design explanation, and clear step-by-step building instructions.
Whether you are early game (wood + stone tools), mid-game (iron + enchantments), or moving toward late-game (nether access, redstone systems), these ideas will help you build smarter and better.
Let’s begin with Idea #1.
1. Starter Wooden Survival House
Introduction
The Starter Wooden Survival House is the foundation of most successful Minecraft worlds. It is simple enough for day one construction yet expandable enough to remain useful for weeks of gameplay. The goal of this build is not luxury — it is efficiency, safety, and organization. Many players underestimate how important their first structured base is. A properly designed starter house reduces chaos, saves time, and protects early-game resources.
This house works best in plains, forest, or taiga biomes where wood is abundant. The key to making it Pinterest-worthy is adding depth and variation. Instead of flat plank walls, you use log pillars. Instead of a flat roof, you use layered stairs. Instead of random torches, you plan lighting placement. These small design decisions transform a beginner box into a charming survival cottage.
This build focuses on:
- Quick construction
- Efficient 9×9 layout
- Organized storage
- Expandable back wall
- Safe lighting coverage
Let’s break it down properly.
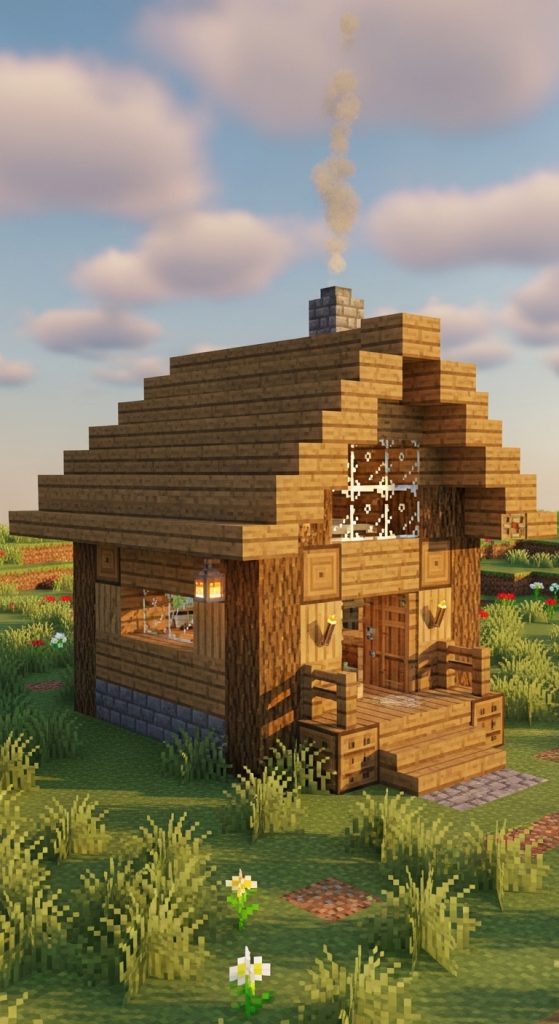
What This Build Is
A 9×9 wooden survival house with:
- Raised foundation
- Log corner pillars
- Slanted stair roof
- Front porch
- Organized interior zones
It is designed for early-game materials only.
Materials List
- 64 Oak Logs
- 128 Oak Planks
- 40 Cobblestone
- 20 Glass Panes
- 1 Wooden Door
- 16 Oak Stairs
- 8 Slabs
- 10 Torches
- 4 Chests
- 1 Crafting Table
- 2 Furnaces
- 1 Bed
Step-by-Step Building Guide
Step 1: Foundation Layout
Mark a 9×9 square on flat land.
Raise the floor one block above ground using oak planks. This prevents water flow issues and adds visual depth.
Add a 3-block-wide staircase entrance in the center front using slabs.
Step 2: Structural Frame
Place oak log pillars in all four corners.
Raise them 4 blocks high.
Then place additional vertical logs every 3 blocks along the walls to avoid flat surfaces.
This creates visual rhythm and stronger architecture.
Step 3: Wall Construction
Fill wall spaces with oak planks.
Leave 2-block-high window gaps on each side.
Install glass panes for light and mob visibility.
Step 4: Roof Design
Use oak stairs to create a slanted roof.
Extend stairs one block outward from walls to create overhang.
Add slab ridge on top to complete the roof peak.
This prevents the house from looking flat.
Step 5: Interior Organization
Divide the interior into zones:
Left wall → Storage wall (double chests stacked 2 high)
Back wall → Furnace + crafting zone
Right side → Bed + personal space
Place torches 2 blocks above ground spaced evenly to prevent mob spawning.
Expansion Tip
Leave the back wall easily breakable so you can extend the house into a larger base later.
This is how you build a starter house that feels intentional — not temporary.
2. Underground Survival Base
Introduction
The Underground Survival Base is one of the safest and smartest early-to-mid game housing strategies in Minecraft Survival mode. Instead of building outward, you build inward — using the terrain itself as protection. This dramatically reduces the number of blocks required while increasing security. Hostile mobs cannot easily detect or surround you, and creeper explosions are far less threatening compared to surface builds.
This design is perfect for players who spawn near mountains, hills, or even flat plains where digging straight down is safe. It’s also excellent for players who prefer hidden or secret bases. Underground bases can look simple at first, but with thoughtful lighting, wall texturing, and room division, they can feel modern, organized, and cozy instead of dark and cramped.
The biggest advantage of underground bases is scalability. You can start with one room and slowly expand into storage halls, enchanting rooms, farms, smelting stations, and even hidden Nether portals. With proper planning, this base becomes a long-term survival headquarters rather than just an early shelter.
Let’s break down how to build it correctly.

What This Build Is
A hidden underground base with:
- Secure staircase entrance
- 7×7 or 9×9 main chamber
- Organized storage section
- Separate crafting/smelting area
- Optional branch tunnels for expansion
It prioritizes security, resource efficiency, and long-term expansion.
Materials List
- Iron or Stone Pickaxe
- 40–60 Torches or Lanterns
- 2–4 Doors (or Iron Door for extra security)
- Ladders or Stairs
- 64 Stone Bricks (optional wall upgrade)
- 4–8 Chests
- 2 Furnaces
- Crafting Table
- Bed
- Trapdoor (optional hidden entrance)
Step-by-Step Building Guide
Step 1: Choosing the Entrance Location
Select a hillside or flat area near your spawn. Avoid digging straight down blindly. Instead, dig forward into a hill or create a staircase descending 3–5 blocks underground.
Create a 2-block wide staircase for easy movement. Use stairs (if available) for smoother travel.
For extra security:
- Place a door at the top.
- Or use a trapdoor flush with grass for a hidden entrance.
Step 2: Main Room Excavation
Dig out a 9×9 area.
Make ceiling height at least 3 blocks tall to prevent cramped feeling.
Immediately place torches every 4–5 blocks to prevent mob spawning. Lighting is critical underground.
Keep the floor flat and clean. Replace uneven dirt with stone or stone bricks for better aesthetics.
Step 3: Wall Design Upgrade (Optional but Recommended)
Instead of leaving raw stone walls, upgrade them:
- Alternate stone bricks with smooth stone.
- Add vertical log pillars every 3 blocks.
- Use slabs along the ceiling edges for depth.
This prevents the base from looking like a simple mining tunnel.
Step 4: Interior Zoning
Divide the space into functional areas:
Back Wall → Furnace & Smelting Station
Left Wall → Double Chest Storage System
Right Side → Bed + Personal Area
Center → Crafting Table & Open Space
Keep walking paths at least 2 blocks wide.
Step 5: Expansion Tunnels
From the main room, dig 3-block wide hallways leading to:
- Enchanting Room
- Strip Mine Entrance
- Auto Farm Area
- Nether Portal Chamber
This creates an organized underground network instead of random tunnels.
Lighting Strategy
Replace torches with lanterns once iron becomes available.
Space lighting evenly — dark corners cause mob spawns.
You can also embed glowstone in the ceiling for a cleaner look.
Long-Term Upgrade Ideas
- Add piston door hidden entrance.
- Build underground crop farm using water channels.
- Create glass ceiling skylight (if not too deep).
This base is efficient, safe, and expandable — perfect for players who prioritize practicality.
3. Mountain Cliff Survival House
Introduction
The Mountain Cliff Survival House combines natural defense with breathtaking aesthetics. Built directly into a mountainside, this house leverages elevation for protection and creates dramatic views across your Minecraft world. Unlike flat ground builds, cliff houses naturally prevent mob swarming and offer high visibility for spotting threats.
This type of survival house works best in mountain or extreme hills biomes. It requires patience because you must terraform and carve into the rock, but the final result is worth it. Large glass windows, layered balconies, and wooden supports make the structure feel architectural rather than accidental.
Cliff houses are ideal for mid-game players who already have iron tools and a steady resource supply. The build emphasizes depth, natural stone integration, and panoramic windows.
If designed correctly, your cliff house becomes a landmark in your survival world.
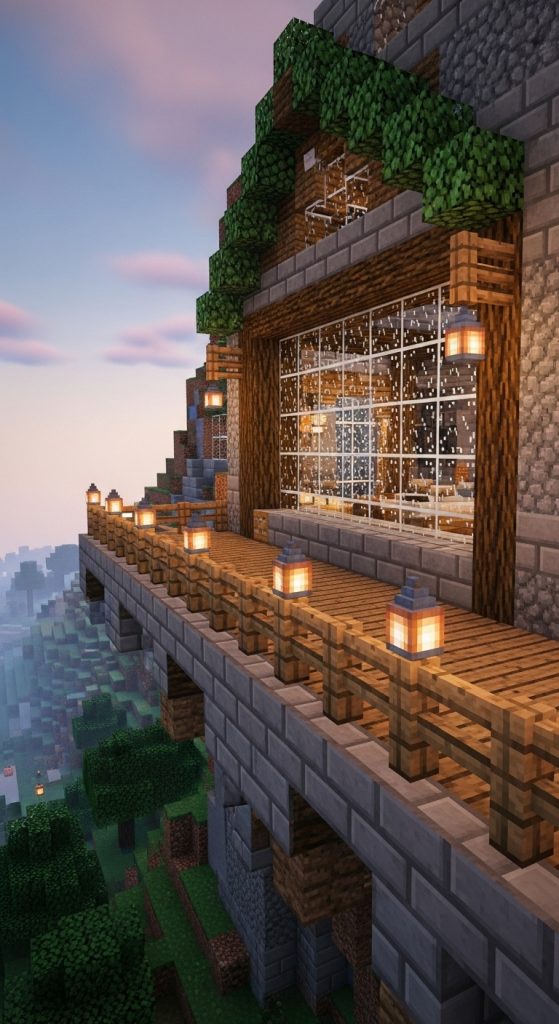
What This Build Is
A carved mountainside home featuring:
- Large panoramic glass wall
- Wooden balcony platform
- Layered roof
- Multi-room interior
- Natural stone blending
Materials List
- Iron Pickaxe
- 2 Stacks Stone
- 64 Stone Bricks
- 40 Spruce Logs
- 2 Stacks Spruce Planks
- 32 Glass Panes
- Lanterns
- Spruce Stairs & Slabs
- Fences
Step-by-Step Building Guide
Step 1: Selecting the Mountain Face
Find a relatively flat vertical section of mountain.
Avoid overhangs that could allow mobs to drop in from above.
Flatten a 10-block wide area on the surface.
Step 2: Carving the Interior
Dig 10 blocks inward.
Create a 10×7 main room with 4-block height ceiling.
Smooth the floor and ceiling.
Replace rough stone with stone bricks for contrast.
Step 3: Glass Wall Installation
Break out the entire front wall.
Install full glass pane wall for panoramic view.
Add vertical spruce log supports every 3 blocks for structure.
Step 4: Balcony Construction
Extend spruce slabs outward 4 blocks.
Add fence railing.
Place lanterns on fence posts for night lighting.
Step 5: Roof & Exterior Detail
Add stair overhang above glass wall.
Layer slabs to create slight roof curve.
Add decorative support beams underneath balcony.
Interior Layout
Back Wall → Storage
Left Side → Bedroom
Right Side → Enchanting Table Area
Center → Crafting & Smelting
Safety Tip
Light surrounding mountain ledges to prevent skeleton sniping.
This house feels cinematic and highly Pinterest-worthy while remaining survival practical.
We will continue with:
- Cozy Rustic Survival Cottage
- Large Survival Farmhouse
- Two-Story Organized Base
- Watchtower Survival Fortress
- Riverfront Dock House
- Compact Storage Mega Base
- Fortified Survival Compound
4. Cozy Rustic Survival Cottage
Introduction
The Cozy Rustic Survival Cottage is ideal for players who love warm, storybook-style builds that feel lived-in and natural. Unlike large bases that focus on efficiency alone, this design blends function with charm. It works especially well in plains, flower forests, taiga, or near village areas. The goal is to create a compact but beautiful survival home that feels intentional and immersive.
Rustic cottages rely on texture contrast. Instead of using one single block type, you combine spruce logs, cobblestone, stripped wood, trapdoors, lanterns, and even leaves for depth. The magic of this build is in the small details: roof overhangs, chimney smoke, flower boxes under windows, and path blocks leading to the door.
Although it looks decorative, this cottage is fully practical. It includes organized storage, a smelting area, and enough room for early-to-mid game survival essentials. It’s perfect for players who want their world to look aesthetic while still being functional.
Let’s design it properly.
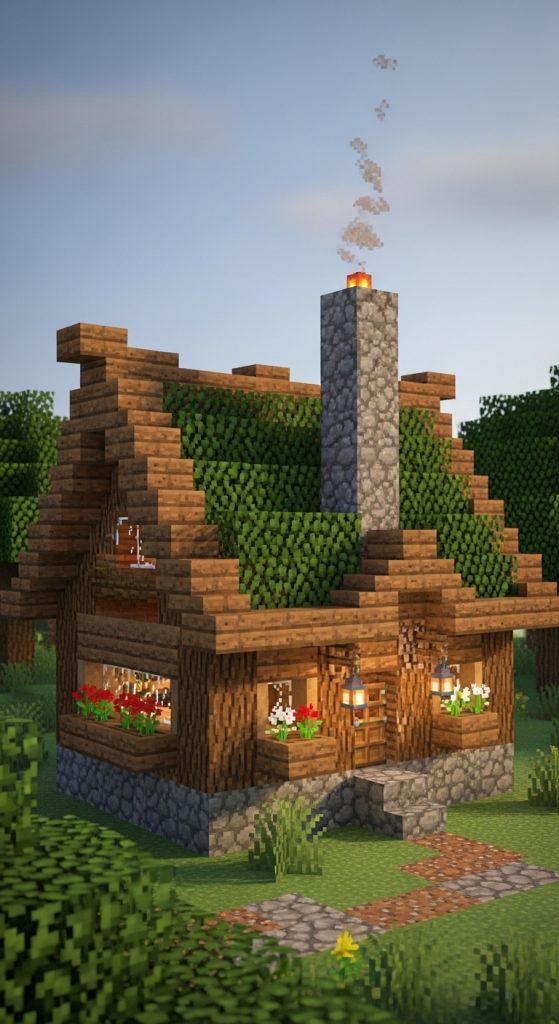
What This Build Is
An 8×10 rustic survival cottage featuring:
- Stone foundation
- Spruce log frame
- Overhanging roof
- Functional chimney
- Compact but organized interior
- Exterior landscaping
Materials List
- 64 Spruce Logs
- 2 Stacks Spruce Planks
- 1 Stack Cobblestone
- 32 Stone Bricks
- 20 Glass Panes
- Spruce Stairs & Slabs
- Campfire (for chimney smoke)
- Lanterns
- Trapdoors
- Leaves (optional decor)
- 4–6 Chests
- 2 Furnaces
- Crafting Table
- Bed
Step-by-Step Building Guide
Step 1: Foundation & Shape
Create an 8×10 rectangle using cobblestone.
Raise the floor one block above ground for depth.
Outline corners and wall sections with spruce logs (4 blocks high).
Step 2: Wall Construction
Fill between logs with spruce planks.
Add 2-block-high windows on both sides.
Under each window, place upside-down stair blocks to create flower ledges.
Install glass panes.
Step 3: Roof Design
Use spruce stairs to create a steep A-frame roof.
Extend stairs one block outward for overhang.
Add slab ridge along top to finish peak.
For extra detail:
- Add trapdoors under roof edges.
- Place upside-down stairs to create roof depth.
Step 4: Chimney Build
Choose one side of roof.
Build 3-block-high stone brick chimney.
Place campfire at base inside house for smoke effect.
This creates cozy atmosphere.
Step 5: Interior Layout
Back Wall → Double chest storage system
Left Corner → Furnace + crafting station
Right Corner → Bed with lantern above
Use carpet to soften floor look.
Step 6: Landscaping
Create path blocks leading to door.
Add flowers and leaves around foundation.
Place lanterns on fence posts near entrance.
Upgrade Ideas
- Add small fenced farm behind cottage.
- Build a well nearby.
- Extend attic storage space under roof.
This cottage balances beauty and survival practicality perfectly.
5. Large Survival Farmhouse Base
Introduction
The Survival Farmhouse Base is designed for players who prioritize food production and sustainable survival systems. Instead of separating home and farmland, this build integrates both into a single organized compound. It works best in plains biomes where large flat land is available.
This design is ideal for mid-game players who want long-term stability. Having crops directly attached to your base reduces travel time and increases efficiency. The farmhouse style focuses on symmetry, clean wooden framing, and fenced farmland sections.
A good farmhouse base includes:
- Indoor storage
- Smelting station
- Bedroom
- Direct farm access
- Animal pens nearby
It’s practical, expandable, and visually cohesive.

What This Build Is
A 12×10 wooden farmhouse connected to:
- Wheat farm
- Animal pen
- Small porch
- Organized storage interior
Materials List
- 2 Stacks Oak Logs
- 3 Stacks Oak Planks
- 1 Stack Fences
- 1 Water Bucket
- Hoe
- Seeds
- Lanterns
- Spruce Stairs
- Glass Panes
- Chests
- Furnaces
Step-by-Step Building Guide
Step 1: House Base
Create 12×10 rectangle.
Add log pillars every 3 blocks.
Build walls 4 blocks high.
Step 2: Roof Construction
Use stairs for angled roof.
Add slab ridge.
Extend overhang for realism.
Step 3: Farm Layout
Create 9×9 farmland area attached to house side.
Place water source in center.
Till soil evenly.
Plant wheat or mixed crops.
Surround farm with fences to prevent mob trampling.
Step 4: Interior Organization
Left Wall → Storage
Right Wall → Smelting
Back → Bed
Keep central walkway clear.
Step 5: Animal Integration
Build small fenced pen near house.
Add gate.
Bring cows or sheep inside.
Efficiency Tips
- Add composter near farm.
- Install lanterns around crops.
- Add secondary crop expansion behind house.
This farmhouse base becomes the center of your survival economy.
6. Two-Story Organized Survival Base
Introduction
The Two-Story Survival Base is perfect for players transitioning from early game to mid-game progression. When storage starts overflowing and you unlock enchanting tables, brewing stands, and multiple furnaces, a single-room house becomes inefficient. A vertical design helps separate activities while keeping footprint small.
This build emphasizes organization and clean zoning. The ground floor becomes your work area, while the upper floor becomes personal space or specialized rooms. It’s ideal for plains or forest biomes.
The key design principle here is structural framing and clean symmetry.

What This Build Is
A 9×9 two-level house with:
- Ground floor workshop
- Upper bedroom/enchanting room
- Central staircase
- Balanced window layout
Materials List
- 2 Stacks Logs
- 3 Stacks Planks
- Stairs
- Slabs
- Glass Panes
- Lanterns
- Chests
- Enchanting Table
Step-by-Step Building Guide
Step 1: Base Structure
Build 9×9 floor.
Raise walls 5 blocks high.
Install log pillars at corners and midpoints.
Step 2: Second Floor
Add plank layer halfway up.
Ensure 3-block ceiling height downstairs.
Install staircase in corner.
Step 3: Roof Design
Use stair roof with slab ridge.
Add window dormers for detail.
Step 4: Interior Zoning
Ground Floor:
Storage wall
Furnaces
Crafting zone
Second Floor:
Bed
Enchanting table
Bookshelves
Lighting Strategy
Use lanterns hanging from ceiling.
Avoid dark upper corners.
Upgrade Options
- Add balcony
- Add small porch
- Connect to underground tunnel
Next, I will continue with:
- Watchtower Survival Fortress
- Riverfront Dock House
- Compact Storage Mega Base
- Fortified Survival Compound
7. Watchtower Survival Fortress
Introduction
The Watchtower Survival Fortress is designed for players who prioritize security, visibility, and strategic positioning. In Survival mode — especially on hard difficulty — nighttime threats can quickly overwhelm poorly lit areas. A watchtower base gives you height advantage, early mob detection, and a strong defensive position for bow combat.
This build works extremely well in plains, savanna, or near villages where flat land makes long-distance visibility valuable. The vertical design reduces ground-level mob pressure while still providing functional living space. Unlike a simple tower, this version is structured as a mini fortress with a secure ground entrance and elevated main living quarters.
The key to making this tower Pinterest-worthy is layering: alternating logs and stone, adding overhangs, placing lantern brackets, and designing a battlement-style top. It should feel intentional, not like a random pillar reaching into the sky.
This build is ideal for mid-game players with steady wood and stone supplies.

What This Build Is
A 5×5 fortified tower featuring:
- Reinforced ground entrance
- Interior ladder or staircase
- Mid-level storage floor
- Top observation deck
- Defensive railing
Materials List
- 2 Stacks Spruce Logs
- 2 Stacks Stone Bricks
- 1 Stack Spruce Planks
- Ladders or Stairs
- Lanterns
- Fences or Walls
- Iron Door (optional)
- Chests
- Bed
- Crafting Table
- Furnace
Step-by-Step Building Guide
Step 1: Foundation
Mark a 5×5 square.
Build stone brick base 3 blocks high.
Place spruce log pillars at each corner extending upward 12–15 blocks.
Step 2: Wall Framing
Fill between pillars using alternating stone bricks and planks.
Add small 1×2 windows every 4 blocks vertically.
Step 3: Interior Floors
At height 6 blocks, add plank floor.
This becomes your storage level.
At height 12 blocks, add second floor for sleeping area.
Use ladders or a compact staircase in one corner.
Step 4: Observation Deck
Extend top layer one block outward.
Add fence or wall railing around perimeter.
Place lanterns on corners for lighting.
Optional: Add slab battlements for fortress look.
Step 5: Interior Organization
Lower Floor → Furnace & crafting
Middle Floor → Storage wall
Top Floor → Bed + emergency chest
Defensive Tip
Light surrounding 20-block radius ground to reduce mob spawn clusters.
This fortress gives both protection and aesthetic medieval vibes.
8. Riverfront Dock Survival House
Introduction
The Riverfront Dock House is one of the most aesthetically pleasing survival builds you can create. Water naturally enhances any Minecraft structure. It reflects light, adds openness, and provides direct access to fishing and boat travel. This design works beautifully near rivers, lakes, or ocean edges.
Beyond beauty, water offers practical benefits. It creates natural mob barriers on one side and provides quick transportation routes. A dock house integrates wooden architecture with slab extensions over water, creating a cozy yet functional survival base.
The key to making this build Pinterest-optimized is creating layered dock platforms, fence railings, lantern posts, and wide glass windows facing the water.
This build suits early-to-mid game players with access to spruce or dark oak wood.
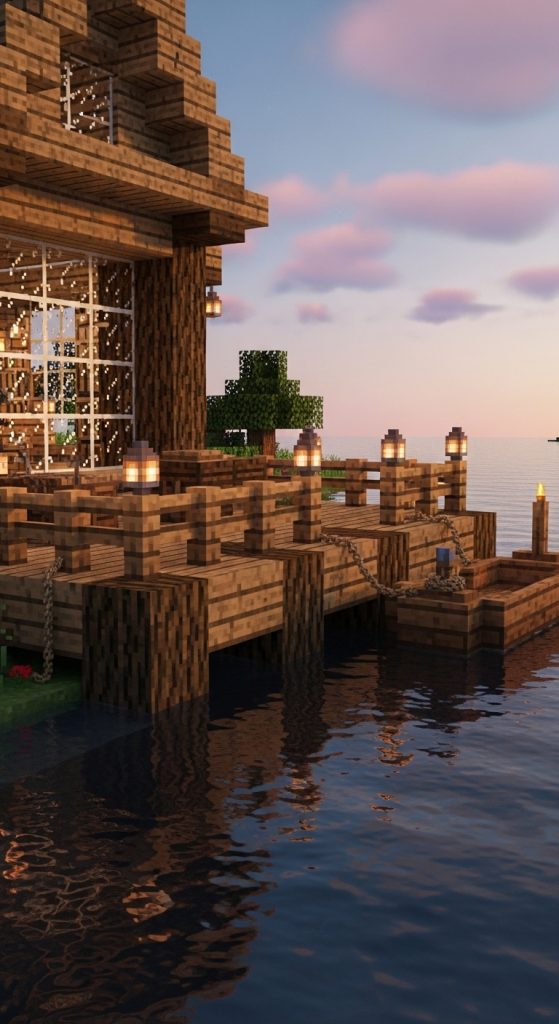
What This Build Is
A 10×8 wooden waterfront house with:
- Extended dock platform
- Fishing area
- Glass-facing river wall
- Organized compact interior
Materials List
- 2 Stacks Spruce Planks
- 1 Stack Spruce Logs
- 32 Slabs
- 20 Fences
- Lanterns
- Glass Panes
- Boat
- Chests
- Furnace
- Crafting Table
- Bed
Step-by-Step Building Guide
Step 1: Placement
Choose flat land directly adjacent to water.
Mark 10×8 rectangle for house.
Step 2: Dock Platform
Extend slabs 4 blocks into water.
Support underside with log pillars down to riverbed.
Add fence railing along edges.
Step 3: House Structure
Build log pillars at corners.
Raise walls 4 blocks high.
Install large 3-block-wide window facing river.
Step 4: Roof
Create slanted stair roof.
Extend roof slightly over dock.
Step 5: Interior Layout
River Wall → Window seating area
Back Wall → Storage
Side Wall → Furnace + crafting
Corner → Bed
Lighting
Place lanterns on dock posts.
Light water area to reduce drowned spawns.
Upgrade Ideas
- Add second dock tier.
- Build small boathouse.
- Connect bridge to nearby land.
This build creates peaceful survival atmosphere.