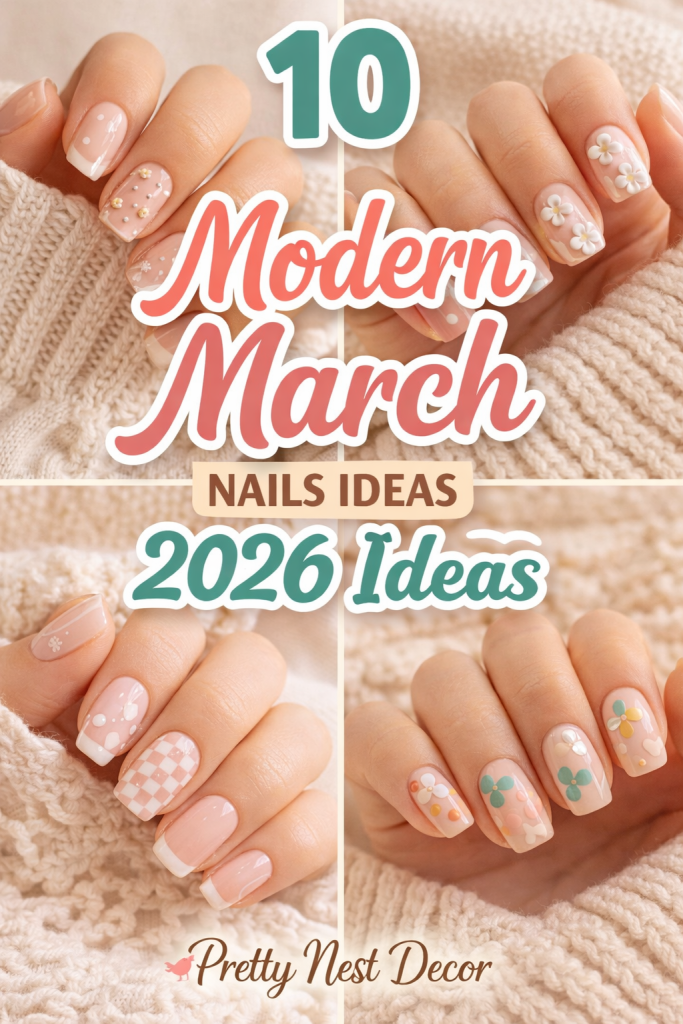
As we move into 2026, nail art continues to evolve as one of the most expressive and trend-driven aspects of personal style. Among seasonal inspirations, March holds a special place because it marks the transition from winter to spring—a time when fashion, beauty, and design shift toward lighter tones, fresh patterns, and renewed creativity. Nail trends during this month reflect that transformation, blending soft aesthetics with modern techniques to create designs that feel both refreshing and stylish. “Modern March nails” are not just about color choices—they represent a mood, a seasonal identity, and a way to subtly align your look with the energy of renewal and change.
In recent years, nail designs have become more than just a beauty routine; they are now a form of self-expression and a key part of curated personal aesthetics. Platforms like Pinterest have played a major role in shaping nail trends, influencing everything from color palettes to design patterns. Users are constantly searching for ideas that are not only visually appealing but also practical, wearable, and adaptable to different lifestyles. This has led to a growing demand for nail designs that balance creativity with simplicity, allowing individuals to achieve salon-quality looks either professionally or at home.
March nail trends in 2026 are expected to highlight a combination of minimalism, elegance, and subtle statement elements. Unlike overly complex or heavily embellished designs, modern nail styles focus on clean finishes, soft gradients, and refined accents. Neutral bases remain popular, but they are often enhanced with delicate details such as abstract lines, micro French tips, floral hints, or chrome finishes. These small yet impactful touches elevate the overall appearance without overwhelming the nails.
Another defining characteristic of modern March nails is the influence of seasonal colors. Spring-inspired palettes such as pastel pinks, soft greens, lavender tones, baby blues, and creamy neutrals dominate this time of year. These shades evoke freshness and lightness, aligning perfectly with the transition from colder months to warmer days. At the same time, deeper accent colors like muted burgundy, olive green, or charcoal may be incorporated to add contrast and depth to the design. The combination of soft and bold tones allows for versatile nail looks that can suit both casual and formal settings.
Texture and finish also play a significant role in modern nail designs. Matte finishes, glossy coatings, chrome effects, and subtle shimmer overlays are often used to enhance the visual appeal of nails. For March 2026, a mix of finishes within a single design is particularly trendy. For example, a neutral base may be paired with glossy tips, matte accents, or reflective chrome lines. These combinations create dimension and make even simple designs look sophisticated and high-end.
Minimalist nail art remains a strong trend due to its timeless appeal and versatility. Clean lines, negative space designs, and understated patterns are widely favored because they are easy to maintain while still looking fashionable. Many people prefer designs that grow out gracefully without requiring frequent touch-ups, making minimalist styles both practical and aesthetically pleasing. This is especially important for individuals with busy schedules who still want to maintain a polished appearance.
At the same time, creative and artistic nail designs continue to gain popularity. Abstract patterns, swirl designs, geometric shapes, and hand-painted details allow for more personalization. These styles give individuals the freedom to experiment with unique combinations of colors and shapes while still following modern design principles. March is an ideal time to explore these creative expressions because the season naturally encourages renewal and experimentation.
Nail length and shape also influence the overall look of modern March nails. Almond, oval, and short square shapes are particularly popular because they provide a clean and elegant base for various designs. These shapes are versatile and complement both minimal and detailed nail art. Medium-length nails are often preferred as they offer enough space for design while remaining practical for everyday use.
Another important aspect of nail trends in 2026 is the emphasis on adaptability. Modern nail designs are created with flexibility in mind, allowing them to suit different occasions, outfits, and personal styles. Whether someone prefers a subtle everyday look or a more eye-catching design for special events, March nail ideas can be adjusted accordingly. This adaptability makes them highly appealing for a wide audience.
In addition to aesthetics, durability and maintenance are also key considerations. Many modern nail designs are created using techniques that ensure longevity, such as gel polish, builder gels, or protective top coats. These methods help maintain the integrity of the design while preventing chipping and fading. As a result, individuals can enjoy their nail art for longer periods without frequent salon visits.
Overall, modern March nails in 2026 represent a blend of seasonal inspiration, minimal elegance, and creative expression. They capture the essence of spring transition while embracing contemporary design trends that prioritize simplicity, functionality, and style. Whether you prefer soft pastel palettes, clean minimalist designs, or artistic abstract patterns, there are endless possibilities to explore. The key is to choose designs that resonate with your personal aesthetic while still aligning with the fresh and uplifting energy that March brings.
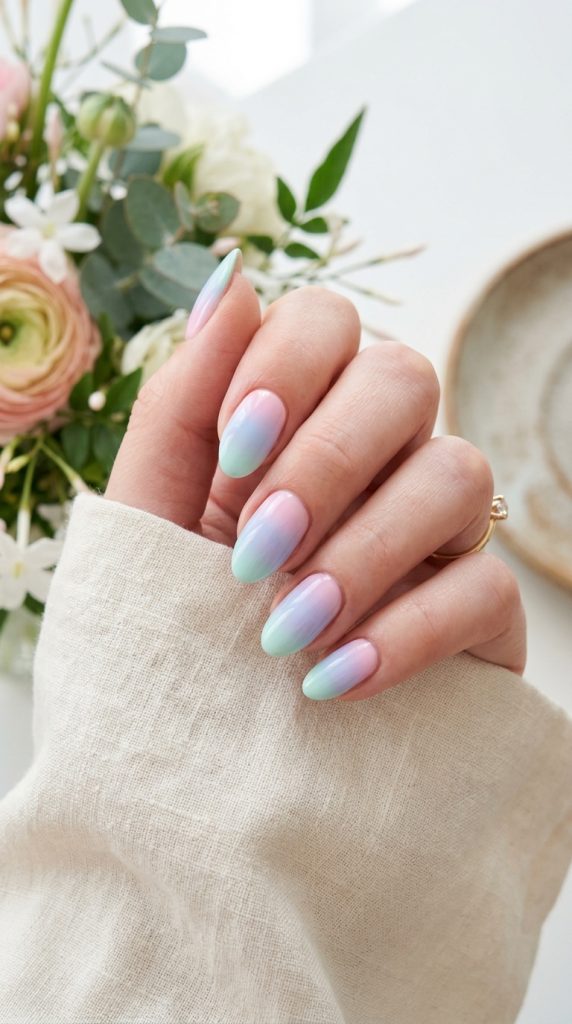
Idea 1: Soft Pastel Gradient Nails
Soft pastel gradient nails are one of the most popular modern nail trends for March, especially in Nail Art aesthetics. This design reflects the transition from winter to spring by blending multiple soft shades into a smooth, seamless gradient. Colors like baby pink, lavender, mint green, sky blue, and peach are commonly used to create a light, refreshing look. The gradient effect gives the nails a dreamy, airy appearance that feels both elegant and seasonal.
This design works beautifully because it is subtle yet visually appealing. Instead of using bold patterns or heavy embellishments, the gradient itself becomes the focal point. It is perfect for individuals who prefer minimal designs but still want something creative and stylish. The soft blending of colors also makes the nails look longer and more refined, especially when paired with almond or oval nail shapes.
How to Create:
Start by applying a base coat to protect the nails. Choose two or more pastel shades that complement each other. Using a makeup sponge or blending brush, apply the colors in overlapping sections and gently dab them onto the nail to create a gradient effect. Repeat the process until the transition between colors appears smooth. Clean up any excess polish around the edges using a small brush dipped in nail remover. Finish with a glossy top coat to seal the design and enhance the smooth gradient finish.
Materials Used:
Base coat, pastel nail polishes, makeup sponge or blending brush, nail polish remover, cleanup brush, glossy top coat.
Idea 2: Minimalist French Tip Nails with a Modern Twist
Minimalist French tip nails are a timeless design that has been reimagined for modern trends in Nail Art. For March 2026, this classic style is updated with thin lines, soft colors, and creative variations instead of traditional thick white tips. Popular versions include pastel French tips, micro French lines, and angled or curved tip designs.
This idea is perfect for those who want a clean and professional look with a subtle hint of creativity. The minimalist approach ensures that the nails remain elegant and versatile, suitable for everyday wear, work environments, or special occasions. Instead of bold designs, the focus is on precision, neatness, and refined detailing.

How to Create:
Begin with a neutral base such as nude, sheer pink, or milky white polish. Once the base is dry, use a fine nail brush or guide stickers to create thin tip lines at the edge of each nail. You can choose classic white tips or experiment with pastel shades for a more seasonal look. Keep the lines clean and consistent across all nails. Allow the tips to dry completely before applying a top coat to seal the design and add shine.
Materials Used:
Base coat, nude or sheer polish, pastel or white nail polish for tips, fine nail brush or tip guides, top coat.
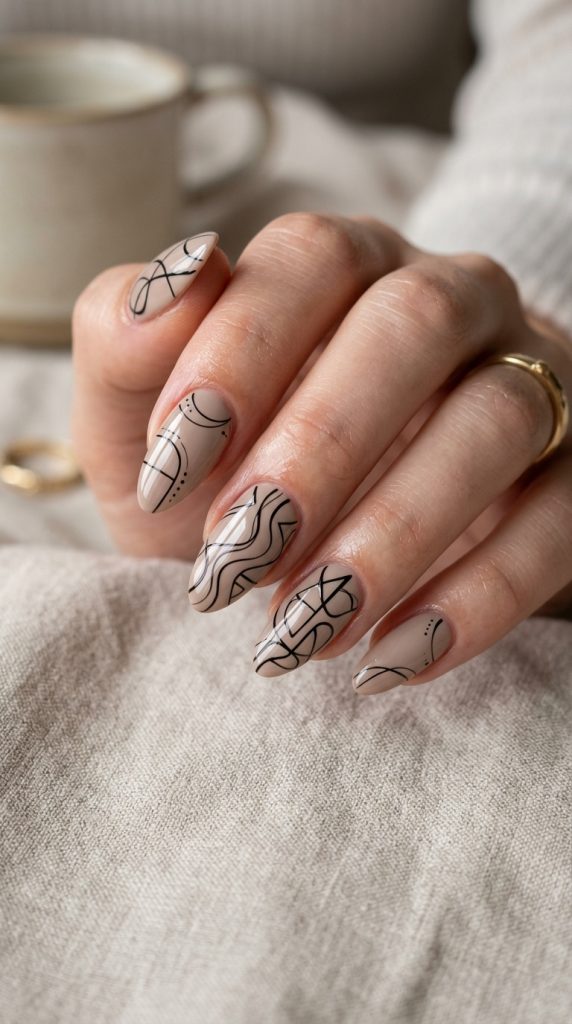
Idea 3: Abstract Line Art Nails
Abstract line art nails are a modern and artistic choice within Nail Art trends. This design features simple yet creative line patterns drawn over a neutral or soft-colored base. The lines can be curved, wavy, geometric, or randomly placed to create a unique and expressive look. It is especially popular for individuals who enjoy minimal designs with a touch of artistic flair.
The beauty of abstract line nails lies in their versatility. Each nail can have a slightly different pattern while still maintaining a cohesive overall theme. This design allows for personalization and creativity without requiring complex techniques. It pairs well with neutral bases such as beige, soft pink, or light gray, allowing the lines to stand out clearly.
How to Create:
Apply a base coat followed by a neutral or pastel background color. Once dry, use a thin nail art brush or liner brush dipped in black, white, or metallic polish to draw abstract lines on each nail. You can create curved strokes, intersecting lines, or asymmetrical shapes depending on your preference. Keep the design balanced by not overcrowding the nail surface. Finish with a glossy or matte top coat to protect the artwork and enhance the final look.
Materials Used:
Base coat, neutral or pastel polish, fine liner brush, black/white/metallic polish, top coat.
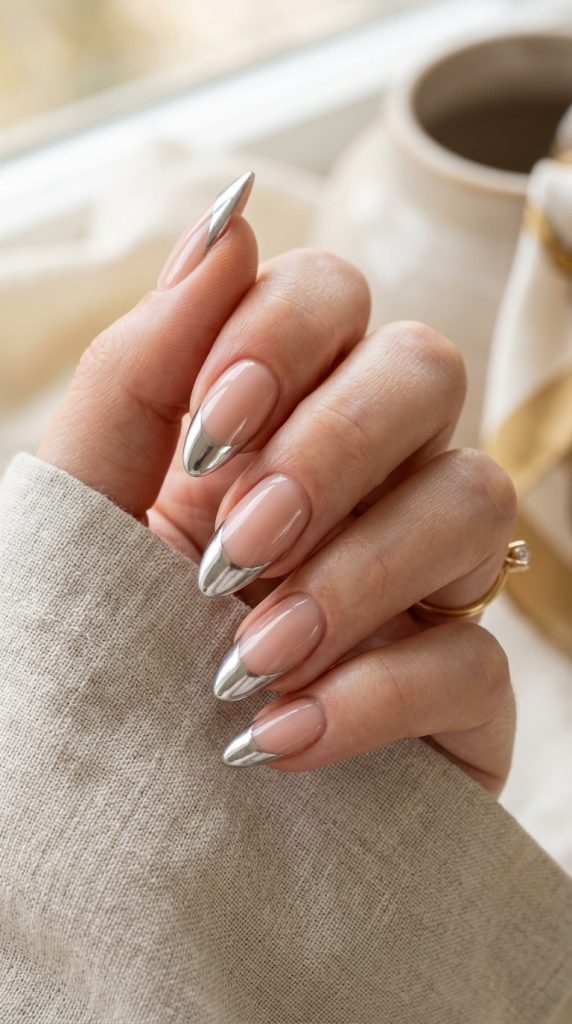
Idea 4: Chrome Accent Nails
Chrome accent nails are a stylish and modern option in Nail Art that adds a reflective, metallic finish to your manicure. Instead of covering all nails with chrome, this design typically features one or two accent nails with chrome effects while the rest remain simple and neutral. This creates a balanced look that is both eye-catching and elegant.
Chrome nails are known for their mirror-like shine, which gives a futuristic and luxurious feel. Popular chrome shades include silver, rose gold, gold, and soft pastel chrome tones that align with March’s seasonal theme. When combined with a minimal base, chrome accents stand out without overwhelming the overall design.
How to Create:
Apply a base coat followed by your chosen base color (usually neutral or pastel). For accent nails, apply a gel polish and cure it under a UV lamp if using gel. Rub chrome powder onto the nail surface using an applicator until a mirror-like finish appears. Seal the chrome nails with a no-wipe top coat to lock in the effect. Keep the remaining nails in a simple glossy or matte finish for contrast.
Materials Used:
Base coat, gel polish (optional), chrome powder, applicator sponge, UV/LED lamp (if gel), top coat.
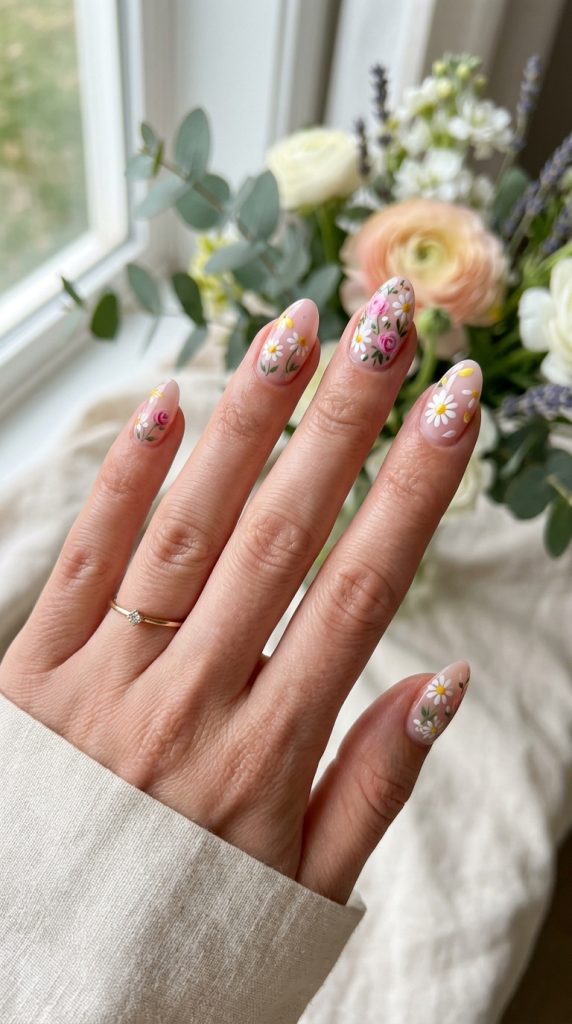
Idea 5: Floral Spring-Inspired Nails
Floral spring-inspired nails are a perfect match for March, aligning with the seasonal transition into spring within Nail Art. This design incorporates small floral patterns such as daisies, petals, or minimal flower accents placed over soft backgrounds. The look is fresh, feminine, and highly Pinterest-friendly, making it a favorite for seasonal nail inspiration.
Floral designs can range from simple hand-painted flowers to sticker-based or stamped patterns. The base is typically kept light, using pastel shades or neutral tones to allow the floral details to stand out. This design works well on all nail lengths and shapes, especially short to medium nails, and can be customized with different color combinations depending on personal preference.
How to Create:
Start with a base coat and apply a light pastel or neutral polish as the background. Once dry, use a fine brush or dotting tool to create small flower shapes using contrasting colors. Add tiny details such as petals or centers to complete the floral look. You can keep the design minimal by placing flowers on accent nails only or distribute them across all nails. Finish with a top coat to protect the design and add shine.
Materials Used:
Base coat, pastel or neutral polish, fine nail brush or dotting tool, accent colors for flowers, top coat.
Idea 6: Chrome French Tip Nails
Chrome French tip nails are a modern upgrade to the classic French manicure within Nail Art. Instead of traditional white tips, this design incorporates metallic chrome finishes such as silver, gold, or rose gold to create a sleek, reflective edge. The combination of a neutral base with shiny chrome tips results in a sophisticated and eye-catching look that feels both minimal and luxurious.
This design is especially popular for March because it blends well with spring transitions while still maintaining a polished aesthetic. The chrome element adds a futuristic touch, while the French tip structure keeps the design clean and timeless. It works beautifully on almond, coffin, and oval nail shapes, as the curved tips complement the nail structure naturally.
Chrome French tips are versatile enough for both casual and formal settings. They pair well with neutral outfits and can also enhance more dressed-up looks. The reflective finish catches light, making the nails appear more dimensional and elegant without requiring complex patterns or heavy decoration.
How to Create:
Begin with a base coat followed by a neutral or sheer nude polish. Once dry, use nail guides or a fine brush to define the tip area. Apply a gel polish on the tips and cure under a UV/LED lamp if using gel products. Then, apply chrome powder over the tip area using an applicator sponge to achieve a metallic finish. Gently buff until the chrome effect becomes smooth and reflective. Seal the design with a no-wipe top coat to protect the chrome and enhance shine. Ensure the base remains clean and smooth for contrast.
Materials Used:
Base coat, nude or sheer polish, gel polish (optional), chrome powder, applicator sponge, UV/LED lamp, nail guides, top coat.
Idea 7: Minimal Nude Nails with Micro Art
Minimal nude nails with micro art are a subtle and elegant choice within Nail Art trends. This design focuses on a clean nude or sheer base enhanced with tiny, delicate designs such as dots, lines, hearts, or micro florals. The overall look is understated yet stylish, making it ideal for those who prefer refined and professional nail aesthetics.
The nude base creates a natural, polished appearance that complements all skin tones. The micro art elements are intentionally small and minimal, ensuring that the nails do not appear busy or overcrowded. This style is perfect for everyday wear, office environments, or anyone who prefers a low-maintenance yet fashionable manicure.
ne of the key advantages of this design is its versatility. It can be customized with different accent colors, though black, white, gold, or pastel tones are commonly used for micro details. The design works well on short nails as well, making it accessible for a wide range of preferences.How to Create:
Apply a base coat followed by a nude or sheer polish. Once dry, use a fine nail art brush or dotting tool to add small designs such as tiny dots, minimalist lines, or micro shapes on one or more nails. Keep the placement balanced and avoid overcrowding the nail surface. You can choose to decorate all nails lightly or use accent nails for subtle emphasis. Finish with a glossy top coat to seal the design and enhance the smooth nude finish.
Materials Used:
Base coat, nude or sheer polish, fine brush or dotting tool, accent polish colors, top coat.
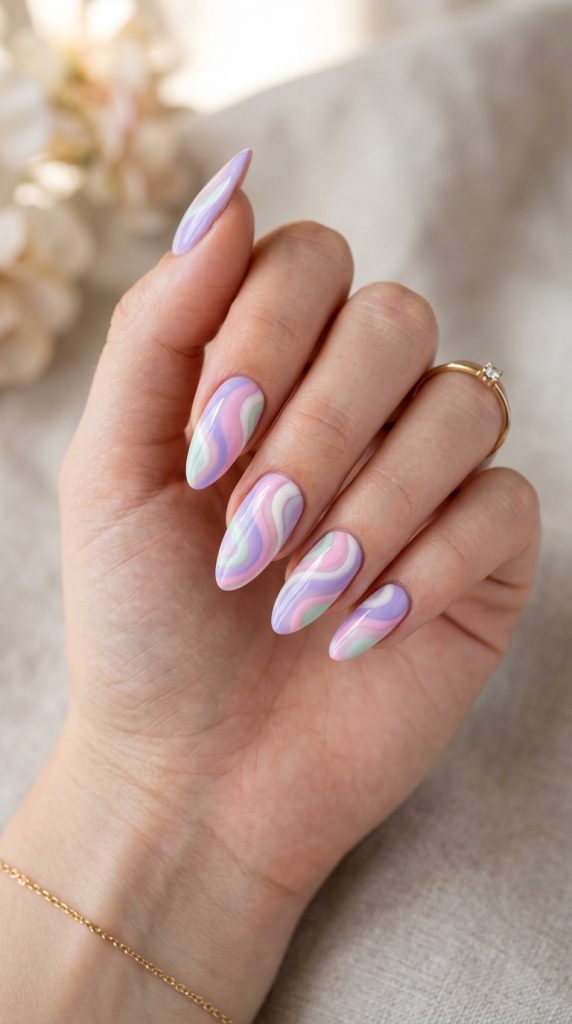
Idea 8: Swirl Pattern Nails (Soft Abstract Swirls)
Swirl pattern nails are a trendy and artistic option in Nail Art that features flowing, curved lines across the nails. These swirls often use multiple soft or contrasting colors to create a dynamic yet harmonious design. For March 2026, pastel swirls combined with neutral bases are especially popular, reflecting the light and fresh mood of spring.
The swirl design adds movement and visual interest without requiring complex patterns. Each nail can have a slightly different swirl layout, making the design feel organic and unique. The flowing lines can be thick or thin depending on the desired effect, and colors can be layered or separated to create contrast.
This design works particularly well on medium to long nails, as the additional surface area allows the swirls to be displayed more clearly. However, it can also be adapted for shorter nails with simpler patterns. The combination of curves and soft tones gives the nails a playful yet sophisticated appearance.
How to Create:
Apply a base coat followed by a neutral or pastel background color. Once dry, use a thin liner brush to draw curved swirl patterns using one or more contrasting colors. You can layer multiple swirls or keep them minimal depending on your preference. Ensure the lines flow naturally across the nail for a smooth visual effect. Avoid overcrowding the design to maintain clarity. Once complete, apply a top coat to seal the design and enhance shine.
Materials Used:
Base coat, neutral or pastel polish, liner brush, accent polishes for swirls, top coat.
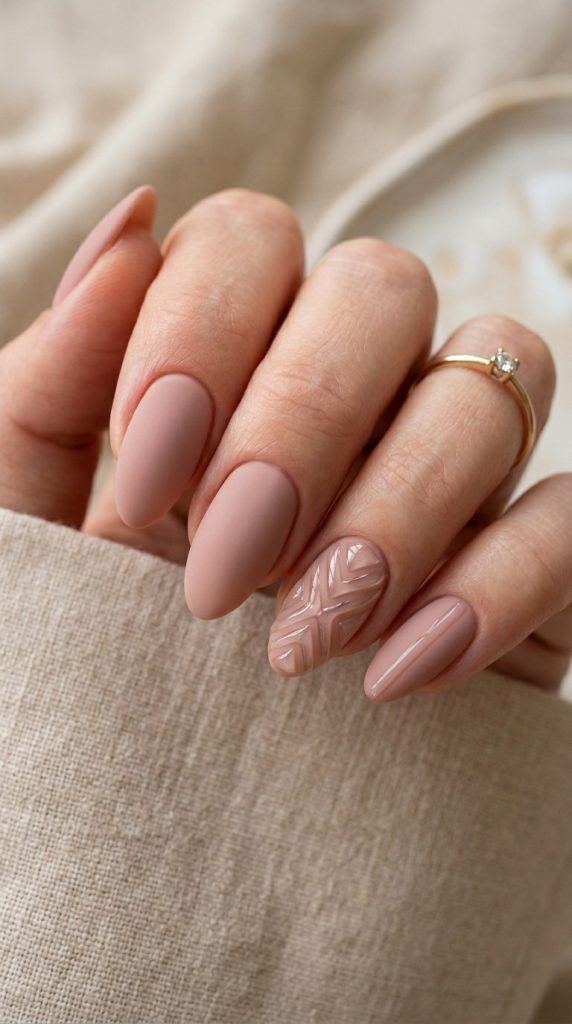
Idea 9: Matte Finish Nails with Glossy Accents
Matte nails with glossy accents offer a unique texture contrast within Nail Art. This design combines a matte base finish with selective glossy details such as lines, shapes, or tips. The contrast between matte and shine creates a subtle yet sophisticated visual effect that stands out without being overly bold.
This design is ideal for individuals who prefer modern and minimal aesthetics but want something slightly different from standard glossy nails. The matte finish gives a soft, velvety appearance, while the glossy accents add depth and highlight specific areas of the nail. This combination works well with neutral tones, pastels, and even darker shades.
The glossy accents can be applied in various forms, such as French tips, abstract lines, or geometric shapes. The key is to keep the design balanced so that the matte base remains dominant while the glossy elements act as highlights.

How to Create:
Start with a base coat and apply your chosen nail color. Once dry, apply a matte top coat over the entire nail to create a matte finish. After the matte layer sets, use a fine brush to apply glossy top coat in specific areas such as tips, lines, or patterns. Allow the glossy sections to dry carefully to maintain contrast. Avoid overlapping too much gloss to preserve the distinction between finishes. This layered approach creates a refined and modern look.
Materials Used:
Base coat, nail polish (neutral or pastel), matte top coat, glossy top coat, fine detail brush.
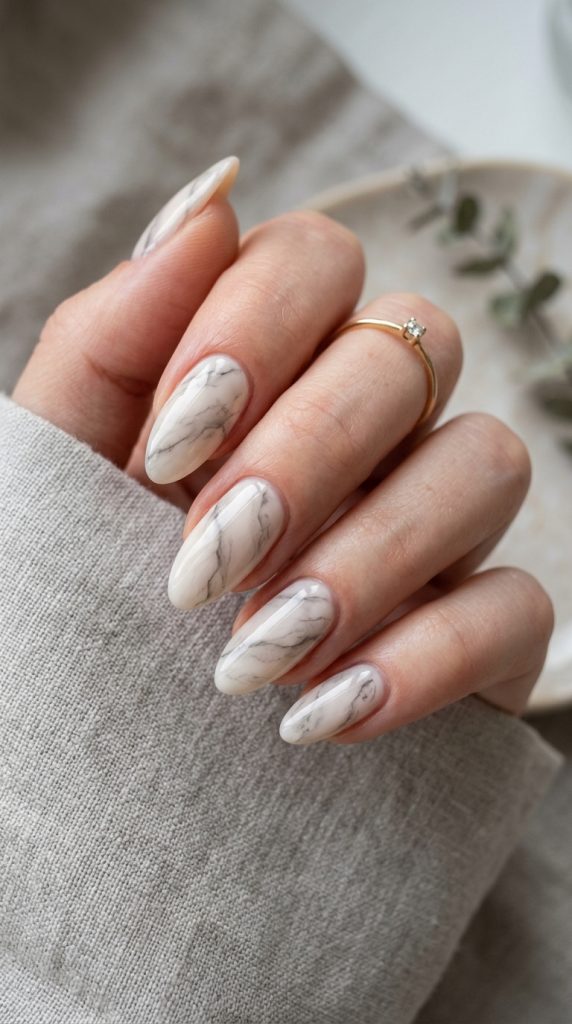
Idea 10: Soft Marble Effect Nails
Soft marble effect nails are an elegant and artistic design within Nail Art that mimics the natural patterns of marble stone. This design is characterized by soft veining lines blended over a light base, often using white, gray, beige, or pastel tones. The result is a sophisticated and luxurious look that remains subtle and wearable.
Marble nails are especially suitable for March because they combine neutral elegance with a fresh seasonal feel. The soft veining patterns can be customized to appear more defined or more blended depending on preference. Adding slight hints of metallic accents such as gold or silver lines can elevate the design further, giving it a premium finish.
This design works well across different nail shapes and lengths, and it is particularly popular for accent nails paired with simpler solid nails. The marble effect adds visual depth without overwhelming the overall look, making it a balanced choice for modern nail aesthetics.
How to Create:
Apply a base coat followed by a light base color such as white or nude. While the polish is still slightly wet or tacky, use a thin brush or toothpick to gently draw irregular veining lines using gray, black, or soft pastel shades. Lightly blend or blur some areas to create a natural marble effect. You can add subtle metallic lines for enhancement if desired. Repeat the process on selected nails or across all nails depending on your design preference. Finish with a glossy top coat to smooth the surface and enhance the marble finish.
Materials Used:
Base coat, light base polish (white/nude), gray/black/pastel polish for veins, fine brush or toothpick, optional metallic polish, top coat.