
A modern, well-organized pantry is far more than a storage space—it’s the heart of an efficient, functional, and visually appealing kitchen. Whether you have a walk-in pantry, a small cabinet, or multiple shelves tucked in your kitchen corner, the way you organize your food, snacks, and cooking essentials can make a huge difference in your daily routine. A cluttered pantry not only slows down meal prep but also leads to frustration, duplicate purchases, and wasted food. Conversely, a thoughtfully organized pantry streamlines cooking, reduces stress, and can even inspire healthier eating habits. In 2026, pantry organization isn’t just about tidiness—it’s about creating a functional lifestyle hub that is efficient, practical, and aesthetically pleasing.

Modern pantry organization combines functionality, accessibility, and design. No longer are pantries simply rows of stacked cans or mismatched boxes. Today’s organizational methods focus on clear visibility, categorization, and easy access. Imagine walking into your pantry and instantly knowing where everything is: baking essentials on one tier, canned goods neatly stacked, snacks at children’s eye level, and breakfast items in their own designated containers. By arranging items according to frequency of use, size, and type, your pantry transforms into a smooth-running system that saves time during busy mornings or family dinners. For example, placing everyday snacks on a lower, easily reachable shelf allows kids to grab what they need independently, while heavier or less frequently used items can occupy higher shelves.
Visual clarity is another cornerstone of a modern pantry. Using transparent jars, labeled containers, color-coded bins, and uniform storage boxes makes it easy to see what’s available and when restocking is necessary. Clear storage doesn’t just look clean—it reduces food waste by keeping perishable items visible and helps you avoid buying duplicates. A mix of textures and materials, such as glass jars, woven baskets, and metal tins, adds aesthetic appeal while keeping items categorized. Thoughtful placement of containers with labels, whether by type (grains, pasta, snacks) or theme (baking, breakfast, canned goods), creates a visually cohesive and functional layout.
Space optimization is key to modern pantry organization. Adjustable shelves, tiered organizers, pull-out drawers, and stackable containers allow you to maximize vertical and horizontal space, making even the smallest pantry feel expansive. Corner shelves, lazy Susans, and rotating spice racks ensure nothing gets lost in the back, while pull-out baskets and bins make deep shelves fully accessible. Hanging storage for utensils or small containers, and even utilizing door space for spices or condiments, adds layers of efficiency and frees up counter space. Every inch is purposefully designed to enhance accessibility and reduce clutter.
Modern pantry design also emphasizes eco-friendly and sustainable practices. Reusable containers, airtight jars, and labeled glass bottles reduce the need for single-use packaging while encouraging mindful consumption. By organizing pantry staples into reusable jars and bins, you can monitor portion sizes, track expiration dates, and prevent unnecessary waste. Color-coordinated or uniform containers not only enhance the look but also create a system that is easy to maintain for the long term. The process of organizing your pantry becomes a satisfying and practical daily routine, rather than a one-time chore.
Technology and innovation are becoming increasingly integrated into pantry organization. Smart storage solutions, including pull-out drawers with dividers, stackable modular containers, and even QR-code labels for digital inventory management, are now accessible for everyday use. These innovations allow homeowners to efficiently track supplies, plan meals, and avoid overstocking. Even without high-tech tools, simple adjustments like adjustable shelving or stackable containers dramatically improve usability, turning a cluttered pantry into a streamlined, functional hub.
Functionality and aesthetic appeal go hand in hand in modern pantry organization. A visually attractive pantry encourages order and simplifies maintenance. Coordinating colors, materials, and container shapes elevates the space, making it Pinterest-worthy while maintaining practicality. Small details, such as decorative jars for grains, clear bins for snacks, and labeled baskets for kids’ favorites, make the pantry feel curated, organized, and intentional. Even a modest pantry can be transformed into a space that is visually satisfying and easy to navigate.
Beyond looks and function, a well-organized pantry contributes to better meal planning, time management, and healthier eating habits. When staples are visible and grouped logically, cooking becomes quicker and more enjoyable. You can easily rotate ingredients, create meal prep zones, and introduce children to the joy of organized spaces by letting them help retrieve or store items. An organized pantry encourages mindful shopping, as you are constantly aware of what is available and what needs replenishment.
In this article, we will explore 10 modern pantry organization ideas that are practical, stylish, and beginner-friendly. Each idea includes step-by-step instructions, a detailed list of materials, and actionable tips for creating a pantry that is both functional and visually appealing. From pull-out drawers and clear containers to themed storage zones and decorative accents, these ideas will help you maximize every inch of your pantry while maintaining order, efficiency, and a Pinterest-ready look.
By the end of this guide, you’ll be equipped to transform your pantry into a modern, organized, and efficient space. Whether you have a small kitchen cabinet or a spacious walk-in pantry, these strategies will help you create a system that works for your family, keeps your pantry neat and accessible, and elevates your kitchen aesthetic in 2026. A modern pantry is not just about storage—it’s about creating a functional, inspiring, and stress-free hub that enhances your everyday life.
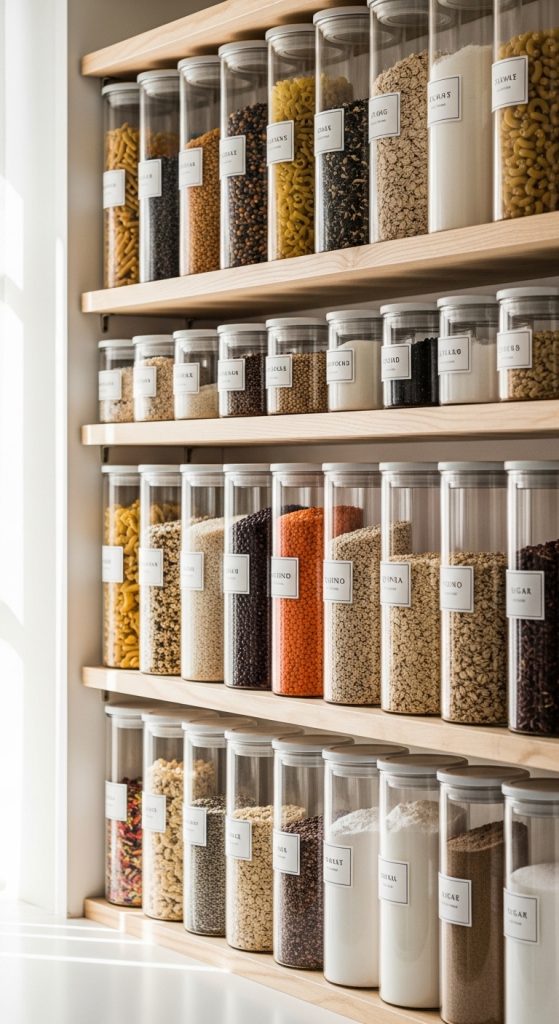
Idea 1: Use Clear Containers for Maximum Visibility
A cluttered pantry can make even simple meal prep stressful, but clear containers instantly transform a chaotic shelf into a visually organized space. Clear containers allow you to see exactly what’s inside, making it easier to track inventory, prevent food waste, and quickly find ingredients. From pasta and grains to snacks and baking supplies, using uniform, transparent containers adds both functionality and a modern aesthetic.
Explanation:
Clear containers are one of the simplest and most effective ways to modernize pantry storage. They provide immediate visibility, reduce reliance on messy bags or boxes, and create a cohesive, minimalist look. Grouping items in matching jars or containers—like all grains together, all baking ingredients together—helps maintain order while making it easy to identify low-stock items. Labels can be added to further organize contents by type, expiration date, or use. Using stackable designs maximizes vertical space, allowing small pantries to hold more items efficiently.
Step-by-Step How-To:
- Assess Your Pantry: Remove items from shelves and categorize by type: grains, pasta, baking, snacks, etc.
- Select Containers: Choose uniform clear containers in sizes suitable for your staples. Consider stackable containers for small shelves.
- Transfer Items: Pour ingredients from original packaging into containers.
- Label Each Container: Use chalkboard labels, printed labels, or handwritten tags with the ingredient name and expiration date.
- Arrange by Category: Group similar items together and place frequently used items at eye level.
- Maintain Regularly: Refill containers as needed, keeping the system tidy and consistent.
Materials Needed:
- Clear jars or stackable containers
- Labels or tags
- Permanent markers or chalk markers
- Scoops or measuring cups for easy transfer
Tips:
- Use airtight containers to preserve freshness.
- Uniform shapes create a sleek, Pinterest-ready look.
- Consider containers with wide openings for easy scooping.
Idea 2: Install Pull-Out Drawers and Sliding Baskets
Deep shelves often result in hidden, hard-to-reach items. Pull-out drawers and sliding baskets make every inch of your pantry accessible while maintaining a modern and organized look.
Explanation:
Pull-out drawers and sliding baskets allow you to access items at the back of shelves without rearranging the front items. They can be used for snacks, canned goods, baking supplies, or small kitchen tools. These storage solutions maximize vertical space, reduce clutter, and help maintain a clean, organized appearance. Children can also easily reach snacks or ingredients, making the pantry user-friendly for the entire household. Modern designs include wire baskets, clear acrylic drawers, and modular pull-outs that can be customized for different shelf heights.

Step-by-Step How-To:
- Measure Your Shelves: Determine the width and height for proper drawer or basket fit.
- Select Storage Units: Choose modular wire baskets, sliding trays, or pull-out organizers.
- Install: Attach pull-out units according to manufacturer instructions. Ensure smooth sliding and stability.
- Categorize Items: Assign each pull-out or basket a purpose—snacks, baking, grains, or cans.
- Place Heavier Items on Lower Pull-Outs: Keeps the pantry safe and prevents tipping.
- Maintain Order: Encourage family members to return items to the correct basket after use.
Materials Needed:
- Pull-out drawers or sliding baskets
- Screws and brackets (if installation is needed)
- Optional liners for drawers to prevent spills
- Labels for organization
Tips:
- Use transparent pull-outs for easy visibility.
- Modular units allow you to adjust layouts as needs change.
- Combine with labeled containers for maximum efficiency.
Idea 3: Create Zones for Specific Categories
Zoning is a powerful strategy that groups pantry items by purpose, making it easier to find what you need and maintain a clean, organized look.
Explanation:
Modern pantries function like small grocery stores. By creating dedicated zones for snacks, breakfast items, grains, canned goods, and baking supplies, you can streamline meal prep and reduce time spent searching for ingredients. Zoning also makes it easier to assign kids’ snacks to lower shelves and keep adult-only items higher up. Using baskets, containers, or dividers to separate zones ensures each category has a designated home. Visual consistency and labels strengthen the organizational system while maintaining a Pinterest-worthy aesthetic.

Step-by-Step How-To:
- Empty Your Pantry: Take everything out and clean shelves.
- Sort Items: Group by category—snacks, breakfast, grains, canned goods, baking ingredients.
- Assign Zones: Designate shelf areas for each category.
- Add Containers or Dividers: Use bins, baskets, or small containers to keep items together.
- Label Zones: Add visible labels for each category.
- Maintain Zones: Encourage family members to return items to their designated zone.
Materials Needed:
- Baskets or bins
- Dividers or small containers
- Labels or tags
- Optional shelf risers to maximize vertical space
Tips:
- Rotate items in each zone periodically to keep the pantry fresh.
- Keep frequently used zones at eye level for convenience.
- Add decorative baskets for a stylish touch.
Idea 4: Use Tiered Shelving and Risers
Tiered shelving and risers are a clever way to maximize visibility and ensure every item is easy to reach, even on deep or tall shelves.
Explanation:
When items are stacked flat on a shelf, smaller boxes or cans often get lost behind taller ones. Tiered shelving raises items at the back slightly, allowing all products to be seen at a glance. This method is especially useful for spices, condiments, or small snacks. Risers can also create multi-level displays for breakfast cereals, baking ingredients, or canned foods. Using tiered shelves reduces clutter, prevents food waste, and creates a clean, organized look that is both functional and visually appealing.

Step-by-Step How-To:
- Identify Shelves for Tiered Setup: Deep or tall shelves benefit the most.
- Choose Risers or Tiered Shelves: Use acrylic, metal, or wooden risers.
- Group Items by Size: Place small items like jars or spice containers on risers.
- Arrange in Rows: Keep similar items together for visual order.
- Label: Optional labels on risers help with organization.
- Adjust as Needed: Move or swap items to maintain accessibility.
Materials Needed:
- Tiered shelving units or risers
- Labels or markers
- Optional baskets to contain smaller items
Tips:
- Use clear or white risers for a modern, Pinterest-ready look.
- Group by category to maintain efficiency.
- Stackable risers can maximize vertical space on small shelves.
Idea 5: Label Everything for Maximum Efficiency
Labels are the unsung hero of modern pantry organization. They add clarity, consistency, and a polished, Pinterest-ready look to any pantry.
Explanation:
Even with clear containers and zones, labels provide essential guidance. They prevent confusion, help maintain order, and make the pantry easy for everyone in the household to use. Labels can include ingredient names, expiration dates, or categories. In addition to practical use, coordinated, stylish labels elevate the visual appeal, giving the pantry a clean and cohesive appearance. Modern label options include chalkboard stickers, printed tags, or adhesive vinyl labels. Using uniform labels across all containers and baskets ensures the pantry looks organized and modern.

Step-by-Step How-To:
- Choose Label Style: Decide between chalkboard, printed, or custom vinyl labels.
- Measure Container or Shelf Space: Ensure labels fit neatly.
- Write or Print Labels: Include item name and, optionally, expiration dates.
- Apply Labels Carefully: Center and align for a clean look.
- Group Similar Labels: Keep labels consistent in font and color.
- Maintain Labels: Replace faded or worn labels regularly.
Materials Needed:
- Labels (chalkboard, printed, or vinyl)
- Permanent markers or label printer
- Optional decorative tape for border accents
Tips:
- Color-code labels by category for easy identification.
- Use waterproof labels for pantry items exposed to moisture.
- Keep labels simple and readable for children.
Idea 6: Use Adjustable Shelving for Maximum Flexibility
One of the hallmarks of a modern pantry is flexibility. Adjustable shelving allows you to customize your storage layout based on the size and shape of your items, making your pantry highly efficient and easy to maintain.
Explanation:
Adjustable shelves are perfect for accommodating different-sized containers, boxes, and jars. As your pantry needs evolve—perhaps you buy a larger bag of flour or a taller container of cereal—you can move shelves up or down to fit. This flexibility ensures optimal use of vertical space, prevents wasted room, and keeps everything accessible. Adjustable shelving works particularly well in walk-in pantries, but even smaller kitchen cabinets benefit from the ability to customize shelf height. With uniform containers and proper organization, adjustable shelves also create a visually appealing, Pinterest-ready look that is functional and modern.

Step-by-Step How-To:
- Measure Your Pantry: Determine shelf width and height for planning purposes.
- Select Adjustable Shelves: Choose shelves compatible with your pantry walls or cabinet system.
- Install Brackets or Tracks: Follow manufacturer instructions to ensure shelves are secure.
- Arrange Items by Size: Place taller containers or bottles on adjustable shelves with extra height.
- Create Zones: Use the flexibility to create specific zones for snacks, baking supplies, or canned goods.
- Update As Needed: Rearrange shelves when new items arrive or storage needs change.
Materials Needed:
- Adjustable shelving units
- Shelf brackets and screws
- Measuring tape
- Level for proper alignment
Tips:
- Leave a small gap between tall items and shelves to make retrieval easier.
- Use shelf liners to prevent spills and keep surfaces clean.
- Coordinate container sizes for maximum efficiency.
Idea 7: Incorporate Pull-Out Spice Racks
Spices are essential in every kitchen, but small bottles can quickly create clutter. Pull-out spice racks make spices visible, accessible, and beautifully organized, contributing to a modern pantry aesthetic.
Explanation:
A dedicated spice area ensures that every bottle is easy to see and reach. Pull-out racks, often slim and vertical, maximize space while keeping spices upright and neatly arranged. This prevents bottles from toppling over or being hidden in the back of the shelf. Pull-out spice racks also enhance workflow, allowing quick access during meal preparation. Modern designs include adjustable racks, labeled pull-out drawers, and even stackable organizers for smaller kitchens. Coordinating labels and bottles adds a Pinterest-worthy uniformity that elevates the pantry’s visual appeal.

Step-by-Step How-To:
- Select Location: Find a narrow space or shelf where a pull-out spice rack will fit.
- Choose a Rack Style: Consider wall-mounted, under-shelf, or cabinet pull-out options.
- Install Rack: Follow manufacturer instructions for stability and smooth sliding.
- Sort Spices: Group by type—herbs, baking spices, savory spices—for easy access.
- Label Each Bottle: Add clear labels for quick identification.
- Maintain Regularly: Refill bottles and clean racks to keep them looking tidy.
Materials Needed:
- Pull-out spice rack
- Spice bottles or jars
- Labels or stickers
- Optional shelf liner
Tips:
- Use uniform bottles for a cohesive look.
- Group spices in order of frequency of use.
- Consider color-coded labels for quick recognition.
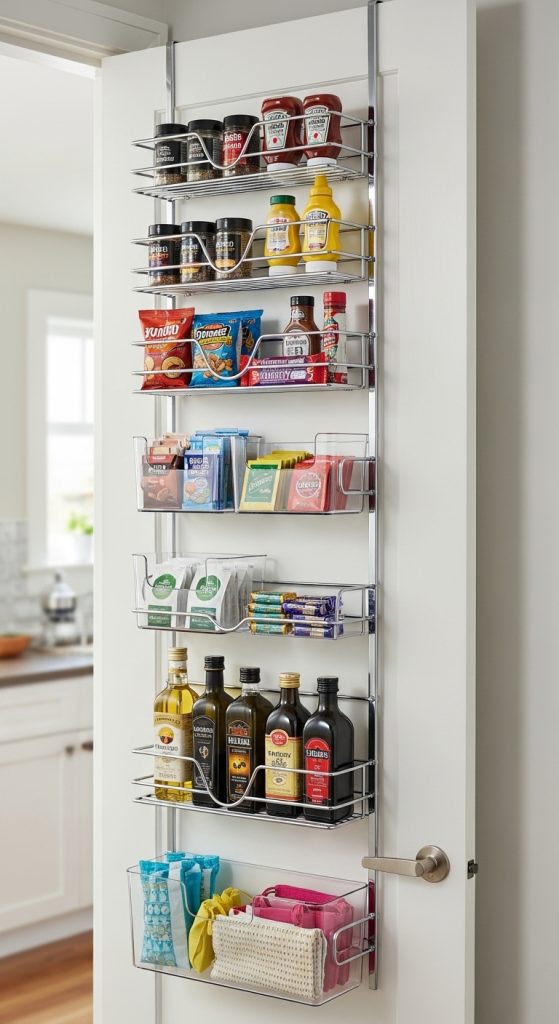
Idea 8: Install Door-Mounted Storage
Unused pantry doors can become valuable storage space with the addition of door-mounted racks, hooks, or organizers. This hidden storage solution keeps items accessible while freeing up shelf space.
Explanation:
Door-mounted organizers are ideal for storing lightweight items such as condiments, spices, snack packs, or cleaning supplies. They make use of vertical space that is often overlooked, reducing clutter on shelves. Modern designs include clear pockets, wire racks, and hanging baskets that blend seamlessly with the pantry’s aesthetic. Using the door for storage also simplifies categorization, as you can dedicate the door to frequently used items while keeping larger, less-accessed goods on shelves. This method combines functionality with style, creating a modern, Pinterest-worthy pantry.
Step-by-Step How-To:
- Measure Door Space: Determine available height and width for storage racks.
- Choose Door-Mounted Organizers: Pick racks, hooks, or pockets based on items you plan to store.
- Install Organizers: Use screws, adhesive hooks, or over-the-door brackets for secure attachment.
- Sort Items: Group by use—snacks, small bottles, or condiments.
- Arrange Neatly: Place frequently used items at eye level.
- Maintain Organization: Periodically review items to prevent clutter accumulation.
Materials Needed:
- Door-mounted racks or hooks
- Small containers or baskets
- Adhesive strips or screws (depending on installation method)
- Labels for clarity
Tips:
- Use lightweight containers to prevent door sagging.
- Keep heavier items on shelves, not the door.
- Consider clear pockets for easy visibility.
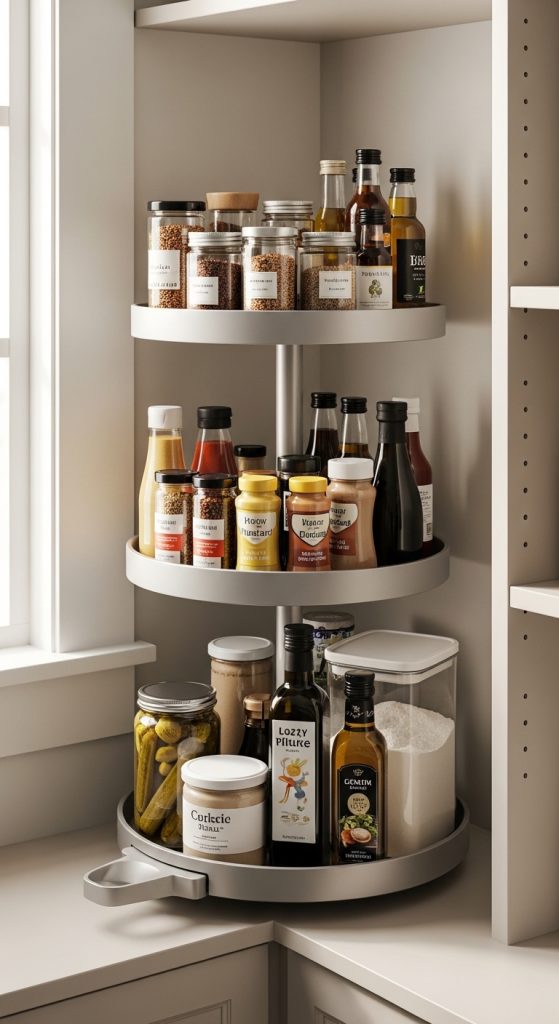
Idea 9: Incorporate Lazy Susans for Corner Shelves
Corners are often wasted space in pantries, but Lazy Susans turn them into functional and visually appealing storage areas.
Explanation:
Lazy Susans are rotating trays that allow easy access to items stored in corners or deep shelves. They are ideal for spices, oils, condiments, or small snacks. By rotating the tray, you can see and reach everything without moving other items, reducing clutter and maintaining organization. Clear or tiered Lazy Susans add a modern touch and work well with glass jars and labeled containers. This solution maximizes pantry space and creates a stylish, efficient look that is Pinterest-ready.
Step-by-Step How-To:
- Measure Corner Space: Ensure the Lazy Susan will fit comfortably on the shelf.
- Select Size and Style: Consider rotating trays or tiered models for smaller items.
- Arrange Items: Group similar items together for easy rotation.
- Label Containers: Maintain visibility and organization with uniform labeling.
- Place Lazy Susan: Center it in the corner or on a shelf for optimal access.
- Maintain Organization: Regularly rotate and clean to prevent spills and clutter.
Materials Needed:
- Lazy Susan or rotating tray
- Containers or jars for grouping items
- Labels
- Optional tiered shelves for additional storage
Tips:
- Use non-slip mats under the Lazy Susan for stability.
- Group items by frequency of use for maximum efficiency.
- Consider transparent trays to maintain visibility.
Idea 10: Add Decorative and Functional Baskets
Baskets are versatile storage solutions that combine style and function, perfect for snacks, produce, or miscellaneous pantry items.
Explanation:
Woven baskets, wire bins, or fabric containers are ideal for items that don’t fit neatly in jars or containers. They create a visually appealing look while grouping loose items together. For example, a basket can hold snack packets, another can store fresh fruit, and a larger bin can hold bread or rolls. Coordinating colors and textures adds warmth and style, while labels ensure organization. Decorative baskets make the pantry feel curated, modern, and Pinterest-ready, while keeping it functional.

Step-by-Step How-To:
- Choose Basket Styles: Pick sizes and materials to match your pantry aesthetic.
- Assign Categories: Determine which items go in each basket.
- Place Baskets on Shelves: Use them for easy-access items or visually unify small objects.
- Label Baskets: Add tags or labels for clarity.
- Rotate Items as Needed: Keep baskets neat and organized regularly.
- Mix and Match: Combine textures and materials for visual appeal without clutter.
Materials Needed:
- Woven, wire, or fabric baskets
- Labels or tags
- Optional liners for easy cleaning
Tips:
- Stackable baskets save vertical space.
- Use baskets for items that are awkwardly shaped or hard to contain.
- Decorative baskets double as functional and Pinterest-worthy elements.