
Easter is one of the most colorful, joyful, and creative holidays for kids. From pastel decorations to adorable bunnies and bright Easter eggs, the season naturally inspires fun craft projects that children absolutely love. Crafting is not just a way to pass time during holidays; it also encourages creativity, improves motor skills, and gives kids the opportunity to express their imagination in exciting ways. When children create something with their own hands—whether it is a bunny decoration or a colorful Easter basket—they feel proud and excited to display their creations around the home.

However, many parents and teachers worry that holiday crafting can become expensive, especially when multiple children are involved. This is where Dollar Tree crafts become incredibly helpful. Dollar Tree stores offer a wide variety of affordable supplies such as foam shapes, paint, paper, baskets, ribbons, and seasonal decorations. With just a few dollars, you can gather everything needed for several creative Easter projects. This makes it possible to organize fun craft sessions at home, in classrooms, or even during Easter parties without spending a lot of money.
DIY Dollar Tree Easter crafts are especially perfect for kids because the materials are simple, colorful, and easy to work with. Most projects can be completed using safe tools like glue sticks, markers, and child-friendly scissors. These crafts can also be adjusted depending on the child’s age. Younger kids can focus on decorating and gluing pieces together, while older kids can add more details like painting, drawing, or assembling small decorations.
Another wonderful benefit of Easter crafts is that they double as decorations. Instead of buying expensive store décor, kids can make adorable items such as bunny jars, egg garlands, Easter baskets, and spring-themed wall art. These handmade decorations make your home feel more festive and personal because each piece carries the charm of a child’s creativity.
Crafting together also creates meaningful family moments. Parents and children can sit together at the table, talk, laugh, and enjoy the process of making something beautiful. These small moments often become treasured memories long after the holiday is over. Teachers can also use these crafts in classrooms to celebrate the season while encouraging teamwork and creativity among students.
The best part about Dollar Tree Easter crafts is their flexibility. Many projects can be customized using different colors, patterns, and decorations. Kids can experiment with glitter, stickers, markers, ribbons, and googly eyes to create unique versions of each craft. Even if several children follow the same instructions, their finished crafts will look completely different because each child adds their own artistic touch.
In this guide, you will discover a collection of DIY Dollar Tree Easter crafts that are simple, affordable, and incredibly fun for kids. Each idea includes clear explanations, easy step-by-step instructions, and a list of materials so parents and teachers can prepare quickly. These projects are designed to be beginner-friendly, meaning even children with little crafting experience can participate.
Whether you are planning a fun weekend activity, organizing a classroom craft session, or preparing decorations for an Easter party, these creative ideas will help you turn inexpensive Dollar Tree supplies into adorable holiday crafts. By the end of this list, you will have plenty of inspiration to keep kids busy, happy, and creative throughout the Easter season.
Now let’s explore the first ten fun and affordable Dollar Tree Easter crafts that kids will absolutely love making.
1. Easter Bunny Paper Plate Craft
Introduction
Paper plate crafts are one of the easiest and most popular activities for children. They are simple, inexpensive, and perfect for creating fun characters like bunnies, chicks, and lambs. This Easter Bunny Paper Plate Craft is a great beginner project that kids can complete with minimal supervision. The materials are easy to find at Dollar Tree, and the craft requires only basic cutting, gluing, and decorating.
This craft is especially great for younger children because it focuses on creativity rather than complicated steps. Kids can decorate their bunny with markers, glitter, cotton balls, or stickers, making every bunny look unique. Once finished, the bunny plates can be used as Easter decorations, classroom wall displays, or even party decorations.
Parents and teachers love this craft because it requires very little preparation. A stack of paper plates, some basic craft supplies, and a little imagination are all that is needed. Within minutes, kids can transform a simple plate into an adorable Easter bunny face that looks cheerful and festive.

Materials Needed
- Paper plates
- White and pink construction paper
- Cotton balls
- Glue stick or craft glue
- Child-safe scissors
- Black marker
- Googly eyes
- Pink pom-pom (for nose)
Step-by-Step Instructions
- Start by placing the paper plate flat on the table. This will serve as the bunny’s face.
- Cut two long bunny ears from white construction paper and smaller pink ear shapes to glue inside them.
- Glue the ears to the top back side of the paper plate.
- Glue googly eyes onto the plate.
- Attach the pink pom-pom in the center for the nose.
- Draw a small bunny mouth and whiskers using a black marker.
- Glue cotton balls around the bottom to create fluffy bunny cheeks.
Why Kids Love It
This craft is soft, fluffy, and easy to personalize. Kids enjoy adding extra decorations like glitter or stickers, making their bunny truly special.
2. Dollar Tree Easter Egg Garland
Introduction
Garlands are simple decorations that instantly make a room feel festive. Kids love making them because they involve colorful shapes, simple cutting, and fun decorating. An Easter Egg Garland is a perfect craft for children because it allows them to design multiple eggs and combine them into one large decoration.
This project is ideal for decorating classrooms, bedrooms, or living rooms for Easter celebrations. It encourages kids to experiment with patterns, colors, and designs. Each egg becomes a small piece of art, and when they are all connected, they form a cheerful Easter decoration.
Because Dollar Tree offers foam eggs, paper cutouts, and craft supplies at affordable prices, creating a large garland becomes very budget-friendly.

Materials Needed
- Foam Easter egg shapes or colored cardstock
- String or twine
- Hole punch
- Markers or paint
- Stickers
- Glue
- Glitter (optional)
Step-by-Step Instructions
- Lay out the egg shapes on a table.
- Let kids decorate each egg using markers, stickers, or paint.
- Allow the decorated eggs to dry completely.
- Punch two small holes at the top of each egg.
- Thread the string through the holes to connect the eggs together.
- Leave small gaps between each egg for a balanced garland.
- Hang the garland on a wall, window, or mantel.
Why Kids Love It
Kids enjoy creating multiple egg designs and seeing their work displayed as a large colorful decoration.
3. Bunny Mason Jar Craft
Introduction
Turning simple Dollar Tree jars into Easter decorations is a fun and creative activity for kids. The Bunny Mason Jar Craft transforms an ordinary glass or plastic jar into an adorable bunny container that can hold candy, small toys, or craft supplies.
This project allows children to explore painting, decorating, and assembling craft elements. It also produces a useful item that kids can keep on their desks or give as a gift.

Materials Needed
- Mason jars from Dollar Tree
- White acrylic paint
- Paint brushes
- Pink felt
- Googly eyes
- Ribbon
- Glue
Step-by-Step Instructions
- Paint the jar white and let it dry completely.
- Cut bunny ear shapes from felt.
- Glue the ears onto the lid or top of the jar.
- Attach googly eyes and a small pink nose.
- Tie a ribbon around the jar’s neck.
Why Kids Love It
Kids enjoy using their jar to store Easter candy after finishing the craft.
4. Easter Chick Foam Craft
Introduction
Easter chicks are one of the cutest and most recognizable symbols of the spring season. Their bright yellow color and playful appearance instantly bring cheerful energy to Easter decorations. For kids, making a chick craft is especially exciting because the design is simple, colorful, and easy to customize. A Dollar Tree Easter Chick Foam Craft is the perfect beginner project for children of all ages, especially toddlers and preschoolers who are just starting to explore crafting.
This project is incredibly budget-friendly because most of the supplies can be found at Dollar Tree. Foam sheets, googly eyes, glue, and markers are all affordable and easy to work with. Foam crafts are also great for kids because the material is lightweight, soft, and safe to handle. Even younger children can easily glue and decorate foam shapes without frustration.
Another reason this craft is popular is that it can be used in many ways after it is finished. Kids can turn their foam chicks into magnets, greeting cards, classroom decorations, or Easter basket tags. Teachers often use chick crafts as part of spring classroom activities because they help children practice cutting, gluing, and creative expression.
This Easter Chick Foam Craft encourages kids to experiment with colors, textures, and simple design elements. Some children may add glitter, feathers, or stickers to make their chick extra special. Others may create an entire chick family using different sizes of foam circles.
With just a few simple supplies and easy steps, kids can create an adorable Easter chick that brings bright springtime joy into any home or classroom.

Materials Needed
- Yellow foam sheets or foam circles
- Orange foam sheet for beak and feet
- Googly eyes
- Glue or glue stick
- Child-safe scissors
- Black marker
- Yellow feathers (optional)
- Glitter or stickers (optional)
Step-by-Step Instructions
- Start by cutting a large circle from yellow foam. This will be the chick’s body. If using pre-cut foam shapes from Dollar Tree, simply choose a large yellow circle.
- Cut two small oval shapes from orange foam to create the chick’s feet.
- Cut a small triangle from orange foam for the beak.
- Place the yellow foam circle flat on the table.
- Glue the googly eyes near the top center of the circle.
- Attach the orange triangle slightly below the eyes to form the beak.
- Glue the orange feet at the bottom edge of the circle so they stick out slightly.
- Use a black marker to draw tiny wing shapes on both sides of the chick.
- For extra decoration, glue a few yellow feathers to the sides or top of the chick.
- Let the craft dry completely before displaying.
Why Kids Love This Craft
Kids enjoy making this craft because it is bright, simple, and very cute. The soft foam texture and colorful decorations make the chick feel playful and fun.
5. Easter Basket Decoration Craft
Introduction
Decorating Easter baskets is one of the most exciting parts of Easter celebrations for kids. Instead of using plain baskets from the store, children can transform simple Dollar Tree baskets into colorful personalized Easter containers. This Easter Basket Decoration Craft allows kids to design their own baskets using ribbons, stickers, foam shapes, and other fun decorations.
This project is great for kids because it gives them the freedom to be creative. Every child can decorate their basket differently, choosing their favorite colors, patterns, and Easter characters. Some may decorate their basket with bunnies and eggs, while others may add flowers, butterflies, or spring designs.
Dollar Tree offers a wide selection of small baskets that are perfect for crafting. These baskets are inexpensive but sturdy enough to hold Easter eggs, candy, and small toys. Because the baskets are affordable, parents and teachers can easily organize this craft for groups of children without spending too much money.
This craft also helps children develop creative thinking and design skills. They learn how to arrange decorations, combine colors, and build their own style. Once finished, the baskets can be used during Easter egg hunts, Easter parties, or as gift baskets for family members.
Decorating Easter baskets turns a simple holiday item into a unique handmade creation that kids will be proud to use and display.

Materials Needed
- Small Dollar Tree Easter baskets
- Colorful ribbon
- Foam Easter shapes
- Stickers (bunnies, eggs, flowers)
- Craft glue or hot glue (adult supervision if needed)
- Glitter glue
- Markers or paint
- Small pom-poms
Step-by-Step Instructions
- Place the basket on a table covered with craft paper to protect the surface.
- Wrap colorful ribbon around the basket handle and secure it with glue.
- Glue foam shapes such as bunnies, flowers, or eggs around the basket’s outer sides.
- Add decorative stickers to fill empty spaces.
- Use glitter glue to outline shapes or create sparkly designs.
- Glue small pom-poms onto the basket for added texture.
- Allow the basket to dry completely before using it.
Why Kids Love This Craft
Children love having their own decorated basket because it feels special and unique. They can proudly use it during Easter egg hunts or to store candy and small toys.
6. Cotton Ball Lamb Craft
Introduction
Fluffy lambs are another beloved symbol of spring and Easter. Their soft white wool and gentle appearance make them perfect for cute seasonal crafts. The Cotton Ball Lamb Craft is especially popular with younger children because it combines simple drawing with a fun sensory activity. Kids enjoy touching and gluing the cotton balls to create a fluffy lamb body.
This craft is perfect for preschool and kindergarten activities because it focuses on simple shapes and textures. Children can practice basic skills like gluing, arranging pieces, and recognizing animal shapes. The cotton balls give the lamb a soft, three-dimensional look that makes the craft more engaging and visually interesting.
Dollar Tree supplies make this craft easy to prepare. Cotton balls, construction paper, glue, and markers are inexpensive and widely available. Teachers often use this craft during spring classroom lessons about farm animals or seasonal changes.
Another advantage of this project is that it can be turned into a decoration or greeting card. Kids can write “Happy Easter” on the page and give their lamb craft to family members or friends. Some children even like to add extra details such as flowers, grass, or butterflies around the lamb.
This simple yet adorable craft encourages creativity while allowing kids to explore texture and design in a fun way.

Materials Needed
- White construction paper
- Cotton balls
- Glue
- Black construction paper
- Child-safe scissors
- Black marker
- Pink marker
Step-by-Step Instructions
- Draw a large oval shape in the center of the white paper to create the lamb’s body outline.
- Cut a small circle from black construction paper to create the lamb’s head.
- Glue the head onto one side of the oval.
- Apply glue inside the oval body shape.
- Stick cotton balls onto the glued area until the entire body is covered.
- Draw the lamb’s legs and ears using a black marker.
- Add small pink dots inside the ears for detail.
- Let the craft dry completely.
Why Kids Love This Craft
Kids enjoy the soft texture of the cotton balls and the adorable fluffy appearance of their finished lamb.
7. Easter Egg Painting Station
Introduction
Painting Easter eggs is one of the most traditional and exciting Easter activities for children. Instead of using real eggs, this Dollar Tree craft uses plastic eggs, making the activity mess-free, durable, and reusable. An Easter Egg Painting Station allows kids to explore colors, patterns, and creative designs while celebrating the holiday spirit.
This craft works especially well for family gatherings, classrooms, or Easter parties because multiple children can participate at the same time. Each child receives several plastic eggs and decorating supplies, allowing them to experiment with different patterns such as stripes, polka dots, flowers, or glitter designs.
Plastic eggs are ideal for kids because they are lightweight and easy to handle. Unlike real eggs, they will not crack or break if dropped. This makes the craft much less stressful for parents and teachers supervising younger children.
Once the eggs are decorated and dry, they can be used in many ways. Kids can place them inside Easter baskets, hide them for egg hunts, or display them in decorative bowls around the house.
Creating a painting station also encourages children to explore artistic techniques and color combinations. The process of painting small objects helps improve fine motor skills while allowing kids to express their creativity in a fun and festive way.

Materials Needed
- Plastic Easter eggs
- Acrylic or washable paint
- Paint brushes
- Paper plates for paint
- Cups of water
- Paper towels
- Glitter or stickers (optional)
Step-by-Step Instructions
- Cover the table with newspaper or craft paper.
- Place plastic eggs in small bowls or egg cartons to keep them steady.
- Pour different paint colors onto paper plates.
- Let kids paint patterns such as stripes, dots, flowers, or zigzag designs.
- Allow the eggs to dry for several minutes.
- Add glitter or stickers for extra decoration.
- Let the eggs dry completely before using them.
Why Kids Love This Craft
Kids enjoy painting bright colors and creating unique patterns on each egg. No two eggs ever look the same.
8. Bunny Headband Craft
Introduction
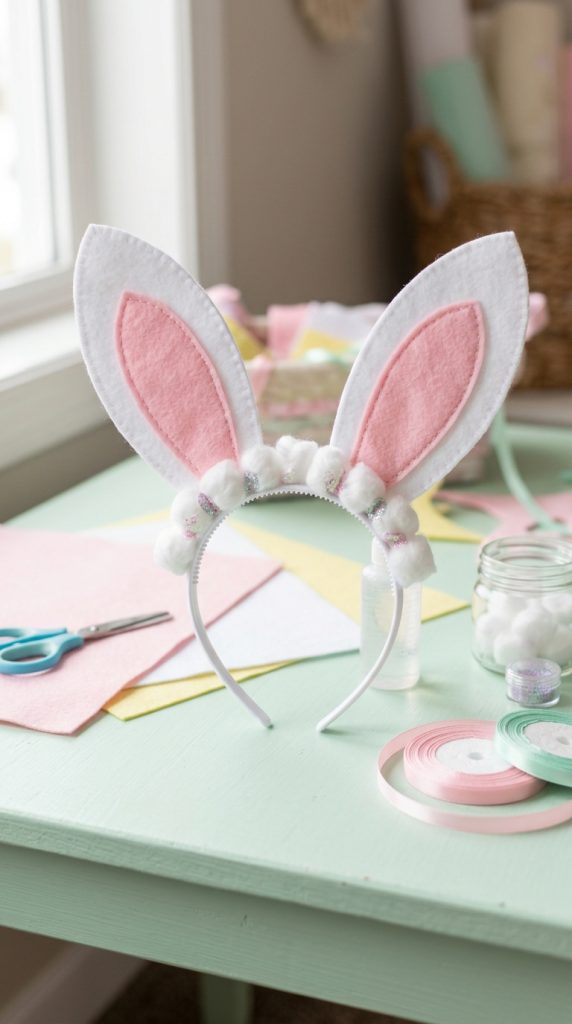
Wearable crafts are always exciting for kids because they can play with their creations after finishing them. The Bunny Headband Craft is a fun and simple project that lets children turn ordinary headbands into adorable Easter bunny accessories. These headbands are perfect for Easter parties, classroom celebrations, photo sessions, or Easter egg hunts.
Dollar Tree headbands and craft supplies make this project very affordable. Kids can decorate their headbands using felt ears, cotton balls, glitter, and ribbons. Each headband becomes a unique bunny accessory that reflects the child’s personality and creativity.
Another benefit of this craft is that it encourages imaginative play. Once kids finish their bunny headbands, they often enjoy pretending to be Easter bunnies hopping around the room. This makes the activity both creative and playful.
Teachers and parents also love this craft because it doubles as a costume piece for Easter events. Instead of buying expensive accessories, children can proudly wear something they created themselves.
The Bunny Headband Craft is simple enough for younger children but still fun for older kids who want to add extra decorations and details.
Materials Needed
- Plain plastic headbands
- White and pink felt
- Glue
- Cotton balls
- Scissors
- Glitter glue (optional)
- Ribbon (optional)
Step-by-Step Instructions
- Cut two large bunny ear shapes from white felt.
- Cut two smaller ear shapes from pink felt.
- Glue the pink pieces inside the white ear shapes.
- Attach the ears to the top of the headband using glue.
- Add cotton balls around the base of the ears for decoration.
- Decorate the headband with glitter glue or ribbon if desired.
- Allow everything to dry before wearing.
Why Kids Love This Craft
Kids enjoy wearing their bunny headbands and pretending to be playful Easter bunnies during holiday activities.
9. Easter Egg Suncatcher Craft
Introduction
Suncatchers are beautiful crafts that allow light to shine through colorful materials, creating a glowing decorative effect. The Easter Egg Suncatcher Craft is a wonderful spring activity that combines creativity with simple crafting techniques. When hung near a sunny window, the colorful tissue paper shines brightly, creating a cheerful Easter decoration.
This craft is perfect for kids because it focuses on arranging colorful shapes rather than complicated assembly. Children can tear or cut tissue paper into small pieces and glue them onto the egg shape. The final result looks like stained glass when sunlight passes through the design.
Dollar Tree provides many inexpensive materials that work perfectly for this project, including clear plastic lids, tissue paper, and ribbon. Because the supplies are affordable, this craft works well for classrooms and group activities.
Another great feature of this craft is its decorative value. Once completed, the suncatcher becomes a bright Easter decoration that kids will be proud to display. Hanging several suncatchers in a window can instantly make a room feel festive and colorful.

Materials Needed
- Clear plastic lids or contact paper
- Colored tissue paper
- Glue
- Scissors
- Ribbon or string
- Hole punch
Step-by-Step Instructions
- Cut an egg shape from clear plastic or contact paper.
- Cut or tear tissue paper into small colorful pieces.
- Spread glue lightly across the egg shape.
- Place tissue paper pieces onto the glue to create patterns.
- Allow the craft to dry completely.
- Punch a hole at the top of the egg.
- Thread ribbon through the hole and tie a knot.
- Hang the suncatcher near a sunny window.
Why Kids Love This Craft
Kids enjoy seeing sunlight shine through the colorful tissue paper, making their craft glow beautifully.
10. Bunny Treat Bags
Introduction
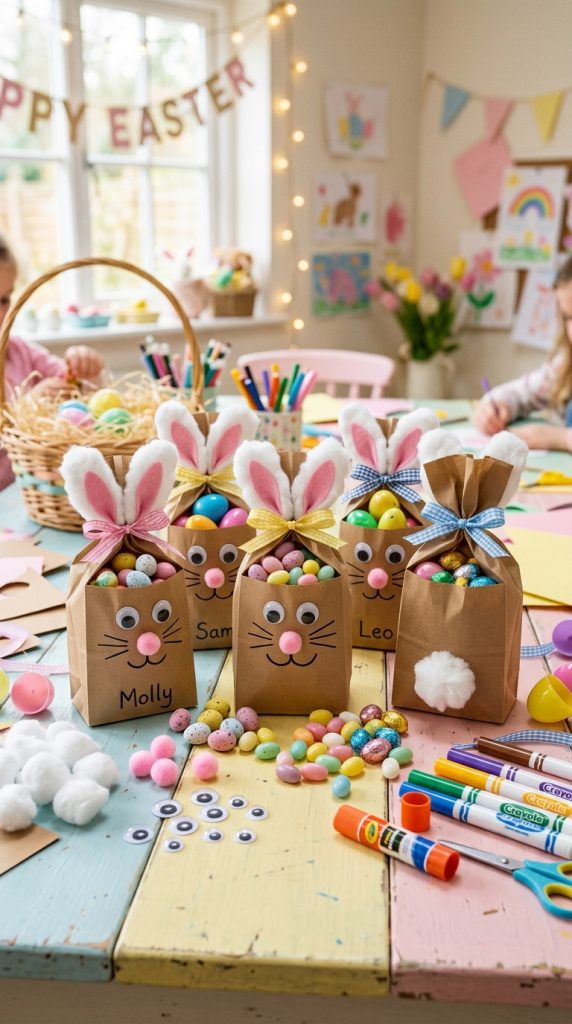
Bunny Treat Bags are one of the easiest and most adorable Easter crafts for kids. These simple bags can be transformed into cute bunny faces using just a few craft supplies. Once finished, they can be filled with candy, small toys, or Easter eggs to create fun holiday gifts.
This craft is perfect for Easter parties, classroom celebrations, or family gatherings. Kids enjoy decorating the bags and then filling them with treats to share with friends and relatives. Because the materials are inexpensive and easy to find at Dollar Tree, this craft is ideal for group activities.
The project is also beginner-friendly, requiring only simple drawing, gluing, and decorating. Even young children can complete this craft with minimal help.
Once the bags are finished, they can be used as party favors, gift bags, or Easter basket additions. Some kids even like to make several bunny bags and give them as handmade gifts.
Materials Needed
- Brown or white paper bags
- Googly eyes
- Pink pom-poms
- Cotton balls
- Markers
- Glue
- Scissors
Step-by-Step Instructions
- Place the paper bag flat on the table.
- Use scissors to cut two bunny ear shapes from the top of the bag.
- Glue googly eyes onto the front of the bag.
- Attach a pink pom-pom for the nose.
- Draw whiskers and a mouth using a marker.
- Glue a cotton ball on the back of the bag for the bunny tail.
- Fill the bag with candy or small Easter treats.
Why Kids Love This Craft
Kids love filling their bunny bags with candy and sharing them with friends or family during Easter celebrations.