If you’ve been scrolling through Pinterest or TikTok lately, you’ve probably noticed one nail trend making a major comeback—and it’s bolder than ever: duck nails. Also known as “flare nails,” this unique nail shape is instantly recognizable for its wide, flared-out tips that resemble a duck’s foot. While this style first gained popularity years ago, it has now returned with a modern twist, especially in sleek and dramatic black designs that are taking over the beauty world.
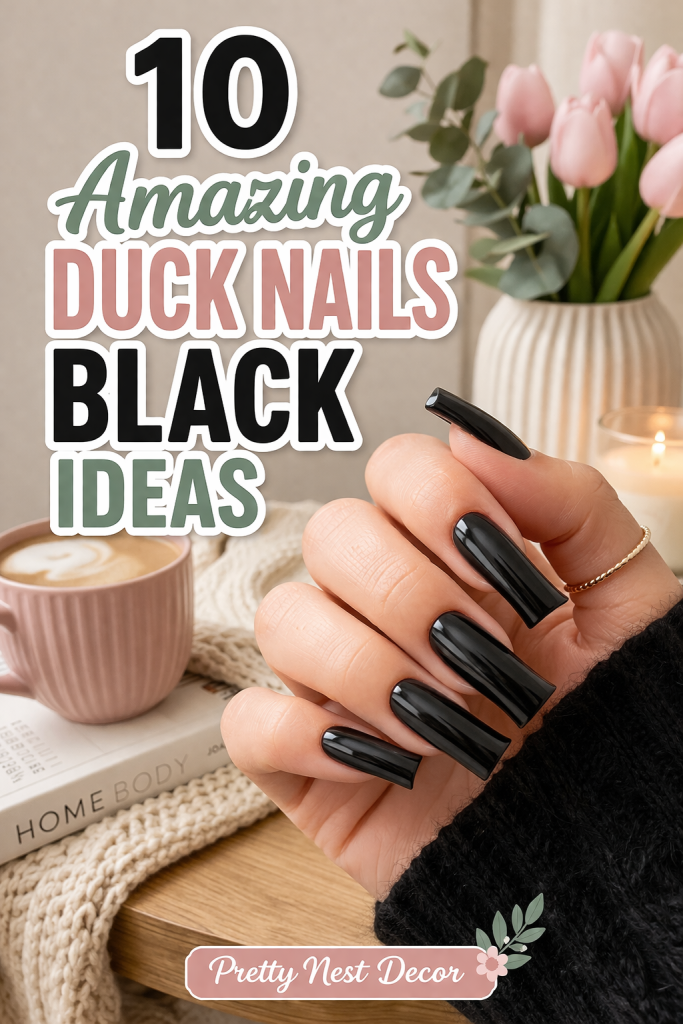
Black duck nails are the perfect combination of edgy, glamorous, and statement-making. They’re not for minimalists—they’re for those who love to stand out, experiment, and express their personality through bold nail art. Whether you prefer glossy black finishes, matte textures, rhinestone accents, or intricate designs, black duck nails offer endless creative possibilities. This trend is all about pushing boundaries and turning your nails into mini works of art that demand attention.
One of the reasons black duck nails are trending so heavily right now is because they break away from traditional nail shapes like almond, coffin, or square. The flared tip gives you extra space for creativity, making it easier to experiment with dramatic designs, layered textures, and eye-catching embellishments. From chrome finishes and glitter details to 3D charms and abstract art, duck nails allow you to go beyond the ordinary and create something truly unique.
Black, as a color, plays a huge role in elevating this trend. It’s timeless, versatile, and effortlessly chic. Black nails have always been associated with confidence and sophistication, but when combined with the bold duck shape, they become even more powerful. You can go for a sleek and polished look with glossy black polish or create a more edgy vibe with matte finishes, metallic accents, or gothic-inspired details. No matter your style, black duck nails can be customized to match your mood and aesthetic.
Another reason why this trend is so popular on Pinterest is its high visual impact. Duck nails naturally stand out because of their shape, and when paired with black designs, they create a striking contrast that looks amazing in photos and videos. This makes them perfect for content creators, beauty lovers, and anyone who wants their nails to be noticed. The bold silhouette combined with creative detailing makes these nails highly “save-worthy” and shareable, which is exactly what drives trends on platforms like Pinterest.
Despite their bold appearance, duck nails are surprisingly versatile. You can keep them simple with a clean black finish for an understated yet trendy look, or go all out with rhinestones, gems, decals, and intricate patterns. They work for a variety of occasions—from everyday glam to special events like parties, photoshoots, or even themed looks. The key is to balance the dramatic shape with designs that complement your overall style.
It’s also important to note that duck nails are all about confidence and self-expression. This isn’t a trend you follow quietly—it’s one you embrace fully. Wearing duck nails, especially in black, shows that you’re not afraid to be bold and try something different. It’s about having fun with your look and experimenting with designs that reflect your personality. Whether you love edgy aesthetics, glam styles, or artistic nail art, duck nails give you the freedom to explore it all.
For beginners, this trend might seem a little intimidating at first, but it’s actually very achievable with the right approach. Nail technicians can easily create the flared shape using acrylics, and there are also press-on options available for those who want a temporary look. Once you have the base shape, the real fun begins—choosing designs, textures, and finishes that bring your vision to life. With a bit of creativity and inspiration, anyone can rock black duck nails confidently.
Maintenance is another factor to consider. Because of their unique shape, duck nails require proper care to keep them looking fresh and polished. Regular fills, gentle handling, and quality products will help maintain their appearance and durability. Choosing the right length and flare size can also make a difference in comfort and wearability, especially if you’re new to this style.
In this article, you’ll discover 10 amazing black duck nail ideas that are trendy, creative, and perfect for anyone looking to try something bold. Each idea is designed to inspire you, whether you prefer subtle elegance or over-the-top glam. From minimalist black designs to fully embellished statement nails, these ideas will help you find the perfect look to match your vibe.
So if you’re ready to step out of your comfort zone and try a nail trend that’s bold, stylish, and completely eye-catching, black duck nails are the perfect choice. Get ready to explore designs that are edgy, glamorous, and totally Pinterest-worthy—because your nails deserve to stand out just as much as you do.
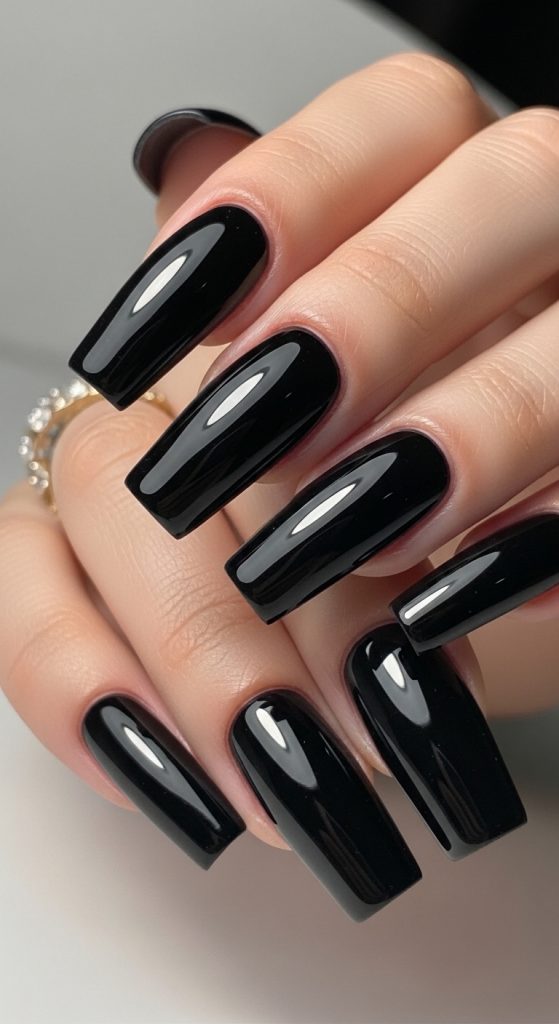
Idea 1: Glossy Black Classic Duck Nails – The Timeless Statement
Introduction
Glossy black duck nails are a perfect combination of boldness and sophistication. This design takes the dramatic flared shape of duck nails and pairs it with the timeless appeal of jet-black polish. The wide, outward-flaring tips give your nails a unique silhouette that is instantly recognizable, making them stand out from traditional nail shapes like almond or coffin. Glossy black enhances this shape by reflecting light, creating a luxurious, polished appearance that looks professional even if you do it at home.
Glossy black duck nails are incredibly versatile. They work well for both casual and formal occasions, making them a great everyday statement or a show-stopping design for parties and events. The high-shine finish amplifies the flared tips, giving your nails a sleek, mirror-like look that photographs beautifully—perfect for Pinterest posts, Instagram reels, or TikTok nail content. Even minimal designs on glossy black duck nails can look glamorous because the shape itself is bold and attention-grabbing.
This style is ideal for beginners looking to step into the world of duck nails because the design itself is simple yet impactful. The black color acts as a base for experimenting with textures, metallics, or accent nails in the future. It’s classic, modern, and forever trendy—a must-try for anyone wanting edgy, chic nails.
Step-by-Step How-To:
- Prep your nails: Remove old polish, trim, and push back cuticles.
- Create the duck shape: Use acrylic or gel tips to form flared tips resembling a duck’s foot.
- File and smooth: Shape edges, ensuring the flare is even and symmetrical on all nails.
- Apply base coat: Protects natural nails and prevents staining from black polish.
- Apply black polish: Use two to three coats for full opacity, curing each layer if using gel.
- Add glossy top coat: Seal the polish for a mirror-like shine and extended wear.
- Finishing touches: Clean edges with a brush dipped in nail polish remover and style minimal accessories for an Instagram-worthy look.
Materials Needed:
- Acrylic or gel duck nail tips
- Nail file, buffer, and cuticle pusher
- Base coat
- Black gel or regular polish
- Glossy top coat
- UV/LED lamp (if using gel)
- Nail brush for clean-up
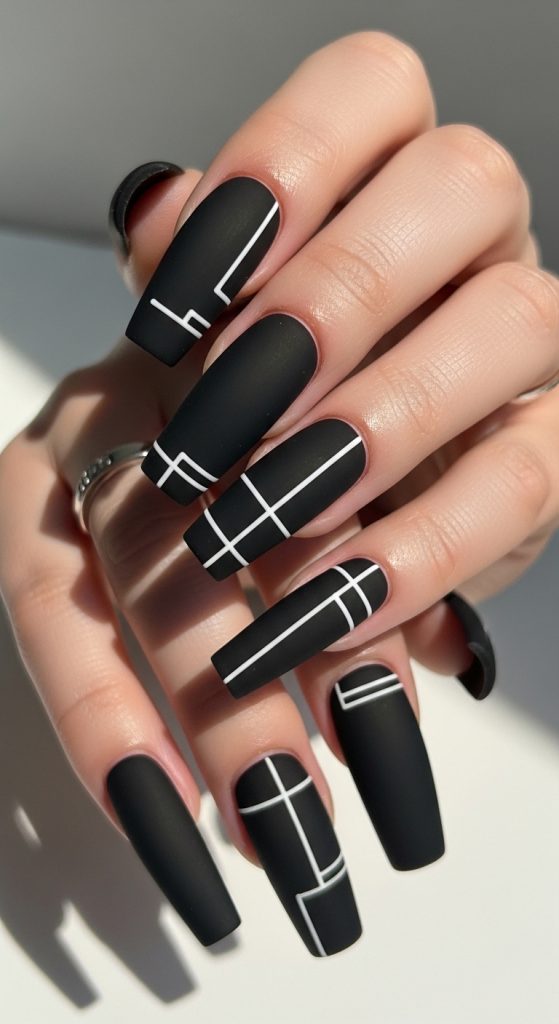
Idea 2: Matte Black Duck Nails with Minimal White Lines – Subtle Elegance
Introduction
Matte black duck nails are a modern, understated alternative to glossy nails while still making a statement. The matte finish softens the bold black, giving it a velvety, refined appearance. When combined with minimal white or metallic lines, this design becomes a perfect balance of edgy and elegant. The flared tips of duck nails provide extra space to create symmetrical lines, abstract shapes, or geometric designs without overwhelming the look.
This style is highly versatile. It’s ideal for someone who prefers minimalist aesthetics yet wants nails that stand out in photos or videos. The matte texture gives an artistic, high-fashion vibe and contrasts beautifully with glossy accent details or metallic lines. These nails work in both professional and casual settings because the design is subtle but sophisticated. Matte black duck nails are also beginner-friendly, as minimal line work is easier to achieve on a large, flared surface.
Step-by-Step How-To:
- Prep nails: Remove polish, trim, push back cuticles, and shape duck tips.
- Apply base coat: Protect natural nails.
- Apply black polish: Two coats for opacity, ensuring smooth, even coverage.
- Apply matte top coat: Cure if using gel to achieve velvety finish.
- Draw minimal lines: Use a fine nail art brush with white or silver polish to create straight, abstract, or geometric lines.
- Seal design lightly: Optional matte or glossy top coat to protect line work.
- Final clean-up: Remove stray polish around nails for a polished finish.
Materials Needed:
- Matte black nail polish or gel
- White or metallic polish for lines
- Fine nail art brush
- Base coat
- Matte top coat
- UV/LED lamp if using gel
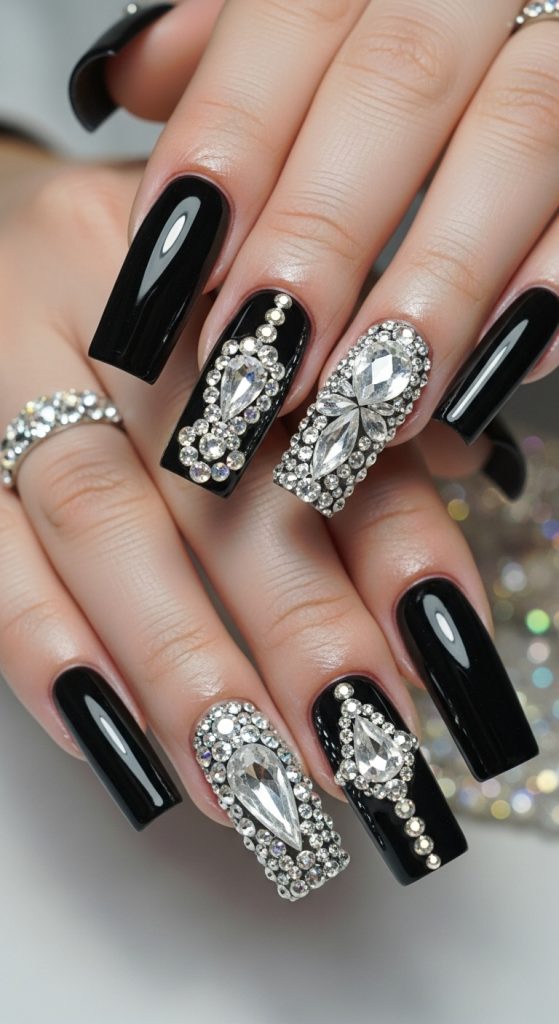
Idea 3: Black Duck Nails with Rhinestone Glam – Sparkling Statement
Introduction
For those who love luxury and sparkle, black duck nails with rhinestones are the ultimate statement. The flared tips offer a wide canvas, perfect for creative placements of gems, crystals, or studs. The glossy black base contrasts perfectly with rhinestones, highlighting their brilliance and creating a dramatic, glamorous effect. This design is perfect for parties, events, or photoshoots where your nails need to stand out.
The beauty of this design is in its versatility. You can cover all nails in rhinestones for a high-drama look, or use accent nails to maintain subtle elegance. Black provides a bold backdrop that enhances the sparkle of rhinestones, making them pop and catch light beautifully in photos—ideal for Pinterest, Instagram, and TikTok. With careful placement, rhinestones add dimension and luxury while keeping the overall look cohesive.
Step-by-Step How-To:
- Prep and shape nails: Create duck shape with acrylic or gel tips.
- Apply black polish: Use two coats for a deep, uniform finish.
- Plan rhinestone placement: Decide which nails will be accent nails and layout design.
- Apply nail glue: Place small dots of glue where rhinestones will sit.
- Place rhinestones: Use tweezers or rhinestone picker tool for precision.
- Secure with top coat: Lightly seal around rhinestones to prevent movement.
- Cure if using gel: Ensure long-lasting durability.
Materials Needed:
- Black nail polish or gel
- Rhinestones or crystals
- Nail glue or rhinestone gel
- Tweezers or picker tool
- Top coat
- UV/LED lamp
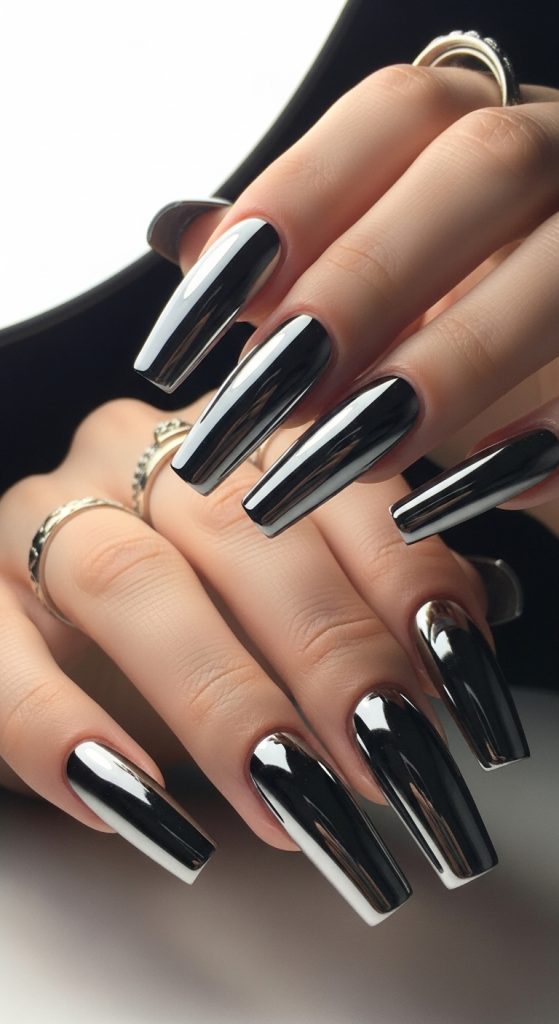
Idea 4: Black Chrome Duck Nails – Futuristic Glam
Introduction
Black chrome duck nails are for anyone who wants futuristic elegance and maximum shine. This design combines the bold flared shape with a reflective, metallic chrome finish. Unlike traditional black polish, chrome catches and reflects light, creating a mirror-like effect that elevates the entire nail look. It’s perfect for trendsetters and content creators because it looks incredibly high-end and Pinterest-ready.
Chrome nails look amazing in photos and real life, especially when paired with black gel for depth. The flared tips of duck nails enhance the reflective surface, giving a dramatic, ultra-fashionable finish. This style works for events, special nights out, or anyone who wants to make a bold statement with their manicure. It’s an edgy twist on classic black that keeps your nails at the forefront of trends.
Step-by-Step How-To:
- Prep nails: Create duck shape and clean nails.
- Apply base coat: Protect nails from staining.
- Apply black gel polish: Two coats for full opacity and cure.
- Apply chrome powder: Rub powder evenly using an applicator sponge for mirror effect.
- Seal with top coat: Cure if using gel.
- Final touch: Clean edges and inspect shine.
Materials Needed:
- Black gel polish
- Chrome powder
- Applicator sponge
- Base coat
- Top coat
- UV/LED lamp
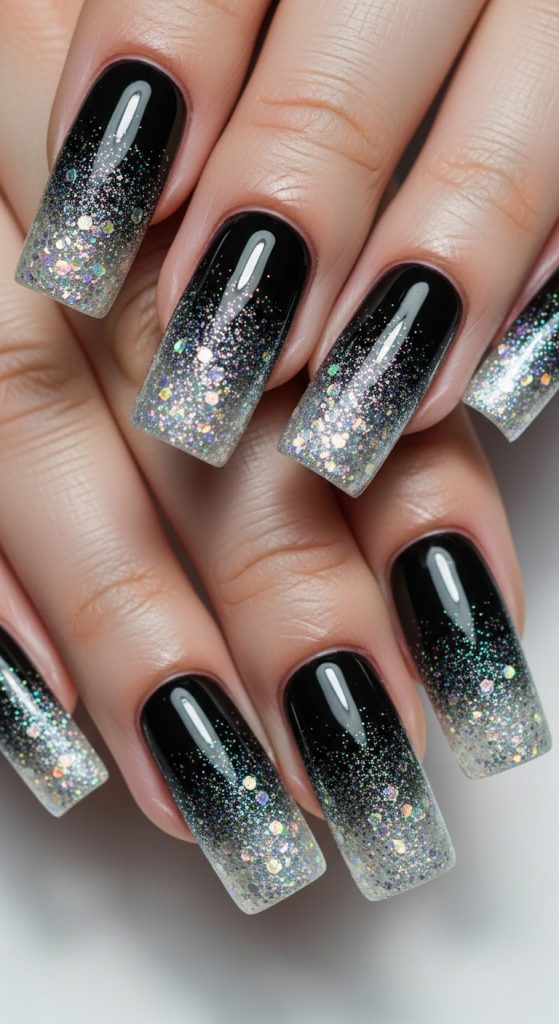
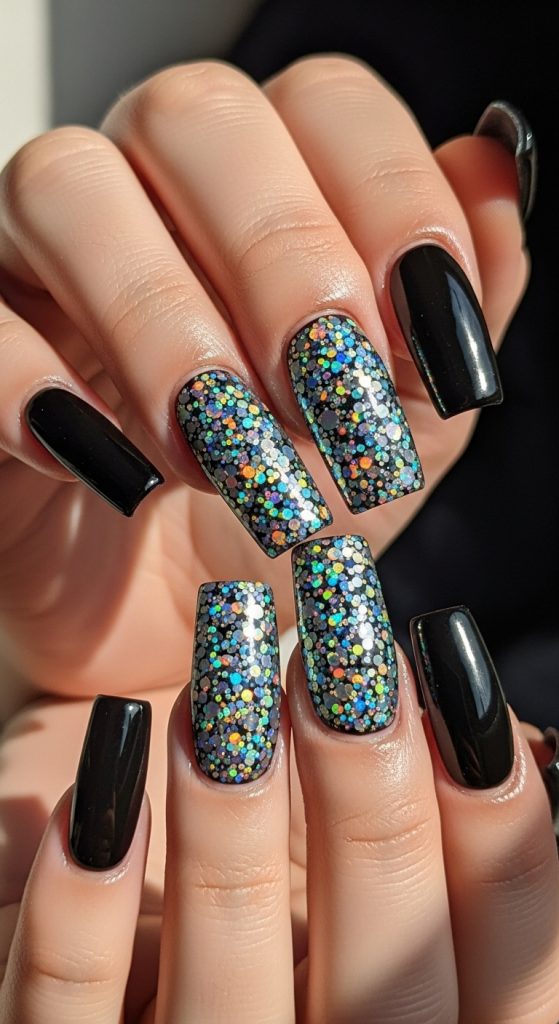
Idea 5: Black Duck Nails with Glitter Fade – Subtle Sparkle
Introduction
Black duck nails with a glitter fade are perfect for those who love understated sparkle. The design starts with a solid black base and gently blends glitter from tips or cuticles, creating a soft gradient. This allows you to add glamour without making the nails feel heavy or overwhelming. It’s ideal for both casual and event looks.
The wide flared tips make the gradient highly visible, giving a dynamic effect that catches light beautifully. You can choose silver, gold, or holographic glitter depending on your style. This trend is Pinterest favorite because it’s visually appealing, versatile, and easy to adapt to different nail lengths. The glitter fade adds dimension and movement, making nails look longer, polished, and ultra-trendy.
Step-by-Step How-To:
- Prep nails: Shape into duck tips and clean surface.
- Apply black base coat: Two layers for depth.
- Apply glitter: Use sponge or brush to gently fade glitter from tip to base (or vice versa).
- Blend softly: Ensure smooth gradient without harsh lines.
- Seal with top coat: Use glossy or matte depending on preference.
- Cure if gel: Ensure glitter stays in place.
- Final clean-up: Remove excess polish around nails for a neat look.
Materials Needed:
- Black nail polish or gel
- Glitter (silver, gold, or holographic)
- Sponge or brush for blending
- Base coat
- Top coat
- UV/LED lamp
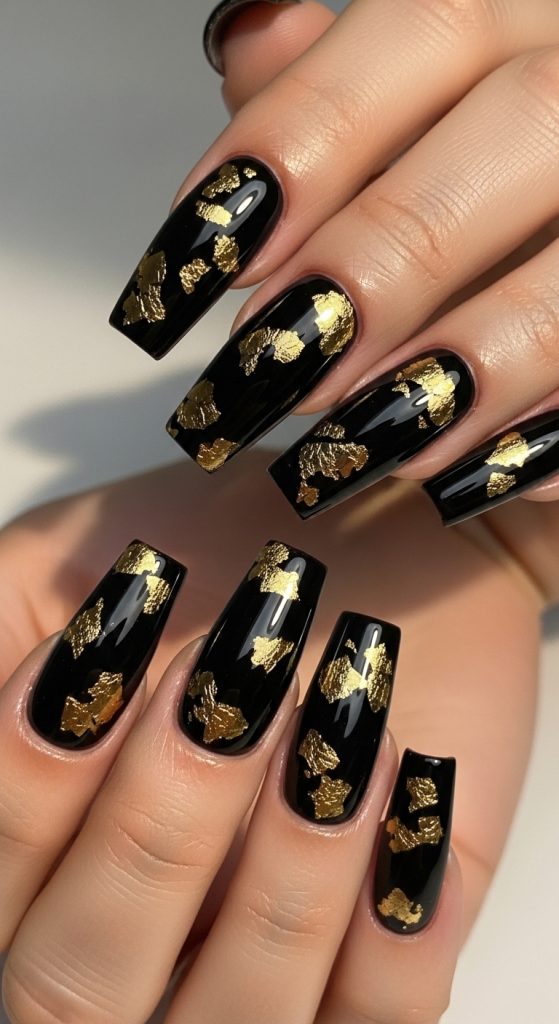
Idea 6: Black Duck Nails with Gold Foil Accents – Luxury Meets Edge
Introduction
Black duck nails with gold foil accents are the ultimate combination of boldness and luxury. The deep, dramatic black base makes the gold details pop, creating an elegant and edgy statement. Gold foil adds texture, dimension, and a reflective sparkle that catches light beautifully, making it perfect for special occasions or social media-ready nails.
This design works wonderfully because the flared duck nail shape provides a larger canvas, allowing the foil to be placed creatively without looking cluttered. You can cover the entire nail for a full glam effect, add foil to accent nails only, or create abstract patterns for a modern artistic vibe. The contrast of dark black and warm gold evokes sophistication while maintaining a bold edge, making your nails Pinterest-worthy and attention-grabbing.
Step-by-Step How-To:
- Prep nails: Clean, trim, and shape into duck nails.
- Apply base coat: Protect nails from staining.
- Paint nails black: Apply two coats of black gel or regular polish and cure if using gel.
- Apply gold foil: Place small pieces of foil on nails while polish is slightly tacky, using tweezers or a silicone tool.
- Press gently: Ensure foil adheres smoothly without wrinkles.
- Seal with top coat: Use glossy top coat to lock in foil and smooth surface.
- Final clean-up: Remove excess polish or foil around nail edges.
Materials Needed:
- Black polish or gel
- Gold foil sheets or flakes
- Tweezers or silicone tool
- Base coat
- Glossy top coat
- UV/LED lamp
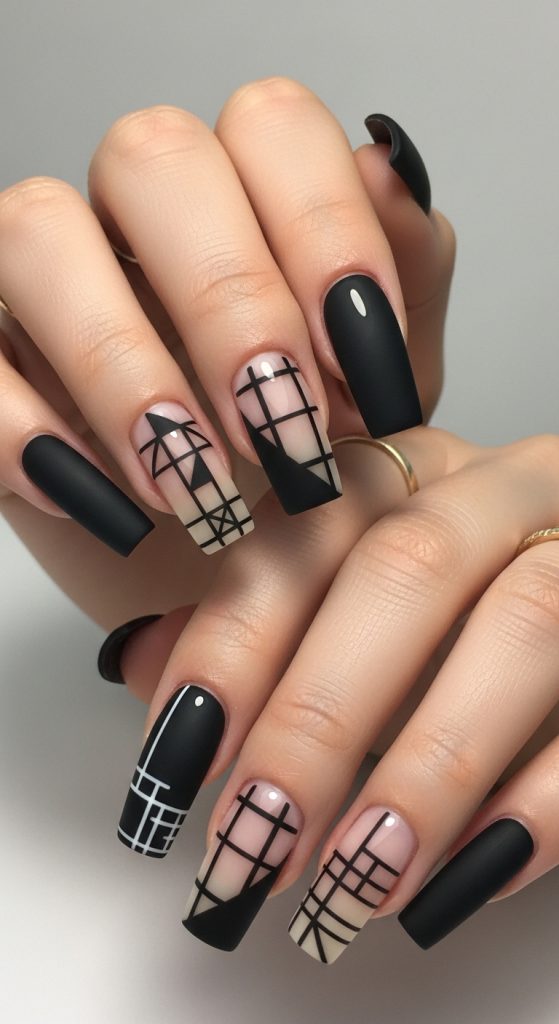
Idea 7: Black Duck Nails with Negative Space Design – Chic & Modern
Introduction
Negative space designs on black duck nails create a modern, minimalist aesthetic that feels effortlessly chic. By leaving parts of the natural nail exposed while applying black polish to specific areas, you create striking geometric patterns, stripes, or abstract shapes. This style leverages the wide canvas of duck nails to make the patterns bold and highly visible, giving a fresh, fashion-forward twist on classic black nails.
Negative space black duck nails are perfect for Pinterest content because they look editorial and high-end while remaining wearable. The design allows for creativity—whether you want symmetrical shapes, diagonal lines, or asymmetrical abstract art. It’s also versatile; you can combine it with matte or glossy finishes depending on the effect you want. Negative space gives your nails a clean, airy feel while still making a statement, perfect for trendsetters who love edgy but elegant styles.
Step-by-Step How-To:
- Prep nails: Shape duck nails, clean, and push back cuticles.
- Apply base coat: Protect nails.
- Plan design: Decide which areas will remain natural.
- Apply black polish: Use tape or stencils if needed for clean edges.
- Cure if using gel: Ensure polish sets completely.
- Top coat: Seal design with glossy or matte top coat.
- Clean edges: Remove stray polish for polished, professional finish.
Materials Needed:
- Black polish or gel
- Base coat
- Top coat (matte or glossy)
- Nail tape or stencils
- UV/LED lamp
Idea 8: Black Duck Nails with Holographic Glitter – Rainbow Sparkle
Introduction
Black duck nails with holographic glitter are playful, bold, and perfect for anyone who loves eye-catching designs. The dark black background makes holographic glitter shine with rainbow-like reflections, creating a magical and whimsical effect. The flared tips of duck nails give enough surface area to apply glitter densely or in gradient styles, making your nails appear three-dimensional and dynamic.
This design is ideal for festive occasions, parties, or content creators looking to create viral nail photos. You can customize it by applying glitter on all nails, accent nails, or just the tips for a subtle sparkle. Holographic glitter adds movement to the nails, reflecting light at different angles, which is perfect for Pinterest-worthy, saveable designs. It’s fun, creative, and glamorous, without being overly complicated for beginners.
Step-by-Step How-To:
- Prep nails: Clean, shape into duck nails, and push back cuticles.
- Apply base coat: Protect nails.
- Paint nails black: Two coats of gel or regular polish.
- Apply glitter: Use sponge or brush to gradually fade glitter from tip to base or vice versa.
- Blend carefully: Ensure gradient is smooth and visually appealing.
- Seal with top coat: Use glossy finish to lock in glitter.
- Final clean-up: Remove excess glitter around nail edges.
Materials Needed:
- Black nail polish or gel
- Holographic glitter
- Sponge or brush for gradient
- Base coat
- Glossy top coat
- UV/LED lamp
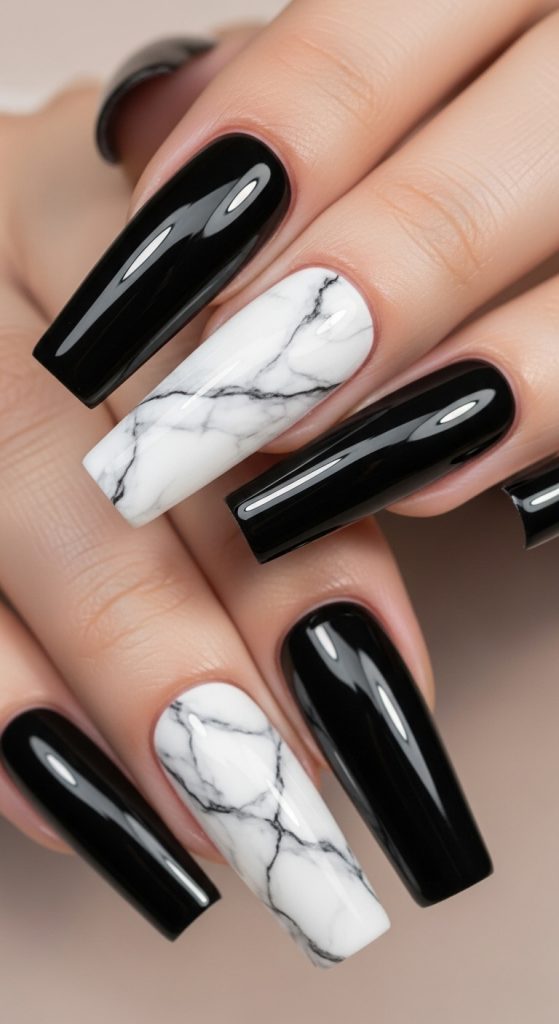
Idea 9: Black Duck Nails with Marble Design – Elegant & Artistic
Introduction
Marble-inspired black duck nails offer a sophisticated and artistic twist on classic black nails. This design combines a deep black base with white or gray veining, mimicking the natural beauty of marble. The wide, flared tips of duck nails provide ample space for veining patterns, allowing each nail to look like a miniature piece of art.
Marble black duck nails are highly versatile. You can go for subtle, soft veins for a minimalist look or bold, dramatic patterns for a statement manicure. This style is perfect for Pinterest because it photographs beautifully, especially when polished and glossy. The combination of black with marble detailing creates a luxurious, high-fashion aesthetic that works for both casual and formal events.
Step-by-Step How-To:
- Prep nails: Shape into duck nails and clean.
- Apply base coat: Protect natural nails.
- Paint base: Apply black polish or gel.
- Create marble effect: Use a thin nail art brush or water marble technique with white/gray polish to create veins.
- Blend carefully: Softly smudge lines for natural marble appearance.
- Seal with top coat: Glossy or matte depending on preference.
- Final clean-up: Remove polish from surrounding skin.
Materials Needed:
- Black polish or gel
- White/gray polish
- Nail art brush
- Base coat
- Top coat (glossy or matte)
- UV/LED lamp
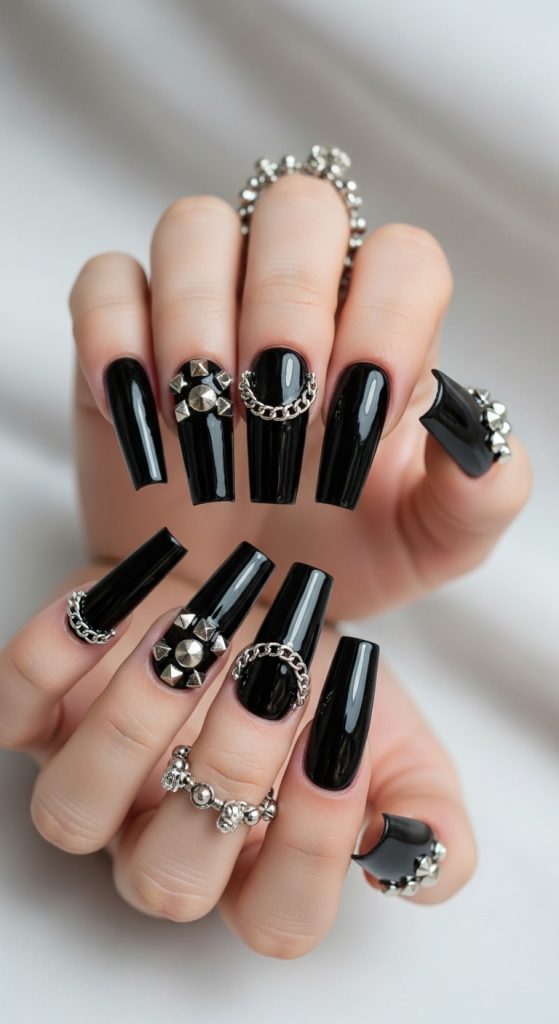
Idea 10: Black Duck Nails with Studs & Chains – Edgy Glam
Introduction
Black duck nails with studs and tiny chains are for those who love edgy, rockstar-inspired nail art. The flared tips make a perfect platform for metallic decorations, creating a bold, dramatic, and Pinterest-worthy look. Black polish acts as the perfect backdrop, allowing metallic studs and chains to shine without overwhelming the design.
This design is highly customizable. You can use studs on all nails, just accent nails, or add tiny chains connecting a few studs for extra drama. The combination of black and metallic elements creates a high-fashion aesthetic that’s perfect for events, concerts, or social media content. The wide duck shape ensures that the embellishments are secure and visible, making them highly functional as well as stylish.
Step-by-Step How-To:
- Prep nails: Shape duck nails, push back cuticles.
- Apply base coat: Protect nails.
- Paint black: Apply two coats and cure if using gel.
- Plan stud placement: Decide accent nails and pattern.
- Attach studs/chains: Use nail glue or gel for metallic elements.
- Seal with top coat: Ensure everything stays secure without dulling shine.
- Final clean-up: Remove excess glue and polish.
Materials Needed:
- Black polish or gel
- Metallic studs, chains, or embellishments
- Nail glue or rhinestone gel
- Base coat
- Top coat
- Tweezers for placement
- UV/LED lamp