Mother’s Day is more than just a date on the calendar—it’s a heartfelt celebration of love, appreciation, and gratitude for the most important women in our lives. While flowers, chocolates, and store-bought gifts have their charm, nothing compares to the personal touch of handmade crafts. Creating a thoughtful craft allows you to express your feelings in a way that is unique, meaningful, and memorable. The beauty of Mother’s Day crafts lies not just in the final product, but in the time, effort, and creativity you put into making something special for someone who has given so much. Whether you are a parent crafting with your child, a teenager looking to surprise your mom, or an adult wanting to create a sentimental gift, handmade crafts provide the perfect avenue to express love.
Handmade crafts come in all shapes, sizes, and materials. From simple paper-based DIY projects to more elaborate creations involving wood, fabric, or clay, the possibilities are virtually endless. This flexibility makes Mother’s Day crafts accessible to people of all skill levels and ages. Even if you are a beginner with limited crafting experience, there are numerous ideas that are easy to follow and create while still leaving a lasting impression. At the same time, seasoned crafters can use these ideas as inspiration to experiment with textures, colors, and techniques, creating one-of-a-kind gifts that will be treasured for years.
One of the most rewarding aspects of crafting for Mother’s Day is the opportunity to infuse personal touches into your project. Personalized gifts carry emotional weight because they reflect thoughtfulness and care. You can incorporate elements like your mom’s favorite colors, patterns, or motifs, or include photographs and handwritten notes to make the craft even more meaningful. When a mother receives a handmade gift that is thoughtfully designed, it communicates not only appreciation but also the time and attention devoted to creating something uniquely hers. These personalized details elevate the gift from ordinary to extraordinary, making the recipient feel cherished and loved.
Crafting also encourages mindfulness and connection. When you take the time to sit down and create something with intention, you are engaging in a process that requires focus, creativity, and patience. This makes the act of crafting not only productive but also therapeutic. Furthermore, crafting can be a bonding activity when done with children or family members. Together, you can share laughs, stories, and memories while creating gifts that hold sentimental value. The experience itself becomes part of the gift, turning crafting into a memorable celebration of love and togetherness.
In addition to the emotional value, Mother’s Day crafts can also be aesthetically beautiful and versatile. They can serve as functional items, such as decorated mugs, photo frames, or planters, or purely decorative pieces like handmade cards, wall hangings, or paper flowers. Many craft ideas are inexpensive and budget-friendly, using materials that are easily accessible at home or at local craft stores. This makes it possible for anyone to participate in the joy of creating, regardless of financial constraints. The satisfaction of transforming simple supplies into a thoughtful masterpiece is unparalleled and adds a sense of accomplishment to the gifting experience.
With the rise of social media and platforms like Pinterest, crafting has become more accessible than ever. Countless tutorials, templates, and inspiration boards provide step-by-step guidance for crafters at all levels. This ensures that your Mother’s Day gifts can be not only creative but also visually appealing and on-trend. Following a structured approach to crafting, including detailed planning, preparation of materials, and stepwise execution, ensures professional-looking results that are worthy of display. Moreover, these crafts are highly shareable, allowing you to showcase your creations and inspire others in the crafting community.
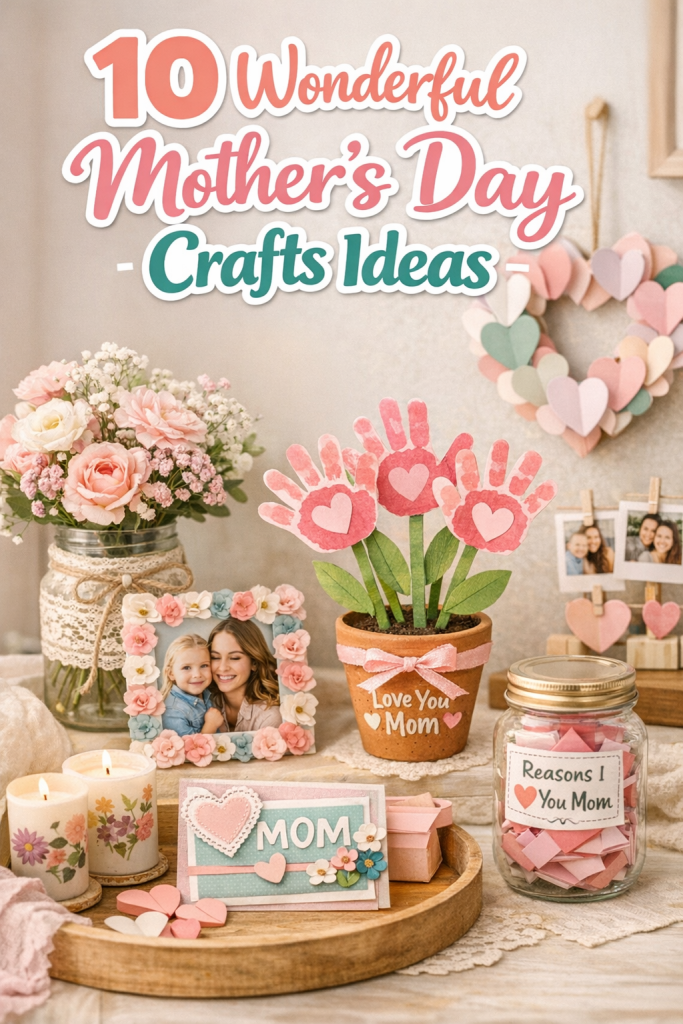
This article is a comprehensive guide to 10 wonderful Mother’s Day craft ideas that are both practical and beautiful. Each idea is designed to be beginner-friendly yet elegant, offering clear instructions, materials lists, and step-by-step guidance. From easy paper crafts suitable for toddlers to intricate DIY projects for adults, these ideas encompass a variety of techniques and styles, ensuring there’s something for everyone. Whether you’re aiming for a sentimental keepsake, a decorative piece, or a functional gift, these crafts are carefully curated to inspire creativity and provide meaningful ways to honor the women in your life.
By following these 10 craft ideas, you will gain not only the satisfaction of creating a thoughtful gift but also the joy of making someone feel special and appreciated. These crafts are designed to evoke smiles, warm hearts, and create lasting memories. They encourage creativity, imagination, and personal expression, transforming ordinary moments into cherished experiences. Each project can be customized to reflect the unique personality and preferences of the recipient, ensuring that your Mother’s Day gift is truly one-of-a-kind. Whether you are crafting solo or with children, the process is as rewarding as the final product, making it a perfect way to celebrate the spirit of Mother’s Day.
Get ready to explore these 10 wonderful Mother’s Day craft ideas, gather your materials, and unleash your creativity. From simple and adorable projects to elegant and sophisticated designs, each craft idea is designed to help you create meaningful, beautiful, and memorable gifts that your mom—or any special mother figure—will treasure forever. These crafts are not just gifts—they are expressions of love, thoughtfulness, and creativity, encapsulating the essence of what Mother’s Day is all about. With guidance, inspiration, and a touch of personal flair, your crafting journey will result in gifts that are as heartfelt as they are beautiful. 🌸💝
🎨 Idea 1: Personalized Handmade Greeting Card
Introduction
A personalized handmade greeting card is one of the simplest yet most heartfelt Mother’s Day gifts you can create. Unlike store-bought cards, a handmade card allows you to express your emotions uniquely, incorporating colors, textures, and personal messages that resonate with your mom. Creating a card is not just about writing “Happy Mother’s Day”—it’s about capturing memories, love, and creativity in a tangible form. Handmade cards are especially suitable for children, teenagers, or adults who want to add a personal touch to their gift. With a few materials and some time, you can craft a card that becomes a keepsake your mom will treasure for years.

Definition / Explanation
A handmade greeting card is a custom-made paper craft that features artistic decorations, messages, and sometimes embellishments to convey love and appreciation. Personalized cards often include handwritten notes, drawings, or photos to make the gift extra special.
Materials Needed
- Cardstock or thick colored paper
- Colored markers or pens
- Stickers, washi tape, or embellishments
- Glue or double-sided tape
- Scissors
- Ruler and pencil
- Optional: photos or printed quotes
Step-by-Step Guide
- Prepare the Card Base: Cut a piece of cardstock to your desired size, typically 5×7 inches, and fold it in half to create the card shape.
- Plan Your Design: Use a pencil to lightly sketch the layout—think about where to place your message, drawings, or photos.
- Add Decorations: Use markers, stickers, or washi tape to add color and style. You can create floral patterns, heart motifs, or abstract designs.
- Write Your Message: Handwrite a personal note expressing your love, gratitude, and appreciation. This is the emotional centerpiece of the card.
- Add Personal Touches: Include photos, small pressed flowers, or printed quotes for a sentimental effect.
- Finalize the Card: Check all glue and pen marks for smudges, and ensure everything is secure.
- Optional Envelope: Decorate an envelope to match the card, making the presentation as charming as the gift itself.
This simple craft balances creativity with personalization and can be customized endlessly, making it perfect for moms of all ages.
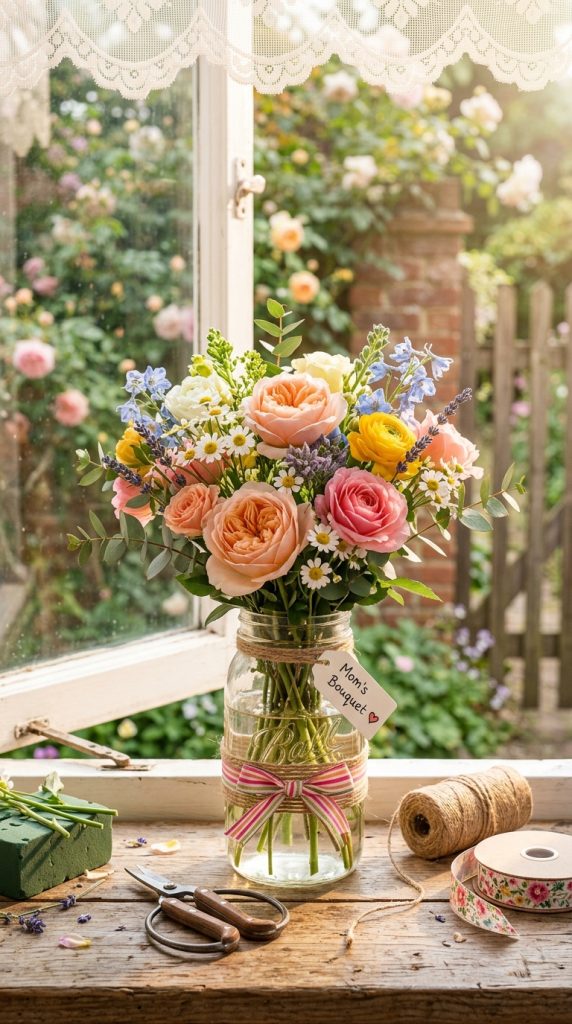
🌸 Idea 2: DIY Flower Bouquet in a Jar
Introduction
A DIY flower bouquet in a jar combines the beauty of real or artificial flowers with a creative twist. Unlike store-bought bouquets that wilt over time, handmade bouquets can be customized in size, colors, and arrangement, creating a long-lasting memory. This craft is particularly fun for children and teens because it allows them to experiment with colors, textures, and patterns. Whether using fresh flowers or colorful paper blooms, a bouquet in a jar is both functional and decorative, making it a charming centerpiece for your mom’s table.
Definition / Explanation
A DIY flower bouquet in a jar is a hand-arranged collection of flowers, real or crafted, displayed in a decorated jar. It serves as a decorative piece and a heartfelt gift.
Materials Needed
- Mason jar or glass vase
- Fresh flowers or colored paper flowers
- Floral foam or pebbles for support
- Ribbon or twine
- Scissors
- Decorative elements: beads, stickers, or charms
Step-by-Step Guide
- Prepare the Jar: Clean the jar and add floral foam or pebbles at the bottom to hold flowers in place.
- Choose Your Flowers: Select flowers based on your mom’s favorite colors or seasonal blooms.
- Arrange the Flowers: Start with larger flowers in the center and smaller flowers around the edges. Vary heights for a natural look.
- Add Decorative Elements: Wrap a ribbon around the jar’s neck, add a tag with a handwritten note, or attach small charms.
- Finalize the Display: Adjust flower positions for balance and ensure all stems are securely in the jar.
This project is visually stunning, highly customizable, and doubles as a decorative piece that brightens your mom’s home.
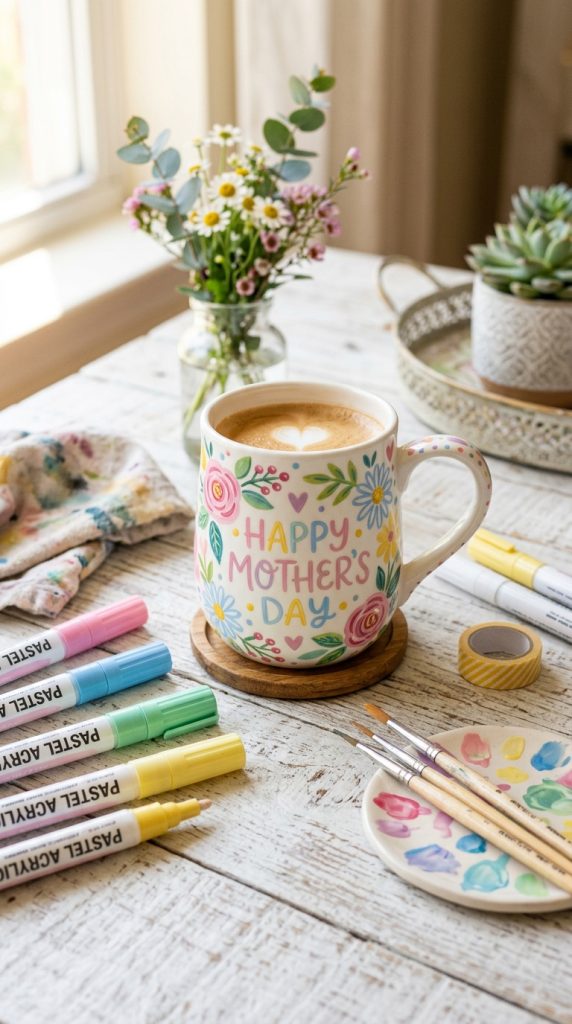
🎁 Idea 3: Hand-Painted Mug
Introduction
A hand-painted mug is a practical yet deeply personal gift. Every sip your mom takes will remind her of your love and effort. Unlike ordinary mugs, this craft allows you to express creativity through patterns, colors, or quotes. It’s perfect for teens and adults who want to create a functional gift that is also a keepsake. With the right paint and sealing technique, this mug can be long-lasting, dishwasher-safe, and a daily reminder of appreciation.
Definition / Explanation
A hand-painted mug is a standard ceramic mug customized with artistic designs or messages using specialized paints or markers for ceramics.
Materials Needed
- Plain ceramic mug
- Porcelain or ceramic paint pens
- Pencil (optional for sketching)
- Painter’s tape (optional for patterns)
- Oven for baking the design
- Protective sealant (optional)
Step-by-Step Guide
- Clean the Mug: Wash and dry the mug thoroughly to remove oils or dust.
- Plan Your Design: Sketch ideas on paper. Popular choices include hearts, flowers, or quotes.
- Draw on the Mug: Use ceramic paint pens to carefully draw your design. Painter’s tape can help create geometric patterns.
- Bake the Mug: Follow paint instructions; typically bake in the oven to set the design.
- Optional Sealant: Apply a protective sealant to increase durability.
- Gift Wrap: Pair the mug with a small box or tissue paper for presentation.
A hand-painted mug is a simple yet creative craft that is functional, sentimental, and perfect for daily use.
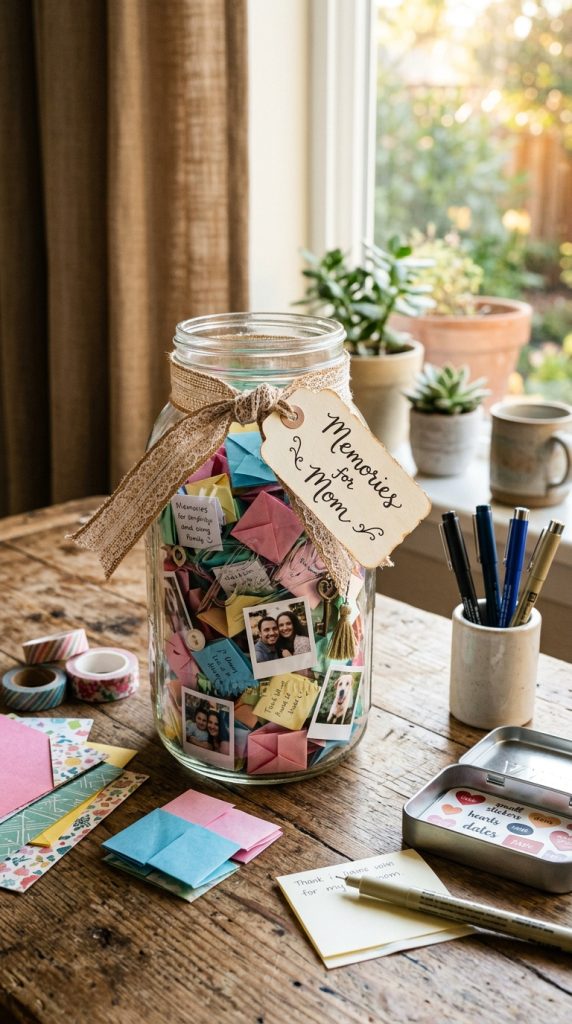
💌 Idea 4: DIY Memory Jar
Introduction
A memory jar is a unique and emotional gift that goes beyond aesthetics. By filling a jar with notes, memories, and tiny mementos, you provide your mom with a daily reminder of love and cherished moments. This craft is especially meaningful because it can include contributions from family members, turning it into a collaborative gift filled with personal stories. Memory jars are beginner-friendly, inexpensive, and provide endless opportunities for customization.
Definition / Explanation
A memory jar is a decorative container filled with handwritten notes, small trinkets, or photos that represent shared memories and heartfelt messages.
Materials Needed
- Mason jar or decorative glass jar
- Colored paper or cardstock
- Pens or markers
- Small trinkets or photos (optional)
- Ribbon or twine
- Stickers or decorative tape
Step-by-Step Guide
- Prepare the Jar: Clean and optionally decorate the jar’s exterior with stickers or ribbon.
- Write Memory Notes: Cut colored paper into strips and write memories, quotes, or reasons you love your mom.
- Include Extras: Add small photos, charms, or dried flowers for personalization.
- Fold and Insert Notes: Fold each note and place it in the jar.
- Seal and Decorate: Tie a ribbon around the jar lid and add a decorative tag.
- Presentation: Encourage your mom to open a note each day for a continuous source of joy.
Memory jars combine creativity, sentiment, and presentation, making them a truly personal and heartfelt gift.
🌿 Idea 5: Handmade Decorative Photo Frame
Introduction
A handmade photo frame is a classic craft that never goes out of style. By creating a custom frame, you can showcase a cherished photograph while adding artistic touches that reflect your mom’s style. This project is perfect for all ages, allowing you to experiment with paints, textures, and embellishments. Whether the frame is rustic, elegant, or colorful, a handmade frame adds a personal touch that store-bought options simply cannot match.
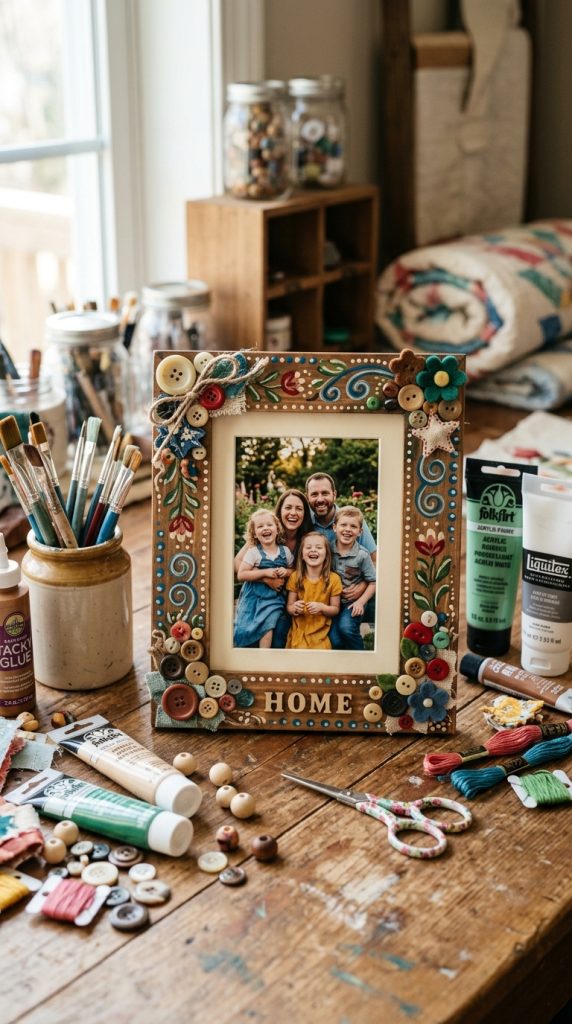
Definition / Explanation
A decorative photo frame is a hand-decorated frame for displaying a photograph, incorporating materials like wood, cardboard, paint, or embellishments to create a unique design.
Materials Needed
- Plain wooden or cardboard frame
- Acrylic paint or markers
- Glue
- Decorative elements: buttons, beads, shells, or fabric
- Photo for the frame
- Optional: glitter, ribbon, or washi tape
Step-by-Step Guide
- Choose a Frame: Use a plain wooden frame or make one from sturdy cardboard.
- Paint the Base: Apply a base color using acrylic paint; let it dry.
- Decorate: Attach embellishments, draw patterns, or add textures using glue.
- Insert the Photo: Place a favorite photo inside the frame.
- Final Touches: Add a ribbon or small tag for personalization.
- Gift Wrap: Present it in decorative wrapping or a gift bag.
This craft combines creativity with sentimentality, resulting in a gift your mom can proudly display for years.
🕯️ Idea 6: DIY Scented Candle
Introduction
A handmade scented candle is a luxurious yet heartfelt gift that combines creativity with practicality. Candles evoke warmth, relaxation, and ambiance, making them the perfect way to pamper your mom. Creating a scented candle allows you to personalize both the fragrance and the appearance, transforming simple ingredients into a beautiful, aromatic gift. This craft is ideal for adults and teens who want to experiment with scents, colors, and containers. By incorporating your mom’s favorite fragrance or colors, you create a gift that is not only decorative but also soothing and memorable.
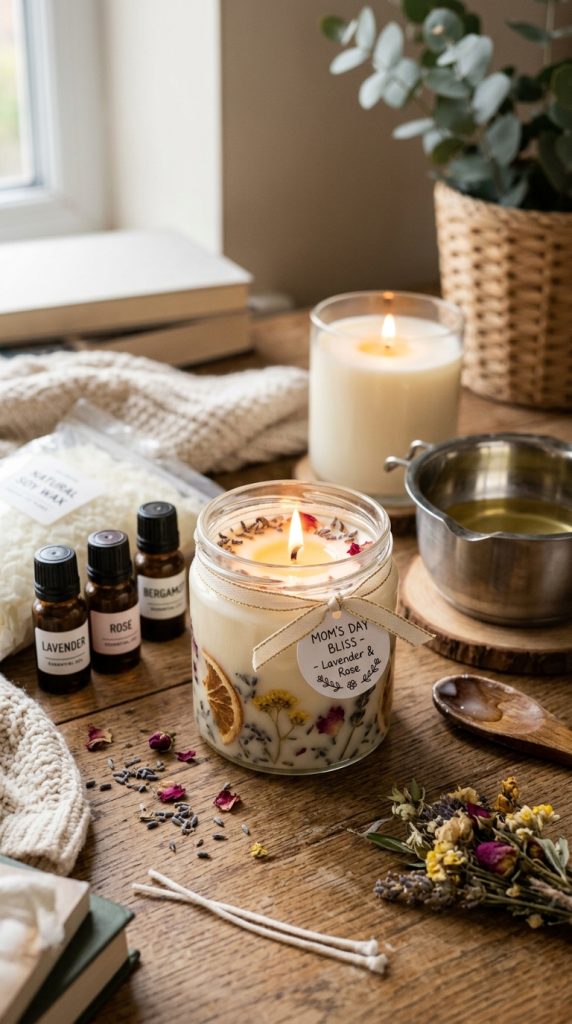
Definition / Explanation
A DIY scented candle is a handmade wax candle infused with essential oils or fragrance, poured into a decorative container. Personalization includes color, scent, and even custom labels or decorations.
Materials Needed
- Soy wax flakes or beeswax
- Candle wicks
- Glass jars or teacups
- Essential oils or fragrance oils
- Double boiler or heat-safe bowl
- Stirring utensil
- Optional: dried flowers, glitter, or paint for decoration
Step-by-Step Guide
- Prepare the Container: Place the candle wick in the center of your jar or cup, securing it with a dab of wax or wick holder.
- Melt the Wax: Use a double boiler or heat-safe bowl to melt wax flakes gently until fully liquid.
- Add Fragrance: Remove from heat and mix in essential oils or fragrance of choice. Adjust scent strength as desired.
- Optional Decorations: Sprinkle dried flowers or glitter into the bottom of the container before pouring wax.
- Pour Wax: Carefully pour melted wax into the container around the wick.
- Secure the Wick: Ensure the wick remains centered and straight.
- Let it Set: Allow the candle to cool completely, typically 4–6 hours.
- Trim Wick: Trim wick to about ¼ inch before gifting.
- Optional Labels: Add a personalized label with your mom’s name or a special message.
A scented candle is not only functional but also an elegant decorative piece, perfect for adding warmth and fragrance to your mom’s space.
🌿 Idea 7: Handmade Herb Garden
Introduction
A small, handmade herb garden is a practical and eco-friendly gift for moms who love cooking, gardening, or natural remedies. Creating a mini herb garden allows you to combine creativity with utility, giving your mom fresh herbs she can use in her kitchen. This craft is ideal for both indoor and outdoor spaces, and it can be customized with painted pots, labels, or unique arrangements. A handmade herb garden demonstrates thoughtfulness and care, making it a meaningful and lasting Mother’s Day gift.
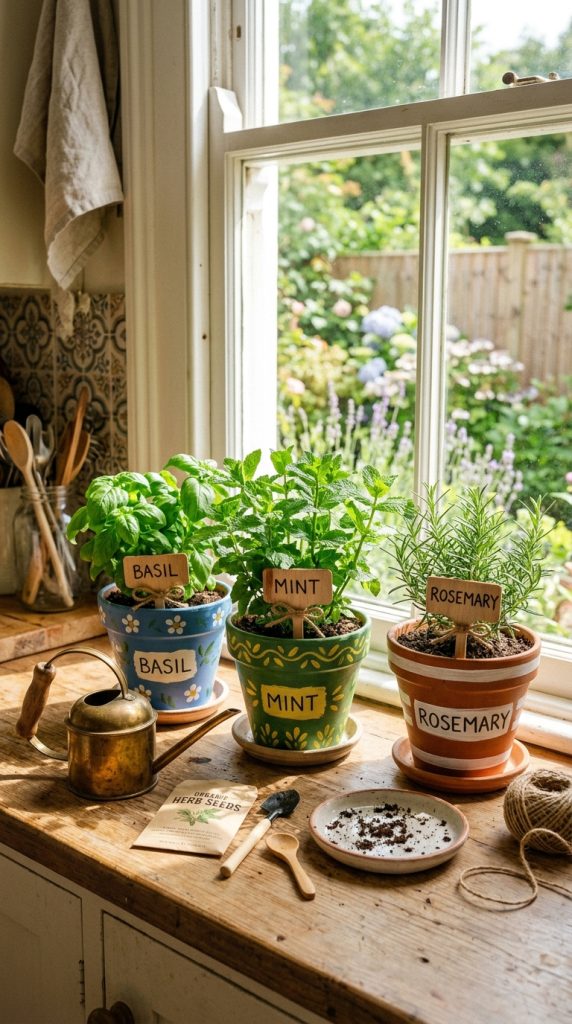
Definition / Explanation
A handmade herb garden is a DIY arrangement of herbs planted in pots or containers, often decorated with paint, labels, or other embellishments for aesthetic appeal.
Materials Needed
- Small pots or containers
- Potting soil
- Herb seeds or small plants (basil, mint, rosemary, etc.)
- Paint or markers for pot decoration
- Plant labels or popsicle sticks
- Watering can or spray bottle
Step-by-Step Guide
- Choose Containers: Select pots or containers that fit your space and style.
- Decorate Pots: Paint, draw, or add designs to personalize the pots.
- Add Soil: Fill containers with potting soil, leaving space for plants.
- Plant Herbs: Plant seeds or small herb seedlings according to instructions.
- Label Plants: Use popsicle sticks or small tags to label each herb.
- Water and Care: Gently water the soil and place the pots in sunlight.
- Arrange Creatively: Group pots together or display them on a decorative tray for added charm.
A DIY herb garden is a gift that keeps on giving, providing fresh ingredients and a touch of greenery that brightens any kitchen or balcony.
💐 Idea 8: Paper Flower Wall Art
Introduction
Paper flower wall art is a visually stunning and creative way to celebrate Mother’s Day. Unlike real flowers that fade, paper flowers are everlasting, allowing your mom to enjoy their beauty year-round. This craft is versatile, allowing you to create a single large flower, a bouquet, or an entire wall installation. By using colorful paper, patterns, and different sizes, you can create a dynamic and eye-catching display. Paper flower wall art is ideal for both beginners and experienced crafters who want to produce a sophisticated and decorative gift.
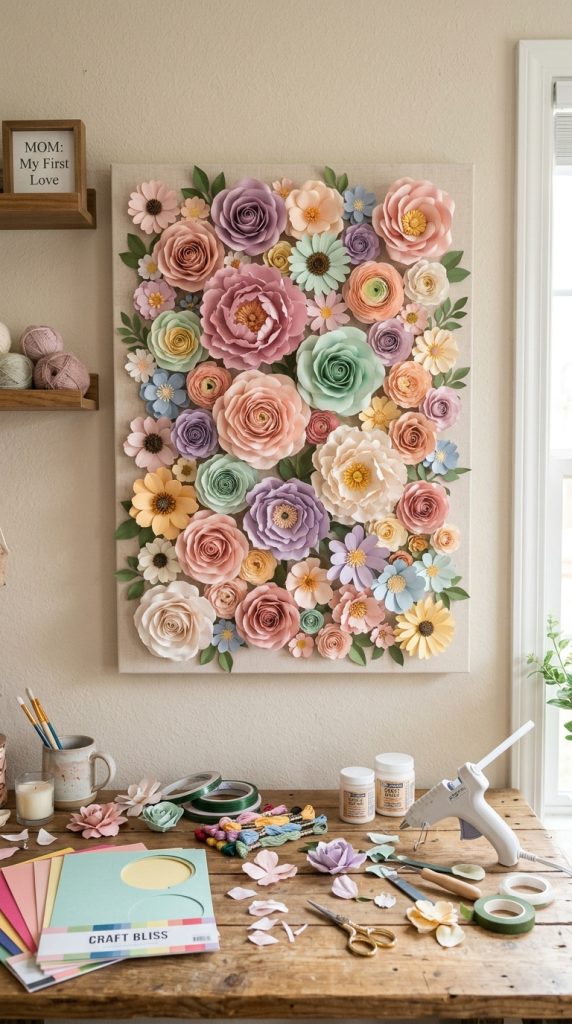
Definition / Explanation
Paper flower wall art is a decorative piece made by crafting flowers from colored or patterned paper, arranging them into a visually appealing composition, and mounting them for display.
Materials Needed
- Colored paper or cardstock
- Scissors
- Glue or hot glue gun
- Floral wire or pipe cleaners
- Cardboard or canvas backing
- Pencil and ruler
Step-by-Step Guide
- Choose Your Colors: Select 3–5 complementary colors for your flowers.
- Cut Flower Shapes: Use scissors to cut petals in various sizes; combine them for layered flowers.
- Assemble Flowers: Glue petals together, layering from largest to smallest for depth.
- Add Stems: Use floral wire or pipe cleaners as stems, securing them to flowers with glue.
- Create Backing: Arrange flowers on a cardboard or canvas backing to form a bouquet or pattern.
- Glue in Place: Secure flowers onto backing with glue, adjusting for spacing and balance.
- Optional Frame: Frame the finished piece for a polished look.
Paper flower wall art is a sophisticated and long-lasting way to bring beauty and creativity into your mom’s space.
🎨 Idea 9: Handmade Jewelry Dish
Introduction
A handmade jewelry dish is both practical and decorative, offering your mom a stylish place to keep rings, earrings, or small trinkets. This craft allows you to work with clay, paint, or resin to create a unique piece that reflects her style. Handmade dishes are ideal for moms who appreciate thoughtful, functional gifts that also serve as décor. The charm of a DIY jewelry dish lies in its personal touch—it can include initials, designs, or motifs your mom loves, making it an unforgettable gift.
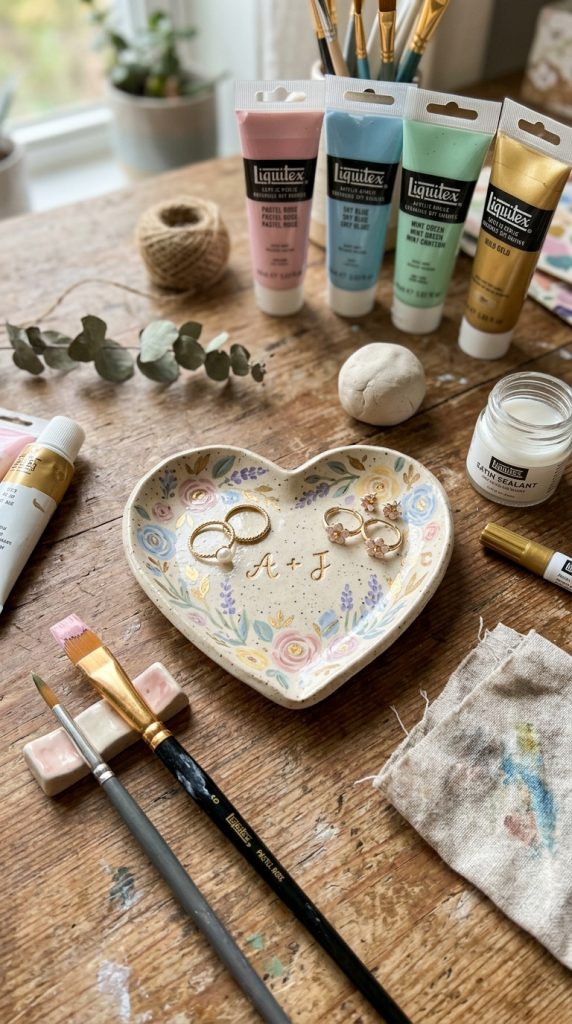
Definition / Explanation
A jewelry dish is a small container made from clay, resin, or similar materials, designed to hold jewelry and decorated with patterns, paint, or textures.
Materials Needed
- Air-dry clay or polymer clay
- Acrylic paint or glaze
- Small rolling pin
- Knife or cookie cutters
- Sandpaper (optional)
- Sealant (optional)
Step-by-Step Guide
- Shape the Dish: Roll out clay and form a small circular or oval dish.
- Smooth Edges: Use fingers or a tool to smooth edges and refine the shape.
- Add Design: Press patterns, stamps, or initials into the clay.
- Dry or Bake: Allow air-dry clay to harden or bake polymer clay as per instructions.
- Paint and Decorate: Add colors, designs, or accents to personalize.
- Seal: Apply a clear sealant for durability and shine.
- Gift Presentation: Wrap in tissue paper or a small decorative box.
A handmade jewelry dish is a versatile gift that combines creativity, function, and personalization, perfect for everyday use.
🌟 Idea 10: DIY Handprint Art Canvas
Introduction
Handprint art on canvas is a sentimental craft that captures a moment in time, especially meaningful for moms. This craft allows children or family members to leave their handprints, turning a simple canvas into a lifelong keepsake. Adding personalized messages, dates, or quotes transforms it into a heartwarming gift that celebrates family bonds. Handprint art is ideal for toddlers, school-aged children, or even adults wanting to create a nostalgic, heartfelt present.
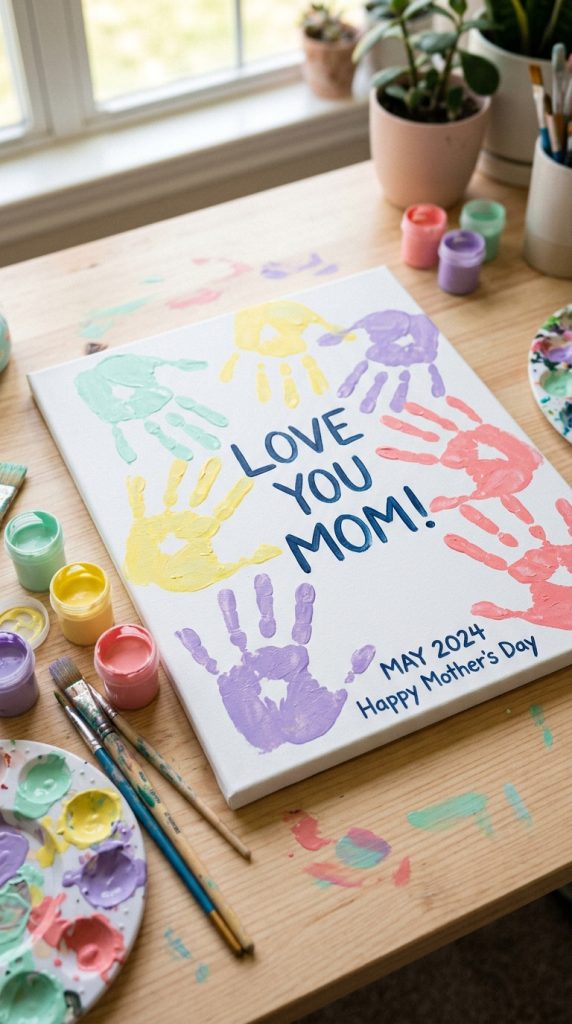
Definition / Explanation
Handprint art canvas is a creative piece where handprints are painted onto a canvas, often accompanied by personalized text or designs, to create a memorable and decorative keepsake.
Materials Needed
- Blank canvas
- Non-toxic acrylic paint
- Paintbrushes
- Marker or paint pen for writing
- Palette or plate for paint
- Optional: stencils, glitter, or embellishments
Step-by-Step Guide
- Prepare Paint: Pour paint onto a palette for easy access.
- Paint Hands: Use a brush to apply paint evenly on hands.
- Press Hands on Canvas: Gently press hand onto canvas and lift carefully.
- Repeat: Add multiple handprints if desired, layering colors or patterns.
- Add Personalization: Write a message, date, or quote around handprints.
- Let Dry: Allow canvas to dry completely.
- Optional Decorations: Add glitter, embellishments, or small drawings for extra flair.
Handprint art captures love and memories in a visually stunning and sentimental way, making it an unforgettable Mother’s Day gift.