
Mastering structural floor plans transforms plain square boxes into breathtaking architectural masterpieces. Furthermore, thoughtful Architecture Floor Plans layout blueprints eliminate building mistakes before placing foundational stone blocks. Many survival builders struggle with awkward room proportions and cramped interior spaces. However, drafting clear floor plans establishes balanced flow, depth, and structural realism. You can design cozy rustic farmhouses, sprawling gothic castles, and sleek modern villas easily. Therefore, understanding architectural floor planning elevates your building skills across every style.
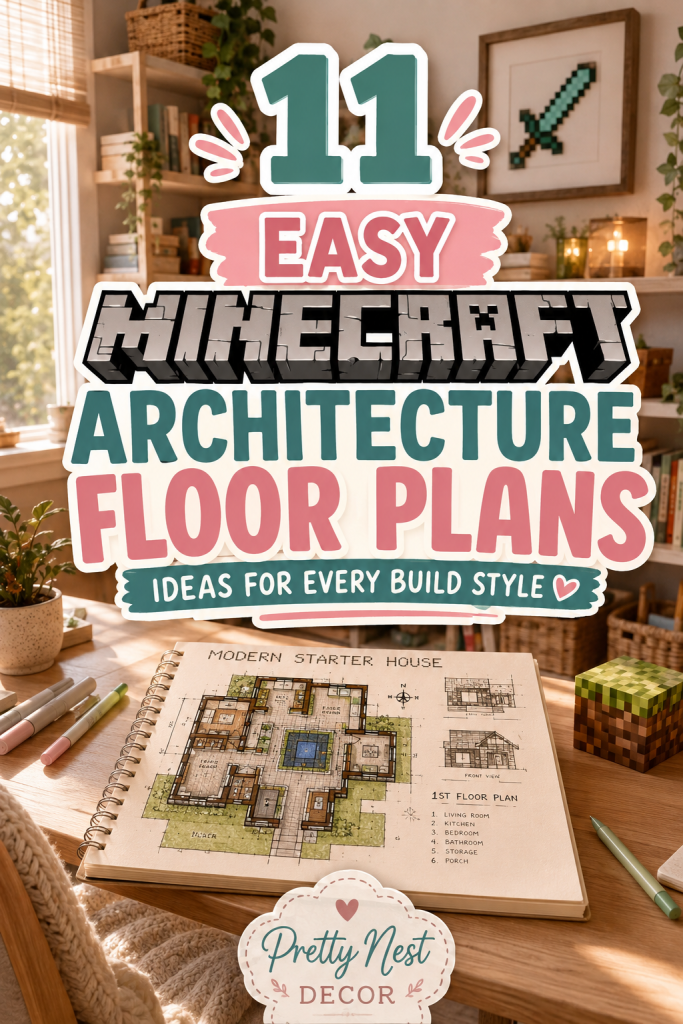
The Power of 2D Blueprint Planning
Every legendary Minecraft build begins with a clear, well-proportioned two-dimensional footprint. First, lay out colored wool or concrete blocks directly onto flat terrain. This simple visual guide defines exterior walls, interior doorways, and functional room zones. In addition, blueprinted outlines allow you to test room scales before committing resources. Walking through your laid-out floor plan reveals cramped hallways and awkward corners instantly. Consequently, you save hours of tedious demolition work during survival gameplay loops.
Balancing Structural Symmetry with Organic Depth
Purely symmetrical square boxes often look rigid, unnatural, and visually uninspiring in-game. Instead, break flat rectangular footprints into interlocking dynamic shapes like L-shapes and T-shapes. Combine primary living volumes with secondary side wings and protruding tower bastions. Furthermore, offsetting exterior wall lines by two or three blocks creates natural depth. Recessed wall sections provide ideal framing pockets for pillars, windows, and gardens. Consequently, your finished structure gains immediate architectural interest from every viewing angle.
Designing Functional Survival Traffic Flow
A beautiful architectural floor plan must remain practical and efficient during daily survival routines. Ensure primary entrance hallways measure at least three to five blocks wide. This generous clearance accommodates rapid sprinting, packed donkeys, and companion pets easily. In addition, place high-traffic crafting benches and storage vaults near main entry portals. Position quiet private bedrooms, enchanting libraries, and potion brewing stations on upper levels. Therefore, your organized layout streamlines daily survival tasks without frustrating navigation bottlenecks.
Selecting Harmonious Structural Block Palettes
Assigning distinct structural blocks to your blueprint lines defines your home’s character. For instance, use stripped oak logs to map out primary structural load-bearing pillars. Meanwhile, smooth stone bricks clearly mark exterior retaining walls and heavy foundation footings. In addition, lay colored wool blocks to designate functional zones like kitchens and bedrooms. Smooth quartz outlines delineate sleek contemporary spaces, while mud bricks suit rustic cottages. Therefore, thoughtful blueprint color-coding simplifies construction for complex multi-room builds.
Integrating Natural Light and Window Openings
Planning window placements during early blueprint drafting ensures bright, airy interior living spaces. Avoid solid, unbroken exterior wall segments longer than five blocks without openings. Instead, design wide panoramic window bays along scenic mountain, ocean, or garden vistas. In addition, incorporate central open-air courtyards into expansive mansion and palace floor plans. Skylights integrated into ceiling rafters flood deep subterranean rooms with natural daylight. Consequently, your completed rooms feel spacious, welcoming, and beautifully illuminated throughout.
Essential Tools for Layout Terraforming
Preparing natural terrain for large-scale architectural layouts demands proper survival equipment. First, craft diamond or netherite shovels and pickaxes with Efficiency V enchantments. In addition, brew swiftness potions to speed up perimeter tracing across extensive landscapes. Use dirt, gravel, and scaffolding blocks to build temporary elevated blueprint viewing platforms. Moreover, keep water buckets on your hotbar for rapid descents and leveling tasks. Therefore, gathering your site preparation supplies beforehand ensures smooth, uninterrupted construction workflows.
1. Classic L-Shaped Medieval Farmhouse Layout
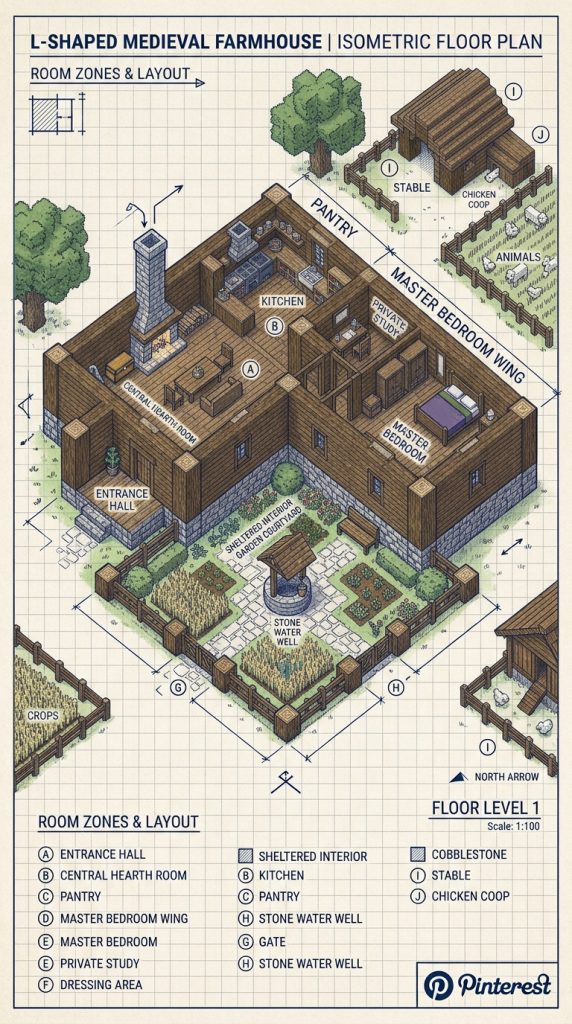
The classic L-shaped footprint provides natural architectural depth, cozy courtyard nooks, and distinct living zones. It represents the quintessential foundation for rustic survival homesteads.
Rustic Homestead Blueprint Design
The L-shaped floor plan solves flat wall monotony by joining two perpendicular rectangular wings. A larger main hall houses the central hearth, kitchen, and crafting workshops. Meanwhile, the perpendicular side wing encloses private sleeping quarters and secure storage vaults. The sheltered inner corner naturally forms a cozy garden courtyard or farm patio. Consequently, this versatile blueprint provides endless character for rural survival homesteads.
Medieval Farmhouse Palette Checklist
- Stripped spruce logs, spruce planks, and spruce stairs
- Cobblestone, mossy stone bricks, and stone slabs
- Oak fences, gates, and dark oak trapdoors
- White wool, yellow carpet, and red terracotta
- Lanterns, chains, and clear glass panes
- Hay bales, barrels, and composters
Tracing the Primary Living Wing
Begin by laying out the main rectangular wing measuring eight blocks wide by fourteen blocks long. Use smooth cobblestone blocks to outline the exterior foundation perimeter on the ground. Next, place stripped spruce logs at every corner to mark structural load-bearing pillars. Divide the interior into a spacious kitchen and a central dining hearth room. Therefore, the primary hall establishes a solid, well-proportioned core for the homestead.
Extending the Perpendicular Wing
Extend a secondary wing measuring seven blocks wide by ten blocks long from the rear corner. Join the two sections seamlessly to create a sharp, distinct ninety-degree L-shape. Next, designate the interior of this secondary wing for sleeping quarters and storage. Frame a two-block-wide interior doorway connecting the two living wings smoothly. Consequently, private quarters remain peacefully separated from noisy, high-traffic crafting areas.
Enclosing the Courtyard Garden
Pave the sheltered interior corner formed by the two wings with coarse dirt and gravel. Enclose the garden patio with low oak fences and hanging lanterns on posts. Next, install a small stone water well and stacked hay bales within the yard. Scatter blooming flower pots and wooden composters along the exterior stone walls. Your classic L-shaped medieval farmhouse blueprint is ready for vertical wall framing.
2. Symmetrical Cross-Wing Gothic Manor Blueprint
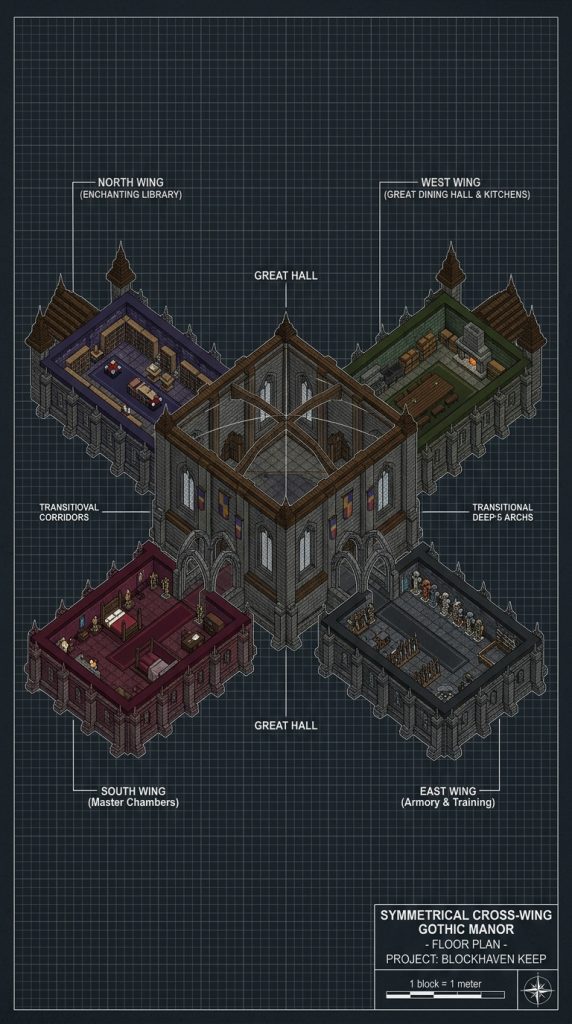
Four balanced wings radiating from a central grand hall define the symmetrical cross-wing manor. It brings imposing gothic grandeur and formal balance to survival estates.
Imposing Aristocratic Manor Architecture
The symmetrical cross-wing floor plan projects power, order, and monumental architectural harmony. A grand central square hall serves as the primary focal point of the estate. Furthermore, four identical wings extend outward along the cardinal directions from the core. High vaulted ceilings and pointed stone archways connect the distinct functional living wings. Consequently, this majestic layout suits sprawling gothic manors and fortified noble estates.
Gothic Manor Resource Palette
- Polished deepslate, deepslate bricks, and deepslate tiles
- Dark oak logs, stripped dark oak, and dark oak planks
- Tinted glass panes, iron bars, and heavy chains
- Soul lanterns, soul campfires, and blackstone
- Red carpet, bookshelves, and armor stands
- Smooth basalt and crying obsidian
Mapping the Central Grand Hall
Outline a central square hall measuring twelve blocks wide by twelve blocks long. Use polished deepslate bricks to mark the heavy perimeter foundation lines on the ground. Next, place massive structural pillars using stripped dark oak logs at all four corners. Mark the central floor with blackstone tiles to accommodate a grand decorative chandelier. Therefore, the core room establishes a commanding, monumental presence for the entire estate.
Extending Four Symmetrical Wings
Extend four identical rectangular wings measuring eight blocks wide by ten blocks long outward. Connect each wing directly to one of the four sides of the central hall. Next, designate the north wing for an enchanting library and the south for entryways. Assign the east wing for master sleeping chambers and the west for workshops. Consequently, the cross-shaped footprint achieves perfect architectural symmetry and functional balance.
Detailing the Vaulted Corridors
Carve wide four-block archway openings connecting the central hall to each outer wing. Frame the high corridor ceilings with polished deepslate stairs to form pointed arches. Next, place armor stand pedestals flanking every corridor threshold for regal defense. Inset glowing soul lanterns behind iron bars along the main stone walkways. Your symmetrical cross-wing gothic manor floor plan is perfectly mapped out.
3. T-Shaped Coastal Fishing Villa Layout
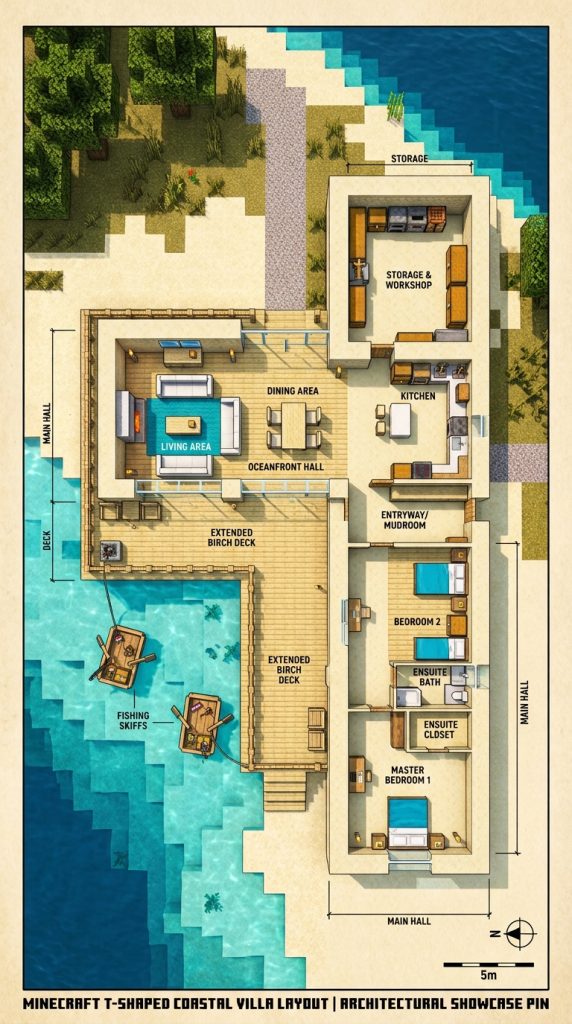
A wide ocean-facing front hall connected to a deep inland rear wing defines the T-shaped villa. It maximizes panoramic shoreline views while maintaining cozy living quarters.
Scenic Waterfront Villa Architecture
The T-shaped layout offers the ultimate floor plan for dramatic coastal and lakeside builds. A wide, expansive front hall stretches horizontally along the natural ocean shoreline. Furthermore, a deep rear wing extends inland to house private bedrooms and workshops. Expansive wraparound glass windows along the front facade capture breathtaking water vistas effortlessly. Consequently, this breezy blueprint brings luxurious seaside holiday living to survival worlds.
Coastal Villa Material Checklist
- Stripped birch logs, birch planks, and birch slabs
- Smooth sandstone, cut sandstone, and sandstone stairs
- White concrete, calcite, and light blue terracotta
- Clear glass blocks, glass panes, and iron bars
- Sea lanterns, oak trapdoors, and barrels
- Lily pads, seagrass, and fishing rods
Tracing the Oceanfront Front Wing
Lay out a long, narrow front hall measuring six blocks deep by eighteen blocks wide. Position the long edge parallel to the natural curve of the ocean shoreline. Next, use smooth sandstone blocks to outline the foundational perimeter on the sand. Mark wide four-block window openings along the entire ocean-facing front facade wall. Therefore, the primary living space captures unobstructed panoramic views of ocean sunrises.
Connecting the Inland Rear Wing
Attach a perpendicular rear wing measuring eight blocks wide by twelve blocks long to the center. Align the rear wing precisely with the midpoint of the front oceanfront hall. Next, divide this back wing into a master bedroom, bathroom, and storage vault. Frame a central hallway three blocks wide connecting all interior rooms seamlessly. Consequently, private sleeping quarters remain shielded from breezy open-air oceanfront entertaining spaces.
Adding Breezy Waterfront Verandas
Extend a wide wooden deck five blocks outward from the front ocean-facing hall. Use smooth birch slabs supported by vertical stripped oak pillars sunk into water. Next, install low sandstone railings and tie small fishing skiffs to wooden posts. Place storage barrels and fishing rod racks neatly along the open dock patio. Your T-shaped coastal fishing villa blueprint is completely laid out and ready.
4. Circular Tower Bastion Castle Blueprint
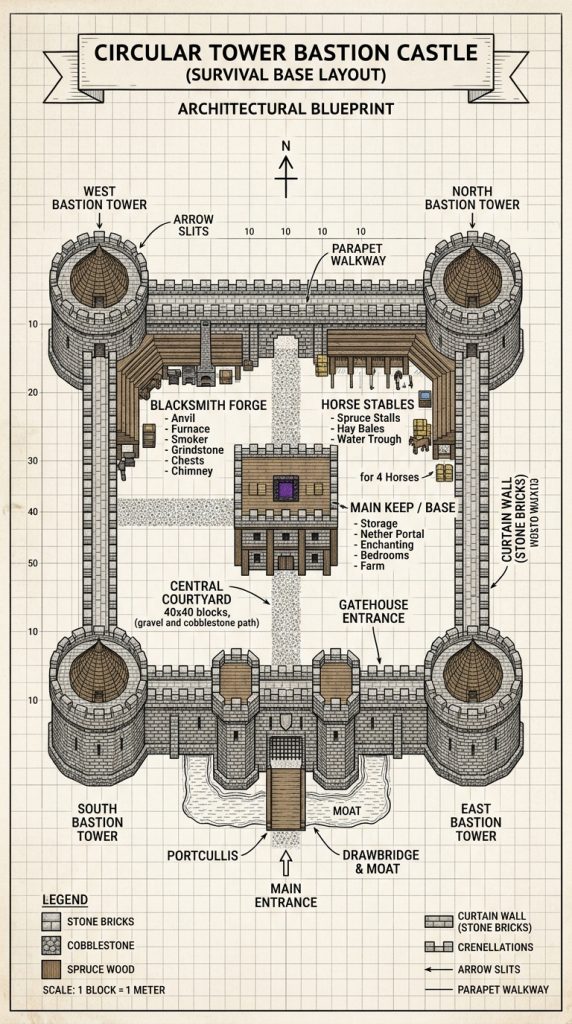
Four circular corner towers linked by thick defensive curtain walls define this bastion castle. It provides impenetrable defense and legendary medieval scale for survival kingdoms.
Formidable Medieval Stronghold Layout
The circular tower bastion blueprint represents the pinnacle of historic military fortress design. Four massive round guard towers anchor the corners of a spacious central courtyard. Furthermore, thick stone curtain walls with elevated rampart walkways connect the defensive towers. A reinforced gatehouse encloses the secure entry portal against hostile mob sieges. Consequently, this fortified layout protects vast survival stockpiles within an impregnable stone perimeter.
Bastion Castle Resource Palette
- Stone bricks, cracked stone bricks, and mossy stone bricks
- Cobblestone, cobblestone stairs, and stone slabs
- Dark oak logs, stripped spruce, and spruce planks
- Iron bars, heavy chains, and iron trapdoors
- Lanterns, redstone torches, and dispensers
- Anvils, grindstones, and armor stands
Outlining Four Circular Corner Towers
Mark four circular tower footprints measuring seven blocks in diameter at property corners. Space the four circular towers twenty blocks apart in a wide square configuration. Next, use smooth stone bricks to trace the curved perimeter walls on the ground. Leave the interior tower bases hollow to accommodate spiral staircases and armory storage. Therefore, the four corner bastions provide overlapping fields of defensive archer fire.
Connecting Fortified Curtain Walls
Span straight stone brick curtain walls five blocks thick between the four towers. Next, designate an elevated three-block-wide walkway along the interior top wall edge. Carve out a five-block-wide central gatehouse opening along the main front wall. Install recessed murder holes and iron portcullis channels within the gatehouse threshold. Consequently, the enclosed central courtyard remains completely secure against exterior hostile threats.
Organizing the Inner Courtyard
Divide the spacious interior courtyard into functional blacksmith, stable, and barracks zones. Pave wide pathways using mixed cobblestone, gravel, and coarse dirt across the yard. Next, place an open-air horse stable along the western interior curtain wall. Position crafting furnaces, anvils, and tool chests near the central blacksmith forge. Your circular tower bastion castle floor plan stands ready for monumental construction.
5. U-Shaped Courtyard Hacienda Floor Plan
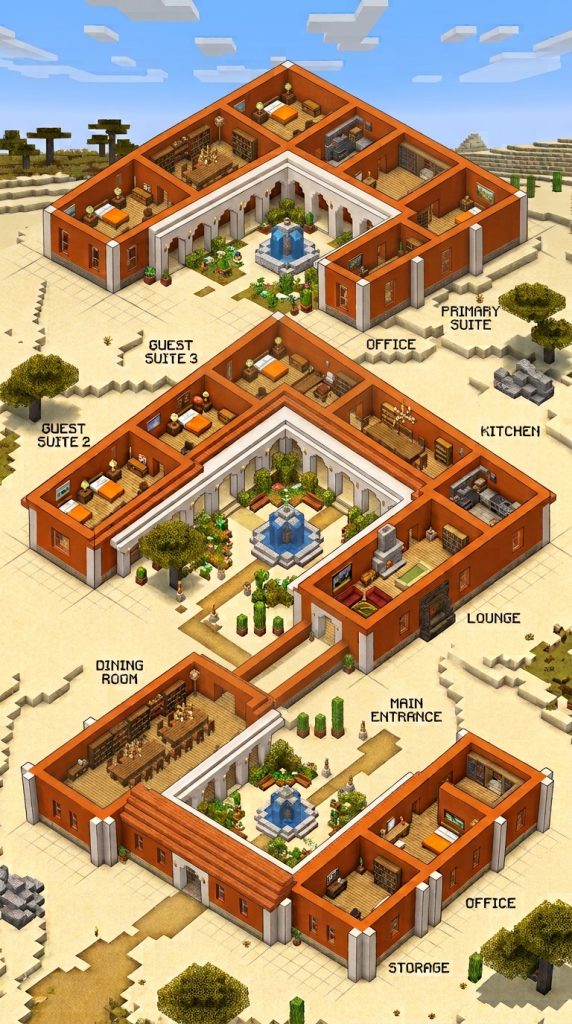
Three interconnected wings wrapping around a private central open-air courtyard define the hacienda. It brings sun-drenched Mediterranean luxury and botanical serenity home.
Sun-Kissed Mediterranean Villa Design
The U-shaped hacienda layout creates a private, sheltered oasis protected from outside wilderness. Three single-story residential wings wrap gracefully around a central paved garden courtyard. Furthermore, open-air covered colonnades connect all interior rooms along the inner perimeter. A central stone fountain and potted citrus trees provide cooling tranquility outdoors. Consequently, this inviting blueprint transforms flat desert or savanna biomes into palatial resorts.
Hacienda Material Checklist
- Terracotta, white concrete, and smooth quartz
- Brick stairs, brick slabs, and polished diorite
- Jungle logs, stripped jungle wood, and jungle leaves
- Flower pots, flowering azalea, and yellow carpet
- Water source blocks, sea lanterns, and iron bars
- Birch fences, gates, and lanterns
Tracing the Central Main Wing
Lay out the central main hall measuring eight blocks deep by sixteen blocks wide. Use smooth terracotta blocks to trace the foundational perimeter lines on the ground. Next, frame wide arched doorway openings leading out toward the front garden patio. Designate the interior of this central wing for grand dining and formal living. Therefore, the central hall anchors the estate with elegance and generous entertaining space.
Extending Dual Courtyard Wings
Extend two parallel wings measuring six blocks wide by fourteen blocks long forward. Project the two side wings outward from both ends of the main central hall. Next, designate the left wing for guest bedrooms and the right for kitchens. This arrangement leaves an open central courtyard space measuring twelve blocks wide between wings. Consequently, the distinct U-shaped footprint creates an intimate, private outdoor living sanctuary.
Detailing the Colonnade and Fountain
Construct an open-air covered walkway along the inner courtyard edges using quartz pillars. Next, build a tiered stone water fountain centered within the open courtyard space. Pave the courtyard floor with warm terracotta tiles and smooth sandstone borders. Place potted flowering azalea bushes and blooming orange tulips along all covered walkways. Your U-shaped courtyard hacienda blueprint is fully mapped and ready for building.
6. Multi-Tiered Mountain Stilt House Blueprint
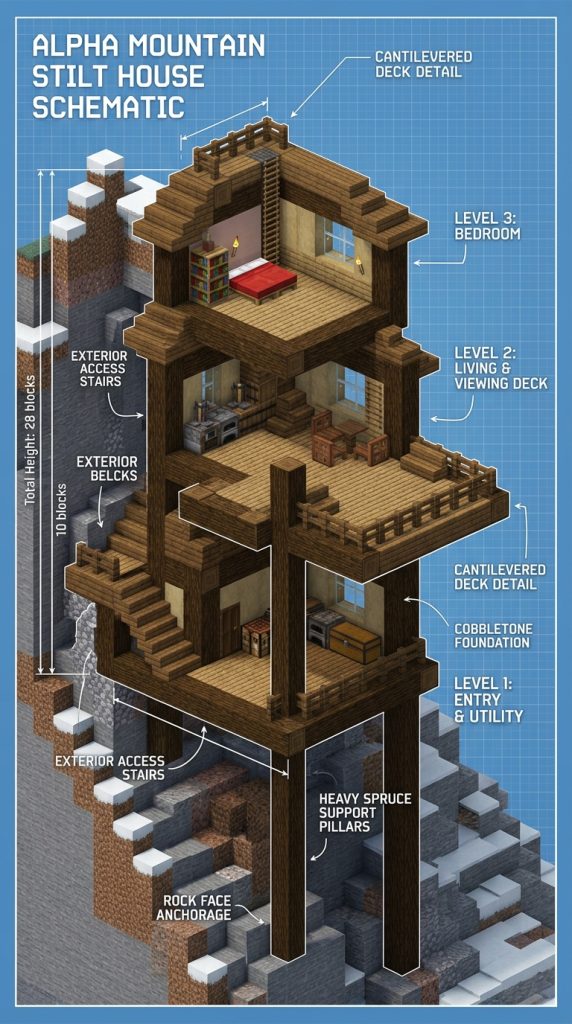
Staggered split-level platforms elevated on sturdy wooden stilts conquer steep, rugged mountain terrain. This layout adapts to extreme slopes without massive terraforming.
Rugged Alpine Split-Level Architecture
The multi-tiered stilt house blueprint masters steep mountain slopes through vertical structural layering. Instead of flattening natural landscapes, three staggered floor platforms follow the hill’s slope. Furthermore, thick vertical timber stilts support the cantilevered wooden living decks safely. Winding interior and exterior staircases connect the separate functional living tiers smoothly. Consequently, this organic layout preserves natural cliffside geography while providing expansive living space.
Mountain Stilt House Palette
- Spruce logs, stripped spruce wood, and spruce planks
- Dark oak slabs, stairs, and dark oak fences
- Cobblestone, mossy stone bricks, and andesite
- Glass panes, iron bars, and heavy chains
- Campfires, lanterns, and sweet berry bushes
- Snow layers and coarse dirt
Anchoring the Lower Terrace Footing
Excavate a small foundation shelf measuring six blocks wide by eight blocks long. Build sturdy retaining walls using rough cobblestone and mossy stone bricks along the slope. Next, drive vertical stripped spruce log pillars deep into the lower mountain grade. Connect the pillars overhead with heavy horizontal dark oak beams to support flooring. Therefore, the lowest tier serves as an entrance foyer and gear storage workshop.
Framing Mid-Level and Upper Platforms
Construct a second living platform raised four blocks higher and shifted back uphill. Make the middle dining and kitchen platform measure eight blocks wide by ten blocks long. Next, build the third uppermost master bedroom tier four blocks higher up the cliff. Connect all three stepped platforms using interior spruce staircases and open landings. Consequently, the house climbs the mountain slope organically without requiring massive excavation.
Connecting Cantilevered Balconies
Extend cantilevered viewing balconies two blocks outward over the cliff from each tier. Border the open balcony edges with dark oak fences and hanging iron lanterns. Next, install large picture windows along all valley-facing exterior walls for panoramic vistas. Place unlit campfires beneath exterior stilt decks to simulate realistic timber cross-braces. Your multi-tiered mountain stilt house floor plan is ready for structural framing.
7. Open-Concept Modern Minimalist Villa Layout
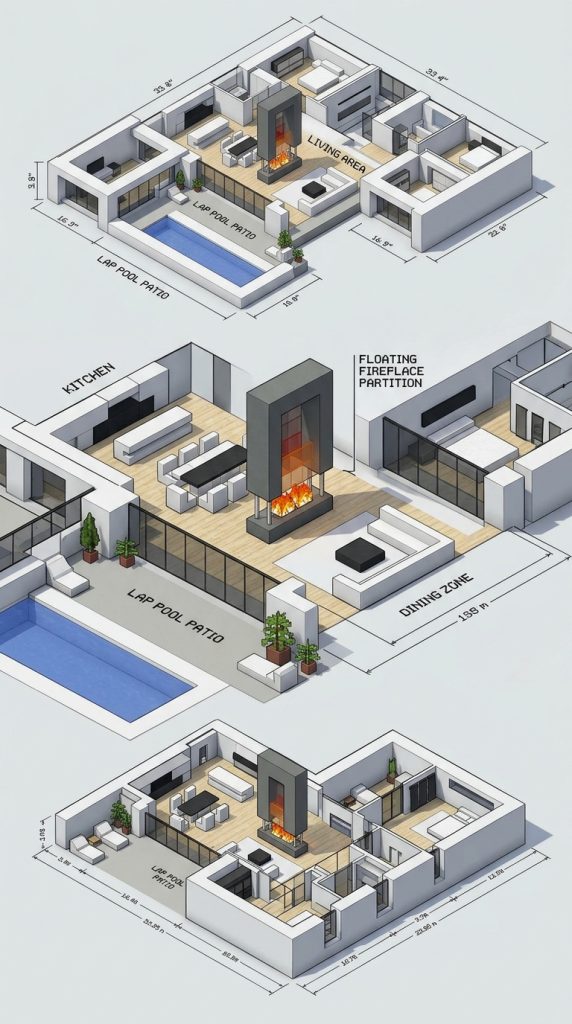
Expansive open living zones, seamless indoor-outdoor patios, and geometric floating dividers define this villa. It brings high-end contemporary luxury to survival worlds.
Contemporary High-End Open Living
The open-concept modern floor plan eliminates unnecessary interior dividing walls to maximize space. A massive, flowing main floor integrates living, dining, and kitchen zones seamlessly. Furthermore, floor-to-ceiling glass walls merge interior rooms with outdoor pool patios effortlessly. Minimalist floating fireplace partitions subtly define functional zones without blocking sightlines or light. Consequently, this sleek blueprint delivers sophisticated, uncluttered penthouse living to survival bases.
Modern Villa Resource Checklist
- White concrete, light gray concrete, and black concrete
- Smooth quartz blocks, quartz stairs, and quartz slabs
- Tinted glass blocks, glass panes, and sea lanterns
- Dark oak planks, birch slabs, and iron trapdoors
- End rods, water source blocks, and cyan carpet
- Gray wool, item frames, and paintings
Pouring the Monolithic Ground Slab
Lay out an expansive rectangular floor footprint measuring sixteen blocks wide by twenty-two blocks long. Pave the entire foundation slab using ultra-smooth white concrete and polished quartz. Next, avoid building solid interior partition walls across the main living floor. Use contrasting dark oak wood flooring insets to designate the cozy living room zone. Therefore, the single grand open space feels exceptionally vast, bright, and uncluttered.
Integrating the Indoor-Outdoor Pool Patio
Dedicate an eight-block-wide section along the rear of the slab for an outdoor patio. Excavate a sleek lap pool measuring four blocks wide by twelve blocks long. Next, line the swimming pool floor with glowing sea lanterns beneath crystal-clear water. Frame the transition between living room and patio with seamless glass walls. Consequently, the interior living space merges effortlessly with the luxurious outdoor pool deck.
Installing Floating Architectural Dividers
Build a freestanding modern fireplace partition between kitchen and living zones using black concrete. Inset a single campfire behind glass inside the partition for realistic modern firelight. Next, construct a floating cantilevered staircase along the side wall using quartz stairs. Inset glowing sea lanterns beneath floor edges for subtle, modern ambient lighting. Your open-concept modern minimalist villa floor plan is complete and sophisticated.
8. Compact Hexagonal Wizard Tower Blueprint
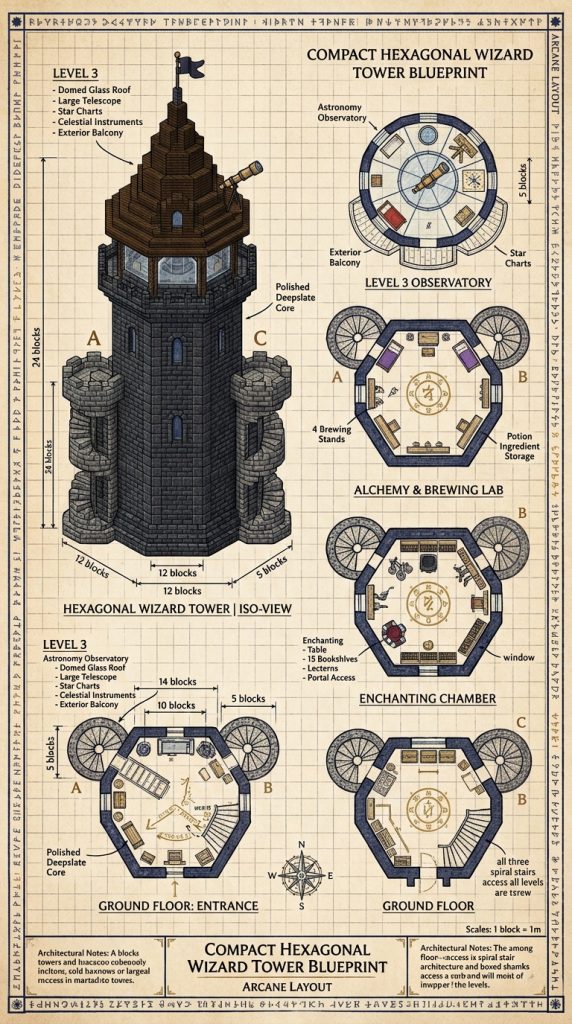
A central hexagonal core flanked by three smaller spiral stair turrets defines this tower. It maximizes vertical space for enchanting libraries and potion laboratories.
Arcane Vertical Stronghold Architecture
The hexagonal wizard tower blueprint utilizes geometric multi-sided planning to maximize vertical efficiency. Six angled exterior stone walls provide superior structural strength and magical visual character. Furthermore, three smaller circular turrets cling to alternating tower faces for staircases. Dedicated vertical floors isolate noisy brewing stations from quiet top-floor stargazing observatories. Consequently, this compact blueprint creates an iconic, functional magical sanctuary.
Wizard Tower Resource Palette
- Deepslate tiles, polished deepslate, and deepslate walls
- Dark prismarine, prismarine bricks, and sea lanterns
- Amethyst blocks, amethyst clusters, and tinted glass
- Bookshelves, chiseled bookshelves, and enchanting tables
- Brewing stands, cauldrons, and soul lanterns
- Warped planks, slabs, and trapdoors
Tracing the Hexagonal Core Foundation
Mark a six-sided hexagonal footprint on the ground measuring eight blocks across. Alternate straight three-block wall segments with diagonal two-block corner turns for symmetry. Next, use polished deepslate bricks to lay the heavy foundational perimeter lines. Leave the central floor open to accommodate a vertical water elevator or spiral staircase. Therefore, the multi-sided geometric footprint provides excellent interior space and stability.
Attaching Three Spiral Turrets
Attach three smaller circular turret footprints measuring three blocks wide to alternating exterior faces. Next, designate one external turret for a winding spiral staircase connecting all floors. Use the second turret for hidden vertical redstone item droppers and wiring. Reserve the third external turret for private potion brewing alcoves and ingredient storage. Consequently, the main central rooms remain completely open for functional arcane crafting.
Layering Vertical Functional Levels
Divide the vertical tower into four distinct levels spaced five blocks apart vertically. Designate the ground floor for storage, the second floor for enchanting libraries. Next, assign the third floor for potion alchemy and the top floor for an observatory. Crown the top observatory level with panoramic tinted glass windows and telescope stands. Your compact hexagonal wizard tower floor plan is ready for magical vertical construction.
9. Central Atrium Roman Domus Blueprint
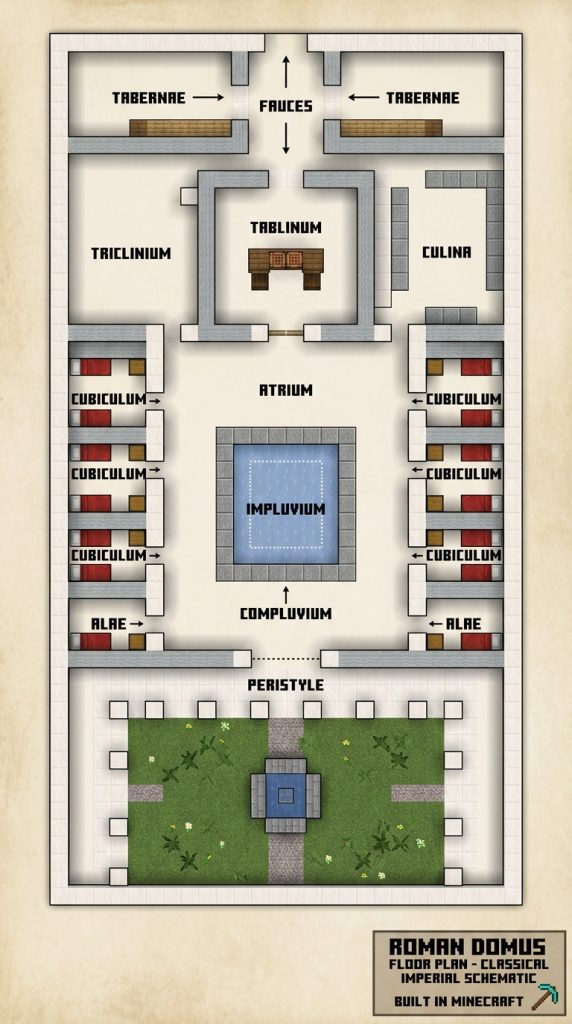
A central sky-lit atrium flanked by symmetrical bedrooms and a rear peristyle garden defines the domus. It brings classical imperial luxury and order to survival worlds.
Classical Imperial Roman Residential Design
The Roman domus floor plan organizes private family living around a central open-air courtyard. An open ceiling skylight channels natural rainwater directly into a central floor basin. Furthermore, symmetrical guest bedrooms and dining tricliniums flank both sides of the atrium. An expansive colonnaded peristyle garden extends across the entire rear property wing. Consequently, this historic blueprint provides unmatched classical balance, privacy, and serene grandeur.
Roman Domus Material Checklist
- Smooth quartz blocks, quartz stairs, and quartz pillars
- Polished diorite, diorite stairs, and white calcite
- Terracotta, red concrete, and gold blocks
- Water source blocks, sea lanterns, and lily pads
- Flowering azalea, oak leaves, and flower pots
- Red carpet, yellow banners, and item frames
Framing the Central Atrium and Impluvium
Lay out a grand central atrium hall measuring twelve blocks wide by fourteen blocks long. Outline the perimeter walls using smooth quartz blocks and fluted quartz pillars. Next, dig a decorative rectangular water basin measuring four blocks by six blocks centered on the floor. Leave the roof directly above the water basin open to the sky to catch rainwater. Therefore, the central hall stays bright, cool, and naturally ventilated throughout sunny days.
Arranging Symmetrical Flanking Chambers
Construct rows of identical square bedrooms measuring four blocks by four blocks along both sides. Frame each bedroom doorway with polished quartz pillars and hanging red banners. Next, pave the central atrium walkways with smooth quartz tiles and red terracotta borders. Place decorative armor stands clad in shining golden armor within hallway niches. Consequently, the interior layout displays pristine imperial symmetry and formal architectural elegance.
Laying the Rear Peristyle Garden
Extend an expansive rear garden wing measuring fourteen blocks wide by sixteen blocks long. Surround the lush open-air garden with covered walkways supported by quartz colonnades. Next, plant manicured flowering azalea hedges, oak trees, and rose bushes along pathways. Install a central reflecting pond topped with floating green lily pads and sea lanterns. Your central atrium Roman domus floor plan is completely mapped out.
10. Split-Level Nordic Viking Great Hall Layout
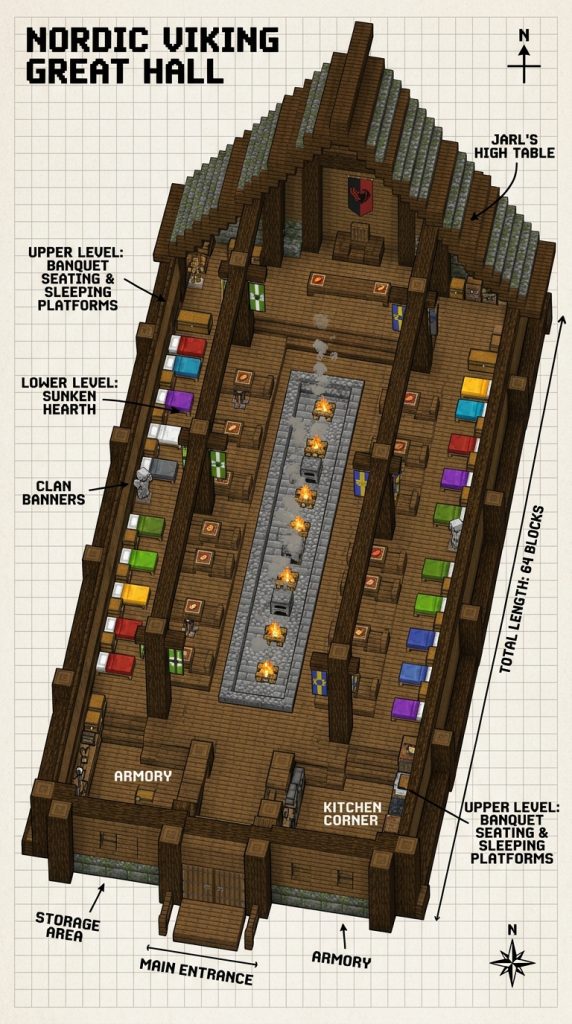
A sunken central banquet fire pit flanked by elevated sleeping platforms defines the Viking great hall. It brings rugged communal warmth to snowy northern biomes.
Rugged Northern Communal Architecture
The Nordic great hall floor plan celebrates communal clan living, feasting, and rugged timber craftsmanship. A long rectangular footprint encloses an expansive open timber hall without interior walls. Furthermore, a sunken central stone fire trench warms the entire building continuously. Raised wooden side platforms provide elevated seating for feasts and sleeping bunks for clan members. Consequently, this sturdy blueprint withstands howling northern blizzards with ease.
Viking Great Hall Palette
- Spruce logs, stripped spruce wood, and spruce planks
- Dark oak stairs, slabs, and dark oak trapdoors
- Cobblestone, mossy stone bricks, and campfire blocks
- Barrels, chests, and armor stands
- Custom banners, shields, and iron chains
- Soul campfires, lanterns, and snow layers
Laying the Longhouse Foundation
Lay a long rectangular foundation measuring twelve blocks wide by twenty-four blocks long. Build sturdy stone foundations along the base using mixed cobblestone and mossy stone. Next, place massive vertical stripped spruce log pillars spaced four blocks apart along walls. Connect the pillars overhead with heavy crossbeams to support the wide roof rafters. Therefore, the structural timber framework easily withstands heavy mountain snow loads.
Excavating the Sunken Central Hearth
Excavate a central trench three blocks wide down the entire length of the hall floor. Line the sunken trench with rough cobblestone and install six burning campfires. Next, place dark oak slabs along the trench borders to prevent accidental burns. Hang heavy iron chains supporting soul lanterns from high ceiling rafters directly above the hearth. Consequently, the sunken fire pit radiates continuous warmth and light across the hall.
Raising Elevated Side Bunk Platforms
Construct raised wooden platforms two blocks wide along both exterior side walls. Pave the elevated side decks using smooth spruce planks bordered by dark oak trapdoors. Next, place communal dining banquet tables and sleeping bunks along the raised platforms. Mount painted wooden clan shields and banners along all exterior structural pillars. Your split-level Nordic Viking great hall floor plan stands ready for feasting.
11. Tiered Steampunk Airship Dock Warehouse Blueprint
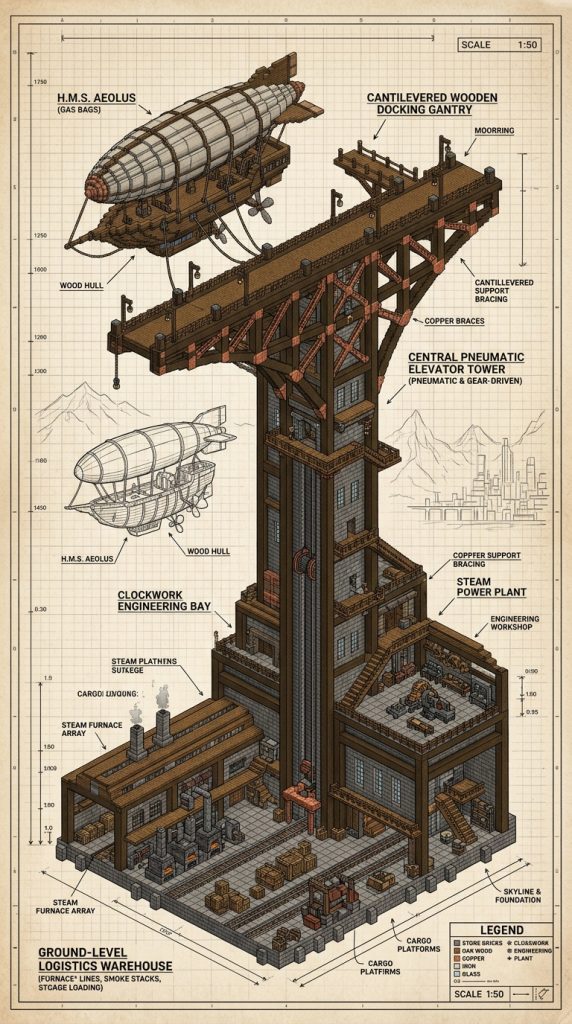
A ground-level cargo warehouse connected to an elevated gantry docking platform defines this industrial build. It merges naval storage with aerial transport.
Industrial Clockwork Logistics Design
The tiered steampunk dock floor plan bridges ground-based survival storage with high-flying airships. A spacious ground-level industrial warehouse organizes heavy cargo chests and smelting operations. Furthermore, a soaring structural elevator tower rises thirty blocks to an elevated docking gantry. Cantilevered docking arms extend outward over water or cliffs to tether hovering airships securely. Consequently, this functional blueprint serves as the ultimate hub for inventive survivalists.
Steampunk Warehouse Checklist
- Cut copper, exposed copper, and copper grates
- Polished deepslate, deepslate tiles, and iron blocks
- Dark oak planks, spruce slabs, and lightning rods
- Redstone lamps, observers, and daylight sensors
- Campfires, chains, and iron bars
- Barrels, chests, and hoppers
Mapping the Ground Warehouse Footprint
Lay out a large industrial warehouse footprint measuring fourteen blocks wide by eighteen blocks long. Outline the exterior walls using heavy polished deepslate bricks and iron blocks. Next, organize the interior into organized aisles for chest storage, furnaces, and hoppers. Inset copper grates into the floor above burning campfires for realistic rising steam. Therefore, the ground floor serves as a highly organized, bustling survival logistics factory.
Erecting the Central Tower Shaft
Construct a square elevator tower shaft measuring six blocks on each side against the warehouse rear. Run vertical iron block columns and copper lightning rods up the four tower corners. Next, install a functional water elevator inside the shaft for rapid vertical ascent. Place redstone lamps connected to daylight sensors along the tower exterior for night signaling. Consequently, players ascend smoothly from ground storage to high docking platforms.
Extending Cantilevered Airship Gantries
Build an expansive horizontal docking platform extending twelve blocks outward from the tower top. Support the heavy wooden gantry deck using diagonal copper and iron structural braces below. Next, install heavy iron winches, chains, and mooring posts along the cantilevered platform edges. Hang glowing lanterns beneath the gantry deck to illuminate ground operations below. Your tiered steampunk airship dock warehouse floor plan is fully operational.