
Constructing massive, grand bridges transforms separated Minecraft biomes into an interconnected empire. Waterways, ravines, and mountain chasms naturally divide survival territories. Furthermore, epic bridges provide safe, illuminated travel routes for players and horses. Masterful bridge architecture effortlessly combines structural engineering with dramatic landscaping. Many builders create basic flat wooden walkways across rivers initially. However, mastering varied bridge designs elevates your entire world-building expertise.

Planning Epic Long-Span Bridge Routes
Every monumental bridge build requires thorough terrain analysis before construction begins. First, survey both shorelines or mountain peaks carefully. Wide ocean gaps demand sturdy underwater support piers for realism. In addition, deep mountain chasms require dramatic structural under-arches. Terraforming the anchor cliffs creates smooth transitions onto the bridge deck. Consequently, your massive bridge appears naturally rooted within the landscape. Clear all surrounding obstacles to ensure unobstructed sightlines across spans.
Selecting Harmonious Structural Block Palettes
Choosing the right block palette defines your bridge’s architectural style. For instance, deepslate bricks establish heavy, imposing gothic viaducts. Meanwhile, smooth stone bricks combined with spruce wood deliver classic medieval charm. In addition, mud bricks provide warm rustic textures for rural river spans. Polished quartz and prismarine create majestic fantasy bridges. Therefore, blending textured blocks with contrasting accents enhances visual realism.
Engineering Depth, Curves, and Parabolic Arches
Flat bridge platforms look rigid, unnatural, and visually unappealing. Instead, incorporate parabolic curves into the main walking deck. Use stairs, slabs, and trapdoors to shape smooth suspension cable sweeps. Furthermore, build tapered support pillars that widen toward the water base. Layering multiple block tiers creates bold, dramatic shadows across structural beams. Consequently, your bridge looks structurally sound, ancient, and truly formidable.
Essential Survival Tools for Bridge Construction
Building massive structures over deep water demands specialized survival preparations. First, brew ample night vision and water breathing potions. Consequently, you can place underwater foundation footings without drowning risks. In addition, scaffolding blocks allow you to climb high suspension towers safely. Keep multiple water buckets handy for rapid vertical descents. Therefore, prepare adequate supplies and tools before placing structural blocks.
Integrating Roadways and Horse Transit
An epic bridge must function smoothly as a primary trade route. Design walking decks at least seven to nine blocks wide. This width easily accommodates horses, donkeys, and walking travelers simultaneously. Furthermore, divide lanes using varied wood planks and stone borders. Add recessed rest alcoves with benches along outer railings. Consequently, your massive bridge functions as a bustling survival highway.
Concealing Lighting and Mob Proofing
Preventing hostile mob spawns along long bridges is crucial for safety. Hide sea lanterns beneath decorative wooden trapdoors along the roadway. In addition, place glowing froglights under stone brick stair borders. Mount soul lanterns and fire braziers atop high structural towers. Furthermore, wire redstone lamps to daylight sensors for automated evening illumination. As a result, your massive bridge remains bright, safe, and atmospheric.
1. Grand Gothic Stone Arch Viaduct
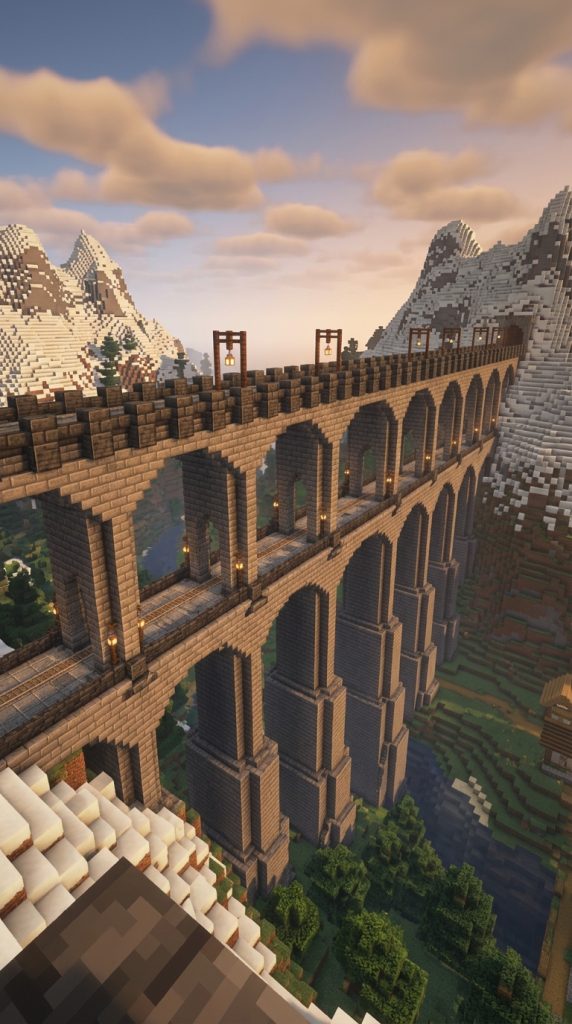
Towering stone pillars, sweeping multi-tiered arches, and deepslate battlements define this viaduct. It bridges massive mountain valleys with monumental strength.
Monumental Valley Crossing Design
Gothic stone viaducts project timeless imperial engineering across rugged terrain. Multiple tiers of massive rounded stone arches support a high railway deck. Furthermore, reinforced stone buttresses flare outward into the valley floor. Weathered cobblestone and mossy bricks show centuries of enduring mountain storms. Consequently, this design conquers impossible terrain while looking historically authentic.
Gothic Viaduct Material Checklist
- Stone bricks, cracked stone bricks, and mossy stone bricks
- Deepslate bricks, polished deepslate, and deepslate walls
- Cobblestone stairs, slabs, and stone brick walls
- Dark oak planks, fences, and trapdoors
- Lanterns, chains, and iron bars
- Campfires and polished andesite
Laying Massive Foundation Piers
Begin by erecting thick rectangular stone brick piers inside the valley. Make each pier base eight blocks wide and six blocks deep. Space the piers evenly across the valley floor twelve blocks apart. Next, taper the piers inward slightly as they climb upward. Therefore, the foundational pillars look capable of bearing tremendous structural weight.
Turning Multi-Tiered Stone Arches
Connect adjacent piers using sweeping stone brick arches at mid-height. Use upside-down stone brick stairs and slabs to smooth the curve. Next, build a second tier of identical arches directly above the first. Fill the spandrel wall sections between arches with mixed cobblestone. Consequently, the double-tiered arch system creates breathtaking depth and rhythm.
Building the Fortified Roadway Deck
Pave the upper roadway with polished andesite bordered by deepslate tiles. Erect solid stone brick battlements along both deck edges for safety. Next, place recessed viewing alcoves supported by corbels above each pier. Hang iron lanterns from decorative dark oak posts every six blocks. Your grand gothic stone viaduct now spans the valley securely.
2. Heavy Timber Mountain Suspension Bridge
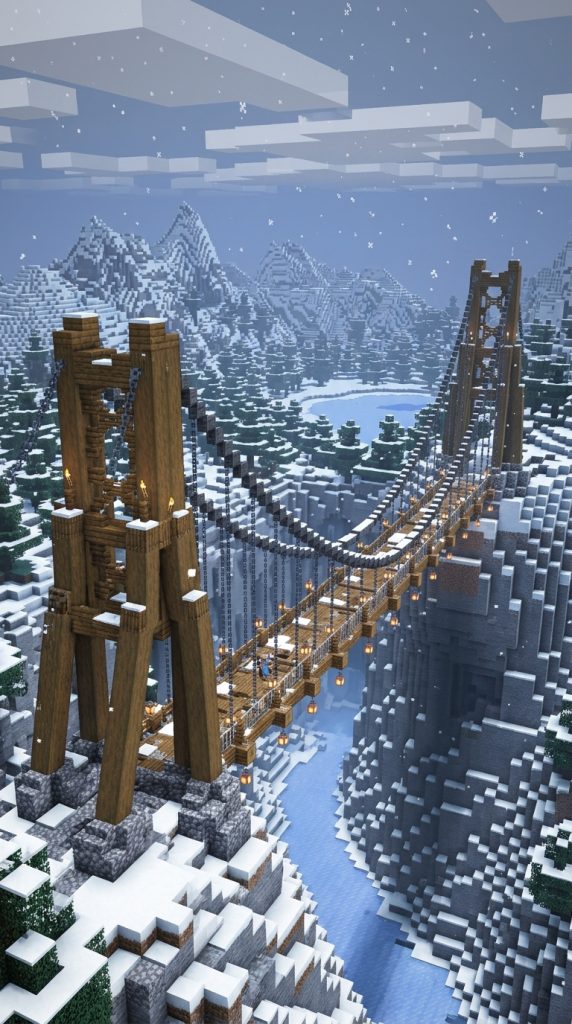
Swaying timber planks, thick iron cables, and wooden anchor towers define this design. It spans deep chasms with rugged wilderness charm.
Rugged Alpine Suspension Engineering
Mountain suspension bridges merge raw timber construction with daring high-altitude engineering. Massive stripped spruce anchor towers stand firmly upon opposite cliff edges. Furthermore, sweeping iron chains and wooden cables dip gracefully across chasms. Weathered wooden planks form a flexible walkway that hugs natural curves. Consequently, this bridge fits perfectly within snowy alpine survival bases.
Timber Suspension Supplies
- Spruce logs, stripped spruce wood, and spruce planks
- Dark oak slabs, stairs, and dark oak fences
- Iron bars, heavy chains, and tripwire hooks
- Oak trapdoors, campfires, and lanterns
- Lead ropes, item frames, and grindstones
- Coarse dirt and cobblestone
Erecting Cliffside Anchor A-Frames
Construct two massive A-frame timber towers on both cliff peaks. Use thick stripped spruce logs reinforced with dark oak braces. Cross horizontal support beams between the vertical tower legs for strength. Next, drive heavy stone anchor blocks into the ground behind towers. Therefore, the suspension framework appears firmly tethered against strong winds.
Stringing the Main Suspension Cables
Run continuous lines of dark oak fences from tower peaks downward. Curve the fence lines downward toward the bridge center smoothly. Next, use iron chains to form the lowest central cable dip. Connect vertical iron bar suspenders from the cables to the deck. Consequently, the suspension system displays an authentic, graceful catenary curve.
Laying the Timber Plank Walkway
Build the walking deck using staggered spruce slabs and trapdoors. Follow the subtle downward curve of the overhead suspension cables. Next, install dark oak fence railings lined with hanging lanterns. Place unlit campfires beneath the deck for realistic timber cross-ties. Your rugged mountain timber suspension bridge is ready for high-altitude crossing.
3. High-Tech Cyberpunk Cable-Stayed Bridge

Glowing neon cables, sleek concrete pylons, and automated traffic lanes define this bridge. It brings futuristic megacity transit to life.
Futuristic Megacity Transit Link
Cyberpunk cable-stayed bridges showcase advanced structural logistics across wide ocean bays. A towering central diamond pylon rises high into night skies. Furthermore, vibrant cyan and magenta cables radiate downward to support roadways. Polished black concrete decks reflect brilliant neon light strips across water. Consequently, this design delivers stunning, high-energy futuristic city atmosphere.
Cyberpunk Bridge Resources
- Black concrete, cyan concrete, and magenta concrete
- Polished deepslate, iron blocks, and smooth quartz
- Sea lanterns, frogs-lights, and colored stained glass
- End rods, lightning rods, and iron bars
- Redstone repeaters, daylight sensors, and observers
- Tinted glass and light gray concrete
Raising the Diamond Cable Pylon
Construct a massive diamond-shaped pylon centered in the water channel. Use sleek black concrete reinforced with polished deepslate blocks. Taper the two pylon legs outward before joining them at top. Next, install glowing vertical light strips using sea lanterns behind glass. Therefore, the central pylon serves as an iconic illuminated landmark.
Installing Radiant Neon Stay-Cables
Run diagonal lines of colored stained glass from the pylon apex. Alternate bright cyan and magenta glass to mimic illuminated laser cables. Anchor each cable securely into the outer edge of the deck. Next, place end rods at cable connection points for bright sparkles. Consequently, the bridge radiates brilliant futuristic color reflections across the water.
Paving the Automated Transit Highway
Pave a wide highway deck using smooth light gray concrete blocks. Divide traffic lanes using embedded yellow concrete and redstone lamps. Next, install sleek polished quartz safety barriers along both outer edges. Add automated sensor gantries across the road using observers and iron. Your high-tech cyberpunk cable-stayed bridge is fully powered and operational.
4. Medieval Covered Timber Truss Bridge
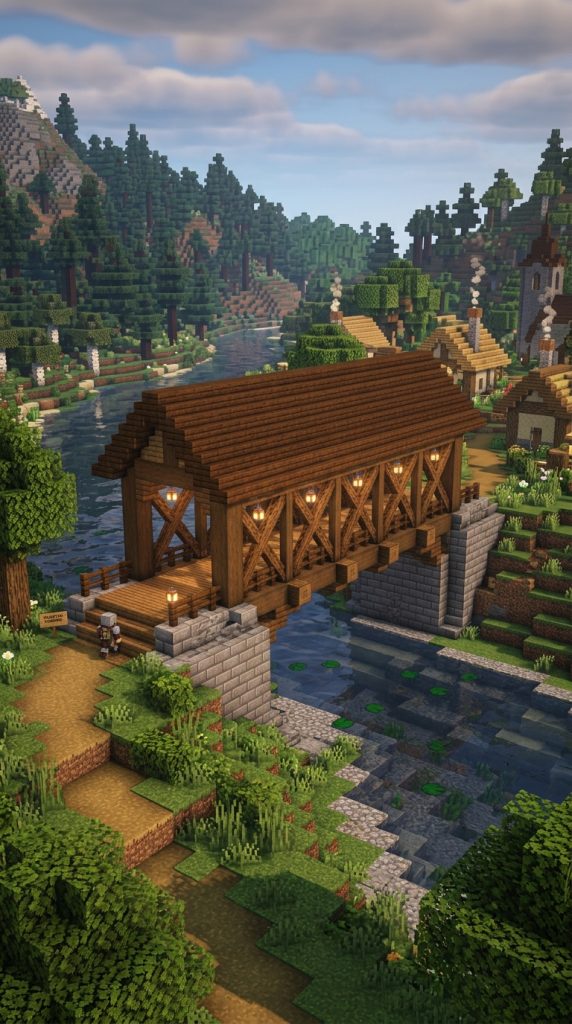
Rustic shingled roofs, heavy truss framing, and stone abutments define covered bridges. This design protects travelers from harsh weather elements.
Cozy Historical Covered River Crossing
Covered timber bridges evoke nostalgic rural charm across peaceful river valleys. Sturdy stone abutments support an enclosed wooden truss gallery over water. Furthermore, a pitched spruce shingled roof shields the interior road from rain. Warm lantern light filters gently through open diamond timber lattice windows. Consequently, this build creates a cozy, safe crossing for rural villages.
Covered Bridge Material Palette
- Spruce planks, spruce stairs, and spruce slabs
- Dark oak logs, stripped dark oak, and oak fences
- Cobblestone, mossy cobblestone, and stone bricks
- Hay bales, barrels, and flower pots
- Lanterns, chains, and iron trapdoors
- Coarse dirt and gravel
Building Riverbank Stone Abutments
Construct thick stone brick abutments on both riverbanks to resist erosion. Mix in mossy cobblestone and cracked bricks near the waterline. Next, span massive dark oak log stringers horizontally across the river. Brace the wooden beams from below using diagonal timber struts. Therefore, the bridge platform rests upon an exceptionally solid foundation.
Framing the Wooden Truss Walls
Erect vertical stripped dark oak posts along both bridge deck edges. Connect the posts with diagonal oak fences to create open trusses. Next, leave evenly spaced rectangular window openings along the wooden walls. Install spruce trapdoors beneath window sills as decorative planter shelves. Consequently, the enclosed gallery feels airy, bright, and structurally authentic.
Pitching the Shingled Spruce Roof
Construct a steep gable roof over the entire wooden bridge gallery. Use spruce stairs and slabs with an overhang along the eaves. Next, hang glowing lanterns from interior ceiling collar ties every five blocks. Scatter hay bales, barrels, and flower pots along the walkway borders. Your medieval covered timber truss bridge provides peaceful, dry passage.
5. Fantasy Elven Crystal Spire Bridge
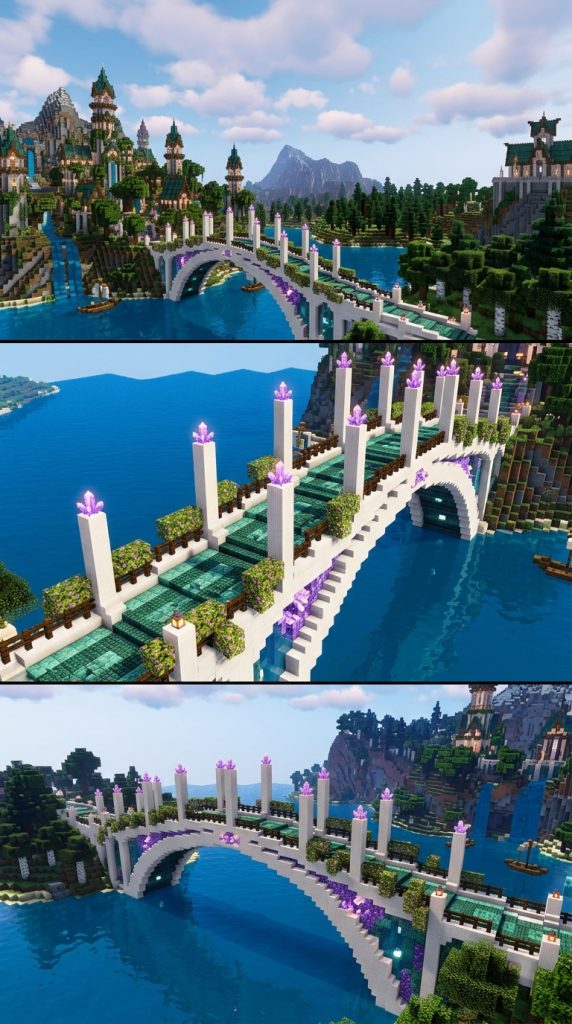
Sweeping white marble curves, glowing amethyst clusters, and elegant spires define this bridge. It connects magical woodland realms gracefully.
Enchanted High-Fantasy Architecture
Elven crystal bridges turn standard river crossings into breathtaking artistic monuments. Pure white quartz arches sweep weightlessly across sparkling azure waters. Furthermore, slender towers crowned with glowing amethyst spires rise along railings. Delicate weeping vines and flowering azalea drape gracefully over carved parapets. Consequently, this ethereal design brings high-fantasy elegance to your kingdom.
Elven Spire Bridge Materials
- Smooth quartz blocks, quartz stairs, and quartz pillars
- Dark prismarine, prismarine bricks, and sea lanterns
- Amethyst blocks, amethyst clusters, and tinted glass
- Flowering azalea leaves and pale oak logs
- End rods, chains, and warped trapdoors
- Lily pads and spore blossoms
Sculpting Sweeping Quartz Arches
Construct a wide, graceful arch spanning the water using smooth quartz. Use inverted quartz stairs to create an ultra-smooth lower curve. Next, pave the central walking deck with decorative dark prismarine tiles. Inset sea lanterns beneath tinted glass along the center road line. Therefore, the bridge appears to float effortlessly above the water.
Erecting Slender Crystal Spires
Build four elegant quartz towers at the bridge piers and abutments. Taper the towers into delicate spires using fluted quartz pillars. Next, crown each tower peak with shimmering purple amethyst crystal clusters. Place vertical end rods atop spires to emit soft magical light. Consequently, the bridge glows with celestial radiance during midnight hours.
Draping Living Botanical Accents
Weave flowering azalea leaves along the outer quartz parapet walls. Next, hang weeping vines and glowing spore blossoms beneath the arch. Place decorative potted pale oak saplings inside recessed tower alcoves. Scatter lily pads across the calm water below the quartz span. Your fantasy elven crystal spire bridge shines with pure enchantment.
6. Fortified Castle Drawbridge & Barbican
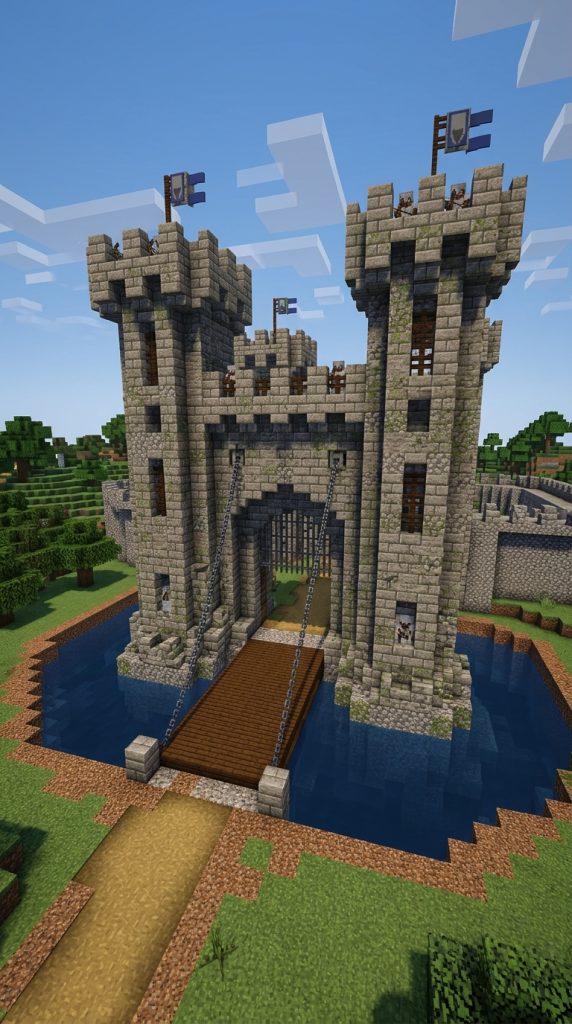
Heavy iron portcullises, deep defensive moats, and stone bastions define this gate bridge. It protects kingdom strongholds from hostile invasions.
Defensive Military Stronghold Crossing
Fortified castle bridges represent the ultimate defensive barrier for medieval strongholds. Massive stone bastion towers flank an elevated wooden drawbridge approach. Furthermore, murder holes and machicolations line the defensive bridge tunnel roof. Deep water moats prevent enemy siege weapons from approaching fortress walls. Consequently, this build secures your survival kingdom from hostile mobs.
Castle Drawbridge Palette
- Stone bricks, cracked stone bricks, and cobblestone
- Dark oak logs, stripped spruce, and spruce slabs
- Iron bars, heavy chains, and iron trapdoors
- Anvils, grindstones, and redstone dust
- Dispenser blocks, arrows, and levers
- Campfires and water buckets
Raising the Stone Bastion Piers
Construct two heavily fortified stone brick towers inside the moat. Carve arrow slits into the thick walls using vertical iron bars. Next, top the towers with crenelated battlements for archer patrols. Add overhanging stone corbels beneath battlements to support defensive platforms. Therefore, the bridge approach is completely commanded by castle archers.
Assembling the Wooden Drawbridge
Build a horizontal wooden bridge deck using heavy dark oak logs. Inset spruce planks and slabs within the central walking platform. Next, angle the outer bridge section upward using spruce stairs. Attach heavy iron chains from the bridge tips to bastion winches. Consequently, the drawbridge appears suspended midway through a defensive raising.
Detailing Winch Rooms and Defenses
Install grindstones, anvils, and chains inside the upper tower rooms. These mechanical elements convincingly simulate heavy industrial lifting gear. Next, place dispensers loaded with arrows behind concealed wall stairs. Hang soul lanterns along the bridge tunnel to provide atmospheric lighting. Your fortified castle drawbridge stands ready to repel enemy sieges.
7. Ancient Roman Stone Aqueduct Bridge
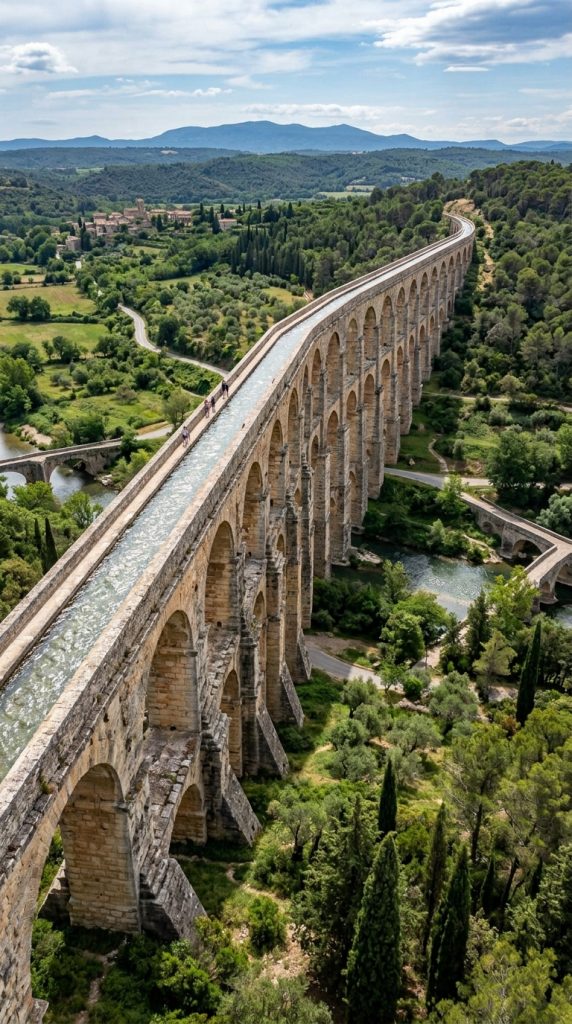
Multi-tiered rounded arches, smooth stone piers, and water conduits define this aqueduct. It carries freshwater across massive valleys effortlessly.
Classical Imperial Roman Engineering
Roman aqueduct bridges celebrate monumental classical stonework and practical civil engineering. Continuous tiers of semi-circular arches march rhythmically across deep valleys. Furthermore, an open water channel flows along the upper bridge level. Monumental stone piers withstand rushing river currents with triangular cutwaters. Consequently, this build brings timeless imperial majesty to survival landscapes.
Roman Aqueduct Resource List
- Smooth stone, stone bricks, and chiseled stone
- Quartz pillars, smooth quartz stairs, and slabs
- Water source blocks, sea lanterns, and iron bars
- Terracotta, red concrete, and gold blocks
- Oak trapdoors, spruce fences, and lanterns
- Vines and mossy stone bricks
Constructing Tiered Aqueduct Piers
Build massive rectangular piers using smooth stone and stone bricks. Construct triangular cutwaters at the base pointing upstream against currents. Space the piers evenly across the valley eight blocks apart. Next, raise the stone piers thirty blocks high above the valley floor. Therefore, the aqueduct achieves monumental scale and authentic Roman proportions.
Turning Classical Semi-Circular Arches
Connect adjacent piers using perfectly rounded stone brick arches. Build three vertical tiers of arches to span the deepest valley sections. Next, trim the arch keystones with chiseled quartz blocks for accent. Fill the wall areas between arches with smooth stone blocks. Consequently, the structure displays magnificent classical rhythm and monumental strength.
Channeling the Upper Waterway
Carve a water channel three blocks wide along the top deck. Line the channel with smooth quartz and place water source blocks. Install a parallel pedestrian walkway beside the water channel with iron railings. Next, hang glowing lanterns from dark oak brackets along the walkway. Your ancient Roman stone aqueduct bridge flows with imperial beauty.
8. Desert Sandstone Oasis Causeway
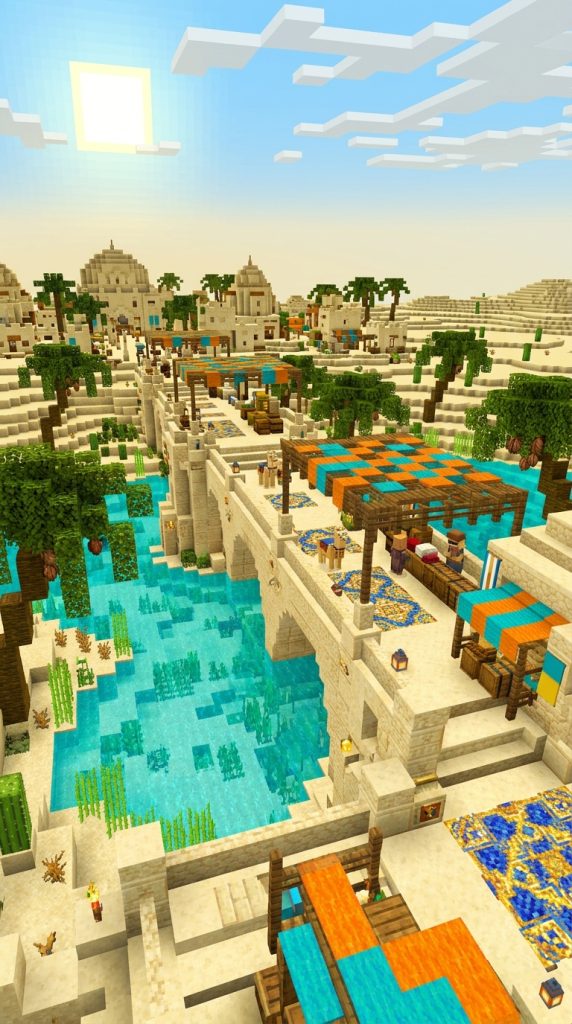
Sun-drenched sandstone, turquoise water channels, and palm pergolas define this causeway. It connects desert cities across shimmering oasis lakes.
Exotic Sun-Baked Desert Promenade
Desert oasis causeways transform hot sand expanses into luxurious waterfront boulevards. Multi-tiered cut sandstone arches rise gently above calm turquoise waters. Furthermore, shaded wooden pergolas draped with colorful fabrics shelter walking travelers. Lush date palms and flowering cacti line wide stone pedestrian promenades. Consequently, this build creates a wealthy, exotic desert trade route.
Desert Causeway Checklist
- Smooth sandstone, cut sandstone, and sandstone stairs
- Red sandstone, chiseled sandstone, and mud bricks
- Lapis lazuli blocks, gold blocks, and glazed terracotta
- Jungle logs, stripped jungle wood, and jungle fences
- Colorful wool banners, carpets, and decorated pots
- Water cauldrons and cactus plants
Building Low Sandstone Arch Foundations
Construct low, wide sandstone arches spanning the shallow oasis waters. Use smooth sandstone stairs and slabs to shape the gentle curves. Next, reinforce the pier bases using sturdy mud brick blocks. Inset decorative chiseled sandstone blocks featuring creeper motifs along walls. Therefore, the causeway blends harmoniously into the golden desert landscape.
Framing Shaded Palm Wood Pergolas
Erect slender jungle wood fence posts along the outer bridge deck. Connect the posts overhead using horizontal stripped jungle wood beams. Next, stretch vibrant orange, yellow, and cyan carpets across the beams. This colorful fabric canopy provides essential shade from intense desert heat. Consequently, travelers cross the sun-baked oasis in cool, shaded comfort.
Insetting Lapis and Gold Mosaics
Carve decorative channels along the outer causeway parapet walls. Fill these recesses with deep blue lapis lazuli and gold blocks. Next, place decorated terracotta pots containing flowering cacti along walkways. Install warm copper lanterns atop sandstone corner pillars for evening light. Your desert sandstone oasis causeway is a magnificent trading marvel.
9. Nordic Dragon-Prow Timber Viaduct
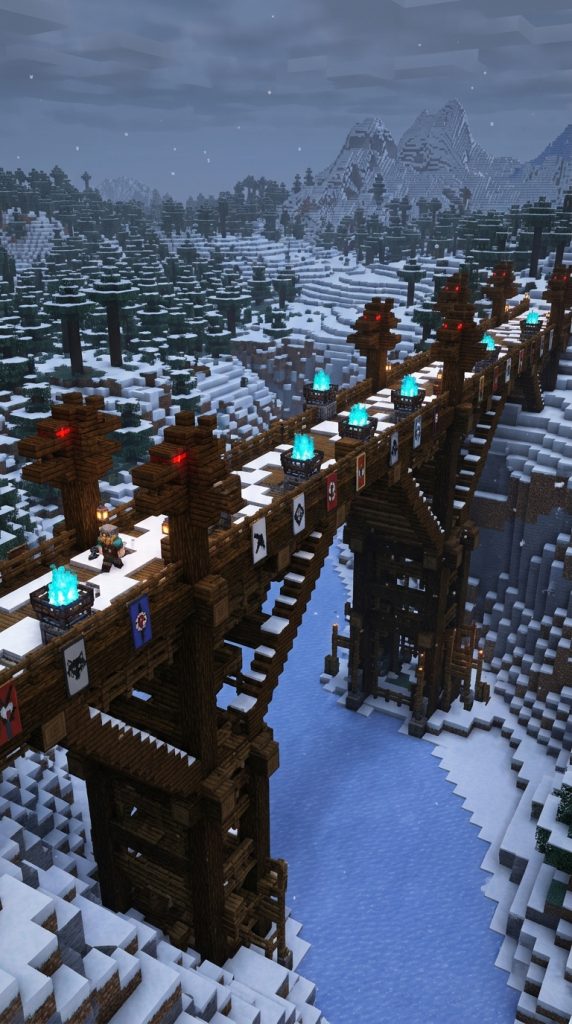
Rough spruce logs, carved dragon heads, and roaring bonfires define this bridge. It spans icy mountain rivers with fierce Viking strength.
Rugged Viking Mountain Crossing
Nordic timber viaducts celebrate raw tribal power and rugged northern survival. Giant unstripped spruce logs form massive diagonal A-frame support trestles. Furthermore, fiercely carved dragon figureheads jut outward from main bridge piers. Roaring soul fire braziers cast dramatic blue light across snowy riverbanks. Consequently, this bridge embodies the indomitable spirit of northern warrior clans.
Nordic Timber Materials
- Spruce logs, stripped spruce wood, and spruce planks
- Dark oak stairs, slabs, and dark oak trapdoors
- Cobblestone, mossy stone, and packed ice
- Soul campfires, regular campfires, and iron chains
- Shields, custom wolf banners, and carved pumpkins
- Snow layers and coarse dirt
Driving Heavy Timber Trestle Piers
Drive vertical unstripped spruce logs deep into the rocky frozen riverbed. Cross heavy diagonal spruce timber braces between piers for lateral strength. Next, reinforce the pier bases with rough cobblestone and mossy stone. Cap the wooden pier tops with dark oak corbel brackets. Therefore, the trestle framework easily withstands freezing winter river ice.
Carving Timber Dragon Figureheads
Extend horizontal dark oak beams outward from the main pier tops. Carve sweeping wooden dragon necks and heads using dark oak stairs. Inset glowing redstone torches inside dragon mouth cavities for fiery eyes. Next, mount painted wooden shields along the outer bridge walkway railings. Consequently, the bridge projects formidable tribal authority across the icy valley.
Laying the Snowy Timber Roadway
Pave the bridge deck using rough spruce planks and dark oak slabs. Allow natural snow layers to gather along deck edges and railings. Next, place soul fire braziers atop corner lookout posts for lighting. Hang custom clan banners from tall wooden flagpoles along the span. Your fierce Nordic dragon-prow timber viaduct stands proudly unyielding.
10. Industrial Netherrack & Basalt Lava Bridge
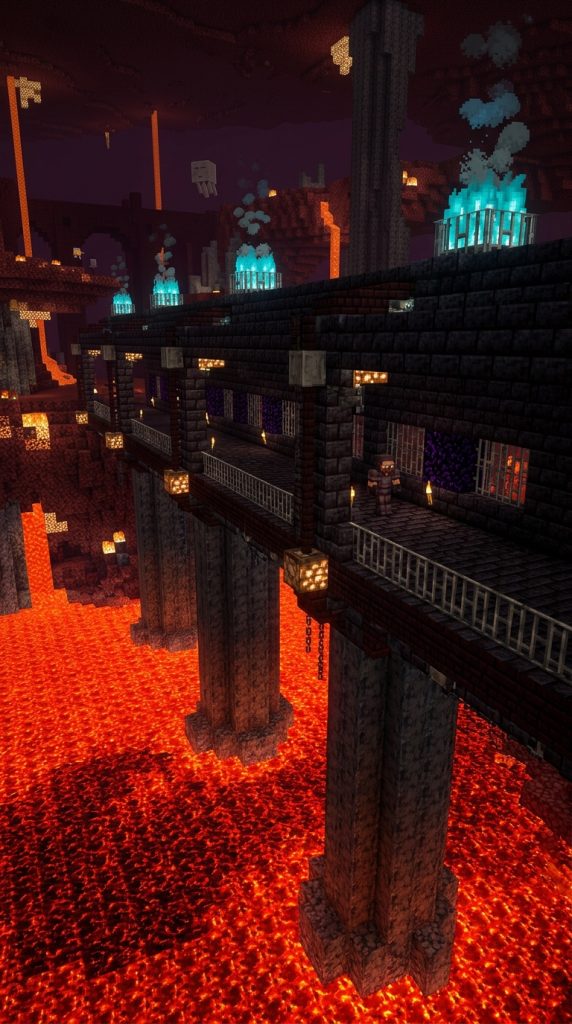
Polished basalt columns, blackstone bastions, and iron grates define this bridge. It spans boiling lava oceans inside the dangerous Nether dimension.
Volcanic Underworld Fortress Crossing
Industrial Nether bridges conquer treacherous lava seas through heavy fireproof engineering. Massive polished basalt pillars anchor firmly into bubbling red magma oceans. Furthermore, blast-resistant blackstone bastions protect travelers from explosive ghast fireballs. Glowing magma blocks and soul fire vents illuminate dark underworld fog. Consequently, this bridge provides vital, secure transport across hostile dimensions.
Nether Bridge Resource List
- Polished basalt, smooth basalt, and basalt pillars
- Polished blackstone bricks, stairs, and slabs
- Crying obsidian, obsidian, and nether bricks
- Iron bars, heavy chains, and copper grates
- Soul lanterns, soul campfires, and magma blocks
- Tinted glass and red nether bricks
Sinking Basalt Pillars into Lava Seas
Place thick columns of vertical polished basalt into the deep lava ocean. Build wide circular footing collars around each pillar using polished blackstone. Next, construct diagonal stone struts extending upward to support the deck. Add glowing veins of crying obsidian within pier crevices for accent. Therefore, the bridge supports survive extreme heat and volcanic pressures.
Framing the Blast-Resistant Roadway
Pave the main transit deck using polished blackstone brick slabs. Construct enclosed side walls using blackstone stairs and iron bars. Next, install a protective overhead roof to shield players from ghast attacks. Place copper grates along the floor to view bubbling lava safely below. Consequently, the enclosed bridge gallery ensures total travel safety in the Nether.
Installing Soul Fire Warning Beacons
Mount glowing soul lanterns on heavy iron chains every four blocks. Next, carve floor trenches filled with soul fire behind iron bars. Place decorative respawn anchors atop bridge entrance bastions for purple lighting. Display netherite armor stands as sentries along the fortified corridor. Your industrial basalt lava bridge masters the fiery underworld completely.
11. Overgrown Ancient Jungle Rope Bridge
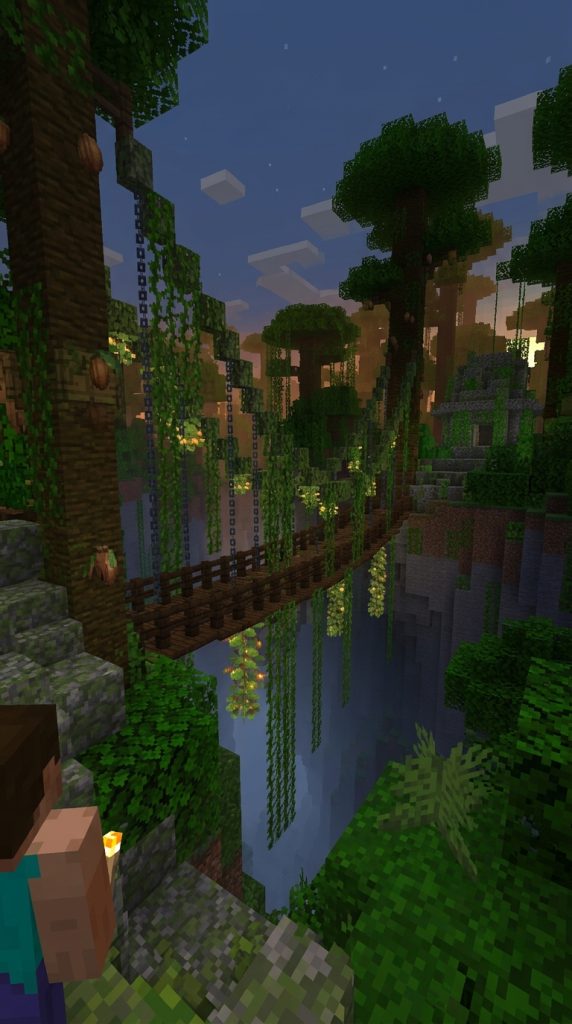
Hanging jungle vines, weathered wooden planks, and mossy stone define this bridge. It weaves between giant ancient jungle trees over deep ravines.
Atmospheric Lost-World Canopy Crossing
Overgrown jungle rope bridges evoke thrilling exploration across lost ancient valleys. Weathered wooden planks hang suspended from thick braided vine ropes. Furthermore, giant jungle tree trunks serve as natural living anchor towers. Lush moss blocks, spore blossoms, and hanging vines drape over railings. Consequently, this build creates an unforgettable, adventurous jungle canopy route.
Jungle Rope Bridge Palette
- Jungle logs, stripped jungle wood, and jungle planks
- Oak slabs, jungle trapdoors, and mangrove wood
- Moss blocks, moss carpets, and weeping vines
- Spore blossoms, glow berries, and leaf blocks
- Lead ropes, chains, and iron bars
- Bamboo stalks and lily pads
Anchoring to Massive Jungle Trees
Select two ancient giant jungle trees standing on opposite ravine cliffs. Build sturdy wooden platforms wrapping around both tree trunks at canopy height. Next, reinforce the wooden platforms with diagonal jungle log braces below. Install vertical ladders and winding staircases around trunks for ground access. Therefore, the bridge integrates seamlessly into natural living tree architecture.
Stringing Hanging Vine Suspension Ropes
Run curving lines of dark oak fences and chains between the trees. Dip the central rope lines deeply to simulate heavy hanging weight. Next, attach vertical chains from the main suspension lines to the deck. Weave weeping vines and jungle leaves throughout the upper cable rigging. Consequently, the bridge appears hand-woven from ancient, living jungle foliage.
Laying the Narrow Swaying Footpath
Construct a narrow walking deck two blocks wide using mixed wooden slabs. Leave deliberate gaps replaced by open trapdoors to show age. Next, hang glowing spore blossoms beneath the bridge for drifting green particles. Place wild orchids and bamboo in pots along the treehouse landings. Your overgrown ancient jungle rope bridge offers thrilling canopy adventures.
12. Modern Cantilever Glass Highway Bridge

Sleek white concrete, cantilevered steel trusses, and glass floor panels define this bridge. It provides panoramic ocean views for modern cityscapes.
Contemporary Architectural Innovation
Modern cantilever bridges celebrate cutting-edge engineering, minimalist aesthetics, and transparency. Massive white concrete anchor arms extend outward over wide waterways. Furthermore, clear glass floor panels allow travelers to view rushing water beneath. Sleek horizontal end-rod lighting illuminates minimalist white barriers at night. Consequently, this design delivers sophisticated, world-class modern transit infrastructure.
Modern Cantilever Checklist
- White concrete, light gray concrete, and smooth quartz
- Polished andesite, iron blocks, and iron bars
- Cyan stained glass, clear glass, and tinted glass
- Sea lanterns, end rods, and daylight sensors
- Black concrete, smooth stone, and redstone lamps
- Heavy weighted pressure plates and levers
Pouring Massive White Concrete Abutments
Construct massive angular concrete counterweight anchors on both shores. Use crisp white concrete reinforced with internal iron block skeletons. Next, extend cantilevered structural arms horizontally toward the river center. Taper the cantilever arms gradually as they reach outward over water. Therefore, the bridge demonstrates advanced, balanced modern structural physics.
Installing the Glass Observation Deck
Span the central gap between cantilever arms using clear glass blocks. Frame the glass walkway with smooth white quartz stairs and slabs. Next, install sleek safety railings using vertical iron bars and tinted glass. Inset sea lanterns beneath floor glass for brilliant night-time illumination. Consequently, walking across the bridge provides a thrilling, floating visual experience.
Wiring Minimalist Roadway Lighting
Lay horizontal end rods along the inner barrier base for continuous light. Next, paint roadway dividing lines using smooth yellow and white concrete. Place automated redstone lamps connected to daylight sensors at bridge portals. Add minimalist overhead sign gantries using iron bars and banners. Your modern cantilever glass highway bridge is a masterpiece of modern design.